
How To Fix Part of the Touch Screen Not Working on Vivo Y100 | Dr.fone
How To Fix Part of the Touch Screen Not Working on Vivo Y100
You probably touch the screen of your phone hundreds of times per day. It’s no surprise that smartphone touchscreens are one of the most common components to fail, given their delicate glass construction. However, a part of the touch screen not working on your Vivo Y100 does not necessarily mean it is a hardware issue. There could be other reasons why your Android’s touch screen stopped responding.
If your phone’s touchscreen frequently fails to respond, there are several things you can try before calling a professional. This article will reveal those proven fixes you can easily perform independently.
Part 1. Why Is Part of My Screen Not Working
There are two possible causes as to why your phone’s touch screen is not working. One is the touch screen may have been damaged, and the other is the Vivo Y100 device may be experiencing technical difficulties.
If you drop your phone and it becomes stuck against something, the touch screen’s connectivity may fail. Only a part of the touch screen may sometimes become damaged and unresponsive. That may also occur when there is a technical failure, such as the phone hanging. A part of the touch screen not working can occur when malware is downloaded or when phone settings are changed.
Now, the problem can affect any Android phone, and users may encounter the following error messages on their respective phone models:
- Vivo Y100 P40 lite half touch screen not working
- Nexus touch screen not working
- LG screen is unresponsive to touch
- Vivo Y100 left side of the screen is not working
- Redmi’s whole screen is unresponsive to touch
Part 2. Different Types of Touch Screen Issues and What You Should Check Before Fixing
You may experience a variety of touch screens not working on Android issues:
- A certain part of the touch screen is not working.
- Your touches do not register on the touch screen.
- The touch screen incorrectly responds to your touch.
- Half touch screen is not working.
- The touch screen becomes frozen or hangs.
- The screen flashes, flickers, or remains blank.
- Theleft side of the phone screen is not working.
Before proceeding to how to fix an unresponsive touch screen on an Android device, you should complete the following steps:
- Examine the screen of your device. Check to see if it is cracked or chipped.
- If the screen is damaged, it must be replaced.
- Remove the Vivo Y100 device cover and screen protector if they are not damaged.
- If there is a sticker on the Vivo Y100 device screen, you must remove it.
- Before continuing, make sure your screen is spotless.
Part 3. How To Fix Part of the Touch Screen Not Working (No Physical Damage)
If you have already tried running the Vivo Y100 device in diagnostic mode and verified that it is not physically damaged, then the problem is most likely technical. If your Vivo Y100’s screen is not responding to touches for technical reasons, follow the methods below to resolve the issue.
Restart Your Device
When your touch screen stops working, the first thing you should do is restart your device. The operation is known as soft resetting. You cannot turn your device off from the option on the screen because the touch screen is not responding. Here are the steps to take.
Step 1: Hold the “Power” button until the Vivo Y100 device turns off.
Tip: If you hold down the power button for a few seconds, you will see the “Power Off” and “Restart” options on the screen. You can’t use it because the entire screen isn’t responding. Hence, you should press and hold the “Power” button for as long as necessary.

Step 2: When the Vivo Y100 device turns off, wait a few seconds.
Step 3: Press and hold the “Power” button to restart the Vivo Y100 device.
Check to see if the Android auto touch screen is not working problem has been resolved. Otherwise, proceed with the following methods.
Turn On Safe Mode
You should switch to Safe mode whenever an application or piece of software causes a problem on your device. Only the most fundamental system components are loaded and used when operating in Safe mode.
If your touch screen is functional in safe mode, the issue is most likely internal. You can quickly fix the Android touchscreen issue by following the prompts given below to activate the safe mode:
Step 1: To force a restart, press and hold the Vivo Y100 device’s “Power” button for an extended period.
Step 2: Maintain pressure on the “Power” button. Take your finger off it once you see the manufacturer’s logo.
Step 3: When you let go of the “Power” button, press and hold the “Volume Down” button. After that, a “Safe Mode” label will appear in your screen’s lower-left corner.

Turn Off Developer Options
Every smartphone is bound to have limitations. However, smartphone makers include a “Developer Options” menu for advanced users. Here, restrictions are removed, and user preferences can be customized.
If you enable Developer Options on some Android devices, they may stop working properly. If you have recently activated Developer Options and your touchscreen is no longer responding as expected, you should disable it. To do so, follow the instructions below:
Step 1: Launch the Settings app on your device.
Step 2: Select the System menu item, which usually locates at the bottom of the screen.
Step 3: Tap the Advanced options menu, then select Developer Options.
Step 4: You will then find the switch to turn it on or off. Disable itby toggling the button off.

Step 5: Restart your device to check if the part of the touch screen not working issue has been resolved.
Reset Device to Factory Settings
Resetting your device to its factory settings will return it to its state when you first unboxed it. All your phone’s data and installed apps will be erased, including any malware on your device that may be causing the issue to occur. Here’s how to restore your device to factory settings:
Step 1: Since your touch screen is not working, you can factory reset it using Google’s Find My Device web service.
Step 2: Go to Find My Device from any device and sign in to the Google account associated with the damaged screen device.
Step 3: After successfully logging in, you will see your device’s name. Select the Erase Device option.

Step 4: Confirm by pressing the Erase Device button.
Tip: Since all your data will be removed, it’s recommended to back up your data first before resetting your device to factory settings.

Part 4. Fix Using a Third-Party App – Wondershare Dr.Fone
If you’ve exhausted all other options and still can’t fix your Android’s part of the touch screen not working issue, it’s time to resort to Dr.Fone – System Repair! It allows you to repair Android system issues with a single click.
Many users have reported exceptions on their Android devices, such as touch screen failure, black screen of death, system UI failure, app crashing, etc. And in this case, people should seek an Android repair tool.
Dr.Fone – System Repair has made it easier than ever for Android users experiencing technical issues with their device, including an unresponsive touch screen, among other system issues. The best part is that no data will be lost while repairing Android system issues.
Follow the steps given below on how to use Wondershare Dr.Fone System Repair for Android:
Step 1: Select the System Repair option from the main window after starting Dr. Fone.

Step 2: Connect your Vivo Y100 or tablet to the computer using the appropriate cable. Choose Android Repair from the three options shown on the left side of the screen.

Step 3: The device information screen will appear in the next window. There, input your device’s unified brand, name, model, country/region, and carrier information. Then click Next after you confirm the warning.

The Android repair procedure may wipe out all data on your device. To confirm and proceed, enter “000000”.
Note: It is strongly advised that you back up your Android data before attempting Android repair.

Step 4: Before repairing your Vivo Y100, you must boot it into Download mode. To boot your Vivo Y100 or tablet into DFU mode, follow the steps below:
For a device that has a Home button:
- Turn off your phone or tablet.
- Hold the Volume Down, Home, and Power buttons for 5 to 10 seconds.
- To enter Download mode, release all the buttons and press the Volume Up button.

For a device that lacks a Home button:
- Turn off the Vivo Y100 device.
- Hold the Volume Down, Bixby, and Power buttons for 5 to 10 seconds.
- To enter Download mode, release all the buttons and press the Volume Up button.

Step 5: Then press the Next button. The program will then download the firmware. After downloading and verifying the firmware, the program will automatically repair your Vivo Y100. And in a while, your Vivo Y100’s system issues will be resolved.

Supported OS
Check Dr.Fone’s supported operating systems below before using the application to fix your mobile technical issues.
| Platform | Supported OS |
|---|---|
| Windows | Windows 11/10/8.1/8/7/Vista/XP |
| Mac | Mac 14/13/12/11/10.15/10.14/X/10.13/10.12/10.11/10.10/10.9/10.8 |
Key Features
Dr.Fone – System Repair is a data management and recovery tool that contains several toolkits in one program, each designed to repair a specific phone problem. Check out its key features below:
- One-click Android Repair Tool
- Troubleshoots and repairs a wide range of Android system problems, including black screen of death, Play Store not working, apps crashing, phone stuck in a boot loop, and bricked Android issues
- A high success rate for fixing Android system issues
- Fixes Android system back to normal
Pros
Here are the advantages of using Dr.Fone – System Repair:
- Highly intuitive UI/UX/. No need for any skill to operate it
- Provides a comprehensive set of toolkits, including advanced data recovery and system repair
- Data management is simple and seamless for both Android and iOS devices
- Data backup with Dr. Fone is simple and quick.
Cons
Check below to know Dr.Fone – System Repair’s limitations:
- Depending on the toolkit required, the program can be costly.
 safe & secure
Conclusion
Fixing an Android part of the touch screen not working issue can be quickly done with just a few fixes you can do on your own. However, there may be times when the solutions provided above may not work, and the worst part is factory resetting your phone erases all your data.
That’s why Dr.Fone – System Repair might be your best solution. It has all the tools you need to keep your Vivo Y100 100%. Not only that, but with Dr.Fone, you can repair your Android system issues without dealing with any data loss.
App Won’t Open on Your Vivo Y100? Here Are All Fixes
It is not a very rare phenomenon where an App won’t open, crash abruptly or face trouble while launching on an Android device. Many Android phone users also add to the fact that whenever they try to launch an App, it keeps loading but does not run smoothly, as it should in normal circumstances.
In such a scenario it is obvious for Android Smartphone users to look for possible solutions for such a random error so that their App/Apps load and work normally.
Many people are also interested in knowing about the causes behind why an App won’t open or why multiple/all Apps won’t open. This article will answer your query about why won’t my App open on an Android phone by listing a few probable causes for the problem.
Here are all the fixes you need if an App won’t open on your Vivo Y100. Read on to find out all about why Apps won’t open on your Vivo Y100 and solutions to overcome such a problem.
Part 1: Possible reasons for Apps won’t open
If you are an Android phone user and face a problem while trying to open an App on your device, you will ask yourself “Why won’t my App open?”. To answer your question and explain to you why an App won’t open on your phone, here are some probable and simple reasons to make you understand the real problem.
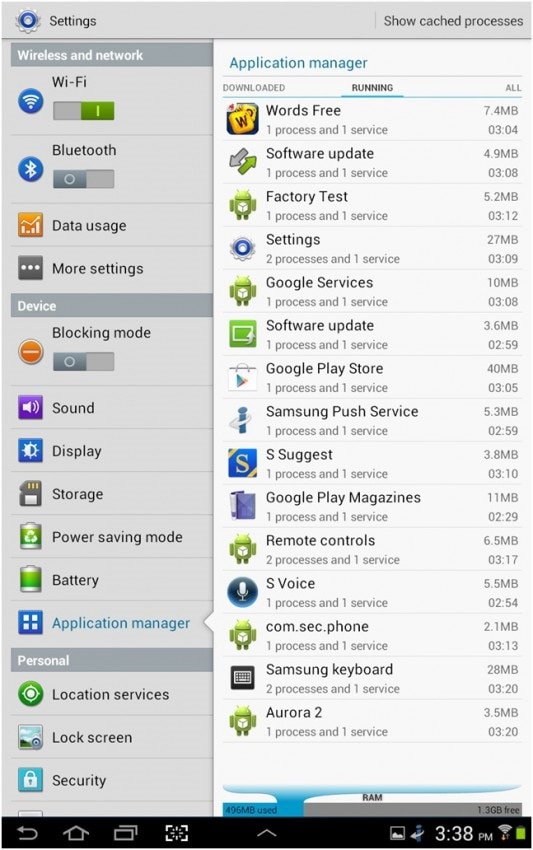
It is appropriate to tag our generation as smartphone addicts because we use smartphones for anything and everything. All our important information, such as photos, videos, audio files, documents, notes, calendars, emails, etc, are stored on our phones. This causes a major storage/space problem in our phones and a shortage of storage space is one of the main reasons why an App won’t open or why all Apps won’t open on your Vivo Y100. To see how much of your storage space is occupied by Apps, go to “Settings” and select “Application Manager”.

Another possible reason for Apps to crash or why an App won’t open is a possible data crash. This may occur due to an unstable internet connection or various other background software interruptions.
The causes for the problem to occur are many and no specific reason can be established as the only reason why Apps won’t open on your Vivo Y100. There are a lot of speculations about why such a problem occurs and persists, but it is more important to focus on how to fix if a particular App won’t open or if all Apps won’t open on Android.
Part 2: Quickest solution to fix apps won’t open on Android
You have already understood ‘why won’t your app open?’ at the start of this article. But, you are not happy with the traditional solutions to fix the app won’t open issue.
Well, in such a case Dr.Fone - System Repair (Android) can prove to be your savior. It resolves failed Android system update issues, crashing apps, and black screen of death. It can also get an unresponsive or bricked Android device or boot loop stuck device fixed with one click.
Dr.Fone - System Repair (Android)
Why won’t my app open? The quick fix is here!
- This is the first software in the industry that repairs Android systems.
- All the latest Vivo Y100 tablets and mobiles are compatible with it.
- With single-click operation, fixing the app won’t open problems is super easy.
- No technical skills are needed to use the tool.
- The high success rate for Vivo Y100 Android device issue fixing.
3981454 people have downloaded it
Here comes the detailed guide to fix apps won’t open problem using Dr.Fone - System Repair (Android)
Note: When you are up to fixing apps won’t open issues, make sure to back up your Vivo Y100 beforehand. These processes might lead to data erasing and you don’t want to suffer data loss this way.
Phase 1: Preparation and connection of Android device
Step 1: Post-installation and launch of Dr.Fone on your computer, you got to press the ‘System Repair’ tab. Connect the Android device later.
Step 2: Hit the ‘Android Repair’ located on the left panel followed by tapping the ‘Start’ button.
Step 3: Feed your Vivo Y100 details under the Vivo Y100 device information screen. Please check the warning and press the ‘Next’ button right after that.
Phase 2: Repairing your Vivo Y100 under ‘Download’ mode
Step 1: You got to boot the Android device under Download mode, as it’s important. The steps for that are as follows –
- Android devise with a ‘Home’ button – Press together ‘Volume Down’, ‘Home’, and ‘Power’ buttons together for 5 to 10 seconds after turning off the Vivo Y100 device. Release them afterward and click the ‘Volume Up’ button to get into the ‘Download’ mode.
- When there is no ‘Home’ button – Turn off the Vivo Y100 device and then for 5 to 10 seconds, keep the ‘Volume Down’, ‘Bixby’, and ‘Power’ buttons pressed. Tap the ‘Volume Up’ button after releasing all the buttons to enter the ‘Download’ mode.
Step 2: Hitting the ‘Next’ button starts downloading the Android firmware.

Step 3: Once Dr.Fone - System Repair (Android) verifies the downloaded firmware, it begins fixing the app won’t open the issue asap.
Part 3: 3 Common fixes if a particular App won’t open
In this segment, we will discuss the three best ways to help you fix the problem if only a particular App won’t open/launch/ run and takes an indefinite time to load.
1. Update the App
It is always advisable to keep your Android software as well as your Apps up-to-date and you must constantly check for any updates which may be available in the Google Play Store.
Follow the steps given below to update the app which won’t open on your phone:
• Visit Google Play Store on your Vivo Y100.
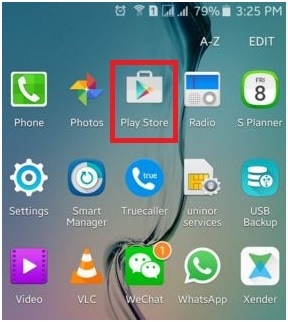
• Now select “My Apps & Games” from the main menu.
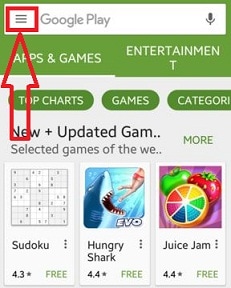
• In this step, you may click on “Update All” to update all Apps for which an update is available or manually select the Apps which you wish to Update.

Once the App is updated, close all Apps and tabs running in the background. Now try to launch the app once again. If it opens, your problem is solved. If not, DO NOT worry as there are more ways to help you.
2. Force Stop the App
Closing the App completely which won’t open on your phone is a good idea. To make sure that no operations are running in the background related to the App, you must “Force Stop” it. Doing this is extremely simple and all you need to do is follow the steps given herein under:
• Visit “Settings” on your phone.
• Click on “Apps” to see a list of all the Apps on your Vivo Y100.
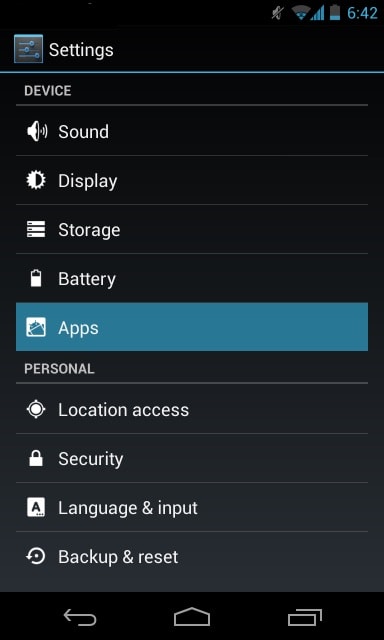
• Select the App which won’t open.
• Now click on “Force Stop” as shown below.
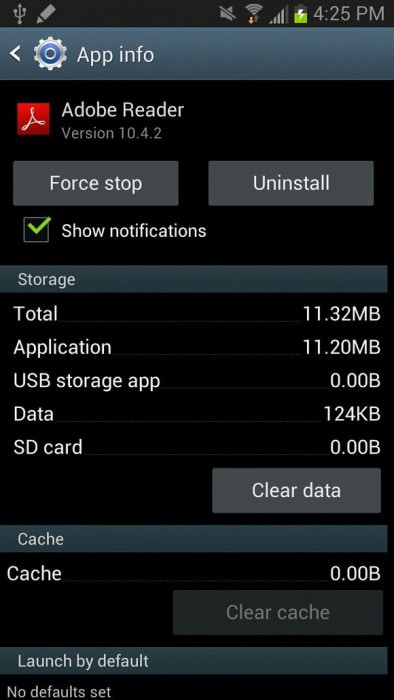
3. Clear App Cache and Data
This method resolves the issue to a great extent by wiping off unnecessary App content from your device.
Carefully follow the step-by-step instructions given below to clear all App cache and data:
• Visit “Settings” and select “Apps”.
• From the list of Apps that appears, select the App that won’t open.
• Now tap on “Clear Cache” and “Clear data” directly or under “Storage”.

Part 4: 3 Common fix if all Apps won’t open on Android
In this segment, we will discuss solutions to the problem if all your Apps won’t open. They are simple and easy to follow and solve the error in no time.
1. Android updates
Firstly, it is very important to keep your Android software updated at all times as an old Android version might not support new Apps or updated Apps.
To update your software:
• Visit “Settings” and keep going downwards.
• Now select “About Phone”.
• From the options available on the screen, tap on “System Updates”

• In this step, if you are prompted for an update, follow the instruction given and do so.
Updating your Android software solves most of your problems. This method might sound weird but works wonders when it comes to App related issues.
2. Restart the phone
Restarting your Vivo Y100 to fix an error might sound old school but it gives good results when your Apps won’t open. Restarting your phone is fairly simple. All you need to do is:
• Long press the power button.
• Now click on “Restart”.
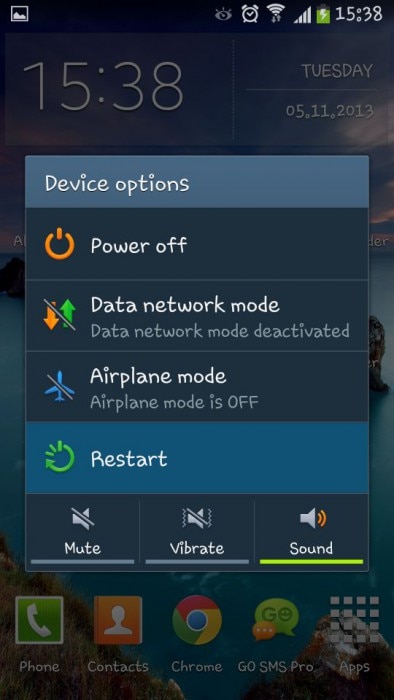
Your phone will automatically restart and once it does, you can try to launch the App. You may also restart your Vivo Y100 by pressing the power button for about 15-20 seconds.
3. Reset Factory Settings
This method is a little tedious and must be last on your list. Also, make sure you take a backup of all your data and contents stored on your Vivo Y100 and this solution will completely wipe off your phone making as good as a new smartphone.
To Factory Reset your Vivo Y100, carefully follow the guidelines given below:
• Visit “Settings” to find the “Backup and reset” option as shown in the screenshot below.
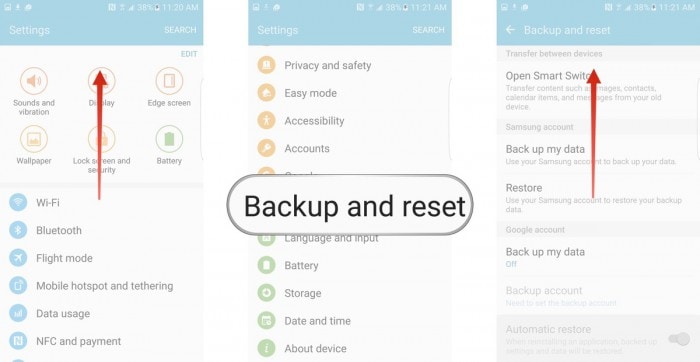
• Now click on “Factory Data Reset”>“Reset Device”>“Erase Everything”
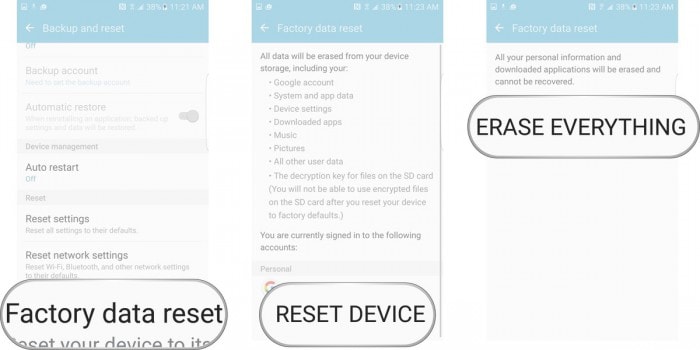
Your phone will now reboot and will be required to set up from scratch.
“Why Won’t my App open” is a question asked by many Android phone users who fear that the problem occurs due to a virus attack or a system failure. However, this is not the case. The reason for the error to the surface is quite minor and can be fixed by you, sitting at home, without resorting to any kind of technical or external assistance. The solutions listed above are easy to understand and not very time-consuming.
So go ahead and try them out now!
How to Fix the Soft Bricked Vivo Y100?
Bricked phone is a serious problem, as your brick smartphone could be suffering from a soft brick or hard brick problem, and must be dealt with carefully. It is very common to see a brick smartphone these days. If you are wondering what exactly is a bricked phone, here is your answer.
A bricked phone, hard brick or soft brick, is a smartphone which refuses to start or boot all the way up the home/main screen of the Vivo Y100 device. This issue is observed within most Android phones because users have a tendency to tamper with the Vivo Y100 device settings, flashing new and customized ROMs and tweaking with the essential files. Playing around with the phone’s internal set-up leads to such errors, worst of them being a brick smartphone. Usually, a bricked phone does not switch on and stays frozen at the Vivo Y100 device logo, a blank screen or even worse, doesn’t respond to any command, even the power on command.
If you are confused about the soft brick and hard brick problems and looking for solutions to fix your priced phone, then here is all you need to know.
Read on to find out more.
Part 1: What is the difference between soft brick and hard brick?
To begin with, let us understand the basic difference between a soft brick and hard brick issue. Both versions of a bricked phone prevent it from booting but differ in their causes and gravity of the problem.
A soft-brick problem is caused merely by a software error/crash and makes your device switch on automatically every time you manually turn it off. This phenomenon is referred to as Boot Loop. Soft bricked Android phones are not as difficult to fix as the hard bricked Android phones. It is convenient to say that a soft bricked phone only boots up half-way and not fully, whereas a hard bricked device does not switch on at all. A hard brick error is thus caused when the kernel, which is nothing but an interface for the software to communicate with the hardware, is tampered with. A hard bricked phone is not recognized by your PC when plugged in and is a serious problem. It requires troubleshooting techniques and cannot be easily fixed as the soft brick problem.

Hard bricked phones are a rare sight, but the soft brick is very common. Given below are ways to fix a soft brick Android phone. The techniques listed here are the best and the most efficient ways to get your phone back to its normal working conditions without losing your important data or damaging your device or its software.
Part 2: Stuck at the Boot Loop
This is the first sign of a soft bricked Android phone. Boot Loop is nothing but when your phone does not remain switched off and turns itself on automatically, and freezes at the logo screen or blank screen, every time you manually try to power it off.
Stuck at boot loop problem can be fixed by clearing your Cache partitions. These partitions are nothing but storage locations for your modem, kernels, system files, drivers and built-in Apps data.
It is advisable to clear Cache partitions regularly to keep your phone free from such glitches.
Since the phone refuses to boot, Cache can be cleared from entering into the Recovery Mode. Different Android devices have different ways to put it in recovery mode. Normally pressing the power key and volume down key helps, but you may refer to your phone’s guide for better understanding and then follow the steps given below to clear the cache partition:
Once you are the recovery mode screen, you will see a number of options as shown in the screenshot.

Use the volume down key to scroll down and select ”Wipe cache partition” as shown below.
 >
>
After the process is completed, select “Reboot System” which is the first option in the recovery mode screen.
This method will help you erase all the clogged up and unwanted files. You may loose some App related data, but that is a small price to pay to fix your bricked phone.
If this method does not boot up your brick smartphone and the problem still persists, there are two more things you can try. Read ahead to find out about them.
Part 3: Booting straight into recovery mode
If your bricked phone does not boot up to your Home Screen or Lock screen and instead boots directly into Recovery Mode, there is not much left to do. Booting straight into recovery mode is undoubtedly a soft brick error but it also indicates a possible problem with your current ROM. The only option you have to flash a new ROM to reboot your bricked phone back to its normal functioning.
To flash a new ROM:
Firstly, you must root your phone and unlock the Bootloader. Every phone’s mechanism to unlock the bootloader is different, thus, we suggest to refer to your user manual.
Once the Bootloader is unlocked, take a backup of all your data by selecting “Backup” or “Android” back in recovery mode. The process should not take long and all you need to do is tap “OK” to config backup.

In this step, download a ROM of your choice and store it in your SD Card. Insert the SD Card in your phone to begin the flashing process.
Once at the recovery mode, select “Install Zip from SD Card” from the options.

Scroll down using the volume key and use the power key to select the downloaded ROM.


This might take a few minutes of your time, but once the process is complete, reboot your phone.
Hopefully, your bricked phone will not boot normally and work smoothly.
Part 4: Booting straight into Bootloader
If your bricked phone boots straight into Bootloader, then this a serious issue and must not be taken lightly. Flashing a new ROM or clearing cache partitions are of little help in such a brick smartphone situation. Booting straight into Bootloader is a peculiar soft bricked Android phone feature and can be tackled only by downloading and flashing your original ROM from the manufacturer. In order to do so, a detailed study about your manufacturer’s ROM, ways to download and flash must be carried out. Since different Android phones come with different types of ROMs, it difficult to cover all the aspects about the different types of ROMs.
Brick smartphone problem has become more prominent than phone freezing or hanging issue. Android users are often seen looking for solutions to fix their soft brick and hard brick phones. Android phones are prone to get bricked and thus, it is important for us to know about the three techniques given above. These methods have been tried, tested and recommended by ay affected bricked phone users. Therefore, these tips are reliable and worth a try. So if your phone acts stubborn and refuses to boot normally, examine the problem carefully and adopt one of the solutions given above which best suits your situation.
Also read:
- Conversione AAC a MP3/M4A OnLine Gratuita Con Movavi
- Ensuring Data Protection: How to Use ChatGPT Responsibly in the Workplace
- How To Correctly Address The Notorious Black Ops Cold War Error 27711 on Your Interface
- In 2024, 11 Best Location Changers for Samsung Galaxy A25 5G | Dr.fone
- In 2024, 11 Best Location Changers for Vivo S18 | Dr.fone
- Maximize Meteorological Measurements with the WS-2902A Osprey: A Detailed Overview
- Reasons for Vivo X Fold 2 Stuck on Boot Screen and Ways To Fix Them | Dr.fone
- Restore Missing App Icon on Honor 80 Pro Straight Screen Edition Step-by-Step Solutions | Dr.fone
- Turbo Windows 11 App Opening Secrets Revealed
- Title: How To Fix Part of the Touch Screen Not Working on Vivo Y100 | Dr.fone
- Author: Abel
- Created at : 2025-01-26 16:57:44
- Updated at : 2025-01-29 22:56:59
- Link: https://fix-guide.techidaily.com/how-to-fix-part-of-the-touch-screen-not-working-on-vivo-y100-drfone-by-drfone-fix-android-problems-fix-android-problems/
- License: This work is licensed under CC BY-NC-SA 4.0.