
How to Fix the Soft Bricked Lava Storm 5G? | Dr.fone
How to Fix the Soft Bricked Lava Storm 5G?
Bricked phone is a serious problem, as your brick smartphone could be suffering from a soft brick or hard brick problem, and must be dealt with carefully. It is very common to see a brick smartphone these days. If you are wondering what exactly is a bricked phone, here is your answer.
A bricked phone, hard brick or soft brick, is a smartphone which refuses to start or boot all the way up the home/main screen of the Lava Storm 5G device. This issue is observed within most Android phones because users have a tendency to tamper with the Lava Storm 5G device settings, flashing new and customized ROMs and tweaking with the essential files. Playing around with the phone’s internal set-up leads to such errors, worst of them being a brick smartphone. Usually, a bricked phone does not switch on and stays frozen at the Lava Storm 5G device logo, a blank screen or even worse, doesn’t respond to any command, even the power on command.
If you are confused about the soft brick and hard brick problems and looking for solutions to fix your priced phone, then here is all you need to know.
Read on to find out more.
Part 1: What is the difference between soft brick and hard brick?
To begin with, let us understand the basic difference between a soft brick and hard brick issue. Both versions of a bricked phone prevent it from booting but differ in their causes and gravity of the problem.
A soft-brick problem is caused merely by a software error/crash and makes your device switch on automatically every time you manually turn it off. This phenomenon is referred to as Boot Loop. Soft bricked Android phones are not as difficult to fix as the hard bricked Android phones. It is convenient to say that a soft bricked phone only boots up half-way and not fully, whereas a hard bricked device does not switch on at all. A hard brick error is thus caused when the kernel, which is nothing but an interface for the software to communicate with the hardware, is tampered with. A hard bricked phone is not recognized by your PC when plugged in and is a serious problem. It requires troubleshooting techniques and cannot be easily fixed as the soft brick problem.

Hard bricked phones are a rare sight, but the soft brick is very common. Given below are ways to fix a soft brick Android phone. The techniques listed here are the best and the most efficient ways to get your phone back to its normal working conditions without losing your important data or damaging your device or its software.
Part 2: Stuck at the Boot Loop
This is the first sign of a soft bricked Android phone. Boot Loop is nothing but when your phone does not remain switched off and turns itself on automatically, and freezes at the logo screen or blank screen, every time you manually try to power it off.
Stuck at boot loop problem can be fixed by clearing your Cache partitions. These partitions are nothing but storage locations for your modem, kernels, system files, drivers and built-in Apps data.
It is advisable to clear Cache partitions regularly to keep your phone free from such glitches.
Since the phone refuses to boot, Cache can be cleared from entering into the Recovery Mode. Different Android devices have different ways to put it in recovery mode. Normally pressing the power key and volume down key helps, but you may refer to your phone’s guide for better understanding and then follow the steps given below to clear the cache partition:
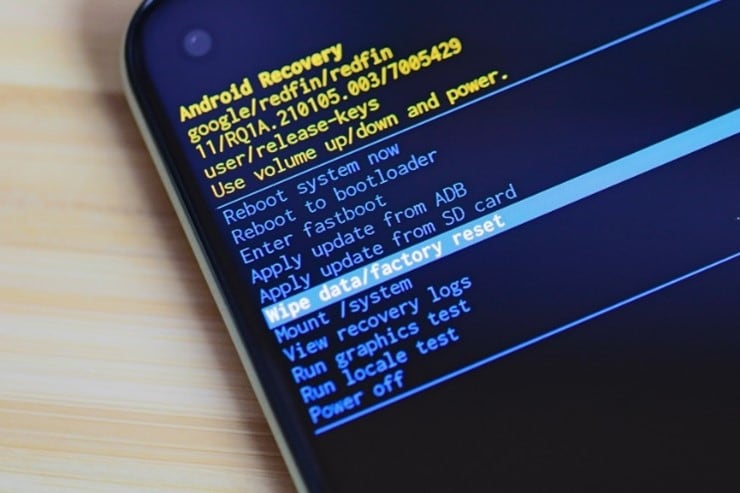
Once you are the recovery mode screen, you will see a number of options as shown in the screenshot.

Use the volume down key to scroll down and select ”Wipe cache partition” as shown below.
 >
>
After the process is completed, select “Reboot System” which is the first option in the recovery mode screen.
This method will help you erase all the clogged up and unwanted files. You may loose some App related data, but that is a small price to pay to fix your bricked phone.
If this method does not boot up your brick smartphone and the problem still persists, there are two more things you can try. Read ahead to find out about them.
Part 3: Booting straight into recovery mode
If your bricked phone does not boot up to your Home Screen or Lock screen and instead boots directly into Recovery Mode, there is not much left to do. Booting straight into recovery mode is undoubtedly a soft brick error but it also indicates a possible problem with your current ROM. The only option you have to flash a new ROM to reboot your bricked phone back to its normal functioning.
To flash a new ROM:
Firstly, you must root your phone and unlock the Bootloader. Every phone’s mechanism to unlock the bootloader is different, thus, we suggest to refer to your user manual.
Once the Bootloader is unlocked, take a backup of all your data by selecting “Backup” or “Android” back in recovery mode. The process should not take long and all you need to do is tap “OK” to config backup.

In this step, download a ROM of your choice and store it in your SD Card. Insert the SD Card in your phone to begin the flashing process.
Once at the recovery mode, select “Install Zip from SD Card” from the options.

Scroll down using the volume key and use the power key to select the downloaded ROM.


This might take a few minutes of your time, but once the process is complete, reboot your phone.
Hopefully, your bricked phone will not boot normally and work smoothly.
Part 4: Booting straight into Bootloader
If your bricked phone boots straight into Bootloader, then this a serious issue and must not be taken lightly. Flashing a new ROM or clearing cache partitions are of little help in such a brick smartphone situation. Booting straight into Bootloader is a peculiar soft bricked Android phone feature and can be tackled only by downloading and flashing your original ROM from the manufacturer. In order to do so, a detailed study about your manufacturer’s ROM, ways to download and flash must be carried out. Since different Android phones come with different types of ROMs, it difficult to cover all the aspects about the different types of ROMs.
Brick smartphone problem has become more prominent than phone freezing or hanging issue. Android users are often seen looking for solutions to fix their soft brick and hard brick phones. Android phones are prone to get bricked and thus, it is important for us to know about the three techniques given above. These methods have been tried, tested and recommended by ay affected bricked phone users. Therefore, these tips are reliable and worth a try. So if your phone acts stubborn and refuses to boot normally, examine the problem carefully and adopt one of the solutions given above which best suits your situation.
Reasons for Lava Storm 5G Stuck on Boot Screen and Ways To Fix Them
One of the main reasons why people own a phone is for convenience. It will be ironic if that device, supposed to grant convenience, provides problems instead. Some people face this when their Android phone is stuck on the logo page and unable to do anything. As expected, this is common in Android phones and is why people are unhappy with Android phones.
This article will share the possible reasons why your Android phone is stuck on the boot screen. This article will share three possible reasons for this problem and five valuable tips to help fix this issue. If all else fails, we have an application to share and recommend that is guaranteed to solve your problem in no time. Keep on reading to find out more!
Part 1. Why Is Your Lava Storm 5G Stuck on the Boot Screen?
There are countless reasons why a problem happens, just like why your Android phone is stuck on the logo page. This section sieved out the top 3 reasons why your Android boot screen happens and some tips to overcome it.
1. Changes to the Software
Android is a flexible operating system. It allows users to customize it in any way they desire, which is Android’s beauty. The customizable nature of the operating system allows users to unlock, root, flash, and tinker. However, this flexibility in customization might be a double edge sword. Accidental tampering with the Android system might result in software problems, such as being stuck on the Android boot screen.
Fortunately, this is not a complicated fix. Android accepts different fixes and allows the system to return to how it once was. Even with software issues, the system does not get completely inoperable. The best way to fix changes to the software is to start from the beginning of the process. This might offer the best chance for you to restore your phone to normal.
Although it is fun to customize and change the software, following trusted sources ensures you do not damage your phone. Having an Android phone stuck on the logo page is one of the many examples of the problems that might happen if changes to the software go out of hand.
2. Android Software Updates
Updates are a common cause of Android phones stuck on the logo. It happened when the update did not complete as it should have been. Several reasons for incomplete updates, such as poor internet connection, the connection between computer and phone being lost, a power cut, the phone freezing, and the list go on. When an update is uncompleted, issues such as being stuck at the Android boot screen and many others might occur.
Before an update starts, your mobile device will notify you of the duration of the update. As a tip, set aside an additional 10-15 minutes on top of the update duration to ensure your update is completed successfully. It will be ideal for activating the software update only when there is sufficient power in your phone or keep it charging during the update.
When an update is disrupted or stopped before it completes, the existing Android version will become corrupted while the new software to be updated is incomplete. This means that your Lava Storm 5G has no system to run on. Always complete your software updates, and you will not have the problem of your Android phone getting stuck on the logo.

3. Malfunctioning Applications
If you noticed that your Android phone is stuck on the logo page only after installing certain apps, there is a high chance that the app is not compatible with the existing apps in your phone or with the Android version. When an app conflicts with the Android system or other apps, this will run into problems with your phone.
This problem typically happens when an app is downloaded from a third-party source, not the official Google Play Store. This app from a third-party source might be malicious or contain a virus. This can cause problems such as being stuck at the Android boot screen.
To overcome this, locate the app that has been giving you issues and remove the app from your phone. Restart your device, and you should be able to have your Lava Storm 5G functioning properly.
Part 2. 5 Helpful Ways To Fix Android Phones Stuck on Boot Screen
After understanding the common problems on why your Android phone is stuck on the logo page, here are five easy solutions you can try solving at home.
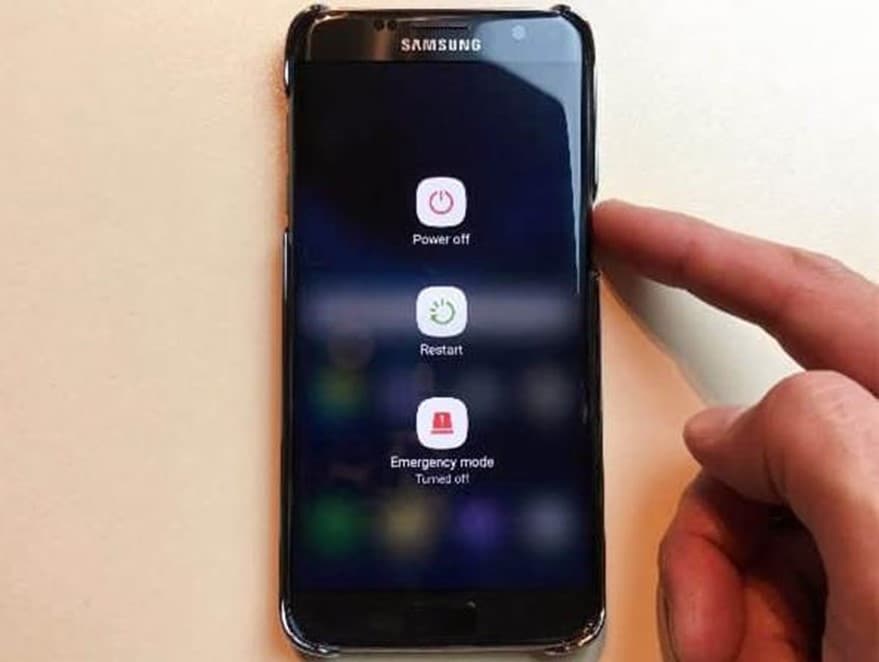
1. Force Reboot
When encountering problems with your Lava Storm 5G, such as being stuck at the Android boot screen, you should first try a forced reboot. This simple yet effective solution could be what you need to solve all your Android problems. It is essential to leave your device turned off for at least a minute or two before turning it back on.
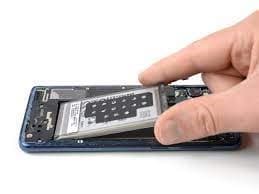
2. Pull Out Battery
Another way to restart your Lava Storm 5G when it is frozen is to try taking the battery out. Android devices are designed with a removable battery, and sometimes you can resolve the issue easily by removing the battery and replacing it after a couple of seconds. Then, turn on your device again and test to see if your Android phone is stuck on the logo page.
If it works, then the problem is solved. However, some Android devices come with a built-in battery. For these kinds of devices, a stimulated battery pull should be attempted. A simulated battery pull is a set of instructions telling your Lava Storm 5G to switch off and on again. If your device does not offer the simulated battery pull option, omit this troubleshooting option.
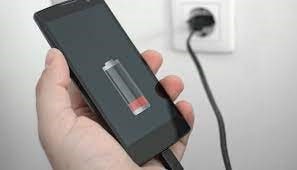
3. Charge Your Device
If your Android phone is stuck on the logo page and not getting past it, no matter how many times you have tried, it may be due to a low battery! As simple as it sounds, plug your device into a power outlet and try restarting your phone. You might be surprised that this simple fix is all it takes to solve your Android problem.
4. Wipe Cache Data
Cache refers to a software or hardware component of an Android device that stores your program and data for reference. This data might result from the daily usage of your device or duplicate data from a different source on the Lava Storm 5G device. Similar to a computer, if the cache occupies too much space on your device, it might cause your Lava Storm 5G to become slower and eventually get stuck at the Android boot screen.
Wiping out the cache data from your Lava Storm 5G could free up more space, allow your device to function faster, and avoid problems such as being stuck at the Android boot screen. Do not worry; wiping the cache data is entirely safe and will not lead to any loss of important data or programs on your phone.
5. Factory Reset
If all the methods above fail, performing a factory rest might be your last option. However, it is important to note that performing a factory reset will erase everything on your phone, including apps, contacts, photos, etc. As a tip, back up all your data from your device before performing a factory reset. That way, you can still retrieve all your precious information after the reset.
Follow the steps below to perform a factory rest on your Lava Storm 5G:
Step 1: Turn off your phone and press the Power button and Volume Down button at the same time
Step 2: Use the Volume button to scroll the options and highlight Wipe data/factory reset. Press the Power button to begin the factory reset.
Part 3. Bonus Tip: Best App To Solve Android Phone Stuck On Boot Screen
If all the solutions above do not work and you do not want to perform a factory reset on your phone, one option is to use an app called Dr.Fone. It is one of the most effective phone recovery solutions and can help to bring your Lava Storm 5G back to a state like it was brand new. Being stuck on the Android boot screen will be a problem of the past.

Refer to the tutorial below to solve your Android phone is stuck on the logo page issue.
Step 1: Download and install Dr.Fone – System Repair (Android) on your computer. Open the application and connect your Lava Storm 5G to the computer.
Step 2: Select the issue you face on the next page. If you use a Lava Storm 5G phone, select Stuck at Lava Storm 5G Logo. Alternatively, you can click on Black Screen or Stuck in Boot Loop.

Step 3: Input the Brand, Name, Model, Country, and Carrier of your phone and click on Next.

Step 4: Follow the instructions provided on the page and wait for the system repair to finish. After which, click on Done to complete the process.
 safe & secure
Conclusion
This article summarizes some possible reasons your Android phone is stuck on the logo page. Five useful strategies were shared to easily overcome your Lava Storm 5G being stuck in the boot. However, if all the above methods do not work, we recommend trying the Dr.Fone-System Repair.
Dr.Fone-System Repair repairs the operating system issues and fixes the problem with your Lava Storm 5G. Once you power on your Lava Storm 5G again, you can rest assured that it will be like new.
Lava Storm 5G Camera Not Working Unexpected Error? Fix It Now
For all its glory and goodness, the Android OS often has its users pulling their hair in frustration at just how buggy the OS can be at times. So, if you’re having one of those days today, we are here to help. Camera app is one of the most used apps on smartphones today. People only launch the app when they want to take a photo, for everything else there’s a dedicated photo gallery app. What happens when you launch the camera app only to realize it threw an error and you missed your photo moment? Don’t throw the phone, not yet. Let us help you out.

Part I: Why Is Android Camera Not Working?
There are a few reasons why the camera app is not working on your Lava Storm 5G.
Low Memory
Camera app does rely heavily on system resources, so in case you have too many apps open and for some reason the OS is not able to manage the resources appropriately for the camera app to function as it should, you will get a camera error.
Low Storage
The camera app needs storage space to save the photos it takes. So, in case your phone is running low on storage space, the camera app would likely malfunction as it would have no way to store the photos it would be taking.
General Bugs And Glitches
OS bugs and general glitches within the OS and the camera app can cause camera not working issue anytime during everyday operation. This is part and parcel of any technology.
Hardware Issues
In the rarest cases, there might have developed an actual hardware issue with the camera system on your Lava Storm 5G. The likely culprit is misuse and abuse, such as a dropped phone or maybe the phone was too hot for extended periods of time, causing hardware issues.
Part II: How To Fix Android Camera Not Working Issue?
So, how to get the Android camera not working problem solved? There are a few ways you can try fixing the camera not working issue on your Lava Storm 5G right where you are, without needing to take the Lava Storm 5G device to the manufacturer’s service center.
II.I: Restart The Handset
One of the first things to do any time an app or your phone or tablet does not work like it should, restarting the Lava Storm 5G device refreshes everything just enough to resolve most commonly occurring issues.

Use the power button on your smartphone to restart your Android handset and see if this resolves the issue.
II.II: Close And Relaunch The Camera App
If the camera app (or any app for that matter) has been in the background for a while and then it is brought to the foreground, there are always chances of it crashing for any reason, or not working as expected. So, closing the app completely and relaunching it is recommended.
Step 1: Launch the app switcher on your specific Android device the way your device manufacturer suggests you to. Usually, it is a swipe up and hold gesture to get into the app switcher.

Step 2: Next, you can choose to close just the camera app or, better yet, close all apps by tapping the Close All button. Flicking any app upwards (quick upward swipe) is how you close an app. If there is no Close All button anywhere, repeat the gesture for all open apps.
II.III: Check App Permissions
These days, thanks to strides in the privacy initiatives, apps need permissions before they can function the way they do. Most of the times, apps such as camera do have the necessary permissions, but sometimes it is possible that the permissions are set incorrectly. To check if the camera app has the requisite permissions, do the following:
Step 1: Go to Settings > Apps > Camera > Permissions.

Step 2: Tap Camera.

Step 3: See if the selected option is Allow Only While Using This App. If not, select it.
II.IV: Clear The Camera App Cache
Clearing the camera app cache is sometimes helpful. To do that:
Step 1: Go to Settings > Apps > Camera and tap Storage Usage.

Step 2: Tap Clear Cache.

II.V: Clear The Photo Gallery App Cache
The camera app is closely tied to the photo gallery app that comes baked in into Android OS. That is because photos that the camera app takes are stored in the photo gallery app. Consequently, if there were any issues in the photo gallery app, that could lead to the camera app not working on Android problem. Here’s how to clear the photo gallery app cache:
Step 1: Go to Settings > Apps > Photos > Storage Usage.

Step 2: Tap Clear Cache.
II.VI: Check For App Updates
This does not happen always, but sometimes, with known bugs and issues, there may be an update released that fixes those bugs and issues that prevent some users from using a given app reliably. Checking for updates is a good step to make sure that your camera app is updated to the latest version possible.
Step 1: Go to Play Store and tap your profile picture on the right.

Step 2: Tap Manage Apps and Device.

Step 3: If there are updates available, Tap Update All to update all apps.
II.VII: Cool The Phone Down
We do not realize the immense power that is packed into the thin smartphone form factor these days. If you have been using the phone to video chat for a while now, you might not realize that the phone has become hot, especially if you are using a desk stand. Same for shooting high-resolution videos; the phone does get quite hot shooting high-resolution videos.
If this is the case, close all apps and let the phone cool down. You might even want to shut the phone off to help cool it faster.
II.VIII: Nudge The Camera System
You may want to tap your camera system (the lenses and surrounding area) gently to see if that gets the camera working. In case it did, this is indicative of a hardware issue, and you should get it checked at the service center at your earliest convenience.
II.IX: Fix Android Camera Not Working Issue In One Click (With Dr.Fone)
Now, if the above fixes have not worked, you might want to repair your Android OS once before you make that appointment with the service centre. And, we have just the app to help you fix your camera not working on Android problem quickly.
Wondershare Dr.Fone is a multi-module app that works on both Windows and macOS and is the only app you will ever need to resolve nearly all of your smartphone and tablet issues that you are likely to encounter. Need to take backups? Dr.Fone Phone Backup has you covered with the ability to take and restore even selective backups, and to any location such as your computer or an external disk as well. Want to transfer WhatsApp chats to a new phone? Use WhatsApp Transfer to do just that! Bought a new phone? Use Phone Transfer to transfer contents from old phone to new, and then use Dr.Fone Data Eraser to securely wipe your old phone before giving it away!
Today, we will use Dr.Fone’s System Repair (Android) module to fix Android camera not working issue quickly.
Download Dr.Fone here.
safe & secure
Step 1: Launch Dr.Fone app on your PC or Mac.
Step 2: Click System Repair module and then Android.

Step 3: For now, don’t bother with the scenarios given and click Start to go to the next screen.
Step 4: Your Android device will be detected by Dr.Fone. If anything seems incorrect, use the dropdown options to change it, and click Next.

Step 5: Your phone needs to be put into Download mode before it can be repaired. Follow the instructions shown onscreen and click Next.

Step 6: Dr.Fone automatically downloads the most recent firmware for your device and when it is ready, waits for your input. Click Fix Now to start the repair process.

Step 7: You will need to enter a 6-digit code (digit zero, six times – 000000) to confirm and begin the repair process.
When the repair is complete, Dr.Fone shows the final screen as below:

safe & secure
Conclusion
The camera app on your smartphone is one of the most important apps you use. This is not a game; this is an app that makes previous memories possible for you. So, when you get any of those incorrigible errors that are impossible to make sense of, what do you do? This guide gives you 9 fixes to fix Android camera not working error quickly and easily.
Also read:
- [New] Master Your Images with the Best Overlay Apps for iOS & Android for 2024
- 基本的な手順:AviUtlを使った音声ファイルの簡単な編集 - カットとボリューム調整
- AnimatedApp Full Guide & Review '24 Overview for 2024
- How to Fix the Soft Bricked Samsung Galaxy A15 5G? | Dr.fone
- How To Revive Your Bricked Lava Blaze Curve 5G in Minutes | Dr.fone
- How To Teleport Your GPS Location On Honor Magic 5 Lite? | Dr.fone
- In 2024, Unseen Video on Sony A6400 What's Going Wrong?
- Is It Legal to Record YouTube?
- Solved Warning Camera Failed on Lava Yuva 3 | Dr.fone
- Solved Warning Camera Failed on Lenovo ThinkPhone | Dr.fone
- Turning Still Shots Into Audio-Visual Narratives
- Title: How to Fix the Soft Bricked Lava Storm 5G? | Dr.fone
- Author: Abel
- Created at : 2025-01-23 22:49:28
- Updated at : 2025-01-29 22:56:14
- Link: https://fix-guide.techidaily.com/how-to-fix-the-soft-bricked-lava-storm-5g-drfone-by-drfone-fix-android-problems-fix-android-problems/
- License: This work is licensed under CC BY-NC-SA 4.0.