
How to Fix the Soft Bricked Samsung Galaxy F14 5G? | Dr.fone
How to Fix the Soft Bricked Samsung Galaxy F14 5G?
Bricked phone is a serious problem, as your brick smartphone could be suffering from a soft brick or hard brick problem, and must be dealt with carefully. It is very common to see a brick smartphone these days. If you are wondering what exactly is a bricked phone, here is your answer.
A bricked phone, hard brick or soft brick, is a smartphone which refuses to start or boot all the way up the home/main screen of the Samsung Galaxy F14 5G device. This issue is observed within most Android phones because users have a tendency to tamper with the Samsung Galaxy F14 5G device settings, flashing new and customized ROMs and tweaking with the essential files. Playing around with the phone’s internal set-up leads to such errors, worst of them being a brick smartphone. Usually, a bricked phone does not switch on and stays frozen at the Samsung Galaxy F14 5G device logo, a blank screen or even worse, doesn’t respond to any command, even the power on command.
If you are confused about the soft brick and hard brick problems and looking for solutions to fix your priced phone, then here is all you need to know.
Read on to find out more.
Part 1: What is the difference between soft brick and hard brick?
To begin with, let us understand the basic difference between a soft brick and hard brick issue. Both versions of a bricked phone prevent it from booting but differ in their causes and gravity of the problem.
A soft-brick problem is caused merely by a software error/crash and makes your device switch on automatically every time you manually turn it off. This phenomenon is referred to as Boot Loop. Soft bricked Android phones are not as difficult to fix as the hard bricked Android phones. It is convenient to say that a soft bricked phone only boots up half-way and not fully, whereas a hard bricked device does not switch on at all. A hard brick error is thus caused when the kernel, which is nothing but an interface for the software to communicate with the hardware, is tampered with. A hard bricked phone is not recognized by your PC when plugged in and is a serious problem. It requires troubleshooting techniques and cannot be easily fixed as the soft brick problem.

Hard bricked phones are a rare sight, but the soft brick is very common. Given below are ways to fix a soft brick Android phone. The techniques listed here are the best and the most efficient ways to get your phone back to its normal working conditions without losing your important data or damaging your device or its software.
Part 2: Stuck at the Boot Loop
This is the first sign of a soft bricked Android phone. Boot Loop is nothing but when your phone does not remain switched off and turns itself on automatically, and freezes at the logo screen or blank screen, every time you manually try to power it off.
Stuck at boot loop problem can be fixed by clearing your Cache partitions. These partitions are nothing but storage locations for your modem, kernels, system files, drivers and built-in Apps data.
It is advisable to clear Cache partitions regularly to keep your phone free from such glitches.
Since the phone refuses to boot, Cache can be cleared from entering into the Recovery Mode. Different Android devices have different ways to put it in recovery mode. Normally pressing the power key and volume down key helps, but you may refer to your phone’s guide for better understanding and then follow the steps given below to clear the cache partition:
Once you are the recovery mode screen, you will see a number of options as shown in the screenshot.

Use the volume down key to scroll down and select ”Wipe cache partition” as shown below.
 >
>
After the process is completed, select “Reboot System” which is the first option in the recovery mode screen.
This method will help you erase all the clogged up and unwanted files. You may loose some App related data, but that is a small price to pay to fix your bricked phone.
If this method does not boot up your brick smartphone and the problem still persists, there are two more things you can try. Read ahead to find out about them.
Part 3: Booting straight into recovery mode
If your bricked phone does not boot up to your Home Screen or Lock screen and instead boots directly into Recovery Mode, there is not much left to do. Booting straight into recovery mode is undoubtedly a soft brick error but it also indicates a possible problem with your current ROM. The only option you have to flash a new ROM to reboot your bricked phone back to its normal functioning.
To flash a new ROM:
Firstly, you must root your phone and unlock the Bootloader. Every phone’s mechanism to unlock the bootloader is different, thus, we suggest to refer to your user manual.
Once the Bootloader is unlocked, take a backup of all your data by selecting “Backup” or “Android” back in recovery mode. The process should not take long and all you need to do is tap “OK” to config backup.

In this step, download a ROM of your choice and store it in your SD Card. Insert the SD Card in your phone to begin the flashing process.
Once at the recovery mode, select “Install Zip from SD Card” from the options.

Scroll down using the volume key and use the power key to select the downloaded ROM.


This might take a few minutes of your time, but once the process is complete, reboot your phone.
Hopefully, your bricked phone will not boot normally and work smoothly.
Part 4: Booting straight into Bootloader
If your bricked phone boots straight into Bootloader, then this a serious issue and must not be taken lightly. Flashing a new ROM or clearing cache partitions are of little help in such a brick smartphone situation. Booting straight into Bootloader is a peculiar soft bricked Android phone feature and can be tackled only by downloading and flashing your original ROM from the manufacturer. In order to do so, a detailed study about your manufacturer’s ROM, ways to download and flash must be carried out. Since different Android phones come with different types of ROMs, it difficult to cover all the aspects about the different types of ROMs.
Brick smartphone problem has become more prominent than phone freezing or hanging issue. Android users are often seen looking for solutions to fix their soft brick and hard brick phones. Android phones are prone to get bricked and thus, it is important for us to know about the three techniques given above. These methods have been tried, tested and recommended by ay affected bricked phone users. Therefore, these tips are reliable and worth a try. So if your phone acts stubborn and refuses to boot normally, examine the problem carefully and adopt one of the solutions given above which best suits your situation.
4 Solutions to Fix Unfortunately Your App Has Stopped Error on Samsung Galaxy F14 5G
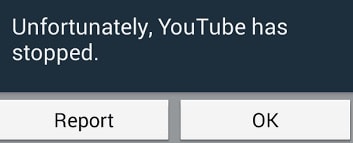
We often find people complaining, “Unfortunately Youtube has stopped”, “Unfortunately the internet has stopped” or “Unfortunately Netalpha has stopped”. An error that causes Apps to randomly stop working is experienced by users daily. This is a strange error as it occurs while you are using an App, and it suddenly stops working or crashes. You are brought back from the App screen to the Home Screen of your device with an error message saying: “Unfortunately, it has stopped working.”
Apps not working or stopped while working, such as unfortunately Netalpha has stopped or unfortunately the internet has stopped, is a very confusing error because one moment your App is running smoothly and the next moment it shuts down automatically with an error message. Unfortunately, Youtube has stopped working, Netalpha has stopped. Unfortunately, the internet has stopped, and many more such examples of Apps stopping while working normally are witnessed by users all over the world, and they are constantly on a lookout for solutions to fix such an error.
Read on to find out why exactly your App stops working suddenly and 3 of the best and most effective ways to tackle the problem.
Part 1: Why your App stops working suddenly?
Unfortunately, Youtube has stopped; unfortunately, Netalpha has stopped working, etc. are error messages that pop-up now and then while using Apps on Android mobile devices. It is important to understand that such errors are not App/Apps specific and may occur to any App/Apps. There is no one specific App or genre of Apps that face this problem.
The reason behind unfortunately internet has stopped or any other App which experiences such a glitch in data crash. A data crash is not a serious problem and only means a situation wherein an App, OS, or software stops working normally and exits abruptly. This may happen due to various reasons such as unstable internet connection, both cellular and WiFi. Another reason for Apps to stop working could be corrupted Cache files, which have not been cleared in a long time.
Many users also feel that incomplete or improper installation may cause the App to crash and stop working suddenly.
There may be many more reasons for them; unfortunately, App has stopped error to show up, but no one reason can be blamed for it.
Therefore it is important for us to carefully examine the problem and choose from the solutions given below to fix Unfortunately, Youtube has stopped; unfortunately, Netalpha has stopped; unfortunately, the internet has stopped and many other similar unfortunately App has stopped working errors.
Part 2: A One-Click Fix to ‘Unfortunately App has Stopped’
Fortunately, while this is an annoying problem that stops you from doing what you’re doing, the best way to eliminate this error is simply to repair the data glitch, thus preventing it from happening.
The easiest solution is to use a software application known as Dr.Fone - System Repair , a specialist piece of programming designed to help you fix your devices as quickly as possible.
If this sounds like the option you need to alleviate your, unfortunately, YouTube has stopped errors; this is how to use it.
How to Use Dr.Fone -Repair to Fix Unfortunately App has Stopped Error
Note: Please note that using this solution may rewrite and repair all data on your phone, meaning there is the potential to lose data during the process. Make sure you back up your device before continuing.
Step #1 - Acquire the Software
Head over to the Dr.Fone - System Repair website and download the software to your Mac or Windows computer.
Step #2 - Connect Your Android Device
Launch Dr.Fone and click the System Repair option from the main menu. Now connect your Samsung Galaxy F14 5G using the official cable.

From the next menu, select the ‘Android Repair’ option and press ‘Start’.

Step #3 - Input Information & Repair
Tap in your phone information. This is to make sure your device is repaired correctly while minimizing the risk of bricking your device.

Follow the on-screen instructions on how to then boot your Samsung Galaxy F14 5G in Download mode.

Once booted, the software will verify your firmware and start repairing your device. Make sure your phone stays connected throughout the process, and you’ll be ready to go and your ‘unfortunately the internet [or another app] has stopped’ error should be erased!

This could take some time, depending on your internet connection and speeds, so be mindful that everything stays connected.
Part 3: Fix your App has unfortunately stopped by clearing App Cache
Herein we bring to you 3 of the most effective remedies to combat the; unfortunately, App has stopped error, which has helped many users facing similar problems.
First among these is to clear the App’s cache. Clearing App Cache to fix Unfortunately Youtube has stopped, and such errors are very popular as it cleans your App/Apps by wiping off data that has been stored due to constant App usage, and it makes the App/Apps as good as new. It is advised to all users to clear the App cache regularly for Apps to function better.
Follow the steps given below to learn how to clear App cache:
• Visit “Settings” to find an option named “Apps”.

• Tap on “Apps” and look for the App which has suddenly stopped.
• Click the App name, say, for example, “Youtube” by scrolling down in “All” Apps.
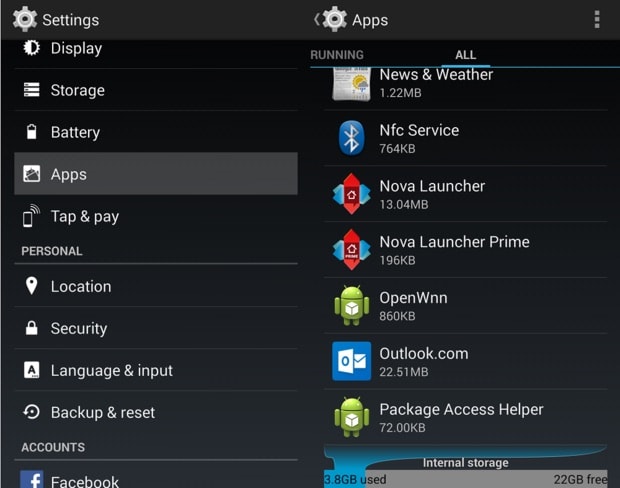
• From the options that appear, tap on “Storage” and then on “Clear cache” as shown below.

Clearing App cache is always a good idea as it prevents any errors which may be caused due to the cache being corrupt or too full. This method is likely to help you, but if the problem persists, read on to find out about 2 more solutions.
Part 4: Fix your App has unfortunately stopped by the fresh installation
Sometimes, unfortunately, Youtube has stopped; unfortunately, the internet has stopped, and such errors are caused due to improper or inappropriate App installation. It is mandatory to completely download the App from the Google Play Store and use it after it is successfully installed on your device.
Firstly, to uninstall all an existing App from your device, follow the instructions given hereunder:
• Visit “Settings” and search for “Application Manager” or “Apps”.
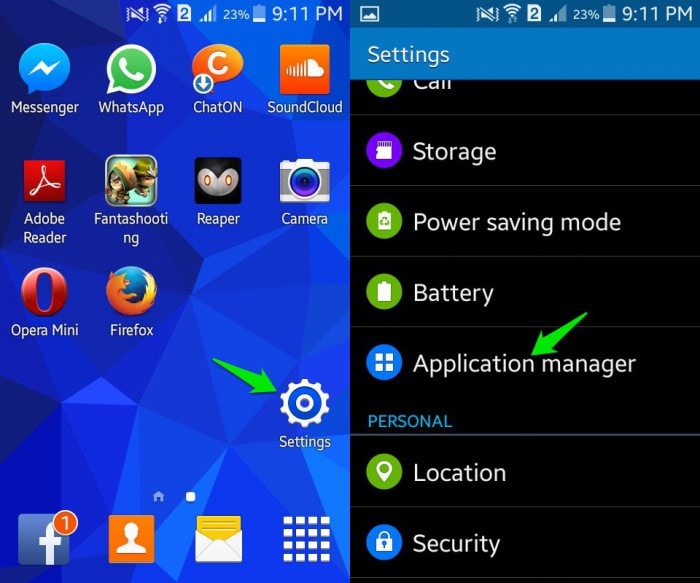
• Select the App you wish to uninstall, say, for example, “Messenger”.
• From the options that appear before you, click on “Uninstall” to delete the App from your device.

You may also uninstall an app directly from the Home Screen (only possible in certain devices) or the Play Store.
To re-install the App, visit Google Play Store, search for the App name and click on “Install”. You will also find the deleted App in “My Apps and games” on your Play store.
This method has helped many and will be useful to you too. So don’t hesitate to try it. It may sound tedious and time-consuming, but it hardly takes 5 minutes of your time.
Part 5: Fix your App has unfortunately stopped by factory reset
Factory Reset must be used only when nothing else works. Please remember to take a back-up of all your data and contents on the cloud or an external memory device, such as a pen drive before adopting this method because the one you perform a factory reset on your device, all media, contents, data and other files are wiped out, including device settings. Do remember to back up the data on an Android device before performing a factory reset.
Follow the step-by-step explanation given below to factory reset your device to fix Unfortunately Youtube has stopped; unfortunately, the internet has stopped working and similar errors:
• Visit “Settings” by clicking the settings icon, as shown below.
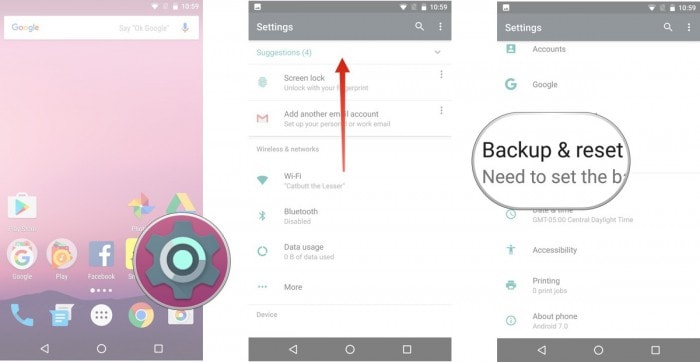
• Now select “Backup and Reset” and move on.
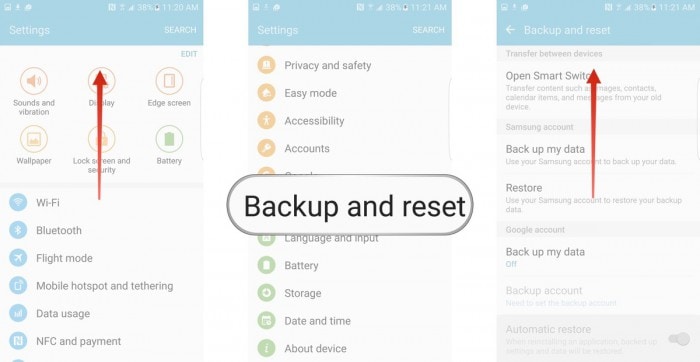
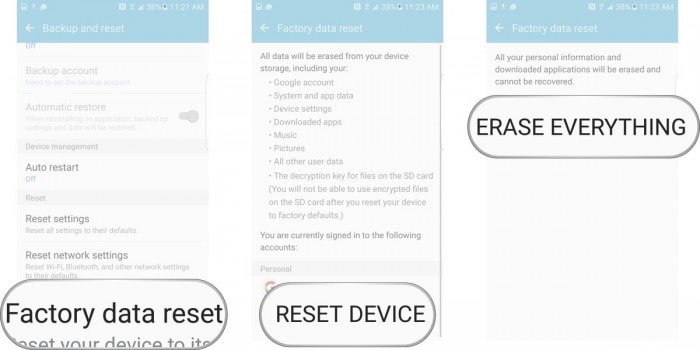
• In this step, select “Factory data reset” and then “Reset Device”.
• Finally, tap on “ERASE EVERYTHING” as shown below to Factory Reset your device.
Note: Once the factory reset process is complete, your device will automatically restart and you will have to set it up once again.
Errors such as unfortunately, Youtube has stopped, unfortunately, Netalpha has stopped, unfortunately, the internet has stopped working and so on are very common these days. They disrupt the normal functioning of an App/Apps and prevent you from using the App/Apps smoothly. Unfortunately, App has stopped error is not a serious problem and does not mean there is a problem with the App, your Android OS version, or your handset. It is a random error which occurs due to various reasons in a given situation. If you experience such an error while sign in your favorite App/Apps, DO NOT panic as unfortunately, App has stopped error can be fixed easily. All you need to do is be patient with the App’s software and not try to launch it again and again once it crashes, and an error message pops-up. Just follow the methods listed and explained in detail in the previous segments to solve the problem of unfortunately App has stopped.
How to Fix Error 495 While Download/Updating Android Apps On Samsung Galaxy F14 5G
Error 495 is a common error that occurs while downloading or updating apps from Google Play Store. This error is usually caused by a problem with the Google Play Store, and it can be fixed by clearing the cache and data of the Google Play Store app. If you are experiencing this error, follow the steps below to fix it.
In this article, you will learn why the Android error 495 pops up, possible solutions to bypass, as well as a dedicated repair tool to radically fix error 495.
We always like to explore every new feature or the features that already exist on our devices. We have a tendency to be the master of our device and want to know every bit of the handset. Unexpected errors ruin that experience and it is just frustrating to experience these errors. And the worst part is that we have no idea where we are wrong or what we did that led to the error. Same is the case with the error 495 which occurs due to downloading or updating of Android Apps. You may have spent countless hours on the internet to find the right solution for error code 495 but even after following many of the most guaranteed steps sometimes the error still doesn’t go away.
However, this article will provide you various methods to get rid of the Error 495 play store problem that you face and you will not have to depend on any other sources for your solution.
Reasons for Google play error 495
Android Apps are most commonly downloaded from the Google Play Store with the help of Wi-Fi or Cellular Data. One may come across many types of errors. Mostly the errors come in during the download or update or installing time. Error 495 occurs when the user isn’t being able to download or install an app over Wi-Fi, but the user is able to do the same thing over cellular data.
Technically speaking, the issue is caused when the connection to the Google Play servers, where the app is hosted, times out. Which is unable to resolve by itself.
Also, there could be another reason that it cannot sync with the servers.
Now that we know the possible reasons for the error 495, let us also know how to get rid of it in the sections below.
Solution 1: One Click to Fix error 495 by Android Repair
Tried several methods to make the error 495 disappear, but nothing works? Well, many people have experienced the same frustration. The root cause is that something is wrong with the Android system. You need to have your Android system repaired to fix error 495 in this situation.
Note: Having your Android system repaired may lose existing data on your Android. Backup the data on your Android before the Android repair.
Dr.Fone - System Repair (Android)
Best tool for fundamental Android repair in one click
- Fixes all Android system issues like error 495, system UI not working, etc.
- One click for Android repair. No special technics needed.
- Supports all the new Samsung Galaxy F14 5G devices like Galaxy Note 8, S8, S9, etc.
- Step-by-step on-screen instructions provided to fix error 495 without any hassle.
3,390,486 people have downloaded it
With Dr.Fone - System Repair (Android) , you can easily fix error 495 in few steps. Here is how:
- Download, install, and launch Dr.Fone - System Repair (Android). Connect your Android to your computer with a USB cable.
- Select the option “Repair” > “Android Repair”, and click “Start”.
- Select the Samsung Galaxy F14 5G device information like brand, name, model, etc., and confirm your selection by typing in “000000”.
- Press the stated keys to boot your Android in download mode to download the firmware as instructed.
- After the firmware is downloaded, the program will automatically start to repair your Android.

Solution 2: Clear the Google Service Framework cache to Fix error 495
Step 1:
Go to the “settings” of your device. Once the series of sections comes up, tap on the “APPS” section.
Step 2:
Click on ‘All Apps’ or ‘Swipe to All’ and the open the section named “Google Services Framework App”
 .
.
STEP 3:
Open “App Details” and the screen shown in the image should come up on your device. As shown in the image, follow the three steps. First, tap on “Force Stop” and then second, tap on the “Clear Data” option and finally go ahead and tap on the “Clear Cache” option.
Following the above steps should solve your problem of Google Play Error 495. And you can enjoy back to using the apps which you couldn’t download or update due to the Error 495.
Solution 3: Reset App Preference in Google play Store to Fix error 495
STEP 1:
Go to the settings section in your device. It will be differently placed for different devices and different users.

STEP 2:
Once the Settings section is open. A lot of further sections will pop up. No find the section named “Application Manager” or “Apps”. After locating it, tap on that section.

STEP 3:
Now go ahead and tap or slide to a section named “ALL”.
STEP 4:
After reaching the “ALL” section tap the touch button to open menu/properties and choose an option named “Reset Apps” or “Reset App Preferences”.
There’s no need to be alarmed because on clicking the reset option, the apps won’t be deleted but it is only going to re-set them. And hence solving the Error 495 created in the Google Play.

Solution 4: Fix Error Code 495 by installing a VPN app
The Error code 495 can be easily removed in another interesting way too. On downloading a Virtual Private Network (VPN) and then operating the play store automatically solves the error 495.
STEP 1:
Install Hideman VPN (using any other VPN will also make it work) from Google Play store. (If the error persists for this app too then download it from a different app store or by using a third-party store).
STEP 2:
Now open the app and select the United States as the country of connection and press the option named Connect.
STEP 3:
Open Google Play Store and Download any app without the Error Code 495 coming in and bothering.
This fix will work for most of the Google Play Errors and not just only The Error Code 495.
Solution 5: Remove your Google Account & Reconfigure it to fix error 495
Removing the Google account and re-configuring it is a very common method adopted to get rid of the Error 495. Adopt the following steps to complete this method.
STEP 1:
Go to the “Settings” section of your device. Like it was mentioned before, different devices and different users will have the placement of the settings section in a different place.

STEP 2:
Go to the accounts section in the settings tab.

STEP 3:
In the accounts section tap on the Google Account part
STEP 4:
Inside The Google section, there’ll be an option called “Remove Account”. Tap on that section, to remove your google account.

STEP 5:
Now go ahead and re-enter/ re-register your Google account and check if the Error 495 still persists.
Now you have completed all the steps and your problem should be solved.
Solution 6: Fix error code 495 by Removing your Google Play Store Data & Cache
One of the best and most accurate methods in the series of various steps in eradicating the Error Code 495 in Google Play Store is by removing the Google play Store Data and Cache. In order to do so follow the steps mentioned below. After following the steps it is guaranteed that the Error code 495 will be done with and you won’t experience any such problems in the future.
STEP 1:
Go to the “Settings” section into your mobile device. The settings can be accessed by scrolling down and pulling down the drop-down menu and most likely the settings app will be on the top-right corner. Otherwise, it will be found after opening the app drawer.

STEP 2:
Once after opening the settings section, select the “Installed apps” or the “Apps” section.

STEP 3:
Find the “Google Play Store” section and select that too.
STEP 4:
Tap on the “Clear data” & “Clear Cache”.

Doing the above steps will clear your caches of the Google Play Store. Now you have a new google Play store.
Hence in this article, we got to know about the error 495 and the possible solutions to it as well. Also, this article explains how Error code 495 can be removed by 5 different ways. These are the best ways by which you can remove or get rid of the Error Code 495. In case one of the method fails, use the other one to rectify this recurring error 495 on your Samsung Galaxy F14 5G.
Also read:
- [New] In 2024, Mastering the Art of Navigating Telegram Web Applications
- [Updated] 2024 Approved Clip Groove Best BGM Choices For Today's Popular YT Shorts
- Comprehensive Lamicall Tablet Support Reviews: Prioritizing Practicality and Convenience
- Evaluating the Future of Video Editing with Movavi's Plus 2024
- How to Fix the Soft Bricked Motorola Moto G84 5G? | Dr.fone
- In 2024, Full Guide to Catch 100 IV Pokémon Using a Map On Realme Narzo N55 | Dr.fone
- In 2024, Why Your WhatsApp Live Location is Not Updating and How to Fix on your Tecno Pop 7 Pro | Dr.fone
- Play Store Not Working On Infinix Note 30 5G? 8 Solutions Inside | Dr.fone
- Play Store Stuck on Downloading Of Lava Blaze 2 5G? 7 Ways to Resolve | Dr.fone
- Reliable User Guide to Fix Honor X7b Running Slow and Freezing | Dr.fone
- The Mechanics of Facebook's Feed Algorithm
- Top Trending Stock Images & Behind-the-Scenes Stories
- Unveiling the Features: Detailed Assessment of Kobo Clara Colour
- Title: How to Fix the Soft Bricked Samsung Galaxy F14 5G? | Dr.fone
- Author: Abel
- Created at : 2025-01-27 16:25:23
- Updated at : 2025-01-29 17:12:59
- Link: https://fix-guide.techidaily.com/how-to-fix-the-soft-bricked-samsung-galaxy-f14-5g-drfone-by-drfone-fix-android-problems-fix-android-problems/
- License: This work is licensed under CC BY-NC-SA 4.0.