
How to Fix the Soft Bricked Samsung Galaxy S23 Tactical Edition? | Dr.fone
How to Fix the Soft Bricked Samsung Galaxy S23 Tactical Edition?
Bricked phone is a serious problem, as your brick smartphone could be suffering from a soft brick or hard brick problem, and must be dealt with carefully. It is very common to see a brick smartphone these days. If you are wondering what exactly is a bricked phone, here is your answer.
A bricked phone, hard brick or soft brick, is a smartphone which refuses to start or boot all the way up the home/main screen of the Samsung Galaxy S23 Tactical Edition device. This issue is observed within most Android phones because users have a tendency to tamper with the Samsung Galaxy S23 Tactical Edition device settings, flashing new and customized ROMs and tweaking with the essential files. Playing around with the phone’s internal set-up leads to such errors, worst of them being a brick smartphone. Usually, a bricked phone does not switch on and stays frozen at the Samsung Galaxy S23 Tactical Edition device logo, a blank screen or even worse, doesn’t respond to any command, even the power on command.
If you are confused about the soft brick and hard brick problems and looking for solutions to fix your priced phone, then here is all you need to know.
Read on to find out more.
Part 1: What is the difference between soft brick and hard brick?
To begin with, let us understand the basic difference between a soft brick and hard brick issue. Both versions of a bricked phone prevent it from booting but differ in their causes and gravity of the problem.
A soft-brick problem is caused merely by a software error/crash and makes your device switch on automatically every time you manually turn it off. This phenomenon is referred to as Boot Loop. Soft bricked Android phones are not as difficult to fix as the hard bricked Android phones. It is convenient to say that a soft bricked phone only boots up half-way and not fully, whereas a hard bricked device does not switch on at all. A hard brick error is thus caused when the kernel, which is nothing but an interface for the software to communicate with the hardware, is tampered with. A hard bricked phone is not recognized by your PC when plugged in and is a serious problem. It requires troubleshooting techniques and cannot be easily fixed as the soft brick problem.

Hard bricked phones are a rare sight, but the soft brick is very common. Given below are ways to fix a soft brick Android phone. The techniques listed here are the best and the most efficient ways to get your phone back to its normal working conditions without losing your important data or damaging your device or its software.
Part 2: Stuck at the Boot Loop
This is the first sign of a soft bricked Android phone. Boot Loop is nothing but when your phone does not remain switched off and turns itself on automatically, and freezes at the logo screen or blank screen, every time you manually try to power it off.
Stuck at boot loop problem can be fixed by clearing your Cache partitions. These partitions are nothing but storage locations for your modem, kernels, system files, drivers and built-in Apps data.
It is advisable to clear Cache partitions regularly to keep your phone free from such glitches.
Since the phone refuses to boot, Cache can be cleared from entering into the Recovery Mode. Different Android devices have different ways to put it in recovery mode. Normally pressing the power key and volume down key helps, but you may refer to your phone’s guide for better understanding and then follow the steps given below to clear the cache partition:
Once you are the recovery mode screen, you will see a number of options as shown in the screenshot.

Use the volume down key to scroll down and select ”Wipe cache partition” as shown below.
 >
>
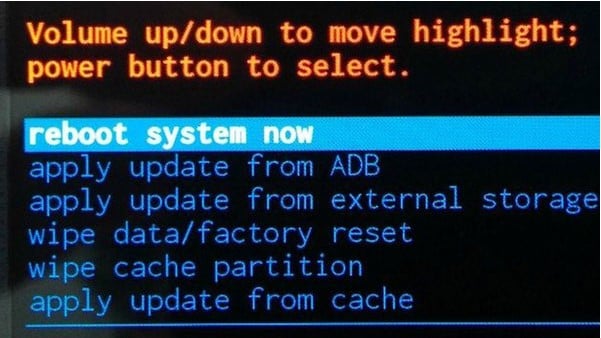
After the process is completed, select “Reboot System” which is the first option in the recovery mode screen.
This method will help you erase all the clogged up and unwanted files. You may loose some App related data, but that is a small price to pay to fix your bricked phone.
If this method does not boot up your brick smartphone and the problem still persists, there are two more things you can try. Read ahead to find out about them.
Part 3: Booting straight into recovery mode
If your bricked phone does not boot up to your Home Screen or Lock screen and instead boots directly into Recovery Mode, there is not much left to do. Booting straight into recovery mode is undoubtedly a soft brick error but it also indicates a possible problem with your current ROM. The only option you have to flash a new ROM to reboot your bricked phone back to its normal functioning.
To flash a new ROM:
Firstly, you must root your phone and unlock the Bootloader. Every phone’s mechanism to unlock the bootloader is different, thus, we suggest to refer to your user manual.
Once the Bootloader is unlocked, take a backup of all your data by selecting “Backup” or “Android” back in recovery mode. The process should not take long and all you need to do is tap “OK” to config backup.

In this step, download a ROM of your choice and store it in your SD Card. Insert the SD Card in your phone to begin the flashing process.
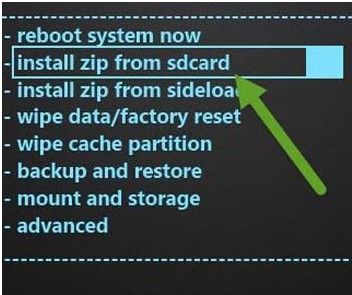
Once at the recovery mode, select “Install Zip from SD Card” from the options.

Scroll down using the volume key and use the power key to select the downloaded ROM.


This might take a few minutes of your time, but once the process is complete, reboot your phone.
Hopefully, your bricked phone will not boot normally and work smoothly.
Part 4: Booting straight into Bootloader
If your bricked phone boots straight into Bootloader, then this a serious issue and must not be taken lightly. Flashing a new ROM or clearing cache partitions are of little help in such a brick smartphone situation. Booting straight into Bootloader is a peculiar soft bricked Android phone feature and can be tackled only by downloading and flashing your original ROM from the manufacturer. In order to do so, a detailed study about your manufacturer’s ROM, ways to download and flash must be carried out. Since different Android phones come with different types of ROMs, it difficult to cover all the aspects about the different types of ROMs.
Brick smartphone problem has become more prominent than phone freezing or hanging issue. Android users are often seen looking for solutions to fix their soft brick and hard brick phones. Android phones are prone to get bricked and thus, it is important for us to know about the three techniques given above. These methods have been tried, tested and recommended by ay affected bricked phone users. Therefore, these tips are reliable and worth a try. So if your phone acts stubborn and refuses to boot normally, examine the problem carefully and adopt one of the solutions given above which best suits your situation.
Ways to Unbrick Your Android Device: Various Ways for Recovery
When your Samsung Galaxy S23 Tactical Edition becomes unresponsive or frozen after mistakenly flashing a ROM or rooting, you are informed that the phone has been bricked. The most terrifying aspect will not just be gadget loss, but also data erasure. However, what exactly is a bricked phone, and, more importantly, how do you fix a bricked Android phone?
This article will explain what a bricked android phone is, why an Android phone becomes bricked, how to unbrick an Android phone without losing data and a third-party application you can use.
Part 1. Causes of Bricked Phones
In everyday settings, our mobile devices have become our greatest friends, therefore breaking your phone is the last thing you want to do. There are different reasons why devices brick, and we must be familiar with them in order to comprehend the various techniques to repair bricked devices.
Here are some common reasons why your Samsung Galaxy S23 Tactical Edition is bricked:
- **Flashing Stock/Custom ROM:**It is possible that you installed an incompatible ROM in the Android phone, that the phone shuts off during the process, or that you have performed other errors that cause your phone to restart indefinitely or to become stuck at the starting screen.
- **Rooting an Android device:**You are unable to effectively root the Samsung Galaxy S23 Tactical Edition device.
- **Android firmware is being updated:**If the phone is interrupted when updating the Android firmware, it will be bricked.
- **Installing harmful applications:**You installed harmful programs on your Samsung Galaxy S23 Tactical Edition, or the phone was infected with a virus.
Part 2. How to Fix a Bricked Phone
The first step is to establish how badly your device is bricked. In most cases, you will be working with soft bricks that are pretty simple to repair. If your phone is stuck in a boot loop or enters recovery mode every time you turn it on, you may have a soft brick.
To repair bricked Android phones and tablets, you must first thoroughly examine the Samsung Galaxy S23 Tactical Edition device’s state. Before you begin troubleshooting, determine the sort of bricking that your phone is experiencing. However, there is no specific software to unbrick your Samsung Galaxy S23 Tactical Edition; you may need to learn the complexities of this issue or hire a professional to do it for you.
 safe & secure
Here are some simple methods for repairing bricked Android devices:
Method 1. Reboot the Phone in Safe Mode
Trying to reboot your android device in safe mode is the first and easiest thing you should try if your phone is bricked. Here’s how to do it:
- Step 1: Turn off your smartphone and press the Volume Up + Power button to enter recovery mode. Then, using the volume controls, navigate the menu and select Reboot system now.
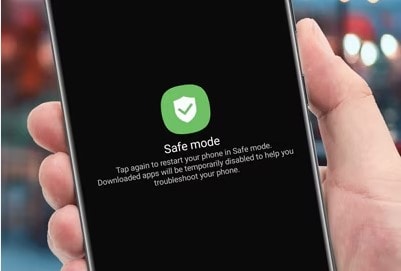
- Step 2: Select the highlighted option by pressing the Power button. After that, wait for your device to reset normally.
- Note: The steps for booting into recovery mode may change based on the manufacturer of your device. For further information, go to the user manual for your phone or tablet.
Method 2. Wipe the Cache Partition
This is the first indication that a user’s phone has gone bricked. The phone turned on automatically, however it became stuck or frozen on the logo screen. The issue might be caused by the undeleting of data and cache, which prevents the phone from displaying the home screen.
This issue, however, may be resolved by wiping the data and cache partitions in recovery mode. You must do the following to do this:
- Step 1: Turn off your smartphone and enter recovery mode by pressing the Power and Volume Down buttons simultaneously. Different devices have various approaches for entering recovery mode, so you may perform better.
- Step 2: After entering recovery mode, you should see the screen below. Remember to pick Advanced and then “Wipe Dalvik Cache” if your device is under Clockwork Mod recovery. Return to the main screen and select “Wipe Cache Partition” once more.
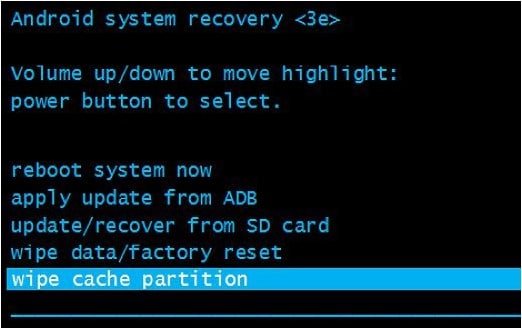
- Step 3: Finally, on your smartphone, choose the Reboot system immediately.
Method 3. Perform a Factory Reset
A factory reset can undo the alterations made to your device that resulted in the brick phone, but you will lose everything you have downloaded and installed in the process. Here’s how to restore a bricked Android phone to factory settings:
- Step 1: Boot your device into recovery mode (turn off your device, then press power button + volume up button).
- Step 2: Select “Wipe Data/“Factory Reset” then confirm the action. When the process is done, you’ll be returned to the recovery mode menu.
- Step 3: Select “Reboot System Now” to restart your device.
Method 4. Flash a Custom ROM
If you boot your phone directly into recovery mode, there’s a problem with the ROM you loaded. Then simply flash the following custom ROM on your phone:
- Step 1: Save the required ROM (in ZIP format) to an SD card. The SD card should then be inserted into your Samsung Galaxy S23 Tactical Edition.
- Step 2: Click the “Install zip from sdcard” button. Then, select the ZIP file that contains the ROM. Finally, click the “reboot system now” button.
Method 5. Using Wondershare Dr.Fone
Wondershare Dr.Fone - Data Recovery is the first data recovery solution for any damaged Android smartphone in the globe. It offers one of the greatest recovery rates and can recover a variety of information like images, videos, contacts, messages, and call logs. The program is most effective with Samsung Galaxy S23 Tactical Edition smartphones.
While it is not an Android unbrick tool, it is a useful tool for retrieving data when your Samsung Galaxy S23 Tactical Edition becomes bricked. It is quite easy to use:
- Step 1: Launch Wondershare Dr.Fone and select “Data Recovery” > “Recover Android Data” from the menu. Then, select “****Recover from Broken Phone”.

- Step 2: Choose the file types you wish to recover. Click “Next” and then select the type of damage your phone is experiencing. Select “Touch screen not responsive, or cannot access the phone” or “Black/broken screen”.

- Step 3: Use the recovery wizard to enter your Android smartphone into Download Mode. Connect your Android handset to the computer after following the instructions to begin automatically analyzing your device.

- Step 4: The program will provide a list of all recoverable files, organized by file type. To preview the file, highlight it. Choose the files you wish to recover and then click “Recover” to save all the data you want to restore.

 safe & secure
Part 3. How to Prevent Bricking Your Phone
How to prevent a device from “bricking” itself and how to repair it if it does The delay is set by the MCU, but it should be long enough to allow the debug adapter to connect to the Samsung Galaxy S23 Tactical Edition device and halt it before the Samsung Galaxy S23 Tactical Edition device disables itself.
Here are some things to remember to prevent your device from bricking:
- Avoiding unofficial firmware updates: Installing unapproved OS firmware on your phone will most certainly violate any manufacturer’s warranty you have on it. Read the installation instructions for your unique phone model thoroughly and then carefully follow them, taking time and patience.
- **Being cautious when rooting or jail breaking:**Rooting and Jail breaking disables parts of the operating system’s built-in security mechanisms, which are part of what makes the operating system safe, and your data protected from exposure or damage.
- **Install an antivirus application on your device:**Mobile devices increase the danger of data leaks and breaches. As a result, antiviral software is beneficial on mobile phones. Mobile Device Management is an excellent choice for virus protection on your mobile device.
- Backup your phone data regularly: Backing up your phone safeguards your data in the event that you lose it, it is stolen, or it no longer works. When it comes time to replace your phone, having a backup makes it simple to restore your data to the new device. Furthermore, backing up your phone allows you to organize your data so that it is easier to access.
- Avoid installing apps from untrusted sources: Apps installed from unauthorized sources make your device and personal data more exposed to dangers such as Ransomware. So you should be wary of where you download applications.
Conclusion
It is certainly upsetting when your gadget bricks, but you may attempt the solutions listed above to resolve the issue. Meanwhile, if you want to solve the problem quickly and easily, you can try Wondershare Dr.Fone. It can not only help you repair your Android smartphone, but it can also help you extract data from a bricked device, recover data, and many more Android device solutions!
safe & secure
7 Solutions to Fix Error Code 963 on Google Play Of Samsung Galaxy S23 Tactical Edition
People are increasingly complaining about Google Play Error Codes which pop-up during downloading, installing or updating an App via Google Play Store. Amongst these, the most recent and common one being Error Code 963.
Google Play Error 963 is a typical error which shows up not only when you try to download and install an App but also during App update.
Error 963 cannot be attributed to a particular App or its update. It is a Google Play Store error and is experienced by Android users across the world.
Error Code 963, just like any other Google Play Store errors, is not something difficult to deal with. It’s a minor glitch which can be fixed easily. There is no need to worry or panic if you see Error 963 on Google Play Store preventing your favorite App from downloading or updating.
Read on to find out more about the Google Play Error 963 and best ways to fix it.
Part 1: What is Error Code 963?
Error 963 is a common Google Play Store error which basically hinders Apps from downloading and updating. Many people get worried when Error Code 963 does not let them install new Apps or update existing ones. However, please understand that Google Play Error is not such a big deal as it may sound and can be overcome easily.
Error 963 pop-up message reads as follows: “cannot be downloaded due to an error (963)” as shown in the image below.

A similar message shows up even while you are trying to update an App, as shown in the screenshot below.

Error Code 963 is basically an outcome of data crash which mostly is seen in cheaper smartphones. There might another reason for Error 963 preventing Apps from downloading and updating, which is Google Play Store Cache being corrupted. People also speculate SD Card related issues as many-a-times external memory enhancer chips do not support large Apps and their updates. Also, Error 963 is very common with HTC M8 and HTC M9 smartphones.
All these reasons and more can handle with ease and you can continue to use Google play services smoothly. In the following segment, we will discuss various fixes to cure the problem to enable to you download, install and update Apps on your device normally.
Part 2: Easiest solution to fix Error Code 963 on Android
When it comes to the most convenient solution to fix error 963, Dr.Fone - System Repair (Android) cannot be missed. It is the most productive program that covers a wide range of Android issues. It ensures full safety while performing and one can fix the Android issues in a hassle-free way.
Dr.Fone - System Repair (Android)
One click to fix Google Play error 963
- The tool is recommended for its higher success rate.
- Not just Google Play error 963, it can fix a large number of system issues including app crashing, black/white screen etc.
- It’s considered as the first tool that offers one-click operation for Android repairing.
- There’s no technical expertise needed to use this tool.
4,997,014 people have downloaded it
This section will provide you the tutorial guide for how to fix error code 963.
Note: Before moving to solve the error 963, we would like to inform you that the process may result in wiping away your data. And therefore, we suggest you to make backup of your Samsung Galaxy S23 Tactical Edition prior to fixing this Google Play error 963.
Phase 1: Connecting and preparing the Samsung Galaxy S23 Tactical Edition device
Step 1 – To begin fixing error 963, run Dr.Fone after downloading and installing it on your PC. Now, pick out the ‘System Repair’ tab from the main screen. Thereupon, with the help of a USB cable, make connection between your Samsung Galaxy S23 Tactical Edition and PC

Step 2 – On the left panel, you’re supposed to choose ‘Android Repair’ and then click the ‘Start’ button.

Step 3 – On the following screen, you need to choose the appropriate details for your device like the name, brand, model, country/region etc. Later, go for warning confirmation and hit ‘Next’.

Phase 2: Taking Android device in Download mode for repairing
Step 1 – It is essential to get your Samsung Galaxy S23 Tactical Edition or tablet entered in Download mode. For this, following are the steps to be taken:
If the Samsung Galaxy S23 Tactical Edition device contains Home button:
- Turn the Samsung Galaxy S23 Tactical Edition device off and then keep holding the ‘Power’, ‘Volume Down’ and ‘Home’ buttons altogether for about 10 seconds. Next, release them all and push the ‘Volume Up’ key. This way, your device will enter the Download mode.

If the Samsung Galaxy S23 Tactical Edition device contains no Home button:
- Switch off your phone/tablet and press the ‘Volume Down’, ‘Bixby’ and ‘Power’ buttons for 10 seconds. Leave the buttons and then press the ‘Volume Up’ button for entering download mode.

Step 2 – Press the ‘Next’ button and then the program will commence the firmware downloading.

Step 3 – Upon successful downloading and verification of the firmware, the process of Android device repairing will begin automatically.

Step 4 – Within a while, the Google play error 963 will be vanished.

Part 3: 6 Common Solutions to fix Error Code 963

Since there is no specific reason for Error Code 963 to occur, similarly there is no one solution to the problem. You may use any one of them below or try them all to never see Error Code 963 on your device.
1. Clear Play Store Cache and Play Store Data
Clearing Google Play Store Cache and Data basically means keeping Google Play Store clean and free from trouble-making data stored in respect of it. It is advisable to carry out this process regularly to prevent Errors like Error Code 963 from occurring.
Follow the steps given below to fix Error Code 963:
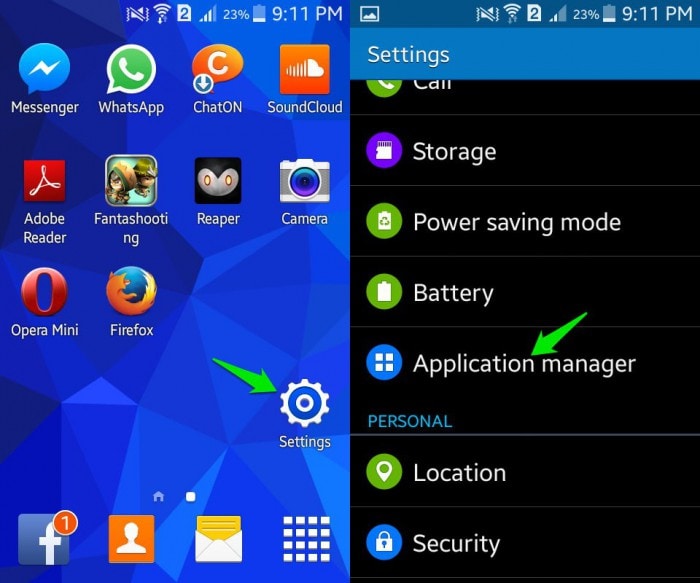
Visit “Settings” and select “Application Manager”.

Now select “All” to see all downloaded and built-in Apps on your device.
Select “Google Play Store” and from the options that appear, tap on “Clear Cache” and “Clear Data”.

Once you are done clearing Google Play Store Cache and Data, try to download, install or update the App facing Google Play Error 963 again.
2. Uninstall updates for Play Store
Uninstalling Google Play Store updates is an easy and quick task. This method is known to have helped many as it brings back the Play Store to its original state, free from all updates.
Visit “Settings” and select “Application Manager”.
Now select “Google Play Store” from “All” Apps.

In this step, click on “Uninstall Updates” as shown below.

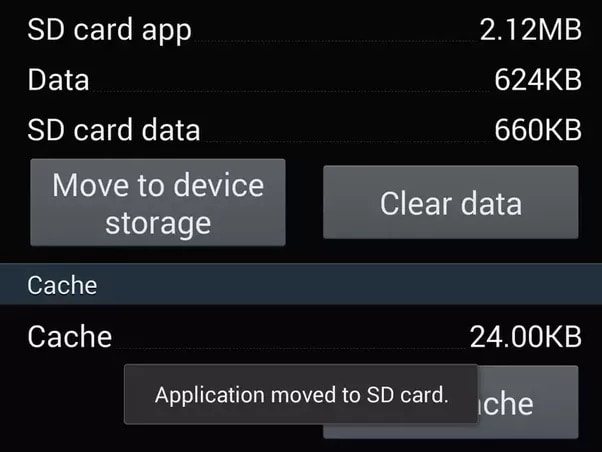
3. Shift the App from SD Card to device’s memory
This method is strictly for certain Apps which cannot be updated because they are stored on an external memory card, i.e., SD Card. Such memory enhancing chips do not support large Apps and due to a shortage of space prevents them from updating. It advisable to move such Apps from the SD Card to the Samsung Galaxy S23 Tactical Edition device’s internal memory and then try to update it.
Visit “Settings” and select “Apps”.

From “All” Apps click on the App which is unable to update.
Now click on “Move to Phone” or “Move to internal storage” and try to download its update again from the Google Play Store.
Try updating the App now. If the Apps’s update does not download even now, DO NOT worry. There are three more ways to help you.
4. Unmount your external Memory Card
Error Code963 may also occur due to an external memory chip used in your device to enhance its storage capacity. This is very common and can be dealt with by unmounting the SD Card temporarily.
To unmount your SD Card:
Visit “Settings” and keep scrolling downwards.
Now select “Storage”.
From the options that appear, select “Unmount SD Card” as explained in the screenshot below.

Note: If the App or its update downloads successfully now, do not forget to mount the SD Card back.
5. Remove and Re-add your Google account
Deleting and re-adding your Google account in might sound a little tedious but it does not take much of your precious time. Moreover, this technique is very effective when it comes to fixing Error Code 963.
Carefully follow the steps given below to remove and then re-add your Google account:
Visit “Settings”, under “Accounts” select “Google”.
Select your account and from the “Menu” select “Remove account” as shown below.

Once your account is removed, follow the steps given hereunder to add it back again after a few minutes:
Go back to “Accounts” and select “Add Account”.

Select “Google” as shown above.
In this step feed in your account details and your Google account will be configured once again.
6. Special technique for HTC users
This technique is specially crafted fro HTC smartphone users who frequently face Google Play Error 963.
Follow the step-by-step instructions given below to uninstall all updates for your HTC One M8 Lock Screen App:
Visit “Settings” and find “HTC Lock Screen” under “Apps”.
Now click on “Force Stop”.
In this step, Click on “Uninstall Updates”.
This remedy is as simple as it sounds and has helped many HTC users to get rid of Error 963.
Google Play Errors are a very common phenomenon these days, especially Error Code 963 which usually occurs in the Google Play Store when we try to download, install or update an App. There is no need to worry if you see Error Code 963 pop-up on your screen as your device and its software are not to be blamed for Error 963 to suddenly surface. It is a random error and can be fixed easily by you. You do not need any technical assistance to deal with the issue. All you need to do is follow the steps introduced in this article to use Google Play Store and its services smoothly.
Also read:
- [Updated] In 2024, Crafting Quality Content Image Submission for YouTubers
- Fix Cant Take Screenshot Due to Security Policy on Oppo A56s 5G | Dr.fone
- How to Fix Unfortunately, Contacts Has Stopped Error on Huawei P60 | Dr.fone
- In 2024, Tips of Transferring Messages from Itel S23+ to iPhone 14/15 | Dr.fone
- Lava Yuva 3 Pro Screen Unresponsive? Heres How to Fix It | Dr.fone
- OnePlus 11R Screen Unresponsive? Heres How to Fix It | Dr.fone
- Quick Fixes for Why Is My Lava Yuva 3 Pro Black and White | Dr.fone
- Tips for Writing Irresistible Podcast Intros for 2024
- Why Your WhatsApp Live Location is Not Updating and How to Fix on your Samsung Galaxy F14 5G | Dr.fone
- Title: How to Fix the Soft Bricked Samsung Galaxy S23 Tactical Edition? | Dr.fone
- Author: Abel
- Created at : 2025-01-24 01:38:52
- Updated at : 2025-01-29 16:17:56
- Link: https://fix-guide.techidaily.com/how-to-fix-the-soft-bricked-samsung-galaxy-s23-tactical-edition-drfone-by-drfone-fix-android-problems-fix-android-problems/
- License: This work is licensed under CC BY-NC-SA 4.0.