
How to Fix Unfortunately, Contacts Has Stopped Error on Nokia 105 Classic | Dr.fone
How to Fix Unfortunately, Contacts Has Stopped Error on Nokia 105 Classic
Have you recently noticed a message stating “Contacts has stopped”? This is enough to take away all your peace. As, our native contacts app stashes all our useful contacts which are time and again needed by a user. It’s malfunctioning is enough to give us chills. But, why the Nokia 105 Classic or any other Android device incurs such problems?
It can occur while you launch the app or while you’re in the app already finding the required contact or when any other application is trying to gain access to it. So, to rage a battle with this issue, you need to seek help of some powerful methods in killing down the issue of contacts app crashes. And, the best part is that you’ve secured yourself by reaching the right place. We will be taking an in-depth discussion on several methods that may prove to be helpful. Let’s read them up here now.
Part 1: Get Android system fixed in one click
We’re always in search of a method that provides handy solution in a quite speedy and hassle-free manner. There are hundreds of tips and tricks for the same. You never know the possibility of firmware being the major drawback. No amount of manual methods can beat the performance of Dr.Fone - System Repair (Android).It is capable of providing 100% solution to any kind of issues, your phone gets troubled with. It is designed with the technology of combating the problem of black screen of death, app crashes and several other issues. In just a single-click, ward off the issue and free your device with errors
Dr.Fone - System Repair (Android)
Fix Contacts app crashing on Android in one click
- Incorporates with 1-click technology to resolve any issues occurring in your Nokia 105 Classic. Black screen of death, app crash, system crash, faulty issues etc.
- fone – Repair (Android) interface is extremely simple for users and lays functionalities aptly.
- One of its kind software with highest success rate in the market.
- Fully compatible with all kinds of Android phones, models, as well as the popular carrier.
- It provides users with 24 hours customer care service to resolve queries.
3,016,434 people have downloaded it
In this tutorial, we will learn the methodology of addressing the contacts keep stopping problem and gain triumph over it.
Step 1: Load program and draw connection of device
Download Dr.Fone - System Repair (Android) on PC. While program installs, use USB cable to connect device with system. From interface, tap on “System Repair” main window.

Step 2: Opt for Android Repair option
You’ll be directed to the “System Repair” screen where you have to opt for “Android Repair” options appearing over the left panel of the program. After that, do not forget to press “Start”.

Step 3: Key in device information
From following screen, fill the fields of “Brand”, “Name”, “Model”, “Country” and several other parameters. Then, tap on “Next” option to proceed further.

Step 4: Download Firmware package
Just follow the on-screen steps for booting your Nokia 105 Classic into download mode. Then, hit the “Next” button to proceed with downloading the most suitable firmware package for your Nokia 105 Classic.

Step 5: Repair Android phone
Once the software downloads, the program will automatically repair any issues irking over your phone. Now, your phone is all free from contacts error.

Part 2: 9 Common ways to fix “Unfortunately, Contacts Has Stopped”
2.1 Restart Android system
Our response to any minuscule issue is straightaway restarting phone. This helps in clearing out any problem that might have disrupt the functioning of phone. So, to fix the problem of “Contacts app won’t open”, you too can try out your hand in this method.
- Get hold of your Android system and long press the power button.
- This will fadeout the main screen and showcase several options from where you’ve to tap on “Reboot/Restart” mode.
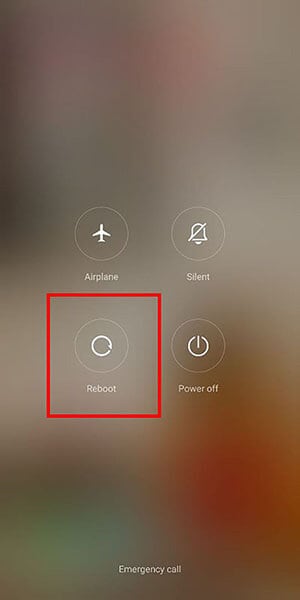
Now, your device will quickly reboot the Nokia 105 Classic device. Once, the Nokia 105 Classic device regains its normal state, check whether the issue is coming again or not.
2.2 Clear cache and data of Contacts app
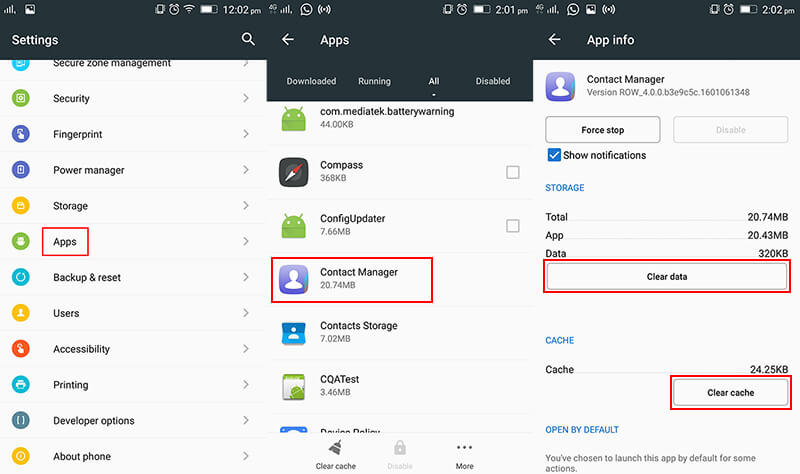
The cache memory basically stashes the copies of the concerned application. It is indeed a streak of copies of the desired app storing information and incurring additional space on the storage. This might be the reason why the contact app crashes rapidly on your Nokia 105 Classic. Hence, it can prove to be a good remedy for this problem. Just follow down the steps mentioned below-
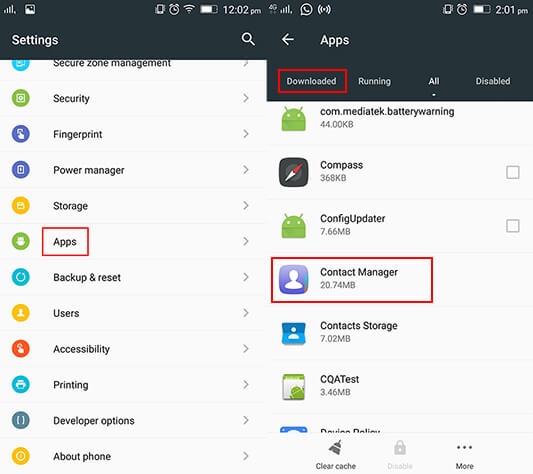
- First of all, go to “Settings” application from the app drawer or from the notification panel.
- Now, surf and select for “Applications” or “Apps & notifications”.
- Here, you need to browse for “Contacts” app and open it.
- On “Contacts” app, just tap on “CLEAR CACHE” and “CLEAR DATA” button. This will prompt the cache memory to be cleared.
2.3 Wipe cache partition
As we know the cache memories are the temporary files build by the firmware. These are of little importance as they are bound to become a bit more corrupted in nature. And sometimes, may indirectly become a hurdle for the working of contacts app. It is good if the Nokia 105 Classic device is cleared off from the caches. Instead of manually wiping down the cache memory, we will understand how to clear off the cache partition in the following steps.
- From device, just power off your device. Then, press the “Volume Down + Power” button with “Home” combinations together.
- In a moment’s time, lose fingers from the “Power” button but do not release fingers from “Volume Down” and “Home” buttons.
- Once you view the “Android System Recovery” screen, just lose the “Volume Down” and “Home” buttons.
- Over the options available, just opt for “wipe cache partition” by tapping the “Volume down” button until the desired option is highlighted.
- Finally, push the “Power” key to give consent to the selection.

- After, the process is through there will be an option for “Reboot System Now”. Tap on it and restart the Nokia 105 Classic device.
2.4 Disable Google+ app
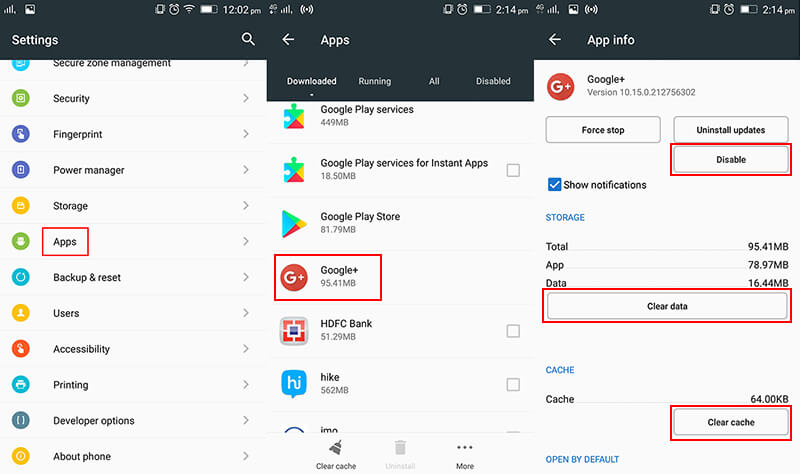
The root cause for detecting any problem is not very easy. You never know the overloading of Google + application might have directly impacted contacts app crashes. To resolve it, disabling it may prove to be a helpful solution. Here is the quick reference for disabling Google+ application.
- First of all, visit “Settings” from your Nokia 105 Classic.
- In “Settings”, visit the “Application Manager” or “Applications” menu and browse for “Google +” app.
- From the application main page, you can choose to do either of the methods:
- Either, completely disable the application to work by pressing on “Force stop” or “Disable” feature.
- Or, brush away the unnecessary cache piled up on your storage by using “Clear Cache” functionality.
There will be a prompt stating that the application may misbehave. However, you must disable the feature and check whether it worked out for you or not.
2.5 Update your device software
Many a times, we skip updating our device software thinking it is of less importance. In fact, one must not miss out the updates that occurs in phone. As, without the updates, the scope of some applications are affected to some extent. For its better functioning and avoiding issues like “contacts keep stopping”, here is how you should update device software.
- First and foremost, head on to “Settings” menu. Over there, click on “About Device”.
- There, you need to tap over “Software Update”.
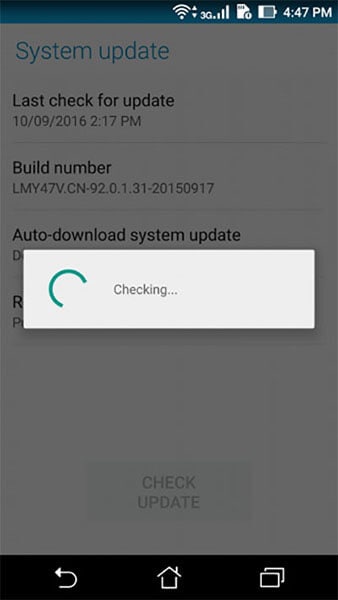
The device will now check whether there are any updates available for your device. If yes, then update application right away.
2.6 Reset App Preferences
As stated, the malfunctioning of contacts can be due to be any unexpected reason. Hence, users can opt for resetting app preferences. This may prove to be helpful in brushing away the issue of “Contacts app won’t open”.
- Launch “Settings” app and surf for “Apps” or “Applications” option on your Nokia 105 Classic.
- Just, tap over the three dots appearing at the upper right section and then tap on “Reset app preferences”.
- At last, just select “Reset default apps”.

2.7 Delete voicemail
Do you happen to exchange voicemails quite often? It can trigger to be the reason for contact app crashes. If your device happens to have a bulk of voicemails, you must get rid of them sooner or later. As, these might standout to be the prime reason for contacts stopping on Nokia 105 Classic. If you’re unaware about the procedure of removing all kinds of voicemails, you can proceed to make use of the following steps.
- Start with, launching the “Google Voice” app.
- From there, duly opt for “Voicemail”.
- Just click on the press menu option and at last select “Delete” option.
2.8 Uninstall the downloaded apps
Some applications contain some unwanted advertisements and some elements of malware. This can be enough for disrupting the functionality of the built-in contact app won’t open. It is crucial for your phone to be detoxed from such elements. You need to manually scrap off such applications. Do, ensure to download the application from the genuine source for future use.
- On your Nokia 105 Classic, just go to “Home” screen and tap on “Apps” icon.
- Then, tap on “Settings” icon followed by going to “Applications” or “Apps & Preferences” menu.
- After that, tap on “Menu icon” which will showcase the apps installed on device.
- Simply, open the app and hit the “Uninstall” button to brush away that app. Repeat the same with other application(s).
Now, check whether you’ve fought the battle with the problem or not.
2.9 Reset to Factory Settings
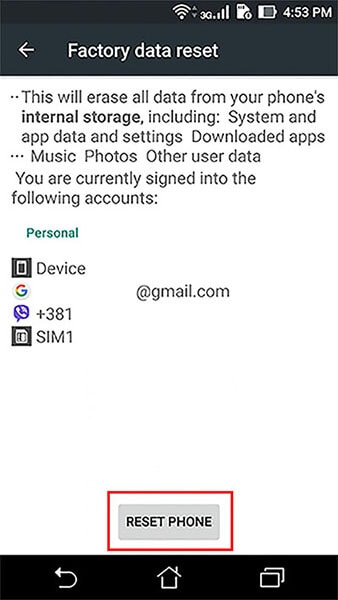
Last but not least, if all the methods falls flat to resolve the issue of contacts app won’t open. Then, it might be your device has some internal problem. This can be any software crash which might not be fixing with the aforementioned steps. That is where reset to factory settings may prove to be a good option. With this method, your phone will be cleared of all the components, settings and everything present in it. Here are is the comprehensive tutorial for biding bye to the problem of contacts app won’t open.
Note: Do ensure to take a backup of all the data available in your device. As, we don’t want you to regret afterwards.
- Just go to “Settings” and surf and select “Backup & Reset” option.
- You need to toggle on the option for performing the backup on your Google account.
- Then, tap on “Reset” button and then tick mark the option for resetting your phone.
Quick Fixes for Why Is My Nokia 105 Classic Black and White
Why is My Nokia 105 Classic in black and white? This sudden shift in display colors can be perplexing and impact user experience. This issue affects various devices, including Nokia 105 Classic and other Android models. The abrupt shift to monochrome can impact your daily use. It can make apps and content appear dull.
If you’re asking why is my Android phone in black and white, then you’re in luck. Dive into the article below to unravel the causes behind your phone’s black-and-white display. Discover insights on addressing this unexpected issue, enhancing your overall mobile experience.

Part 1. Phone Screen in Black and White? Easy Fixes for Android Devices
Discovering your Nokia 105 Classic going monochrome can be annoying. The section below answers the question: why did my Nokia 105 Classic phone go black and white? It involves a combination of software adjustments and careful troubleshooting. Follow the practical solutions below to restore vibrant colors to your device.

Accessibility Settings
Accidental activation of accessibility settings may turn your display monochromatic. The “Grayscale“ or “Color Inversion“ option in the Accessibility or Vision section of your phone’s settings might be enabled. It can cause a black-and-white display. Here’s the solution:
- Step 1: Open your phone’s settings. Navigate to the Accessibility or Vision section.

- Step 2: Disable the Grayscale or Color Inversion option.
App Conflicts
Certain third-party apps can cause conflicts, leading to a black-and-white display . Newly installed apps might be the culprit, affecting your device’s color settings. Some apps also have grayscale modes that can impact the overall display. Here’s how to fix it:
- Step 1: Identify and uninstall recently installed apps.
- Step 2: Check individual app settings for grayscale modes.
System Glitches
System glitches or software bugs can trigger display issues. It can result in a black-and-white screen. Outdated software versions may contain bugs affecting color output as well. Regularly checking for software updates can prevent or resolve such glitches. Here’s how.
- Step 1: Go to your phone’s settings. Check for software updates in the Software update or System update section.

- Step 2: Update your device if there is a software update available. Ensure your device is running the latest software version.
Battery Saving Modes
Battery-saving modes can also alter display settings to conserve energy. It can sometimes result in a black-and-white screen. These modes limit power consumption by reducing color output. Reviewing and adjusting these settings can restore the normal color display. Follow the steps below.
- Step 1: Open your Nokia 105 Classic’s Settings. Navigate to the Battery or Battery & Performance section.

- Step 2: Check and adjust battery-saving settings, including toggling power-saving modes on or off.
Hardware Issues
In rare cases, hardware issues may cause a black-and-white display. Physical damage, loose connectors, or problems with the display hardware can impact color reproduction. Identifying and addressing these hardware issues may be crucial for resolving the problem. Here’s what you should do.
- Step 1: Check for physical damage, loose connectors, or display hardware issues.

- Step 2: Seek professional assistance or contact the Nokia 105 Classic device manufacturer if hardware problems are suspected.
Consider a reliable third-party tool if your phone persists in black and white despite troubleshooting attempts. Tools such as Dr.Fone System Repair Android offer advanced solutions for complex system issues. They ensure your phone regains its vibrant display without a hitch.
Part 2. Using a Dedicated Tool: Dr.Fone for Fixing Black and White Display Problems
Dr.Fone is a reliable solution for addressing black-and-white display issues on Android devices. For a stress-free repair experience, follow these simple steps using Dr.Fone - System Repair (Android).
![]()
Dr.Fone - System Repair (Android)
Repair Android System Errors without Any Trouble.
- Fix your Android to normal, no skills required.
- Fix various Android system issues, stuck in boot loop , black screen , or won’t turn on , looping on start, etc.
- The high success rate in resolving Android system issues.
- Compatible with a wide range of Android devices and OS versions
- User-friendly interface with easy-to-follow steps.
3981454 people have downloaded it
- Step 1: Download and install Dr.Fone. Launch the program and click on System Repair on the main window. Connect your Nokia 105 Classic to the computer using the correct cable. Choose Android among the options.
 safe & secure
3,601,336 people have downloaded it
- Step 2: Provide accurate device information, including brand, name, model, country/region, and carrier details. Confirm the warning and click Next.
- Step 3: Follow the on-screen instructions and wait for the program to download the firmware. Once downloaded and verified, Dr.Fone automatically initiates the repair process on your Nokia 105 Classic.
- Step 4: After a while, your Nokia 105 Classic will have all system issues fixed. Click Done to complete the process or choose Try again if the problem persists, allowing you to repeat the steps.
Note
It’s highly recommended to back up your Android data before using Dr.Fone for repair.
How Dr.Fone Can Help You Beyond Display Issues
Beyond resolving black-and-white display problems, Dr.Fone serves as a comprehensive tool for all Android issues. The platform can enhance your device functionality.
Key Features
Here are key features that make Dr.Fone an invaluable resource:
- Fix All Kinds of Android Problems
Dr.Fone is designed to address a wide range of Android issues. These include black screens, malfunctioning Play Store, app crashes, boot loops , and bricked Android devices . Its versatility makes it a go-to solution for diverse system challenges.
- Wide Device Compatibility
With support for over 1000 Android models, Dr.Fone ensures compatibility with a vast array of devices. The platform is versatile and a widely applicable tool for Android users.
- High Success Rate
Dr.Fone boasts a high success rate in resolving Android issues. It provides users with confidence in its effectiveness and reliability.
Additional Functionalities
Below are additional functionalities of Dr.Fone that support your device to keep it in top shape.
- **Phone Manager.**Fone acts as a comprehensive phone manager. It allows you to transfer contacts, SMS, photos, videos, and more between your Nokia 105 Classic and computer. The feature simplifies data management and ensures seamless organization.
- Phone Backup. The tool enables selective backup of Android data on a computer. It provides you with the flexibility to safeguard essential information. The selective backup feature ensures efficient use of storage and allows for easy restoration when needed.
- **Screen Unlock Without Losing Data.**Fone offers a secure way to unlock the screen of Android devices without losing data. You can regain access to your devices without compromising valuable data, whether due to forgotten passwords, pattern locks, or PINs.
Part 3. Tips for Maintaining Your Phone Display Brilliance
Maintaining a vibrant phone display enhances user experience and ensures optimal visual clarity. Follow these tips to keep your phone’s display at its best:

Adjust Brightness Mindfully
Optimize brightness settings based on ambient lighting. Avoid excessively high brightness levels, which can strain your eyes and impact battery life.
- Update Regularly
Keep your phone’s software up-to-date to benefit from performance enhancements, bug fixes, and display optimizations provided by system updates.
- Be Mindful of Background Apps
Close unused background apps to free up system resources and prevent unnecessary strain on your phone’s display and overall performance.
- Use Static Wallpapers
Dynamic wallpapers and live backgrounds consume more power. Opt for static wallpapers to reduce battery drain and maintain consistent display performance.
- Avoid Extreme Temperatures
Exposure to extreme hot and cold temperatures can affect your phone’s display and overall performance. Store your device in a moderate environment.
- Implement Screen Timeout
Set a screen timeout to turn off the display when not in use automatically. This conserves battery life and prevents unnecessary wear on the screen.
- Clean Your Screen Regularly
Fingerprints, dust, and smudges can affect display clarity. Clean your screen regularly with a microfiber cloth to ensure a crisp and vibrant view.
- Secure Your Phone
Implement security measures to prevent unauthorized access. This protects your data and ensures the display remains secure and untouched.
- Enable Night Mode
Many phones offer a night mode that reduces blue light emission. It promotes better sleep and reduces eye strain, especially during nighttime use.
- Implement App-Specific Settings
Some apps have specific display settings. Explore and adjust these settings within individual apps to enhance your visual experience and reduce strain.
Conclusion
The guide highlights the “Why is My Nokia 105 Classic black and white“ query. It offers practical solutions for Android and Nokia 105 Classic users. By addressing common issues such as accessibility settings, app conflicts, and system glitches, you can restore their vibrant displays. Maintaining your phone display involves mindful practices, from adjusting brightness to regular updates.
The guide provided solutions for display issues and showcased the versatility of Dr.Fone System Repair Android. It’s a holistic solution for users seeking a seamless and reliable Android experience, addressing diverse concerns with precision and efficiency.
How to Fix Android App Not Installed Error on Nokia 105 Classic Quickly?
App not installed on Android is no more an unknown Error Code during Application installation as many people experience it on a day-to-day basis. An “Application not installed” error message usually pops up when you are trying to download and install an App with a .apk file extension from somewhere other than the Google Play Store. The error is very confusing at first but makes sense when you realize that this unknown Error Code during Application installation is neither a software issue nor a hardware problem. It is a direct outcome of what you do with your device. Yes, you heard that right. Your faulty actions can cause Android App not installed error.
What to do when trying to install the Android APK it says “app not installed”? It is terrible that you can’t install App on your device. But in this article, you will know more about the causes behind this error and the best ways to fix it, read on, here is all you need to know.
Part 1: Common reasons for the “Android App not installed” error
You may ask: Why can’t I download apps on my Nokia 105 Classic? Understanding the underlying causes of the “Android App Not Installed” error is crucial for resolving the issue effectively. So, what are the reasons for Android App not installed error? Given below are a few reasons:
1. Insufficient storage
Android software and if data such as photos, videos, music, messages, apps, contacts, emails, etc are stored in the internal memory there is not adequate storage left for another App, leading to Android App not installed error.
2. Corrupted/Contaminated App file
When you do not download Apps from the Play Store and choose another platform to do so, App files are usually corrupted and hence cannot be installed on your device smoothly. You should be doubly sure of the source from where you download an App, check its extension name, and make an effort not to install contained files.
3. SD Card not mounted in the Nokia 105 Classic device
At times your phone could be connected to your PC or another electronic device that can access the SD Card from your device. In such situations when you install an App and choose to save it to your SD Card, you will see Android App not installed error because the App cannot find the SD card as it is not mounted in your device.
4. Storage location
You must be aware that certain Apps work their best when stored in the Nokia 105 Classic device’s internal memory, whereas others need to be located on an SD Card. If you do not save the App in an appropriate location, you will find that the App isn’t installed because of an unknown Error Code.
5. Corrupt storage
Corrupted storage, especially a corrupted SD Card, is known to cause the Android App isn’t installed error. Even the internal storage can get clogged due to unnecessary and unwanted data, some of which might contain an element that disturbs the storage location. Take this issue seriously as a corrupted SD Card and even clogged up internal memory can put your device in danger.
6. Application Permission
Software operations running in the background and App Permission are not new concepts. Such errors can also cause the Unknown Error Code during App installation.
7. Incorrect file
If you already have an App installed but download another variant of it having a distinct signed or unsigned certificate can also make the Android App not installed error pop-up. This sounds technical, but this and all the other reasons listed above can be tackled by you.
The Unknown Error Code during Application installation can occur due to any one or more of the reasons stated above. So read them carefully and understand them well to avoid such glitches in the future.

Part 2: One-click to fix App not installed on Android error
So App not installed on your Nokia 105 Classic or tablet? The most horrible part is that this issue may come out of the corruption in the system files. In this situation, Android apps won’t be installed no matter what measures you take. Android system repair is the only effective solution to deal with this issue.
Android system repair used to require high technical skills. But most of the users know little about technical things. Well, worry not  allows you to repair Android easily, that is, complete the fix with just one click.
Dr.Fone - System Repair (Android)
A powerful tool to fix the “Android App not installed” error in one click
- Fix all Android system issues like Android App not being installed, the system UI not working, etc.
- One-click to fix Android App not installed. No technical skills are required.
- Support all the new Nokia 105 Classic devices, etc.
- On-screen instructions are provided to prevent any misoperation.
3981454 people have downloaded it
Note: Getting your Android system repaired may erase the existing device data. It is recommended that you should back up your Android data before starting the Android repair.
The following steps illustrate how to fix the “Android App not installed” error in one click:
- Install Dr.Fone on your Windows. After that, launch it, and click “System Repair”. Connect your Android to the computer.
- Select the “Android” option and click “Start”.
- Select device information, such as brand, name, model, country, etc., from each field, and type “Next”.
- Follow the on-screen instructions to boot your Android in download mode, and allow the tool to download the firmware to your device.

- After the firmware is downloaded, the tool will start to repair your Android, hereby fixing the “Android App not installed” error.

 safe & secure
Part 3: How to fix App not installed error on Android
We understand that it can be a tricky situation to be in when Android App not installed error pops up, but what if we tell you can get rid of it in easy and simple steps? Yes, there is!
#1. Delete unnecessary files/Apps
Insufficient storage can prevent the app from being installed. Make some storage space on your device by cleaning unwanted data and deleting extra media and other files. You can also get rid of heavy Apps by:
Visiting “Settings” on your device. Then select “Manage apps”, “Application Manager” or “Apps” (varies based on device model or version) from the list of options before you.

Now select the App you wish to uninstall and wait for the App Info screen to open, then click on “Uninstall” as shown in the screenshot.

You can also uninstall the unnecessary application on the home screen, just long-press the app you want to uninstall until you see the “uninstall” icon. Click “Uninstall”, then, you need to click “OK” to confirm the uninstall process.

#2. Use only Google Play Store
As you are all aware, the Play Store is specially designed for Android software and contains only trusted and safe Apps. It is often known as the “Android Market” because it is loaded with different types of Apps to stiffly all your needs so that you don’t have to rely on other third-party sources to purchase/install Apps.

#3. Mount your SD Card
Another remedy for Android App not installed error is to make sure that the SD card inserted in your device is not inaccessible.

To check the same:
First, disconnect your Nokia 105 Classic from your PC and then visit “Settings” on your Android and select “Storage” from the options that appear. Finally, click on “Mount SD Card” at the Storage Info screen.
You can now restart your device and try to install the app now, it should work!
#4. Choose App location wisely
It is advisable to not tamper with the App’s location and let the software decide where it needs to be placed. As far as possible, let the Apps be in your device’s internal memory.
#5. Format SD Card
The chances of your SD Card being corrupted are very high. You can format it either while it is in your device or externally.
Now to Clean up your SD Card, simply visit “Settings” and select “Storage” and tap on “Format SD Card” and mount it once again to use it smoothly.

#6. App Permissions
You can reset App permissions to combat the Android App not installed error by Visiting “Settings” and then selecting “Apps”. Now access the Apps menu and hit “Reset App Preferences” or “Reset application permissions”. This will allow third-party apps to get installed on your device.
#7. Choose the correct App file
Make sure to always download an App file only from a trusted and safe source to avoid any errors during installation.
#8. Reboot your device
Finally, if nothing else works, restart your device to end all operations which could be causing the said error. To reboot, just press the power button till you see a pop-up. Select “Restart” and wait for your device to reboot.

Conclusion
Encountering the “App Not Installed” error on Android can be frustrating, but by understanding the causes and implementing the appropriate solutions, you can overcome this issue. We saw that Android App not installed error can be fixed quickly if you keep in mind the tips given in this article. However, please ensure that you follow each instruction carefully to avoid any further goof up.
safe & secure
Also read:
- [New] 2024 Approved Explore 12 Prime Flip Screen Cameras Revolutionizing Vlogs
- [New] How-To Link Up in the World of Instagram
- [New] In 2024, Capturing Moments Essential Cameras Reviewed
- [New] In 2024, The Pinnacle of Engagement Custom YouTube Shorts Thumbnails Guide
- Courtroom Clash as Cooler Master Takes on Industry Peers Over Stolen Thermal Management Design
- How To Restore a Bricked Xiaomi 14 Ultra Back to Operation | Dr.fone
- How To Unbrick a Dead Vivo X Flip | Dr.fone
- In 2024, How to Share/Fake Location on WhatsApp for Vivo X100 Pro | Dr.fone
- Leveraging Windows 11 Features for Comics Exploration
- Proven Ways to Fix There Was A Problem Parsing the Package on Oppo Find N3 Flip | Dr.fone
- Proven Ways to Fix There Was A Problem Parsing the Package on Xiaomi Mix Fold 3 | Dr.fone
- Spotify Keeps Crashing A Complete List of Fixes You Can Use on Nokia XR21 | Dr.fone
- Streamlined Guide: Transforming YouTube Media to Audio Format with MP3 Conversion Techniques
- Turning Off Two Factor Authentication On Apple iPhone 12? 5 Tips You Must Know
- Title: How to Fix Unfortunately, Contacts Has Stopped Error on Nokia 105 Classic | Dr.fone
- Author: Abel
- Created at : 2025-01-19 16:03:57
- Updated at : 2025-01-22 16:09:35
- Link: https://fix-guide.techidaily.com/how-to-fix-unfortunately-contacts-has-stopped-error-on-nokia-105-classic-drfone-by-drfone-fix-android-problems-fix-android-problems/
- License: This work is licensed under CC BY-NC-SA 4.0.