
How to Fix Unfortunately, Contacts Has Stopped Error on OnePlus Nord CE 3 5G | Dr.fone
How to Fix Unfortunately, Contacts Has Stopped Error on OnePlus Nord CE 3 5G
Have you recently noticed a message stating “Contacts has stopped”? This is enough to take away all your peace. As, our native contacts app stashes all our useful contacts which are time and again needed by a user. It’s malfunctioning is enough to give us chills. But, why the OnePlus Nord CE 3 5G or any other Android device incurs such problems?
It can occur while you launch the app or while you’re in the app already finding the required contact or when any other application is trying to gain access to it. So, to rage a battle with this issue, you need to seek help of some powerful methods in killing down the issue of contacts app crashes. And, the best part is that you’ve secured yourself by reaching the right place. We will be taking an in-depth discussion on several methods that may prove to be helpful. Let’s read them up here now.
Part 1: Get Android system fixed in one click
We’re always in search of a method that provides handy solution in a quite speedy and hassle-free manner. There are hundreds of tips and tricks for the same. You never know the possibility of firmware being the major drawback. No amount of manual methods can beat the performance of Dr.Fone - System Repair (Android).It is capable of providing 100% solution to any kind of issues, your phone gets troubled with. It is designed with the technology of combating the problem of black screen of death, app crashes and several other issues. In just a single-click, ward off the issue and free your device with errors
Dr.Fone - System Repair (Android)
Fix Contacts app crashing on Android in one click
- Incorporates with 1-click technology to resolve any issues occurring in your OnePlus Nord CE 3 5G. Black screen of death, app crash, system crash, faulty issues etc.
- fone – Repair (Android) interface is extremely simple for users and lays functionalities aptly.
- One of its kind software with highest success rate in the market.
- Fully compatible with all kinds of Android phones, models, as well as the popular carrier.
- It provides users with 24 hours customer care service to resolve queries.
3,016,434 people have downloaded it
In this tutorial, we will learn the methodology of addressing the contacts keep stopping problem and gain triumph over it.
Step 1: Load program and draw connection of device
Download Dr.Fone - System Repair (Android) on PC. While program installs, use USB cable to connect device with system. From interface, tap on “System Repair” main window.

Step 2: Opt for Android Repair option
You’ll be directed to the “System Repair” screen where you have to opt for “Android Repair” options appearing over the left panel of the program. After that, do not forget to press “Start”.

Step 3: Key in device information
From following screen, fill the fields of “Brand”, “Name”, “Model”, “Country” and several other parameters. Then, tap on “Next” option to proceed further.

Step 4: Download Firmware package
Just follow the on-screen steps for booting your OnePlus Nord CE 3 5G into download mode. Then, hit the “Next” button to proceed with downloading the most suitable firmware package for your OnePlus Nord CE 3 5G.

Step 5: Repair Android phone
Once the software downloads, the program will automatically repair any issues irking over your phone. Now, your phone is all free from contacts error.

Part 2: 9 Common ways to fix “Unfortunately, Contacts Has Stopped”
2.1 Restart Android system
Our response to any minuscule issue is straightaway restarting phone. This helps in clearing out any problem that might have disrupt the functioning of phone. So, to fix the problem of “Contacts app won’t open”, you too can try out your hand in this method.
- Get hold of your Android system and long press the power button.
- This will fadeout the main screen and showcase several options from where you’ve to tap on “Reboot/Restart” mode.
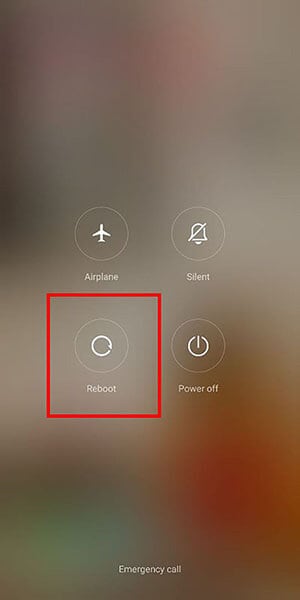
Now, your device will quickly reboot the OnePlus Nord CE 3 5G device. Once, the OnePlus Nord CE 3 5G device regains its normal state, check whether the issue is coming again or not.
2.2 Clear cache and data of Contacts app
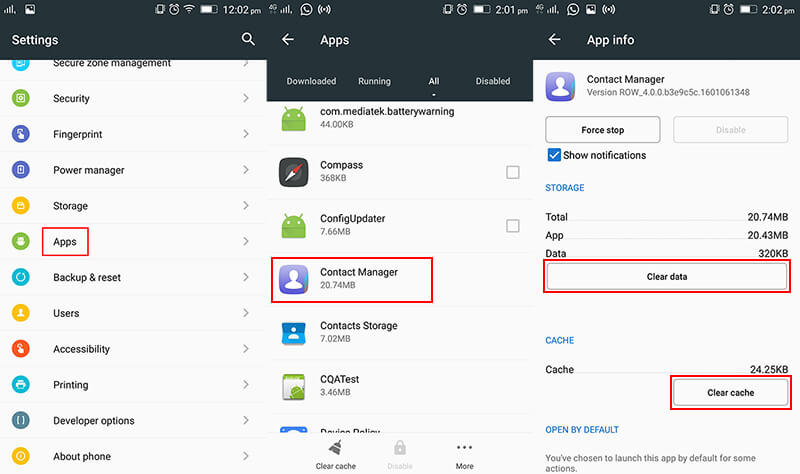
The cache memory basically stashes the copies of the concerned application. It is indeed a streak of copies of the desired app storing information and incurring additional space on the storage. This might be the reason why the contact app crashes rapidly on your OnePlus Nord CE 3 5G. Hence, it can prove to be a good remedy for this problem. Just follow down the steps mentioned below-
- First of all, go to “Settings” application from the app drawer or from the notification panel.
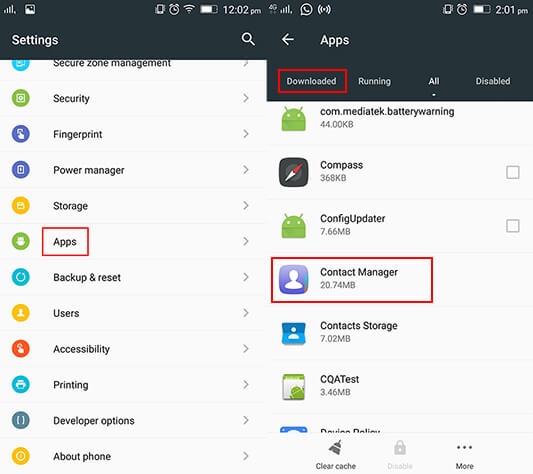
- Now, surf and select for “Applications” or “Apps & notifications”.
- Here, you need to browse for “Contacts” app and open it.
- On “Contacts” app, just tap on “CLEAR CACHE” and “CLEAR DATA” button. This will prompt the cache memory to be cleared.
2.3 Wipe cache partition
As we know the cache memories are the temporary files build by the firmware. These are of little importance as they are bound to become a bit more corrupted in nature. And sometimes, may indirectly become a hurdle for the working of contacts app. It is good if the OnePlus Nord CE 3 5G device is cleared off from the caches. Instead of manually wiping down the cache memory, we will understand how to clear off the cache partition in the following steps.
- From device, just power off your device. Then, press the “Volume Down + Power” button with “Home” combinations together.
- In a moment’s time, lose fingers from the “Power” button but do not release fingers from “Volume Down” and “Home” buttons.
- Once you view the “Android System Recovery” screen, just lose the “Volume Down” and “Home” buttons.
- Over the options available, just opt for “wipe cache partition” by tapping the “Volume down” button until the desired option is highlighted.
- Finally, push the “Power” key to give consent to the selection.

- After, the process is through there will be an option for “Reboot System Now”. Tap on it and restart the OnePlus Nord CE 3 5G device.
2.4 Disable Google+ app
The root cause for detecting any problem is not very easy. You never know the overloading of Google + application might have directly impacted contacts app crashes. To resolve it, disabling it may prove to be a helpful solution. Here is the quick reference for disabling Google+ application.
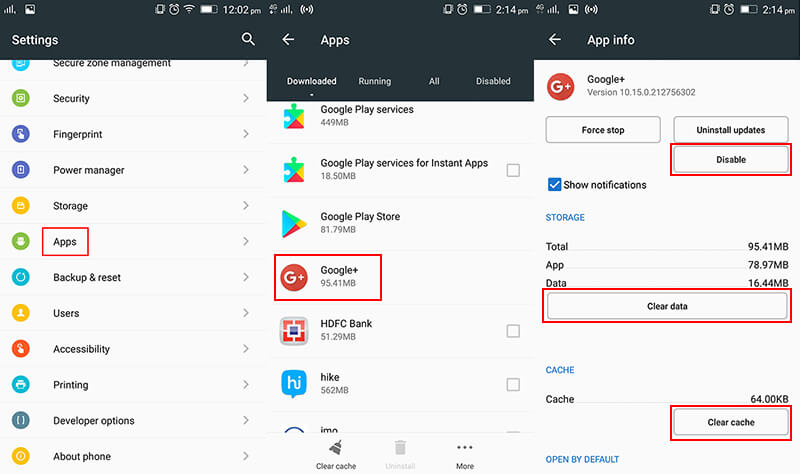
- First of all, visit “Settings” from your OnePlus Nord CE 3 5G.
- In “Settings”, visit the “Application Manager” or “Applications” menu and browse for “Google +” app.
- From the application main page, you can choose to do either of the methods:
- Either, completely disable the application to work by pressing on “Force stop” or “Disable” feature.
- Or, brush away the unnecessary cache piled up on your storage by using “Clear Cache” functionality.
There will be a prompt stating that the application may misbehave. However, you must disable the feature and check whether it worked out for you or not.
2.5 Update your device software
Many a times, we skip updating our device software thinking it is of less importance. In fact, one must not miss out the updates that occurs in phone. As, without the updates, the scope of some applications are affected to some extent. For its better functioning and avoiding issues like “contacts keep stopping”, here is how you should update device software.
- First and foremost, head on to “Settings” menu. Over there, click on “About Device”.
- There, you need to tap over “Software Update”.
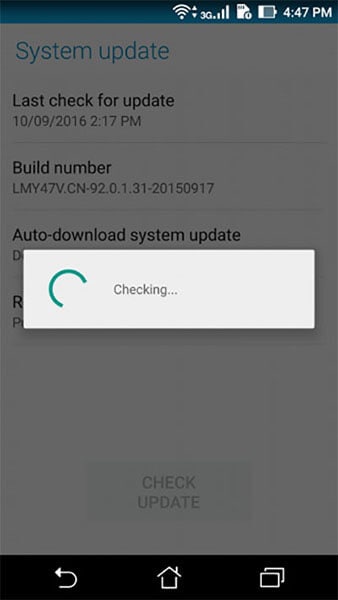
The device will now check whether there are any updates available for your device. If yes, then update application right away.
2.6 Reset App Preferences
As stated, the malfunctioning of contacts can be due to be any unexpected reason. Hence, users can opt for resetting app preferences. This may prove to be helpful in brushing away the issue of “Contacts app won’t open”.
- Launch “Settings” app and surf for “Apps” or “Applications” option on your OnePlus Nord CE 3 5G.
- Just, tap over the three dots appearing at the upper right section and then tap on “Reset app preferences”.
- At last, just select “Reset default apps”.

2.7 Delete voicemail
Do you happen to exchange voicemails quite often? It can trigger to be the reason for contact app crashes. If your device happens to have a bulk of voicemails, you must get rid of them sooner or later. As, these might standout to be the prime reason for contacts stopping on OnePlus Nord CE 3 5G. If you’re unaware about the procedure of removing all kinds of voicemails, you can proceed to make use of the following steps.
- Start with, launching the “Google Voice” app.
- From there, duly opt for “Voicemail”.
- Just click on the press menu option and at last select “Delete” option.
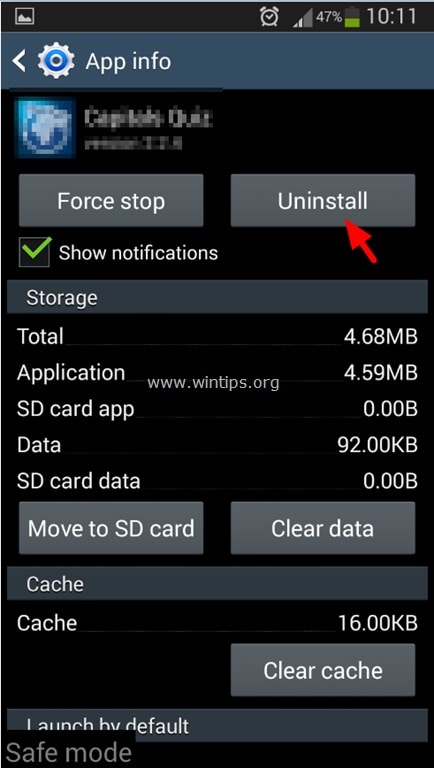
2.8 Uninstall the downloaded apps
Some applications contain some unwanted advertisements and some elements of malware. This can be enough for disrupting the functionality of the built-in contact app won’t open. It is crucial for your phone to be detoxed from such elements. You need to manually scrap off such applications. Do, ensure to download the application from the genuine source for future use.
- On your OnePlus Nord CE 3 5G, just go to “Home” screen and tap on “Apps” icon.
- Then, tap on “Settings” icon followed by going to “Applications” or “Apps & Preferences” menu.
- After that, tap on “Menu icon” which will showcase the apps installed on device.
- Simply, open the app and hit the “Uninstall” button to brush away that app. Repeat the same with other application(s).
Now, check whether you’ve fought the battle with the problem or not.
2.9 Reset to Factory Settings
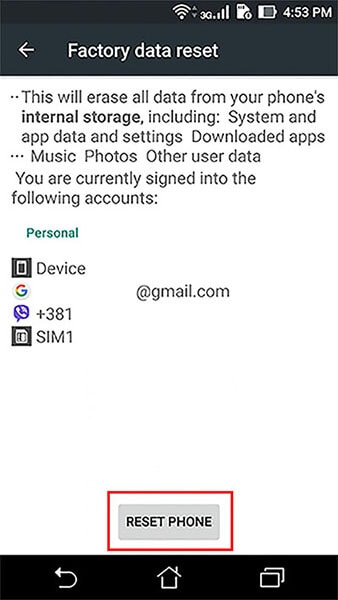
Last but not least, if all the methods falls flat to resolve the issue of contacts app won’t open. Then, it might be your device has some internal problem. This can be any software crash which might not be fixing with the aforementioned steps. That is where reset to factory settings may prove to be a good option. With this method, your phone will be cleared of all the components, settings and everything present in it. Here are is the comprehensive tutorial for biding bye to the problem of contacts app won’t open.
Note: Do ensure to take a backup of all the data available in your device. As, we don’t want you to regret afterwards.
- Just go to “Settings” and surf and select “Backup & Reset” option.
- You need to toggle on the option for performing the backup on your Google account.
- Then, tap on “Reset” button and then tick mark the option for resetting your phone.
Proven Ways to Fix There Was A Problem Parsing the Package on OnePlus Nord CE 3 5G
Unable to install your favorite Apps from Google Play Store because there was a problem parsing the package?
The Parse Error or there was a problem parsing the package error is very common with Android devices. Android is a versatile platform and, therefore, a very popular OS. It is an open software and allows users to download and use various types of apps from the Play store. Android is also a cheaper alternative as compared to other Operating Software.
Since many of us are well versed with most of the Android devices, parse error, or there is a problem parsing the package is an error is not something new and uncommon.
The error message usually pops up on the OnePlus Nord CE 3 5G device screen when we try to download and install an App, for example, “There is a problem parsing the package Pokémon Go ”.
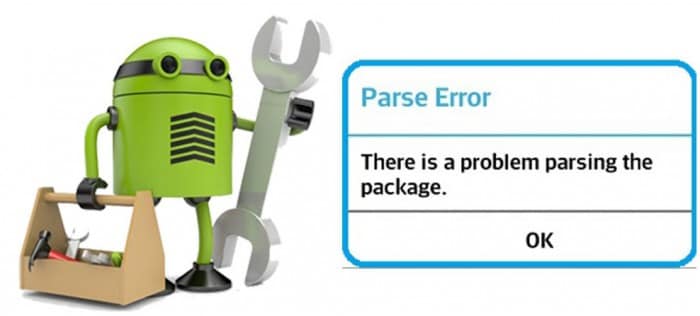
The error message which appears reads as follows:
“Parse error: There is a problem parsing the package”.
Android users who have experienced this would know that the parse error leaves us with only one option, i.e., “OK” as shown in the image below.
There was a problem parsing the package may occur due to several reasons, most of which are listed and explained below. Furthermore, there is a list of solutions to choose from to eliminate the “there is a problem parsing the package” error.
Read on to find out more.
Part 1: Reasons for the parsing error
Parse Error, better known as “there was a problem parsing the package” error is very common and normally surfaces when we try to download and install new Apps onto our Android devices from Google Play Store.
The reason for the error message to pop-up are many but none of them can be blamed singularly for the “there is a problem parsing the package” error. Given below is a list of the most probable reasons for Parse Error to stop an App from installing. Examine them carefully before moving on to the solutions to fix the “there was a problem parsing the package” error.
• Updating the OS may cause some disturbances in the manifest files of different Apps leading to Parse Error.
• Sometimes, the APK File, i.e., Android Application Package, gets infected due to improper or incomplete App installation causing “there is a problem parking the package” error.
• When Apps are downloaded and installed from unknown sources, due permission is needed. In the absence of such permission, the chances of the Parse Error to occur increase.
• Certain Apps are not compatible or supported by the latest and updated Android versions.
• Anti-virus and other cleaning Apps are also a major reason for the “there was a problem parsing the package” error.
The causes listed above are not App specific. The Parse Error may occur due to any one or more of these reasons, but what is more important is to try to get rid of the problem.
Let us move on to learn ways to fix the there was a problem parsing the package error.
Part 2: 8 Solutions to fix the parsing error
“There is problem parking the package” error can be dealt with easily if only we do not panic and deliberately follows the steps explained in this segment. Here are 7 of the most reliable and trustworthy methods to fix the Parse Error.
They are easy, user-friendly, and do not take much of your time. So don not waste any more of your time and try them now.
2.1 One Click to Fix ‘There is a Problem Parsing the Package
If you’re still encountering the Parsing error, there may be a problem with the OnePlus Nord CE 3 5G device data on your device, which means you’ll need to repair it. Luckily, there’s a simple, one-click solution you can follow called Dr.Fone - System Repair .
Dr.Fone - System Repair (Android)
Android repair tool to fix all android system issues in one click
- Simple, clean, and user-friendly interface
- No technical knowledge required
- Easy one-click repair to fix ‘there is a problem parsing the package’ error
- Should repair most parsing problems with apps, like ‘there is a problem parsing the package Pokemon Go’ error
- Supports most OnePlus Nord CE 3 5G devices and all the latest models like Galaxy S9/S8/Note 8
3981454 people have downloaded it
If this sounds like the solution you’re looking for, here’s a step by guide on how to use it yourself;
Note: Please note that this repair process can erase all data on your phone, including your personal information. This is why it’s so important to back up your OnePlus Nord CE 3 5G before proceeding.
Step #1 Head over to the Dr.Fone website and download the software. Install the downloaded software and open it. From the main menu, select the System Repair option.
Input your device and firmware information to confirm you’re installing the right version of the operating system.
Step #2 Follow the onscreen instructions on how to get into Download Mode to start the Repair process.

Once complete, the firmware will start downloading.
Step #3 Once the firmware has downloaded, it will automatically install it to your device.
When this is completed, you’ll be free to disconnect your OnePlus Nord CE 3 5G and use it how you please without the ‘there is a problem with the parsing package’ error.
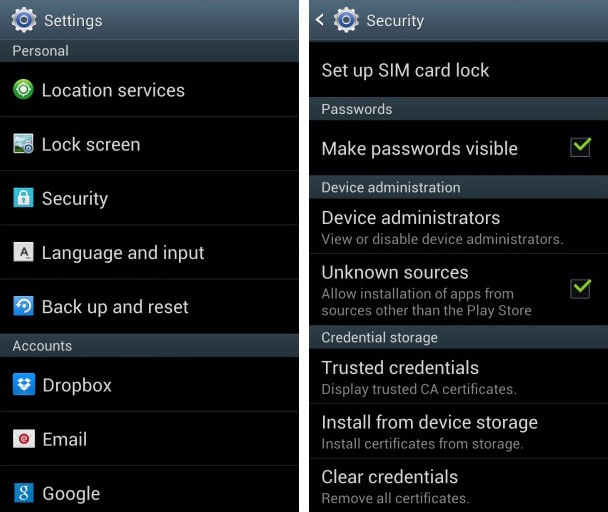
2.2 Allow installation from unknown sources
When we install Apps from other sources and not Google Play Store, there might be a glitch in using such Apps. To overcome this problem, turn on “Allow App installation from other sources”. Follow the steps given below for better understanding:
• Visit “Settings” and select “Applications”.
• Now tick mark on the option saying allow App installation from unknown sources.
2.3 Enable USB debugging
USB debugging is not considered necessary by many users but these methods give you an edge over others while using an Android device as it lets you access things on your phone, etc which you could not earlier.
To enable USB Debugging to fix “There is a problem parsing the package” error, follow these steps:
• Visit “Settings” and select “About Device”.
• Now click on “Build Number” not once but continuously for seven times.

• Once you see a pop-up saying “You are now a developer”, go back to “Settings”.

• In this step, select “Developer Options” and turn on “USB Debugging”.

This should solve the problem. If not, move on to the other techniques.
2.4 Check APK File
An incomplete and irregular App installation may cause the .apk file to get corrupted. Make sure you download the file completely. If need be, delete the existing App or its .apk file and reinstall it from Google Play Store for it to be compatible with your device’s software and to use the App smoothly.
2.5 Check App Manifest File
Manifested App files are nothing but .apk files which are improvised by you. Such changes may cause the Parse Error to occur more frequently. Modifications in the App file can be made by changing its name, App settings, or more advanced customizations. Make sure you roll back all changes and restore the App file to its original state to prevent it from getting corrupted.
2.6 Disable Antivirus and other cleaner Apps
Antivirus software and other cleaning Apps are very helpful in blocking unwanted and harmful Apps from damaging your device. However, sometimes such Apps also prevent you from using other safe Apps.
We do not suggest that you delete the Antivirus App permanently. Temporary uninstallation will be useful here. To do so:
• Visit “Settings” and then select “Apps”.
• Select the antivirus App to click on “Uninstall” and then tap “OK”.
Now download and install the desired App again. Once this is done, do not forget to install the Antivirus App again.
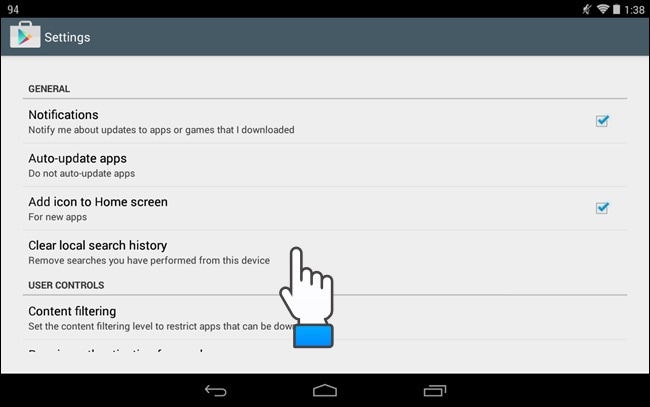
2.7 Clear Cache cookies of Play Store
Clearing Play Store Cache cleans the Android Market platform by deleting all clogged up unwanted data. Follow the steps given below to delete Play Store cache:
• Tap on Google Play Store App.
• Now visit Play Store’s “Settings”.

• Select “General Settings” to “Clear local search history”.
2.8 Factory Reset Android
Factory Resetting your device to fix the Parse Error should be the last thing you try. Make sure you take a back-up of all your data on your Google Account or a Pen Drive because this technique erases all media, contents, data, and other files, including your device settings.
Follow the steps given below to factory reset your device:
• Visit “Settings”.
• Now select “Backup and Reset”.

• In this step, select “Factory data reset” and then “Reset Device” to confirm Factory Reset.
The whole process of factory resetting your OnePlus Nord CE 3 5G might sound tedious, risky, and cumbersome but it helps to fix the Android SystemUI has stopped error 9 out of 10 times. So, think carefully before using this remedy.
Parse Error: There was a problem parsing the package is an error message that has troubled many Android users. The good part is that the above-stated fixes not only solve the problem but also prevent it from occurring in the future. So, keep them in mind the next time you or anyone you know faces such an issue.
OnePlus Nord CE 3 5G Camera Not Working Unexpected Error? Fix It Now
For all its glory and goodness, the Android OS often has its users pulling their hair in frustration at just how buggy the OS can be at times. So, if you’re having one of those days today, we are here to help. Camera app is one of the most used apps on smartphones today. People only launch the app when they want to take a photo, for everything else there’s a dedicated photo gallery app. What happens when you launch the camera app only to realize it threw an error and you missed your photo moment? Don’t throw the phone, not yet. Let us help you out.

Part I: Why Is Android Camera Not Working?
There are a few reasons why the camera app is not working on your OnePlus Nord CE 3 5G.
Low Memory
Camera app does rely heavily on system resources, so in case you have too many apps open and for some reason the OS is not able to manage the resources appropriately for the camera app to function as it should, you will get a camera error.
Low Storage
The camera app needs storage space to save the photos it takes. So, in case your phone is running low on storage space, the camera app would likely malfunction as it would have no way to store the photos it would be taking.
General Bugs And Glitches
OS bugs and general glitches within the OS and the camera app can cause camera not working issue anytime during everyday operation. This is part and parcel of any technology.
Hardware Issues
In the rarest cases, there might have developed an actual hardware issue with the camera system on your OnePlus Nord CE 3 5G. The likely culprit is misuse and abuse, such as a dropped phone or maybe the phone was too hot for extended periods of time, causing hardware issues.
Part II: How To Fix Android Camera Not Working Issue?
So, how to get the Android camera not working problem solved? There are a few ways you can try fixing the camera not working issue on your OnePlus Nord CE 3 5G right where you are, without needing to take the OnePlus Nord CE 3 5G device to the manufacturer’s service center.
II.I: Restart The Handset
One of the first things to do any time an app or your phone or tablet does not work like it should, restarting the OnePlus Nord CE 3 5G device refreshes everything just enough to resolve most commonly occurring issues.

Use the power button on your smartphone to restart your Android handset and see if this resolves the issue.
II.II: Close And Relaunch The Camera App
If the camera app (or any app for that matter) has been in the background for a while and then it is brought to the foreground, there are always chances of it crashing for any reason, or not working as expected. So, closing the app completely and relaunching it is recommended.
Step 1: Launch the app switcher on your specific Android device the way your device manufacturer suggests you to. Usually, it is a swipe up and hold gesture to get into the app switcher.

Step 2: Next, you can choose to close just the camera app or, better yet, close all apps by tapping the Close All button. Flicking any app upwards (quick upward swipe) is how you close an app. If there is no Close All button anywhere, repeat the gesture for all open apps.
II.III: Check App Permissions
These days, thanks to strides in the privacy initiatives, apps need permissions before they can function the way they do. Most of the times, apps such as camera do have the necessary permissions, but sometimes it is possible that the permissions are set incorrectly. To check if the camera app has the requisite permissions, do the following:
Step 1: Go to Settings > Apps > Camera > Permissions.

Step 2: Tap Camera.

Step 3: See if the selected option is Allow Only While Using This App. If not, select it.
II.IV: Clear The Camera App Cache
Clearing the camera app cache is sometimes helpful. To do that:
Step 1: Go to Settings > Apps > Camera and tap Storage Usage.

Step 2: Tap Clear Cache.

II.V: Clear The Photo Gallery App Cache
The camera app is closely tied to the photo gallery app that comes baked in into Android OS. That is because photos that the camera app takes are stored in the photo gallery app. Consequently, if there were any issues in the photo gallery app, that could lead to the camera app not working on Android problem. Here’s how to clear the photo gallery app cache:
Step 1: Go to Settings > Apps > Photos > Storage Usage.

Step 2: Tap Clear Cache.
II.VI: Check For App Updates
This does not happen always, but sometimes, with known bugs and issues, there may be an update released that fixes those bugs and issues that prevent some users from using a given app reliably. Checking for updates is a good step to make sure that your camera app is updated to the latest version possible.
Step 1: Go to Play Store and tap your profile picture on the right.

Step 2: Tap Manage Apps and Device.

Step 3: If there are updates available, Tap Update All to update all apps.
II.VII: Cool The Phone Down
We do not realize the immense power that is packed into the thin smartphone form factor these days. If you have been using the phone to video chat for a while now, you might not realize that the phone has become hot, especially if you are using a desk stand. Same for shooting high-resolution videos; the phone does get quite hot shooting high-resolution videos.
If this is the case, close all apps and let the phone cool down. You might even want to shut the phone off to help cool it faster.
II.VIII: Nudge The Camera System
You may want to tap your camera system (the lenses and surrounding area) gently to see if that gets the camera working. In case it did, this is indicative of a hardware issue, and you should get it checked at the service center at your earliest convenience.
II.IX: Fix Android Camera Not Working Issue In One Click (With Dr.Fone)
Now, if the above fixes have not worked, you might want to repair your Android OS once before you make that appointment with the service centre. And, we have just the app to help you fix your camera not working on Android problem quickly.
Wondershare Dr.Fone is a multi-module app that works on both Windows and macOS and is the only app you will ever need to resolve nearly all of your smartphone and tablet issues that you are likely to encounter. Need to take backups? Dr.Fone Phone Backup has you covered with the ability to take and restore even selective backups, and to any location such as your computer or an external disk as well. Want to transfer WhatsApp chats to a new phone? Use WhatsApp Transfer to do just that! Bought a new phone? Use Phone Transfer to transfer contents from old phone to new, and then use Dr.Fone Data Eraser to securely wipe your old phone before giving it away!
Today, we will use Dr.Fone’s System Repair (Android) module to fix Android camera not working issue quickly.
Download Dr.Fone here.
 safe & secure
Step 1: Launch Dr.Fone app on your PC or Mac.
Step 2: Click System Repair module and then Android.

Step 3: For now, don’t bother with the scenarios given and click Start to go to the next screen.
Step 4: Your Android device will be detected by Dr.Fone. If anything seems incorrect, use the dropdown options to change it, and click Next.
Step 5: Your phone needs to be put into Download mode before it can be repaired. Follow the instructions shown onscreen and click Next.

Step 6: Dr.Fone automatically downloads the most recent firmware for your device and when it is ready, waits for your input. Click Fix Now to start the repair process.

Step 7: You will need to enter a 6-digit code (digit zero, six times – 000000) to confirm and begin the repair process.

When the repair is complete, Dr.Fone shows the final screen as below:
safe & secure
Conclusion
The camera app on your smartphone is one of the most important apps you use. This is not a game; this is an app that makes previous memories possible for you. So, when you get any of those incorrigible errors that are impossible to make sense of, what do you do? This guide gives you 9 fixes to fix Android camera not working error quickly and easily.
Also read:
- [New] 2024 Approved Identifying a User' Writes Silent, Unseen Snapshots
- [Updated] In 2024, 10 Best Instagram Meme Accounts to Make You Laugh (with Tears)
- 6 Solutions to Address Your Steam VR Headset Detection Issues
- Expert Advice: Navigating Through TITLE - The Ultimate Series (Full Set) for Optimal DVD Titling Choices
- Guide: Connecting with Snapchat's Help Desk
- How To Fix Unresponsive Phone Touchscreen Of Honor 90 GT | Dr.fone
- How to Update Your Dell Wireless Card Driver for Optimal Performance
- In 2024, Does Tecno Camon 20 Have Find My Friends? | Dr.fone
- Laugh Out Loud for Free EasyMemes Tutorial for 2024
- Play Store Not Working On Vivo V30 Lite 5G? 8 Solutions Inside | Dr.fone
- Play Store Not Working On Xiaomi Civi 3 Disney 100th Anniversary Edition? 8 Solutions Inside | Dr.fone
- PUBG Bug Solved: Steps to Ensure All Buildings Load Correctly Now
- Reasons for Poco X5 Stuck on Startup Screen and Ways To Fix Them | Dr.fone
- Samsung Galaxy A23 5G Not Receiving Texts? 10 Hassle-Free Solutions Here | Dr.fone
- Standout Creators Elevating VR Content Quality
- Stuck at Android System Recovery Of Nokia C22 ? Fix It Easily | Dr.fone
- Title: How to Fix Unfortunately, Contacts Has Stopped Error on OnePlus Nord CE 3 5G | Dr.fone
- Author: Abel
- Created at : 2025-01-18 16:08:49
- Updated at : 2025-01-22 16:05:12
- Link: https://fix-guide.techidaily.com/how-to-fix-unfortunately-contacts-has-stopped-error-on-oneplus-nord-ce-3-5g-drfone-by-drfone-fix-android-problems-fix-android-problems/
- License: This work is licensed under CC BY-NC-SA 4.0.