
How to Flash Dead Lava Yuva 3 Pro Safely | Dr.fone
How to Flash Dead Lava Yuva 3 Pro Safely
- Fix malfunctioning Android to normal in one click.
- Highest success rate to fix all Android issues.
- Step-by-step guidance through the fixing process.
- No skills required to operate this program.
A phone is considered to be dead when it becomes completely unresponsive and refuses to switch on. Similarly, an Android phone is said to be dead when it does not boot up. You may try to switch it on several times by pressing the power button but in vain. You will see no sign of the phone’s logo or anything like a welcome screen. The Android phone’s screen remains black and does not illuminate when you try to turn it on. Interestingly, even when you charge this dead device, it does not show that it is getting charged.
Many people regard this as a battery issue, and many think of it as a temporary software crash. Some users also seem to believe that this is because of a virus attack. However, if you are looking for ways that tell how to fix a dead Android phone, you must understand that a dead phone or device can be cured by flashing custom firmware safely. If you are keen to know how to flash a dead Android phone or how to flash dead Android phones using PC, here are ways to help you.
Given below are eight techniques to flash your Lava Yuva 3 Pro safely, depending upon which phone you are using. It may seem time-consuming and tedious, but we can assure you that it works. So, move ahead and read on to learn about flashing new firmware, your Lava Yuva 3 Pro, MTK Android, and Lava Yuva 3 Pro safely.
 safe & secure
Part 1: Can a Dead Phone Be Flashed?
Flashing a dead Android phone might be skeptical for many users who have been in such a situation. Although it is possible to flash a dead Android phone, it is essential to be aware of the reasons that lead you into such a situation. Before a remedy, diagnosing the problem is a necessity for retaining the Lava Yuva 3 Pro device.
From battery issues to physical damage to the Lava Yuva 3 Pro device, there can be many reasons your Lava Yuva 3 Pro died. The reasons for a dead Android phone are not restricted to these points. There can be software-related issues or firmware issues that might cause such havoc on your Android.
Part 2: How to flash Lava Yuva 3 Pro in one click
While you are worried about how to flash Lava Yuva 3 Pro instantly with a single click, Dr.Fone - System Repair (Android) swiftly makes its way with a galore of options for you. This amazing tool from Wondershare can fix a plethora of Android system issues such as crashing of apps, black screen of death, failed system update, etc. Moreover, it can also get your device out of boot loop, unresponsive bricked Android mobiles as well as stuck at the Lava Yuva 3 Pro logo.
Dr.Fone - System Repair (Android)
One-click solution to flash Lava Yuva 3 Pro
- The high success rate in fixing Lava Yuva 3 Pro Android devices.
- All the latest Lava Yuva 3 Pro devices are supported by this software.
- One-click operation of this tool helps you how to flash Lava Yuva 3 Pro easily.
- Being very intuitive, it doesn’t need you to be tech-savvy to use this software.
- It is one of its kind and the first one-click Android repair software on the market.
3981454 people have downloaded it
Step-by-step Tutorial
We are going to explain how to flash a dead Android phone using a PC using Dr.Fone - System Repair (Android)
Note: Before you understand how to flash Dead Android phone, take a backup of your data and then proceed to avoid any data loss.
Phase 1: Prepare your Lava Yuva 3 Pro
Step 1: Once you have downloaded and installed Dr.Fone, launch it. From the main menu, tap on ‘System Repair’ and get your Lava Yuva 3 Pro connected to it.

Step 2: Click ‘Android Repair’ from the available options, and then press the ‘Start’ button to fix the Dead Android phone by flashing it.

Step 3: On the Lava Yuva 3 Pro device information screen, pick the appropriate device brand, name, model, and other details followed by tapping the ‘Next’ button.

Phase 2: Put the Android device in Download mode to start repair.
Step 1: It is essential to boot your Lava Yuva 3 Pro in Download mode before repairing.
- If the Lava Yuva 3 Pro device has a ‘Home’ button: Turn it off and then hold down the ‘Volume Down’, ‘Home’, and ‘Power’ buttons altogether for 5-10 seconds. Un-hold all of them and hit the ‘Volume Up’ button for entering ‘Download’ mode.

- In the absence of a ‘Home’ button: Switch off the Android device and hold the ‘Volume Down’, ‘Bixby’, and ‘Power’ buttons for 5 to 10 seconds, then release them. Hit the ‘Volume Up’ button for entering the ‘Download’ mode.

Step 2: Press the ‘Next’ button for initiating firmware download.

Step 3: Once the firmware gets downloaded and verified Dr.Fone - System Repair (Android) starts to flash your Dead Android phone. All the Android system issues will be fixed soon after.

safe & secure
Part 3: How to flash Lava Yuva 3 Pro dead phone with Odin?
In this segment, we will learn how to fix the dead Android phone, i.e., Lava Yuva 3 Pro phones using Odin software. Odin is software used internally by Lava Yuva 3 Pro to generally unblock devices and perform a more utility-based job, namely, flashing new firmware in place of the old one. There are different variants available, so choose the one which is supported by your Galaxy phone. Here is a step-by-step explanation of how to flash dead Android phone (Lava Yuva 3 Pro) using Odin software.
Step 1: Install the driver software on the computer. You can find the best driver software for your device and PC on the official Lava Yuva 3 Pro website. You may also download Lava Yuva 3 Pro Kies on your PC. Once you have downloaded and installed the driver software, restart the PC.
Step 2: Now download suitable firmware for your device in the form of a zip folder that you can open and store on your desktop.

Make sure the file is .bin, .tar, or .tar.md5 only as these are the only file types recognized by Odin.


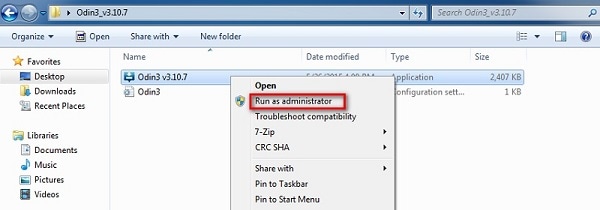
Step 3: In this step, download the latest version of Odin on your PC and move it to the desktop, and then right-click on the downloaded Odin file to select “Run as Administrator”.

Step 4: Now, boot your dead device to Download Mode by pressing the power, volume down, and home button together. When the phone vibrates, release the power button only.

Step 5: Gently press the volume up button, and you will see the Download Mode Screen.

Step 6: Now, you may use a USB to connect your Lava Yuva 3 Pro to the PC. Odin will recognize your device, and in the Odin window, you will see a message saying “Added”.

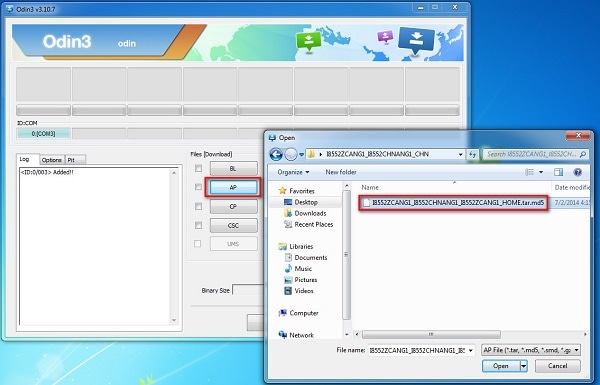
Step 7: In this step, find the tar.md5 file you downloaded by clicking on “PDA” or “AP” on the Odin window and then click “Start”.
Finally, once the flashing process is complete, your Lava Yuva 3 Pro phone will reboot and start normally, and you may see a “Pass” or “Reset” message on the Odin window on the PC.
Part 4: How to flash MTK Android dead phone with SP Flash tool?
SP Flash tool, also known as SmartPhone Flash tool is a popular freeware tool used to flash custom ROM or firmware in MTK Android phones. It is a very successful tool and is extremely easy to use.
Let us look at the steps given below to learn how to flash dead Android phones using PC with the help of the SP Flash tool.
Step 1: To start with, download and install the MTK driver on your PC and then download the ROM/firmware you wish to use for flashing purposes.
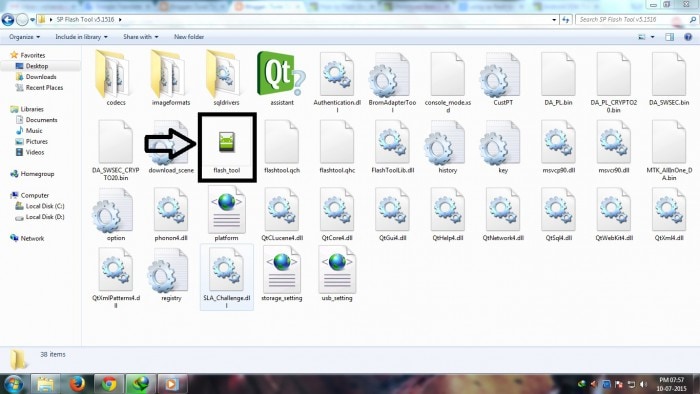
Step 2: Once done, you should download the SP Flash tool and extract it on your PC and move on to launch the Flash_tool.exe file to open the SP Flash tool window.
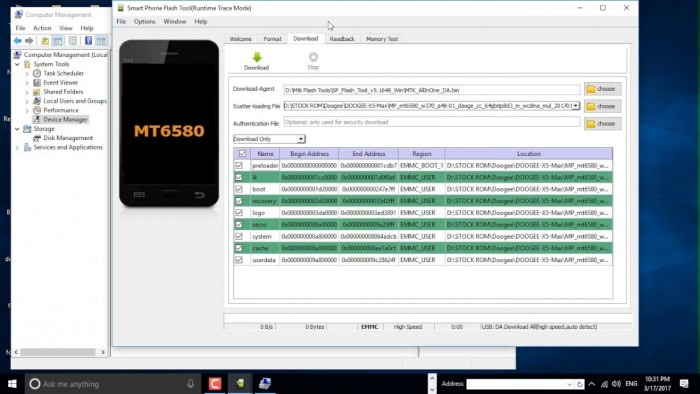
Step 3: Now, on the SP Flash tool window, click on “Download” and select “Scatter-loading”.

Step 4: The last step would be to locate the file downloaded by you and click “Open” and then finally, select “Download” on the SP Flash tool window.
After completing the above steps, connect your dead device to the PC with a USB cable and wait for it to get recognized. The flashing process will take a few minutes to finish and then you will see a green circle indicating “OK Download”.
That’s it! Now simply disconnect your phone and wait for it to reboot.
Part 5: How to flash Lava Yuva 3 Pro dead phone with the Phoenix tool?
Phoenix tool, better known as PhoenixSuit, is a tool similar to the SP False tool and Odin. It works very well with Lava Yuva 3 Pro and is the best answer to “How to fix dead Android phone?”, “How to flash dead Android phone using PC?”, etc.
Let’s look at the steps of flashing the Lava Yuva 3 Pro dead phone with the Phoenix tool.
First, download and install the Lava Yuva 3 Pro PC Suite driver on your PC. Then you will need to download the PhoenixSuit tool and then launch it.

Now, on the toolbar, click “Tools” and select “Data Package Download” from the drop-down list.

Then move to download the firmware for your dead Lava Yuva 3 Pro and save it in a new Folder. Once done, go back to the Phoenix tool window and click on “File” and select “Open Product”.

Simply, feed in the details and then click “OK”.

After this, click on “Flashing” and select “Firmware update” and then browse to select the appropriate product code and then click “OK” again.
Then move on to select “Dead Phone USB Flashing” from the Firmware Update Box.

Lastly, just click on “Refurbish” and connect your phone to the PC using a USB cable.
That was it, the flashing process may take up to a few minutes after which your dead Lava Yuva 3 Pro will restart automatically.
Part 6: How to flash a dead phone that won’t turn on via factory reset?
Using tools for flashing Android devices can be a solution; however, it is heavily restricted to the Lava Yuva 3 Pro device models. For a generalized solution, there can be other options that you can go with. Factory resetting an Android device by putting it in Recovery Mode is one way. To know how to flash a dead Android phone using factory reset, go through the steps featured below:
Step 1: To initiate the process, you will have to put your Lava Yuva 3 Pro in Recovery Mode. Generally, Android phones are put in Recovery Mode by holding the “Power” and “Volume Up” keys for a few seconds after turning them off. The key combinations can vary according to your Lava Yuva 3 Pro.
Step 2: As the Android boot menu opens on your screen, use the “Volume Down” and “Volume Up” keys to scroll up and down the menu. On accessing the “Wipe Data/Factory Reset” option, use the “Power” key to select the particular option.
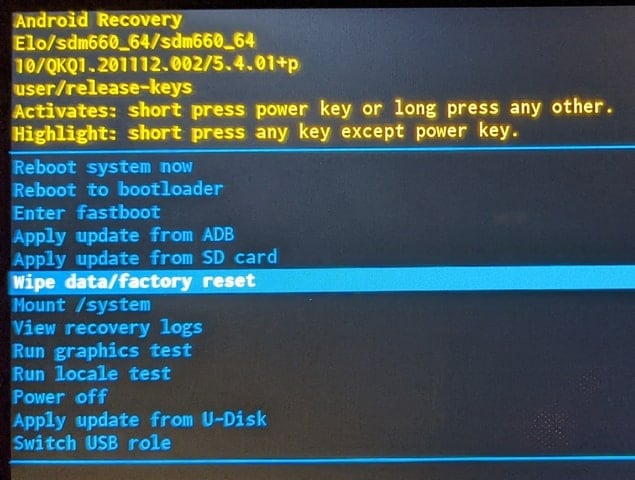
Step 3: Continue to select the “Yes” option for confirming the factory reset of the Android device. The phone will automatically reboot after successfully factory resetting.
Part 7: How to flash a dead Android phone by checking screen faulty
The screen of your Lava Yuva 3 Pro may be faulty, due to which it is not launching. While seeking the right way of how to fix a dead Android phone, you can force restart your phone using the Volume buttons according to your device model.
If the Android vibrates on restarting and the screen does not lighten up, the problem can be directed to a hardware fault. The screen is broken and needs physical assistance to resolve the issue.

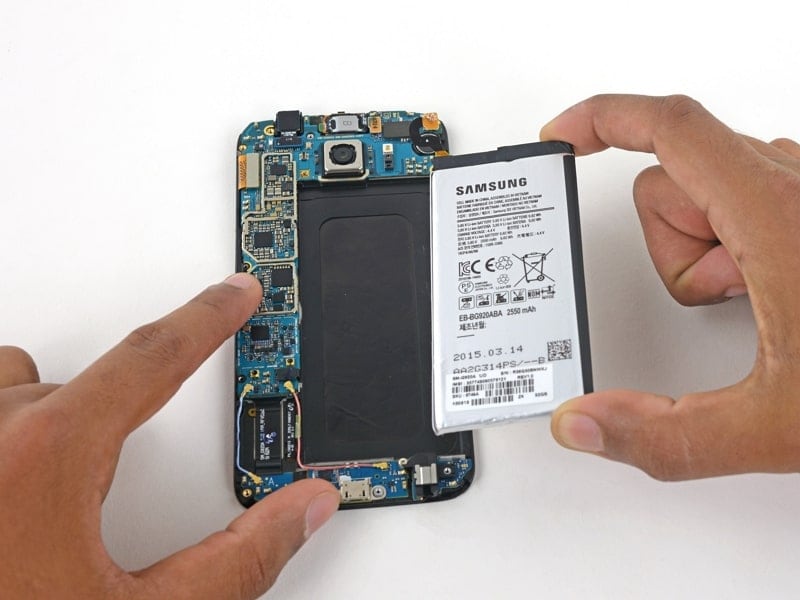
Part 8: How to fix a dead Android phone by changing the battery
Another solution that can help you fix the dead Android phone is changing its battery. The battery of an Android device can last up to 3 years. When its capacity drops to a bare minimum, it is best to change the battery of your Android. Upon trying to restart your Lava Yuva 3 Pro, if it does not, you might need to replace your battery. All Android phone batteries are removable, which should be regulated with proper supervision.
Part 9: How to repair dead Android phone by contacting official support
If you are unable to discover any proper solution for how to flash dead Android phones, you might have to consult the respective customer support of the Android phone manufacturers. Consult customer support to discover why the phone is dead and how it can be flashed. The respective personnel will assist you in resolving the issue, which might require monetary input from your side.
Conclusion
A dead Android phone might be the cause of worry, but the techniques given above to flash your dead Android device safely are very helpful. These methods have been tried and tested by users all over the world and thus, we recommend them to you. If your phone is dead or has become unresponsive, do not panic. Depending on your phone’s brand, here are ways to guide you on how to fix the dead Android phone and how to flash dead Android phone using PC.
It has been observed that Wondershare Dr.Fone – System Repair (Android) assists in the best way. Resolve all your concerns involving your dead Android phone and flash it to make it operable again.
Carefully follow the instructions given, and you will be able to reboot your dead Android phone successfully.
Calls on Lava Yuva 3 Pro Go Straight to Voicemail? 12 Fixes
Have you ever experienced incoming calls to your phone go straight to voicemail without ringing? It can be frustrating, especially if you’re expecting an important call. It could be due to simple things like turning down the volume or forgetting to turn off the Do Not Disturb mode. In other cases, it might be because you accidentally blocked the caller’s number.
In most cases, incoming calls going to voicemail without ringing are common. However, if it’s happening frequently or for all calls, your phone may have a problem.
This article will discuss why incoming phone calls go straight to voicemail and how to fix the problem. We’ll also show you how to use Wondershare Dr.Fone, a powerful Android System Repair tool, to solve such issues. So, if you’re uncertain why that last call went straight to voicemail, keep reading, and we’ll cover everything you need to know.

Part 1: Not Ringing? Here’s Why Calls on Your Phone Go Straight to Voicemail
If an incoming call to your cell phone goes straight to voicemail without ringing, there could be a few reasons. Here’s what to look for and what you should do to fix it:
- Turn Off Do Not Disturb (DND) Mode
DND mode is a feature that silences all incoming calls, notifications, and alerts. If DND mode is enabled, your cell phone goes straight to voicemail when someone calls. To turn off DND mode, swipe down from the top of the screen to open the notification settings panel, then tap the Do not disturb icon.

Here’s an alternative way:
- Step 1: Open the Settings app and go to Notifications.
- Step 2: Tap Do not disturb.

- Step 3: Toggle Do Not Disturb offto disable the mode.
- Turn Off Call Forwarding
One reason calls go straight to voicemail without ringing is if you enabled call forwarding. Call forwarding is a feature that redirects incoming calls to another number. To turn off call forwarding:
- Step 1: Open the Phone Dialer app on your device, then tap the menu icon and select Settings.

- Step 2: Navigate to Supplementary services > Call forwarding.

- Disable Call Barring
If a phone call went straight to voicemail, another possible explanation is the call barring. It is a feature that restricts calls from being made or received on your phone. If activated, it can cause incoming calls to a phone to go straight to voicemail. To turn off call barring on Lava Yuva 3 Pro devices:
- Step 1: Open the Phone Dialer app, then tap the menu icon in the top right corner.
- Step 2: Go to Settings > Supplementary services > Call barring, then tap OK.
- Step 3: Select Voice call, then turn off your preferred outgoing and incoming calls. When prompted, enter 0000 as a password.

- Update Your Phone’s Software
Sometimes, software bugs can cause problems with incoming calls, which may be why your last incoming call went straight to voicemail. If your phone runs outdated software, try updating it to the latest version.
To check for updates, open the Settings app and go to Software update or System update. For a seamless update experience, follow the step-by-step instructions on your mobile screen.

- Reset Network Settings
If the incoming calls on your phone go straight to voicemail, consider resetting your phone’s network settings. Network settings control how your phone connects to the cellular network. If these settings are not set up correctly, incoming calls may not be able to reach your device.
Note: Resetting your network settings will erase any saved Wi-Fi networks and Bluetooth pairings, requiring you to re-enter them after the reset is complete.
To reset your network settings on most Android devices:
- Step 1: Open the Settings app on your smartphone, then tap System or General Management.
- Step 2: Go to Reset > Reset Network Settings and confirm the action.

- Turn Off Bluetooth
When Bluetooth is on, it can interfere with your device’s ability to receive calls, causing them to go straight to voicemail without ringing. To turn off Bluetooth on an Android device, you can do one of the following:
- Swipe down from the top of the screen to open the Quick Settingspanel, then tap the Bluetooth icon to turn it off.

- Go to Settings> Connections > Bluetooth and toggle the switch off.

It should help ensure that calls come through to your phone instead of going to voicemail.
- Check Airplane Mode
If turning off Bluetooth didn’t solve the issue, another possible cause could be that your phone is in Airplane Mode. Airplane Mode turns off all wireless connections on your phone, including cellular service, which can cause calls to dial straight to voicemail. There are two ways to turn off Airplane mode on Android:
Using the Settings app:
- Step 1: Open the Settings app.
- Step 2: Tap Network & internet.
- Step 3: Toggle off Airplane mode or Flight mode.
Using the Quick Settings panel:
- Step 1: Swipe down from the top of the phone screen to access the Quick Settings panel.
- Step 2: Look for the Airplane mode or Flight mode icon, then tap it to turn it off.

- Check Blocked Numbers
“My boyfriend’s phone goes straight to voicemail when someone is calling. Any idea why that might be?”
Do you also find yourself asking what does it mean? It could be that he has blocked that phone number. To check this:
- Step 1: Open the Phone dialer app.
- Step 2: Tap the menu icon in the top right corner and select Settings.
- Step 3: Tap Block numbers. If you find the number in the blocked list, remove it to ensure that their calls come through to the phone.

If you still have trouble reaching your boyfriend, try calling him from a different number. If your call didn’t go through, you know that he hasn’t blocked your number and that there may be another issue with his phone.
- Turn Off Google One VPN
If you’re using Google One VPN, try turning it off to see if that fixes the problem. Some users have reported that Google One VPN can cause incoming calls to a phone to go straight to voicemail. To turn off Google One VPN:
- Step 1: Open the Google One app on your Lava Yuva 3 Pro.
- Step 2: At the bottom, go to the Benefits tab, then tap View Details below the Online protection with a VPN section.

- Step 3: Toggle off Enable VPN.

- Contact Your Carrier
If your phone calls go straight to voicemail after trying all the above, contact your carrier for help. They may be able to troubleshoot the problem or determine if there is a service outage in your area.
And if your carrier confirms that there is no service outage or billing-related block, the problem may be with your phone itself. You may need to try resetting your phone to factory settings or taking it to a repair shop.
- The Caller Used Ringless Voicemail
Ringless voicemail is a service that allows businesses to bypass your phone’s ringtone and send you pre-recorded messages directly to voicemail. Ringless voicemail is often used for marketing purposes. If you think you’re receiving ringless voicemail calls, you can contact the company calling you and ask them to remove you from their list.
Part 2: Not Clear About the Root Cause? Troubleshoot Directly by Wondershare Dr.Fone
If you’re unsure what’s causing your calls to go straight to voicemail, you can try using the Dr.Fone System Repair tool. This software can scan and repair your phone for any underlying problems, which may fix the issue and get your calls ringing again.
Dr.Fone supports over 1000 Android models, including unlocked Lava Yuva 3 Pro models and models from carriers like AT&T and Vodafone. It has an intuitive interface and is easy to use, even for beginners. Learn below the steps on how to use Dr.Fone System Repair to fix incoming calls that dial straight to voicemail:
- Step 1: Download Dr.Fone on your computer, then launch it once installed.
safe & secure
4,118,635 people have downloaded it
- Step 2: Connect your smartphone to your desktop or computer using a USB cable. Next, from the Toolbox homepage, select System Repair.
- Step 3: Select Android as the Lava Yuva 3 Pro device type.

- Step 4: Click Start to begin repairing your smartphone.
- Step 5: Select the Lava Yuva 3 Pro device details on the Name, Model, Country, and Carrier drop-down lists. Next, select the agreement checkbox, then click Next to proceed.
- Step 6: Follow the in-app instructions to enter Download mode on your Lava Yuva 3 Pro, then click Next.
- Step 7: Wait while the app downloads the firmware; once done, click Fix Now.

- Step 8: Enter the code in the input box to verify the Lava Yuva 3 Pro device information in the dialogue box, then click Confirm.

- Step 9: The app will start repairing the system issue on your Lava Yuva 3 Pro. Once completed, your app should restart, then click Done to close the app.
You May Also Like:
Top 5 Best Android System Repair Apps
How to Fix It: Android Stuck on Boot Screen?
How to Flash Dead Android Phone Safely
Conclusion
When your phone calls go straight to voicemail without ringing, it can be a frustrating and disruptive experience. Not only do you miss important calls from work, friends, or family, but it also leaves you feeling disconnected and out of the loop. As a temporary measure to avoid missing important calls, check your voicemail regularly.
For a prompt solution, consider using Dr.Fone if incoming calls on your phone go straight to voicemail. It is a powerful mobile solution that can also address other system problems, including stuck boot loops, app crashes, black screens, and bricked devices. If you consistently experience this issue, it’s advisable to reach out to a professional for assistance.
safe & secure
4,215,287 people have downloaded it
Fix Lava Yuva 3 Pro Android System Webview Crash 2024 Issue
In recent months, the term “Android WebView crash 2023“ has become a common search term among Android users seeking solutions to these app crashes . The issue has been particularly prevalent on Lava Yuva 3 Pro devices, but it has also affected users of other Android models.
Android WebView for Android apps allows you to see and interact with web pages without leaving your app. But lately, it’s been causing more headaches than it’s worth.
So, what’s going on with Lava Yuva 3 Pro Android System WebView, and what can you do to fix its issues? Let’s take a look. This article will shed light on Lava Yuva 3 Pro Android System WebView crashing apps, helping you understand what triggers them, how to identify them, and what you can do to prevent them from happening again.
Part 1: What Should We Know About Lava Yuva 3 Pro Android System WebView Crashes?
This year, the term “Android WebView crash 2023“ has become a familiar and dreaded phrase. This issue has plagued Android users, causing app crashes, freezing , and frustration. But what exactly is Android WebView, and what triggers these apps to crash?
Android WebView is an integral component of Android apps, acting as the invisible engine that renders web content within these apps. It allows users to seamlessly browse websites, watch videos, and interact with web pages without switching to a separate browser. However, when WebView crashes, it disrupts this integrated experience, causing apps to malfunction.
Several signs can indicate an impending or ongoing Android WebView crash. These include:
- App Freezing
One of the earliest signs of an Lava Yuva 3 Pro Android System WebView crash is the app freezing. The app may become unresponsive, refusing to respond to your taps or gestures.
- Unexpected App Closures
Another common sign is unexpected app closing. The app may shut down without warning, abruptly ending your activity. Lava Yuva 3 Pro Android System WebView crashing apps can be disruptive if you are in the middle of a conversation, shopping online, or filling out an important form.
- Error Messages
Error messages can also provide valuable clues about the impending crash. These messages may appear as pop-ups or be displayed within the app itself.

- Slow Loading Times
Slow loading times can also be a sign of an impending crash. If webpages within the app take unusually long to load or images and other content appear pixelated or distorted, it could be a sign that Lava Yuva 3 Pro Android System WebView is struggling to handle the workload.
But why does WebView crash Android smartphones? The answer involves several factors:
- Updates and Compatibility Issues
Updates are often intended to improve software stability and compatibility, but in some cases, they can introduce new bugs or compatibility issues that lead to crashes. It is particularly evident when app developers and WebView developers release updates that don’t fully align, causing conflicts.
- Insufficient Memory
Lava Yuva 3 Pro Android System WebView requires a certain amount of memory to operate properly. If your device is running low on memory, it can cause Lava Yuva 3 Pro Android System WebView to crash. It is more likely to happen on older devices with less RAM.

- Outdated Lava Yuva 3 Pro Android System WebView
The WebView app is responsible for rendering web content within Android apps. Using an outdated version of WebView can introduce known bugs and security vulnerabilities that can cause crashes.
- Conflicts With Other Apps
WebView might crash if it conflicts with other resources or processes running on the Lava Yuva 3 Pro device. It can happen if the Lava Yuva 3 Pro device runs low on memory or other resource-intensive apps compete for system resources.
In the next section, you’ll explore potential solutions to keep your apps running smoothly.
Part 2: Android WebView Crashes? Here Are Quick and Proven Solutions
Now you’ve identified the signs and causes of Lava Yuva 3 Pro Android System WebView crashing apps on your phone. While these issues can be frustrating, there are several quick and proven solutions to fix them.
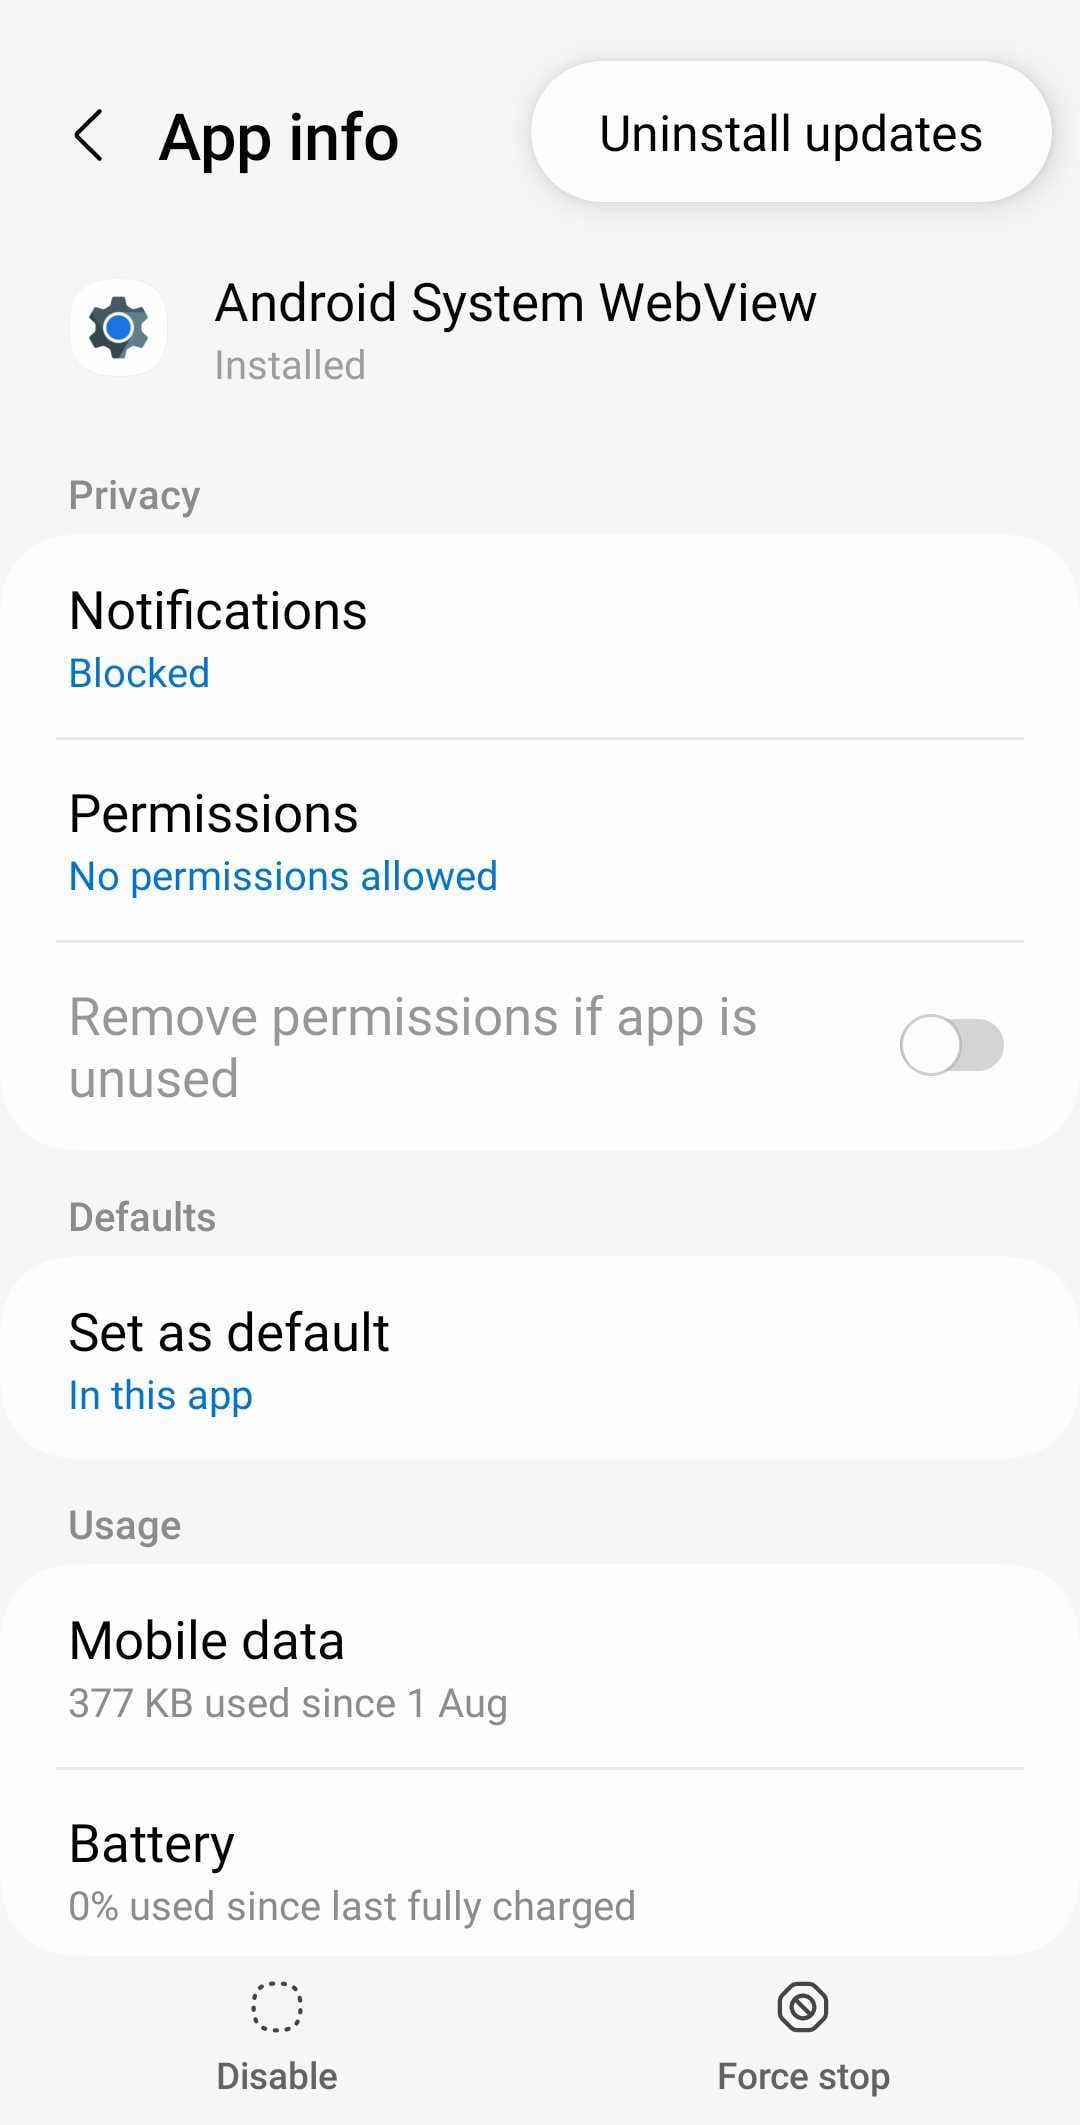
Uninstall WebView Updates
If you’re experiencing apps crashing after a recent update, consider uninstalling those updates. This action can potentially revert to a more stable version of Lava Yuva 3 Pro Android System WebView.
To do this on your Lava Yuva 3 Pro, navigate to Settings > Apps, then select Lava Yuva 3 Pro Android System WebView. Tap the menu icon in the top right corner and tap Uninstall updates.
Update Android WebView
Regularly updating Lava Yuva 3 Pro Android System WebView to the latest version is crucial for maintaining compatibility and addressing known bugs. Google releases updates to address these concerns, ensuring optimal performance and stability.
Check for available updates on Lava Yuva 3 Pro devices by navigating to Settings > Apps. Then, select Lava Yuva 3 Pro Android System WebView and tap App details in-store. If an update is available, tap Update to install it and restart your phone.

Update Google Chrome
Android WebView is closely tied to Google Chrome, and issues with Chrome can sometimes affect WebView functionality. As such, updating Chrome to the latest version can help address Android System and WebView forcibly closing your phone’s apps.
Open the Google Play Store and search for Google Chrome. If an update is available, tap Update to install it, then restart your device.
Clearing Cache and Data for Android WebView
Clearing the cache frees up phone storage and helps the app run more efficiently. To clear Lava Yuva 3 Pro Android System WebView’s cache and data, go to Settings > Apps and select Lava Yuva 3 Pro Android System WebView. Tap on Storage and tap Clear cache on the lower right corner of your screen.

Restart Device
A simple restart can often resolve temporary glitches or conflicts that might be causing Android WebView crashes. The specific steps to restart your phone will vary depending on your device type.
Check Internet Connection
A stable internet connection is essential for Lava Yuva 3 Pro Android System WebView to render web content properly. If the internet connection is unstable or down, it can lead to crashes. Ensure you have a stable internet connection before using WebView-based apps.
Update Device Software
OS updates may introduce changes to the Lava Yuva 3 Pro Android System WebView that make it more compatible with newer web standards and technologies. It can enhance the performance and stability of apps that rely on WebView for web content.
Check for available software updates by going to Settings > Software Update. If an update is required, tap on Download and install.

While problems like when the Android System WebView crashes Android phones are common, they don’t have to be a persistent problem for Lava Yuva 3 Pro users. It’s also equally important to have effective solutions when app crashes occur. This is where Wondershare Dr.Fone steps in as a reliable and comprehensive solution for restoring app stability and overall phone performance.
Part 3: Restoring Apps and Phone Stability: A Step-by-Step Guide
Dr. Fone’s System Repair tool can help you resolve common Android scenarios, including Google Play Store malfunctions and persistent app crashes.
How To Use Dr.Fone for Lava Yuva 3 Pro Android System WebView Crashing Apps?
Before attempting any repairs, it is crucial to back up your Lava Yuva 3 Pro to prevent data loss. Once you have a secure backup, follow these steps to fix WebView app crashes and restore your Lava Yuva 3 Pro to its optimal performance.
- Step 1: Download the Dr.Fone toolkit. Next, install the software on your desktop and launch it.
safe & secure
3,090,920 people have downloaded it
- Step 2: Connect your Lava Yuva 3 Pro to your computer using a USB cable. Dr.Fone will automatically detect and establish a connection.
- Step 3: Select the System Repair function from the Toolbox homepage and choose Android to confirm your device type.
- Step 4: Click Start to begin the process of fixing Lava Yuva 3 Pro Android System WebView crashes. Next, choose your device details and follow the in-app instructions to put your device in Download mode.
- Step 5: Dr.Fone will analyze your device’s system and download the firmware to solve the root cause of the issue.
- Step 6: Confirm your device information in the dialogue box. Dr.Fone will proceed to repair the detected WebView-related problems.

- Step 7: Once the repair is complete, your device will restart, and Lava Yuva 3 Pro Android System WebView crashing apps should no longer occur.
More Articles About Android System:
5 Ways to Do With & Access Android Phone with Broken Screen
Google Play Services Won’t Update? 12 Fixes are Here!
Easy Ways to Bypass Google Account Verification (FRP) On Android Phones
Conclusion
The “Android WebView crash 2023“ issue was widespread for many Android users. The common issues encountered were app crashes, slow loading times, and error messages. Fortunately, these problems are manageable with the right approach.
By understanding the signs and causes of Lava Yuva 3 Pro Android System WebView crashes, you can take proactive measures to prevent them. Quick fixes such as clearing cache and data or updates can often resolve the issue promptly.
For more comprehensive troubleshooting, Dr. Fone’s mobile solution offers a reliable and user-friendly approach. Its advanced capabilities effectively tackle app crashing issues, providing you peace of mind that your phone is functioning optimally.
safe & secure
4,684,259 people have downloaded it
Also read:
- [New] 2024 Approved The Gastronome's Guidebook Culinary Videos
- [New] Enhance Your Story Game Applying Fun Sticker Themes
- 2024 Approved Stats Galore! Visualize YouTube's Fascinating Facts (2017)
- 6 Proven Ways to Unlock Nokia Phone When You Forget the Password
- Curtailing Premature Windows Edge Tabs
- Hassle-Free Ways to Remove FRP Lock on OnePlus 11R Phones with/without a PC
- How To Fix Unresponsive Touch Screen on Samsung Galaxy S23 Tactical Edition | Dr.fone
- How To Revive Your Bricked Oppo A59 5G in Minutes | Dr.fone
- In 2024, Deciphering the Power of Apple’s New M1 Laptops
- IPad Creativity Showdown: Apple Pencil Pro vs Apple Pencil (2Nd Gen) – Ultimate Verdict for Artists and Designers | TechRadar
- My Videos Arent Playing on Poco X5 Pro – What Can I Do? | Dr.fone
- Play Store Not Working On Lava Blaze 2 5G? 8 Solutions Inside | Dr.fone
- Prevent Cross-Site Tracking on Samsung Galaxy S24+ and Browser | Dr.fone
- Quick Fixes for Why Is My Samsung Galaxy F14 5G Black and White | Dr.fone
- Reasons for Realme Narzo 60 5G Stuck on Startup Screen and Ways To Fix Them | Dr.fone
- Simple Solutions to Fix Android SystemUI Has Stopped Error For Itel S23+ | Dr.fone
- Simple Solutions to Fix Android SystemUI Has Stopped Error For Nokia C210 | Dr.fone
- Stuck at Android System Recovery Of Itel P55T ? Fix It Easily | Dr.fone
- The Essential Guide to Taking Charge of Your Cloud Security Risks | Cyber Defense Today
- Title: How to Flash Dead Lava Yuva 3 Pro Safely | Dr.fone
- Author: Abel
- Created at : 2025-01-10 10:18:55
- Updated at : 2025-01-15 20:22:02
- Link: https://fix-guide.techidaily.com/how-to-flash-dead-lava-yuva-3-pro-safely-drfone-by-drfone-fix-android-problems-fix-android-problems/
- License: This work is licensed under CC BY-NC-SA 4.0.