
How to Flash Dead Samsung Galaxy S23 Safely | Dr.fone
How to Flash Dead Samsung Galaxy S23 Safely
- Fix malfunctioning Android to normal in one click.
- Highest success rate to fix all Android issues.
- Step-by-step guidance through the fixing process.
- No skills required to operate this program.
A phone is considered to be dead when it becomes completely unresponsive and refuses to switch on. Similarly, an Android phone is said to be dead when it does not boot up. You may try to switch it on several times by pressing the power button but in vain. You will see no sign of the phone’s logo or anything like a welcome screen. The Android phone’s screen remains black and does not illuminate when you try to turn it on. Interestingly, even when you charge this dead device, it does not show that it is getting charged.
Many people regard this as a battery issue, and many think of it as a temporary software crash. Some users also seem to believe that this is because of a virus attack. However, if you are looking for ways that tell how to fix a dead Android phone, you must understand that a dead phone or device can be cured by flashing custom firmware safely. If you are keen to know how to flash a dead Android phone or how to flash dead Android phones using PC, here are ways to help you.
Given below are eight techniques to flash your Samsung Galaxy S23 safely, depending upon which phone you are using. It may seem time-consuming and tedious, but we can assure you that it works. So, move ahead and read on to learn about flashing new firmware, your Samsung Galaxy S23, MTK Android, and Samsung Galaxy S23 safely.
 safe & secure
Part 1: Can a Dead Phone Be Flashed?
Flashing a dead Android phone might be skeptical for many users who have been in such a situation. Although it is possible to flash a dead Android phone, it is essential to be aware of the reasons that lead you into such a situation. Before a remedy, diagnosing the problem is a necessity for retaining the Samsung Galaxy S23 device.
From battery issues to physical damage to the Samsung Galaxy S23 device, there can be many reasons your Samsung Galaxy S23 died. The reasons for a dead Android phone are not restricted to these points. There can be software-related issues or firmware issues that might cause such havoc on your Android.
Part 2: How to flash Samsung Galaxy S23 in one click
While you are worried about how to flash Samsung Galaxy S23 instantly with a single click, Dr.Fone - System Repair (Android) swiftly makes its way with a galore of options for you. This amazing tool from Wondershare can fix a plethora of Android system issues such as crashing of apps, black screen of death, failed system update, etc. Moreover, it can also get your device out of boot loop, unresponsive bricked Android mobiles as well as stuck at the Samsung Galaxy S23 logo.
Dr.Fone - System Repair (Android)
One-click solution to flash Samsung Galaxy S23
- The high success rate in fixing Samsung Galaxy S23 Android devices.
- All the latest Samsung Galaxy S23 devices are supported by this software.
- One-click operation of this tool helps you how to flash Samsung Galaxy S23 easily.
- Being very intuitive, it doesn’t need you to be tech-savvy to use this software.
- It is one of its kind and the first one-click Android repair software on the market.
3981454 people have downloaded it
Step-by-step Tutorial
We are going to explain how to flash a dead Android phone using a PC using Dr.Fone - System Repair (Android)
Note: Before you understand how to flash Dead Android phone, take a backup of your data and then proceed to avoid any data loss.
Phase 1: Prepare your Samsung Galaxy S23
Step 1: Once you have downloaded and installed Dr.Fone, launch it. From the main menu, tap on ‘System Repair’ and get your Samsung Galaxy S23 connected to it.

Step 2: Click ‘Android Repair’ from the available options, and then press the ‘Start’ button to fix the Dead Android phone by flashing it.

Step 3: On the Samsung Galaxy S23 device information screen, pick the appropriate device brand, name, model, and other details followed by tapping the ‘Next’ button.

Phase 2: Put the Android device in Download mode to start repair.
Step 1: It is essential to boot your Samsung Galaxy S23 in Download mode before repairing.
- If the Samsung Galaxy S23 device has a ‘Home’ button: Turn it off and then hold down the ‘Volume Down’, ‘Home’, and ‘Power’ buttons altogether for 5-10 seconds. Un-hold all of them and hit the ‘Volume Up’ button for entering ‘Download’ mode.

- In the absence of a ‘Home’ button: Switch off the Android device and hold the ‘Volume Down’, ‘Bixby’, and ‘Power’ buttons for 5 to 10 seconds, then release them. Hit the ‘Volume Up’ button for entering the ‘Download’ mode.

Step 2: Press the ‘Next’ button for initiating firmware download.

Step 3: Once the firmware gets downloaded and verified Dr.Fone - System Repair (Android) starts to flash your Dead Android phone. All the Android system issues will be fixed soon after.

safe & secure
Part 3: How to flash Samsung Galaxy S23 dead phone with Odin?
In this segment, we will learn how to fix the dead Android phone, i.e., Samsung Galaxy S23 phones using Odin software. Odin is software used internally by Samsung Galaxy S23 to generally unblock devices and perform a more utility-based job, namely, flashing new firmware in place of the old one. There are different variants available, so choose the one which is supported by your Galaxy phone. Here is a step-by-step explanation of how to flash dead Android phone (Samsung Galaxy S23) using Odin software.
Step 1: Install the driver software on the computer. You can find the best driver software for your device and PC on the official Samsung Galaxy S23 website. You may also download Samsung Galaxy S23 Kies on your PC. Once you have downloaded and installed the driver software, restart the PC.
Step 2: Now download suitable firmware for your device in the form of a zip folder that you can open and store on your desktop.

Make sure the file is .bin, .tar, or .tar.md5 only as these are the only file types recognized by Odin.


Step 3: In this step, download the latest version of Odin on your PC and move it to the desktop, and then right-click on the downloaded Odin file to select “Run as Administrator”.


Step 4: Now, boot your dead device to Download Mode by pressing the power, volume down, and home button together. When the phone vibrates, release the power button only.

Step 5: Gently press the volume up button, and you will see the Download Mode Screen.

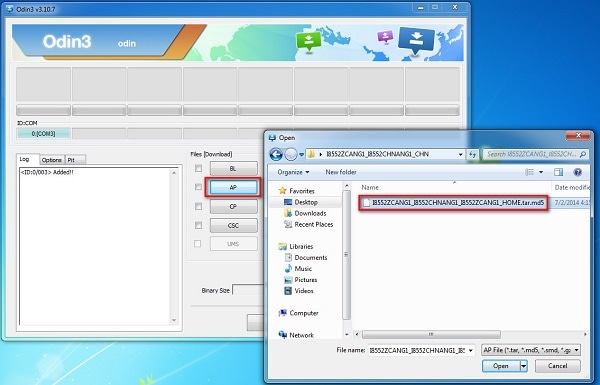
Step 6: Now, you may use a USB to connect your Samsung Galaxy S23 to the PC. Odin will recognize your device, and in the Odin window, you will see a message saying “Added”.

Step 7: In this step, find the tar.md5 file you downloaded by clicking on “PDA” or “AP” on the Odin window and then click “Start”.
Finally, once the flashing process is complete, your Samsung Galaxy S23 phone will reboot and start normally, and you may see a “Pass” or “Reset” message on the Odin window on the PC.
Part 4: How to flash MTK Android dead phone with SP Flash tool?
SP Flash tool, also known as SmartPhone Flash tool is a popular freeware tool used to flash custom ROM or firmware in MTK Android phones. It is a very successful tool and is extremely easy to use.
Let us look at the steps given below to learn how to flash dead Android phones using PC with the help of the SP Flash tool.
Step 1: To start with, download and install the MTK driver on your PC and then download the ROM/firmware you wish to use for flashing purposes.
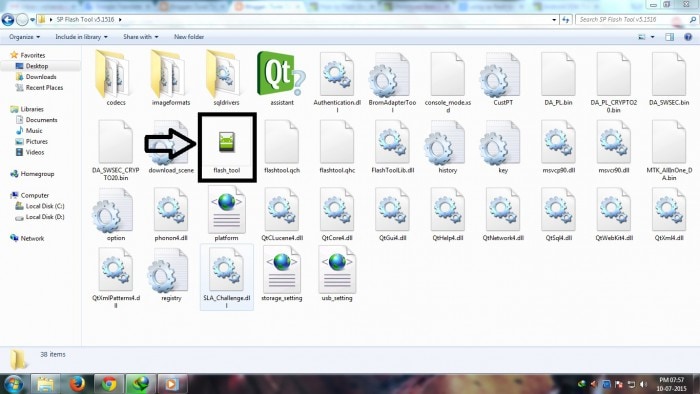
Step 2: Once done, you should download the SP Flash tool and extract it on your PC and move on to launch the Flash_tool.exe file to open the SP Flash tool window.
Step 3: Now, on the SP Flash tool window, click on “Download” and select “Scatter-loading”.

Step 4: The last step would be to locate the file downloaded by you and click “Open” and then finally, select “Download” on the SP Flash tool window.
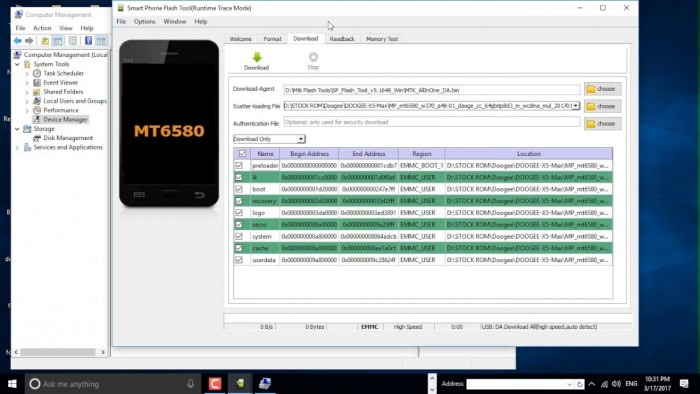
After completing the above steps, connect your dead device to the PC with a USB cable and wait for it to get recognized. The flashing process will take a few minutes to finish and then you will see a green circle indicating “OK Download”.
That’s it! Now simply disconnect your phone and wait for it to reboot.
Part 5: How to flash Samsung Galaxy S23 dead phone with the Phoenix tool?
Phoenix tool, better known as PhoenixSuit, is a tool similar to the SP False tool and Odin. It works very well with Samsung Galaxy S23 and is the best answer to “How to fix dead Android phone?”, “How to flash dead Android phone using PC?”, etc.
Let’s look at the steps of flashing the Samsung Galaxy S23 dead phone with the Phoenix tool.
First, download and install the Samsung Galaxy S23 PC Suite driver on your PC. Then you will need to download the PhoenixSuit tool and then launch it.

Now, on the toolbar, click “Tools” and select “Data Package Download” from the drop-down list.

Then move to download the firmware for your dead Samsung Galaxy S23 and save it in a new Folder. Once done, go back to the Phoenix tool window and click on “File” and select “Open Product”.

Simply, feed in the details and then click “OK”.

After this, click on “Flashing” and select “Firmware update” and then browse to select the appropriate product code and then click “OK” again.
Then move on to select “Dead Phone USB Flashing” from the Firmware Update Box.

Lastly, just click on “Refurbish” and connect your phone to the PC using a USB cable.
That was it, the flashing process may take up to a few minutes after which your dead Samsung Galaxy S23 will restart automatically.
Part 6: How to flash a dead phone that won’t turn on via factory reset?
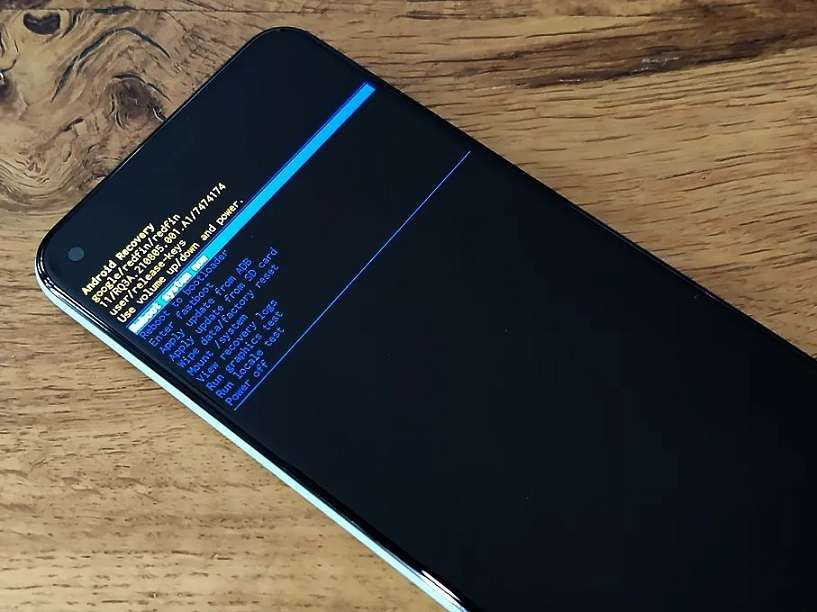
Using tools for flashing Android devices can be a solution; however, it is heavily restricted to the Samsung Galaxy S23 device models. For a generalized solution, there can be other options that you can go with. Factory resetting an Android device by putting it in Recovery Mode is one way. To know how to flash a dead Android phone using factory reset, go through the steps featured below:
Step 1: To initiate the process, you will have to put your Samsung Galaxy S23 in Recovery Mode. Generally, Android phones are put in Recovery Mode by holding the “Power” and “Volume Up” keys for a few seconds after turning them off. The key combinations can vary according to your Samsung Galaxy S23.
Step 2: As the Android boot menu opens on your screen, use the “Volume Down” and “Volume Up” keys to scroll up and down the menu. On accessing the “Wipe Data/Factory Reset” option, use the “Power” key to select the particular option.
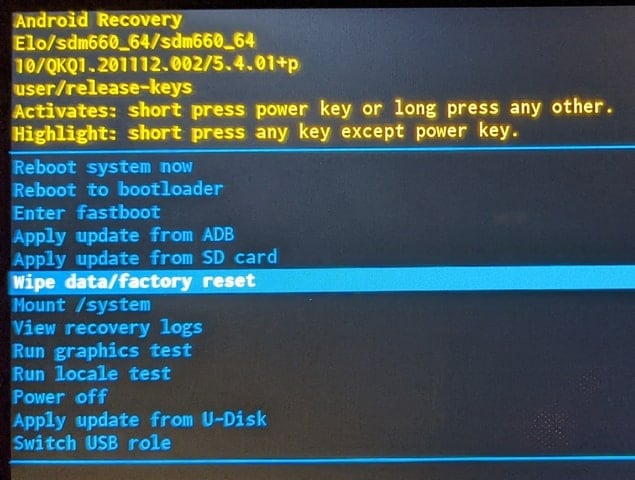
Step 3: Continue to select the “Yes” option for confirming the factory reset of the Android device. The phone will automatically reboot after successfully factory resetting.
Part 7: How to flash a dead Android phone by checking screen faulty
The screen of your Samsung Galaxy S23 may be faulty, due to which it is not launching. While seeking the right way of how to fix a dead Android phone, you can force restart your phone using the Volume buttons according to your device model.
If the Android vibrates on restarting and the screen does not lighten up, the problem can be directed to a hardware fault. The screen is broken and needs physical assistance to resolve the issue.

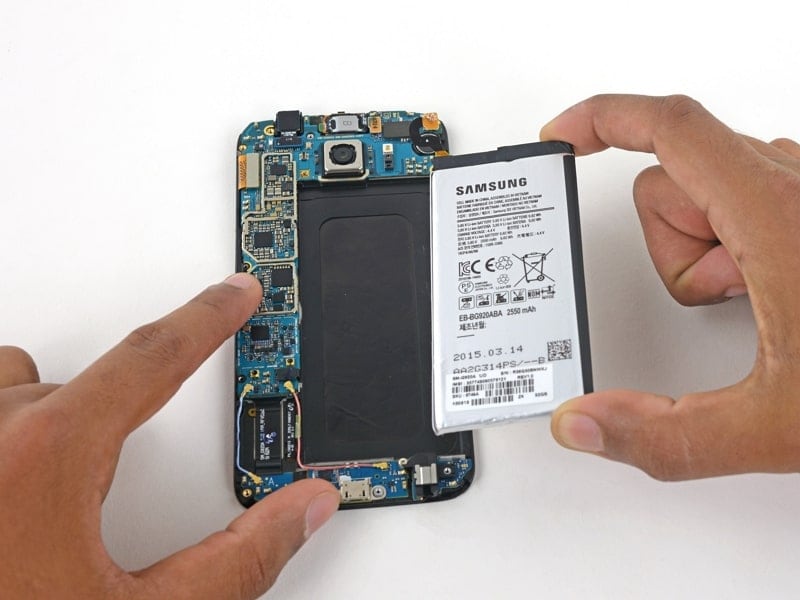
Part 8: How to fix a dead Android phone by changing the battery
Another solution that can help you fix the dead Android phone is changing its battery. The battery of an Android device can last up to 3 years. When its capacity drops to a bare minimum, it is best to change the battery of your Android. Upon trying to restart your Samsung Galaxy S23, if it does not, you might need to replace your battery. All Android phone batteries are removable, which should be regulated with proper supervision.
Part 9: How to repair dead Android phone by contacting official support
If you are unable to discover any proper solution for how to flash dead Android phones, you might have to consult the respective customer support of the Android phone manufacturers. Consult customer support to discover why the phone is dead and how it can be flashed. The respective personnel will assist you in resolving the issue, which might require monetary input from your side.
Conclusion
A dead Android phone might be the cause of worry, but the techniques given above to flash your dead Android device safely are very helpful. These methods have been tried and tested by users all over the world and thus, we recommend them to you. If your phone is dead or has become unresponsive, do not panic. Depending on your phone’s brand, here are ways to guide you on how to fix the dead Android phone and how to flash dead Android phone using PC.
It has been observed that Wondershare Dr.Fone – System Repair (Android) assists in the best way. Resolve all your concerns involving your dead Android phone and flash it to make it operable again.
Carefully follow the instructions given, and you will be able to reboot your dead Android phone successfully.
How To Deal With the Samsung Galaxy S23 Screen Black But Still Works?
With the advance of technology over the years, many of us rely on smartphones to communicate, work, and play. As such, it can be pretty concerning when your device begins to act strange like your phone screen suddenly went blank.

Whether you’re using an iPhone or an Android device, you’ll eventually encounter a problematic symptom like this. Therefore, this article will explore what to do when your phone screen goes black. After exploring below, you’ll learn the common causes of why your phone screen went black and how to fix it. Read on below to learn more.
Part 1: Why Did My Samsung Galaxy S23 Screen Go Black but Still Works? Common Causes
Experiencing a cell phone blank screen is not exclusive to Android or iOS users. A phone screen not turning on happens all the time due to several factors that may or may not be out of your control. While they can be frustrating, here are some common causes you should know as to why your phone screen went black but still works.
A Drained Battery
The first thing that comes to mind when your phone screen suddenly goes black is you have a drained battery. Even though this is obvious, it’s still important to mention, as this is usually what most people encounter. To fix this problem, plug your smartphone into a charger and wait for your device to turn on again. If it works, then you just prevented a rather annoying experience.

App Troubles
If your phone is working, but the screen is black, there’s also a high probability that you are having an isolated issue with a particular application. An app could be loading something, which often happens for streaming apps such as YouTube, Netflix, Prime, and more, especially if you have slow internet connectivity.
Software Issues
A potential reason why your phone screen went black but still works could be because of your smartphone’s software. This problem suggests that your Samsung Galaxy S23 is crashing, potentially freezing your device if not addressed immediately. If this is the cause, then your device is likely experiencing a critical system error, and you should directly try to reboot your phone.
Hardware Problem
If you dropped your phone, there’s a high chance the LCD connectors went loose due to the physical impact. If this happened to you, the phone might be working, but the screen is black due to the LCD cable dislodging. Another issue could be your phone got exposed to extreme temperatures. This can also cause a black screen but your phone is still on.

Part 2: How To Fix Black Screen on Your Phone
Here are four valuable methods you should know on what to do when your phone screen goes black on your iPhone or Android smartphone to get them working again.
Method 1: Force Restart your Android/iOS Smartphone
If your phone screen is black but still works, force restarting it is the easiest way to fix it. The following are the detailed steps for both Android and iOS devices.
How to Force Restart your Android Device
Here is how you force restart an Android device when your phone screen doesn’t turn on.
Step 1: Press and hold the Power and Volume Down buttons simultaneously.
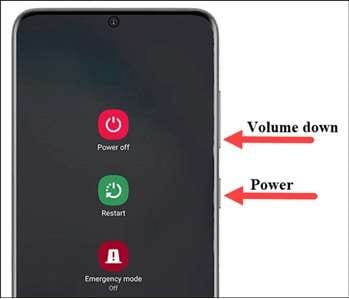
Step 2: Hold the same buttons until your device restarts, and display the phone’s logo.
How to Force Restart your iOS Device
If you own the latest iPhone models, here are the method of restarting it from iPhone 8 up to 14.
Step 1: Press and immediately release Volume Up. Next, press and immediately release Volume Down.

Step 2: Press and hold Sleep/Wake until you see the Apple logo.
Note
If you own an iPhone 7, press and hold the Side button and Volume Down simultaneously until you see the apple logo.
Method 2: Uninstall or Update Outdated Applications
In some cases, your phone screen is black but still works because of installing incompatible apps on your iOS/Android device. If the installed app is frequently crashing, it may be the source of a blank cell phone screen. Uninstall the problem app to see if the black screen disappears or not.
Method 3: Inspect the LCD Connectors
If your phone screen goes black but still works, you should inspect the logic board to the LCD screen to see if it has become disconnected. It is common for smartphones that often get dropped a few times. It’s best to plug the connectors back to regain your screen’s functionality.
However, this requires technical know-how. It’s better to seek help from a professional as you could risk causing more damage to your device if you don’t know what you’re doing.
Method 4: Perform a Factory Reset
If all the methods above did not solve your problem, the last resort you can take is to perform a Factory Reset. This method works on Android and iOS smartphones and erases all your data. It is the quickest way to try to fix why your phone screen went black. Here are the steps.
For Android Users
If you’re on Android, tap Settings > Backup and Reset. Tap on Factory data reset > Delete all to initiate the factory reset.
If you cannot do this, here’s how to perform a factory reset manually using Recovery Mode.
Note
The process of booting into Recovery Mode is not the same across all Android devices and depends on the manufacturer and model of your phone. Refer to your owners manual to see which method is the right one for your Samsung Galaxy S23.
Step 1A: Press and hold the Power button and Volume Down buttons simultaneously and continue holding until the screen starts.
Step 1B: For Android devices with a Home button, press and hold the Home button and the Power button and continue holding until the screen starts.
Step 1C: Press and hold the Power button as well as the Volume Up and Volume Down buttons simultaneously and continue holding until the screen starts.

Step 2: Use the Volume buttons to navigate the choices and select Wipe data/factory reset and confirm your choice with the Power button.
Step 3: Simply wait for the process to complete and wait for your Samsung Galaxy S23 to restart automatically.
F****or iOS Users
Step 1: For iOS users, meanwhile, tap Settings > General > Transfer or Reset iPhone.
Step 2: Next, choose Erase All Content and Settings. Check the list of items you want to remove.

Step 3: Tap Continue and enter your iPhone passcode. A message warns you that the process will delete all media and data and reset all settings.
Step 4: Tap Erase iPhone to confirm. You’ll be asked to type in your Apple ID and password if Find My is active. Enter your password and tap Erase.
Part 3: How To Fix Black Screen Phone With an Alternative
If your phone screen went black but still works and doing the methods above did not solve the issue, you can use Wondershare Dr.Fone for iOS and Android as a last resort. It’s one of the most popular smartphone repair tools today, enabling you to fix all kinds of annoying scenarios. These include black screen, boot loop, white screen of death, bricked iOS or Android device, and more.
Key Features
Dr.Fone – System Repair for iOS and Android has fantastic features you can immediately take advantage of. Here are its key features below.
- Fix all Android and iOS Problems in Minutes
Dr.Fone – System Repair can fix all kinds of issues on your Android/iOS, such as a black screen, white screen of death, screen freeze, boot loop, or recovery mode. All of this can be done within less than 10 minutes to save you precious time.
- Supports up to 1000+ Android Smartphones and the latest iOS
All iOS versions, including the latest iOS 16 and iOS 16 beta, are fully supported by Dr.Fone – System Repair. The app handles all your smartphone issues without data loss to secure your info. On the other hand, if you own an Android, the app supports up to 1000+ Android smartphones, making it highly versatile for Android owners.
Tech Specs
Dr.Fone – System Repair (Android)’s minimum system requirements for your computer are listed below.
| Computer OS | Android |
|---|---|
| Windows 11, 10, 8.1, 8, 7 | Android 2.1 and up to the latest |
Meanwhile, here are the system requirements for Dr.Fone – System Repair (iOS).
| Computer OS | iOS |
|---|---|
| Windows 11, 10, 8.1, 8, 7 | Supports all iOS versions, including the latest iOS 16 and iOS 16 beta |
| macOS 12, 11, 10.15, 10.14, 10.13, 10.12, 10.11, 10.10, 10.9, 10.8 |
Pros and Cons
If you’re still undecided about Dr.Fone – System Repair, here are its pros and cons.
Pros
- Fone – System Repair for iOS and Android has a clutter-free and beginner-friendly user interface. It’s easy to understand and use, so you can start immediately.
- Both the iOS and Android versions finish the repair tasks within less than 10 minutes to save you time.
Cons
- Each version for each OS is sold separately.
- The free version works up to your device’s compatibility. Once you start the repair process, the app will ask you for a valid license key.
How to Fix Black Phone Screen With Dr.Fone – System Repair
Here’s how to fix your phone screen with Dr.Fone – System Repair on iOS/Android.
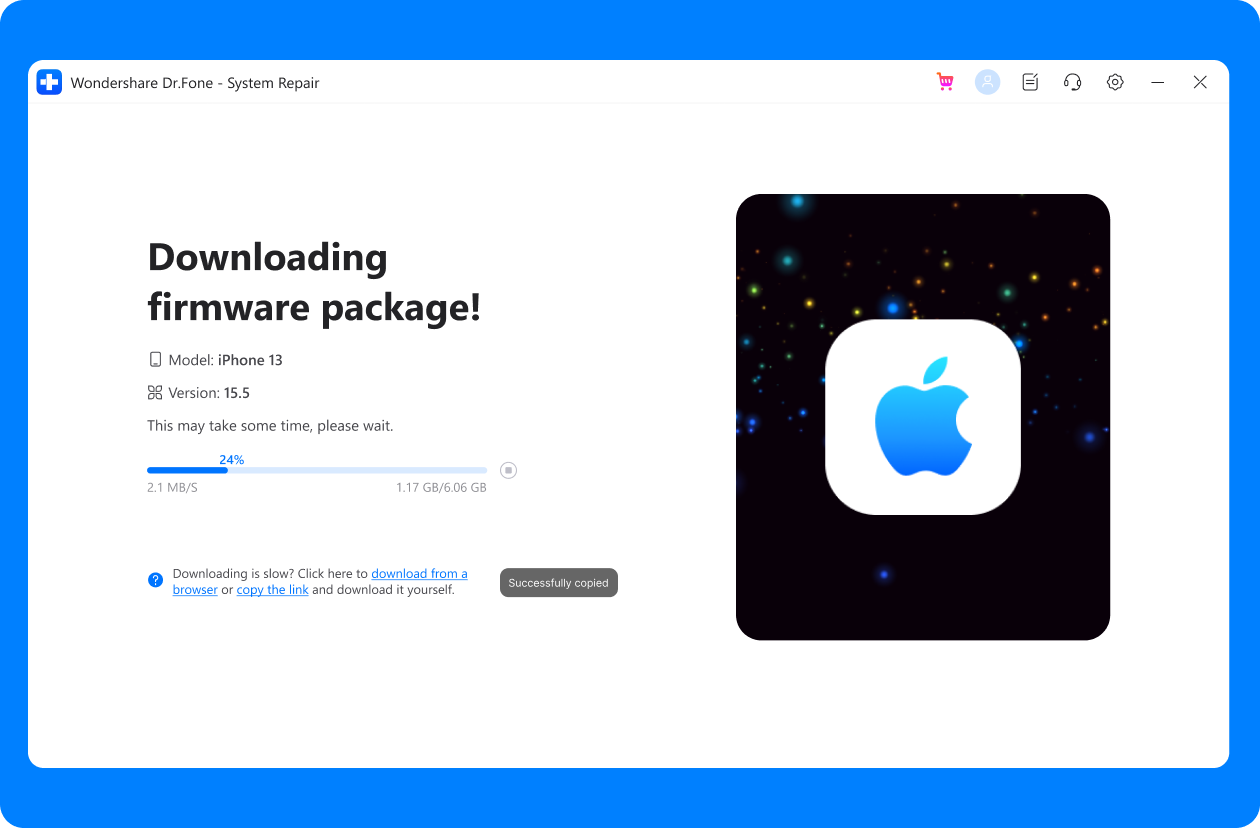
Step 1: Download and install Dr.Fone – System Repair for iOS or Android. Next, open the program and connect your smartphone.
Step 2A (For iOS): Choose the correct model of your iPhone for the program to be able to download the appropriate firmware package.
Step 2B (For Android): Click Start. On the next window, choose the Brand, Name, Model, Country, and Carrier of your smartphone, then click Next.

Step 3: Follow the on-screen instructions provided on the main program window and wait for the repair process to complete.
safe & secure
4,262,204 people have downloaded it
Conclusion
Our increasing reliance on smartphones has led to amazing advancements in new technologies. However, lingering issues such as your phone screen not turning on or your phone screen being black but still working are ongoing problems to many. That’s why learning how to prevent these events is essential to take care of your smartphone.
Doing all the recommended methods above usually solves the case. If the different fixes don’t work for you, Dr.Fone – System Repair for iOS and Android can help resolve all your problems within less than 10 minutes. You can download it for free on Windows and Mac to test it yourself.
Proven Ways to Fix There Was A Problem Parsing the Package on Samsung Galaxy S23
Unable to install your favorite Apps from Google Play Store because there was a problem parsing the package?
The Parse Error or there was a problem parsing the package error is very common with Android devices. Android is a versatile platform and, therefore, a very popular OS. It is an open software and allows users to download and use various types of apps from the Play store. Android is also a cheaper alternative as compared to other Operating Software.
Since many of us are well versed with most of the Android devices, parse error, or there is a problem parsing the package is an error is not something new and uncommon.
The error message usually pops up on the Samsung Galaxy S23 device screen when we try to download and install an App, for example, “There is a problem parsing the package Pokémon Go ”.
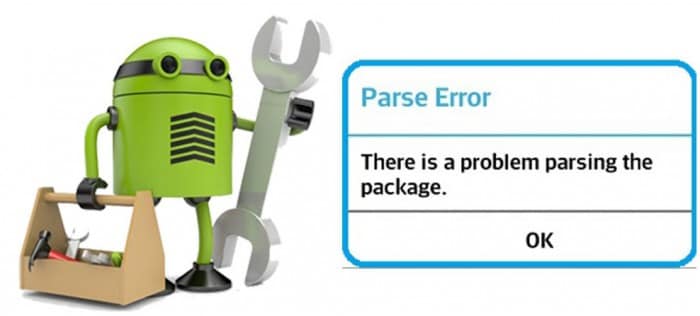
The error message which appears reads as follows:
“Parse error: There is a problem parsing the package”.
Android users who have experienced this would know that the parse error leaves us with only one option, i.e., “OK” as shown in the image below.
There was a problem parsing the package may occur due to several reasons, most of which are listed and explained below. Furthermore, there is a list of solutions to choose from to eliminate the “there is a problem parsing the package” error.
Read on to find out more.
Part 1: Reasons for the parsing error
Parse Error, better known as “there was a problem parsing the package” error is very common and normally surfaces when we try to download and install new Apps onto our Android devices from Google Play Store.
The reason for the error message to pop-up are many but none of them can be blamed singularly for the “there is a problem parsing the package” error. Given below is a list of the most probable reasons for Parse Error to stop an App from installing. Examine them carefully before moving on to the solutions to fix the “there was a problem parsing the package” error.
• Updating the OS may cause some disturbances in the manifest files of different Apps leading to Parse Error.
• Sometimes, the APK File, i.e., Android Application Package, gets infected due to improper or incomplete App installation causing “there is a problem parking the package” error.
• When Apps are downloaded and installed from unknown sources, due permission is needed. In the absence of such permission, the chances of the Parse Error to occur increase.
• Certain Apps are not compatible or supported by the latest and updated Android versions.
• Anti-virus and other cleaning Apps are also a major reason for the “there was a problem parsing the package” error.
The causes listed above are not App specific. The Parse Error may occur due to any one or more of these reasons, but what is more important is to try to get rid of the problem.
Let us move on to learn ways to fix the there was a problem parsing the package error.
Part 2: 8 Solutions to fix the parsing error
“There is problem parking the package” error can be dealt with easily if only we do not panic and deliberately follows the steps explained in this segment. Here are 7 of the most reliable and trustworthy methods to fix the Parse Error.
They are easy, user-friendly, and do not take much of your time. So don not waste any more of your time and try them now.
2.1 One Click to Fix ‘There is a Problem Parsing the Package
If you’re still encountering the Parsing error, there may be a problem with the Samsung Galaxy S23 device data on your device, which means you’ll need to repair it. Luckily, there’s a simple, one-click solution you can follow called Dr.Fone - System Repair .
Dr.Fone - System Repair (Android)
Android repair tool to fix all android system issues in one click
- Simple, clean, and user-friendly interface
- No technical knowledge required
- Easy one-click repair to fix ‘there is a problem parsing the package’ error
- Should repair most parsing problems with apps, like ‘there is a problem parsing the package Pokemon Go’ error
- Supports most Samsung Galaxy S23 devices and all the latest models like Galaxy S9/S8/Note 8
3981454 people have downloaded it
If this sounds like the solution you’re looking for, here’s a step by guide on how to use it yourself;
Note: Please note that this repair process can erase all data on your phone, including your personal information. This is why it’s so important to back up your Samsung Galaxy S23 before proceeding.
Step #1 Head over to the Dr.Fone website and download the software. Install the downloaded software and open it. From the main menu, select the System Repair option.
Input your device and firmware information to confirm you’re installing the right version of the operating system.
Step #2 Follow the onscreen instructions on how to get into Download Mode to start the Repair process.
Once complete, the firmware will start downloading.
Step #3 Once the firmware has downloaded, it will automatically install it to your device.
When this is completed, you’ll be free to disconnect your Samsung Galaxy S23 and use it how you please without the ‘there is a problem with the parsing package’ error.
2.2 Allow installation from unknown sources
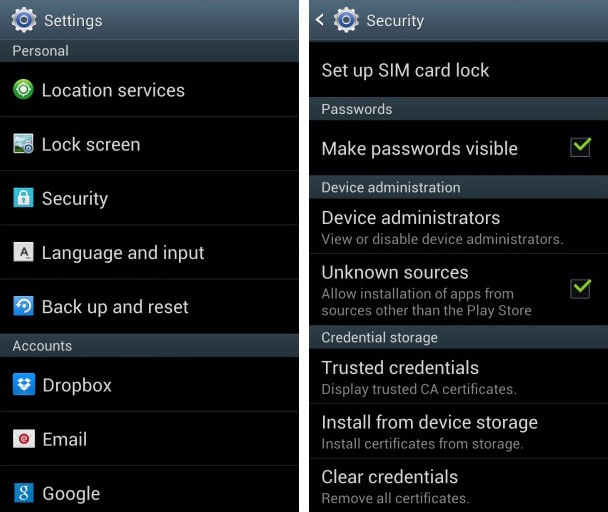
When we install Apps from other sources and not Google Play Store, there might be a glitch in using such Apps. To overcome this problem, turn on “Allow App installation from other sources”. Follow the steps given below for better understanding:
• Visit “Settings” and select “Applications”.
• Now tick mark on the option saying allow App installation from unknown sources.
2.3 Enable USB debugging
USB debugging is not considered necessary by many users but these methods give you an edge over others while using an Android device as it lets you access things on your phone, etc which you could not earlier.
To enable USB Debugging to fix “There is a problem parsing the package” error, follow these steps:
• Visit “Settings” and select “About Device”.
• Now click on “Build Number” not once but continuously for seven times.

• Once you see a pop-up saying “You are now a developer”, go back to “Settings”.

• In this step, select “Developer Options” and turn on “USB Debugging”.

This should solve the problem. If not, move on to the other techniques.
2.4 Check APK File
An incomplete and irregular App installation may cause the .apk file to get corrupted. Make sure you download the file completely. If need be, delete the existing App or its .apk file and reinstall it from Google Play Store for it to be compatible with your device’s software and to use the App smoothly.
2.5 Check App Manifest File
Manifested App files are nothing but .apk files which are improvised by you. Such changes may cause the Parse Error to occur more frequently. Modifications in the App file can be made by changing its name, App settings, or more advanced customizations. Make sure you roll back all changes and restore the App file to its original state to prevent it from getting corrupted.
2.6 Disable Antivirus and other cleaner Apps
Antivirus software and other cleaning Apps are very helpful in blocking unwanted and harmful Apps from damaging your device. However, sometimes such Apps also prevent you from using other safe Apps.
We do not suggest that you delete the Antivirus App permanently. Temporary uninstallation will be useful here. To do so:
• Visit “Settings” and then select “Apps”.
• Select the antivirus App to click on “Uninstall” and then tap “OK”.
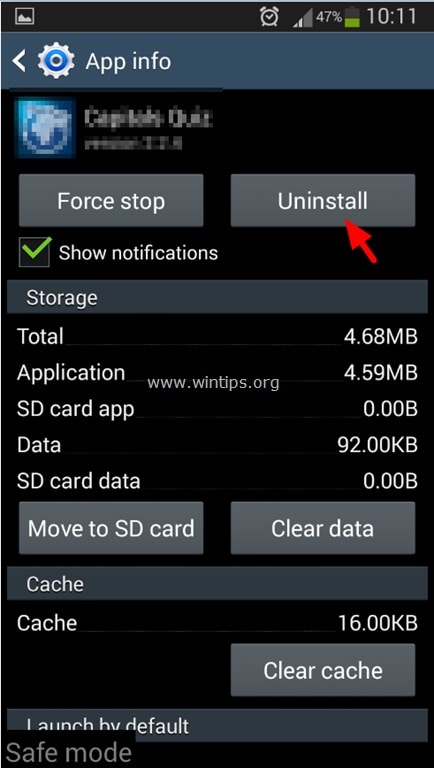
Now download and install the desired App again. Once this is done, do not forget to install the Antivirus App again.
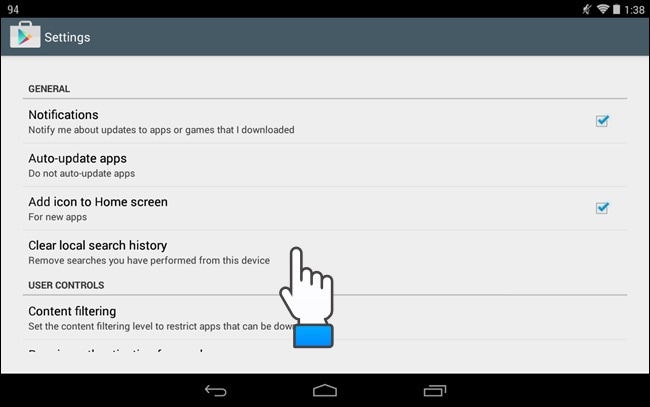
2.7 Clear Cache cookies of Play Store
Clearing Play Store Cache cleans the Android Market platform by deleting all clogged up unwanted data. Follow the steps given below to delete Play Store cache:
• Tap on Google Play Store App.
• Now visit Play Store’s “Settings”.

• Select “General Settings” to “Clear local search history”.
2.8 Factory Reset Android
Factory Resetting your device to fix the Parse Error should be the last thing you try. Make sure you take a back-up of all your data on your Google Account or a Pen Drive because this technique erases all media, contents, data, and other files, including your device settings.
Follow the steps given below to factory reset your device:
• Visit “Settings”.
• Now select “Backup and Reset”.

• In this step, select “Factory data reset” and then “Reset Device” to confirm Factory Reset.
The whole process of factory resetting your Samsung Galaxy S23 might sound tedious, risky, and cumbersome but it helps to fix the Android SystemUI has stopped error 9 out of 10 times. So, think carefully before using this remedy.
Parse Error: There was a problem parsing the package is an error message that has troubled many Android users. The good part is that the above-stated fixes not only solve the problem but also prevent it from occurring in the future. So, keep them in mind the next time you or anyone you know faces such an issue.
Also read:
- [Updated] 2024 Approved Pioneering Digital Realms Comparing Metaverse & Omniverse
- [Updated] Beginner's Guide to Video Capture with Logitech Cam
- 2024 Approved Navigating Phantom's Reverse Video Capabilities
- 2024 Approved Stepping Into Filmmaking Learning the Basics of Key Shots
- Financing Your Business with Blockchain: Innovative Strategies From YL Computing and YL Software
- How To Fix Part of the Touch Screen Not Working on Realme GT 3 | Dr.fone
- How to Fix the Soft Bricked Samsung Galaxy F54 5G? | Dr.fone
- How To Fix Unresponsive Phone Touchscreen Of Honor 90 Pro | Dr.fone
- How to Perform Hard Reset on Nubia Red Magic 9 Pro+? | Dr.fone
- In 2024, The Drone Photographer's Stabilization Companion
- Mastering Online Subtitles Our Choice of Free Services for 2024
- My Videos Arent Playing on Tecno Pova 5 – What Can I Do? | Dr.fone
- OnePlus Nord N30 SE Not Receiving Texts? 10 Hassle-Free Solutions Here | Dr.fone
- Play Store Not Working On Motorola Edge 2023? 8 Solutions Inside | Dr.fone
- Proven Ways to Fix There Was A Problem Parsing the Package on Oppo Reno 10 Pro 5G | Dr.fone
- Realme V30T Not Receiving Texts? 10 Hassle-Free Solutions Here | Dr.fone
- Reasons for Tecno Spark 10 Pro Stuck on Startup Screen and Ways To Fix Them | Dr.fone
- The Ultimate Guide to Using VLC for MP4 & Format Shifting for 2024
- Top 10 Essential Free Photo Layering Tools on iOS/Android
- Title: How to Flash Dead Samsung Galaxy S23 Safely | Dr.fone
- Author: Abel
- Created at : 2025-01-04 17:36:06
- Updated at : 2025-01-10 18:24:15
- Link: https://fix-guide.techidaily.com/how-to-flash-dead-samsung-galaxy-s23-safely-drfone-by-drfone-fix-android-problems-fix-android-problems/
- License: This work is licensed under CC BY-NC-SA 4.0.