
How to Flash Dead Tecno Pop 7 Pro Safely | Dr.fone
How to Flash Dead Tecno Pop 7 Pro Safely
- Fix malfunctioning Android to normal in one click.
- Highest success rate to fix all Android issues.
- Step-by-step guidance through the fixing process.
- No skills required to operate this program.
A phone is considered to be dead when it becomes completely unresponsive and refuses to switch on. Similarly, an Android phone is said to be dead when it does not boot up. You may try to switch it on several times by pressing the power button but in vain. You will see no sign of the phone’s logo or anything like a welcome screen. The Android phone’s screen remains black and does not illuminate when you try to turn it on. Interestingly, even when you charge this dead device, it does not show that it is getting charged.
Many people regard this as a battery issue, and many think of it as a temporary software crash. Some users also seem to believe that this is because of a virus attack. However, if you are looking for ways that tell how to fix a dead Android phone, you must understand that a dead phone or device can be cured by flashing custom firmware safely. If you are keen to know how to flash a dead Android phone or how to flash dead Android phones using PC, here are ways to help you.
Given below are eight techniques to flash your Tecno Pop 7 Pro safely, depending upon which phone you are using. It may seem time-consuming and tedious, but we can assure you that it works. So, move ahead and read on to learn about flashing new firmware, your Tecno Pop 7 Pro, MTK Android, and Tecno Pop 7 Pro safely.
 safe & secure
Part 1: Can a Dead Phone Be Flashed?
Flashing a dead Android phone might be skeptical for many users who have been in such a situation. Although it is possible to flash a dead Android phone, it is essential to be aware of the reasons that lead you into such a situation. Before a remedy, diagnosing the problem is a necessity for retaining the Tecno Pop 7 Pro device.
From battery issues to physical damage to the Tecno Pop 7 Pro device, there can be many reasons your Tecno Pop 7 Pro died. The reasons for a dead Android phone are not restricted to these points. There can be software-related issues or firmware issues that might cause such havoc on your Android.
Part 2: How to flash Tecno Pop 7 Pro in one click
While you are worried about how to flash Tecno Pop 7 Pro instantly with a single click, Dr.Fone - System Repair (Android) swiftly makes its way with a galore of options for you. This amazing tool from Wondershare can fix a plethora of Android system issues such as crashing of apps, black screen of death, failed system update, etc. Moreover, it can also get your device out of boot loop, unresponsive bricked Android mobiles as well as stuck at the Tecno Pop 7 Pro logo.
Dr.Fone - System Repair (Android)
One-click solution to flash Tecno Pop 7 Pro
- The high success rate in fixing Tecno Pop 7 Pro Android devices.
- All the latest Tecno Pop 7 Pro devices are supported by this software.
- One-click operation of this tool helps you how to flash Tecno Pop 7 Pro easily.
- Being very intuitive, it doesn’t need you to be tech-savvy to use this software.
- It is one of its kind and the first one-click Android repair software on the market.
3981454 people have downloaded it
Step-by-step Tutorial
We are going to explain how to flash a dead Android phone using a PC using Dr.Fone - System Repair (Android)
Note: Before you understand how to flash Dead Android phone, take a backup of your data and then proceed to avoid any data loss.
Phase 1: Prepare your Tecno Pop 7 Pro
Step 1: Once you have downloaded and installed Dr.Fone, launch it. From the main menu, tap on ‘System Repair’ and get your Tecno Pop 7 Pro connected to it.

Step 2: Click ‘Android Repair’ from the available options, and then press the ‘Start’ button to fix the Dead Android phone by flashing it.

Step 3: On the Tecno Pop 7 Pro device information screen, pick the appropriate device brand, name, model, and other details followed by tapping the ‘Next’ button.

Phase 2: Put the Android device in Download mode to start repair.
Step 1: It is essential to boot your Tecno Pop 7 Pro in Download mode before repairing.
- If the Tecno Pop 7 Pro device has a ‘Home’ button: Turn it off and then hold down the ‘Volume Down’, ‘Home’, and ‘Power’ buttons altogether for 5-10 seconds. Un-hold all of them and hit the ‘Volume Up’ button for entering ‘Download’ mode.

- In the absence of a ‘Home’ button: Switch off the Android device and hold the ‘Volume Down’, ‘Bixby’, and ‘Power’ buttons for 5 to 10 seconds, then release them. Hit the ‘Volume Up’ button for entering the ‘Download’ mode.

Step 2: Press the ‘Next’ button for initiating firmware download.

Step 3: Once the firmware gets downloaded and verified Dr.Fone - System Repair (Android) starts to flash your Dead Android phone. All the Android system issues will be fixed soon after.

safe & secure
Part 3: How to flash Tecno Pop 7 Pro dead phone with Odin?
In this segment, we will learn how to fix the dead Android phone, i.e., Tecno Pop 7 Pro phones using Odin software. Odin is software used internally by Tecno Pop 7 Pro to generally unblock devices and perform a more utility-based job, namely, flashing new firmware in place of the old one. There are different variants available, so choose the one which is supported by your Galaxy phone. Here is a step-by-step explanation of how to flash dead Android phone (Tecno Pop 7 Pro) using Odin software.
Step 1: Install the driver software on the computer. You can find the best driver software for your device and PC on the official Tecno Pop 7 Pro website. You may also download Tecno Pop 7 Pro Kies on your PC. Once you have downloaded and installed the driver software, restart the PC.
Step 2: Now download suitable firmware for your device in the form of a zip folder that you can open and store on your desktop.

Make sure the file is .bin, .tar, or .tar.md5 only as these are the only file types recognized by Odin.


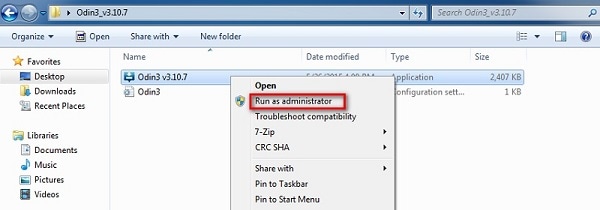
Step 3: In this step, download the latest version of Odin on your PC and move it to the desktop, and then right-click on the downloaded Odin file to select “Run as Administrator”.

Step 4: Now, boot your dead device to Download Mode by pressing the power, volume down, and home button together. When the phone vibrates, release the power button only.

Step 5: Gently press the volume up button, and you will see the Download Mode Screen.

Step 6: Now, you may use a USB to connect your Tecno Pop 7 Pro to the PC. Odin will recognize your device, and in the Odin window, you will see a message saying “Added”.

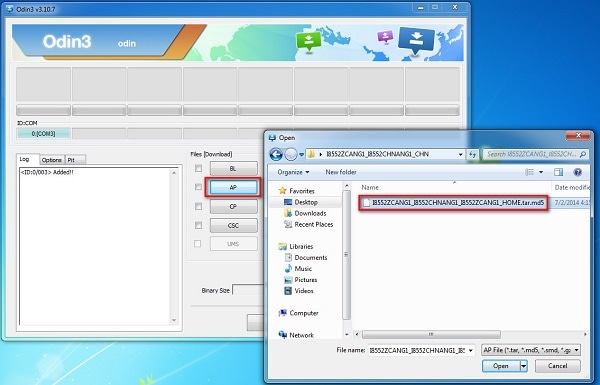
Step 7: In this step, find the tar.md5 file you downloaded by clicking on “PDA” or “AP” on the Odin window and then click “Start”.
Finally, once the flashing process is complete, your Tecno Pop 7 Pro phone will reboot and start normally, and you may see a “Pass” or “Reset” message on the Odin window on the PC.
Part 4: How to flash MTK Android dead phone with SP Flash tool?
SP Flash tool, also known as SmartPhone Flash tool is a popular freeware tool used to flash custom ROM or firmware in MTK Android phones. It is a very successful tool and is extremely easy to use.
Let us look at the steps given below to learn how to flash dead Android phones using PC with the help of the SP Flash tool.
Step 1: To start with, download and install the MTK driver on your PC and then download the ROM/firmware you wish to use for flashing purposes.
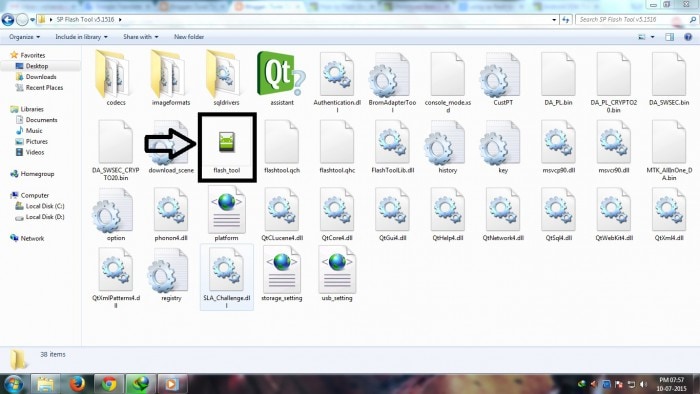
Step 2: Once done, you should download the SP Flash tool and extract it on your PC and move on to launch the Flash_tool.exe file to open the SP Flash tool window.
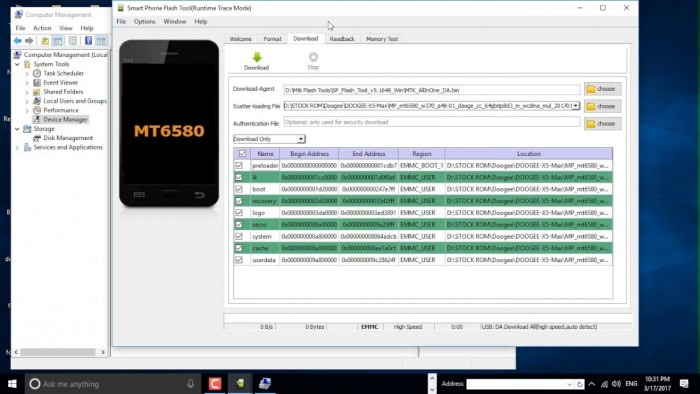
Step 3: Now, on the SP Flash tool window, click on “Download” and select “Scatter-loading”.

Step 4: The last step would be to locate the file downloaded by you and click “Open” and then finally, select “Download” on the SP Flash tool window.
After completing the above steps, connect your dead device to the PC with a USB cable and wait for it to get recognized. The flashing process will take a few minutes to finish and then you will see a green circle indicating “OK Download”.
That’s it! Now simply disconnect your phone and wait for it to reboot.
Part 5: How to flash Tecno Pop 7 Pro dead phone with the Phoenix tool?
Phoenix tool, better known as PhoenixSuit, is a tool similar to the SP False tool and Odin. It works very well with Tecno Pop 7 Pro and is the best answer to “How to fix dead Android phone?”, “How to flash dead Android phone using PC?”, etc.
Let’s look at the steps of flashing the Tecno Pop 7 Pro dead phone with the Phoenix tool.
First, download and install the Tecno Pop 7 Pro PC Suite driver on your PC. Then you will need to download the PhoenixSuit tool and then launch it.

Now, on the toolbar, click “Tools” and select “Data Package Download” from the drop-down list.

Then move to download the firmware for your dead Tecno Pop 7 Pro and save it in a new Folder. Once done, go back to the Phoenix tool window and click on “File” and select “Open Product”.

Simply, feed in the details and then click “OK”.

After this, click on “Flashing” and select “Firmware update” and then browse to select the appropriate product code and then click “OK” again.
Then move on to select “Dead Phone USB Flashing” from the Firmware Update Box.

Lastly, just click on “Refurbish” and connect your phone to the PC using a USB cable.
That was it, the flashing process may take up to a few minutes after which your dead Tecno Pop 7 Pro will restart automatically.
Part 6: How to flash a dead phone that won’t turn on via factory reset?
Using tools for flashing Android devices can be a solution; however, it is heavily restricted to the Tecno Pop 7 Pro device models. For a generalized solution, there can be other options that you can go with. Factory resetting an Android device by putting it in Recovery Mode is one way. To know how to flash a dead Android phone using factory reset, go through the steps featured below:
Step 1: To initiate the process, you will have to put your Tecno Pop 7 Pro in Recovery Mode. Generally, Android phones are put in Recovery Mode by holding the “Power” and “Volume Up” keys for a few seconds after turning them off. The key combinations can vary according to your Tecno Pop 7 Pro.
Step 2: As the Android boot menu opens on your screen, use the “Volume Down” and “Volume Up” keys to scroll up and down the menu. On accessing the “Wipe Data/Factory Reset” option, use the “Power” key to select the particular option.
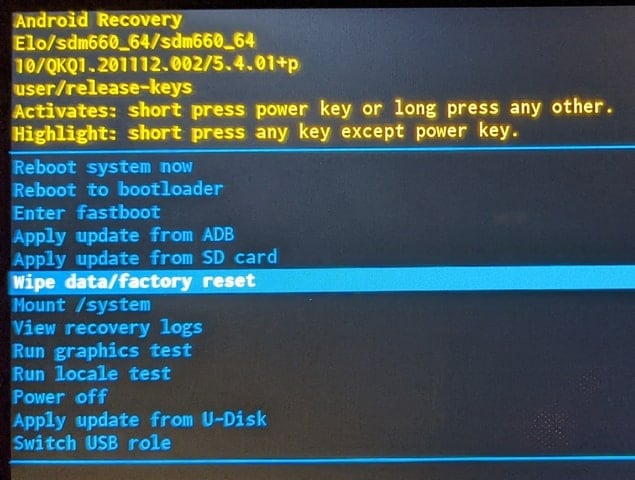
Step 3: Continue to select the “Yes” option for confirming the factory reset of the Android device. The phone will automatically reboot after successfully factory resetting.
Part 7: How to flash a dead Android phone by checking screen faulty
The screen of your Tecno Pop 7 Pro may be faulty, due to which it is not launching. While seeking the right way of how to fix a dead Android phone, you can force restart your phone using the Volume buttons according to your device model.
If the Android vibrates on restarting and the screen does not lighten up, the problem can be directed to a hardware fault. The screen is broken and needs physical assistance to resolve the issue.

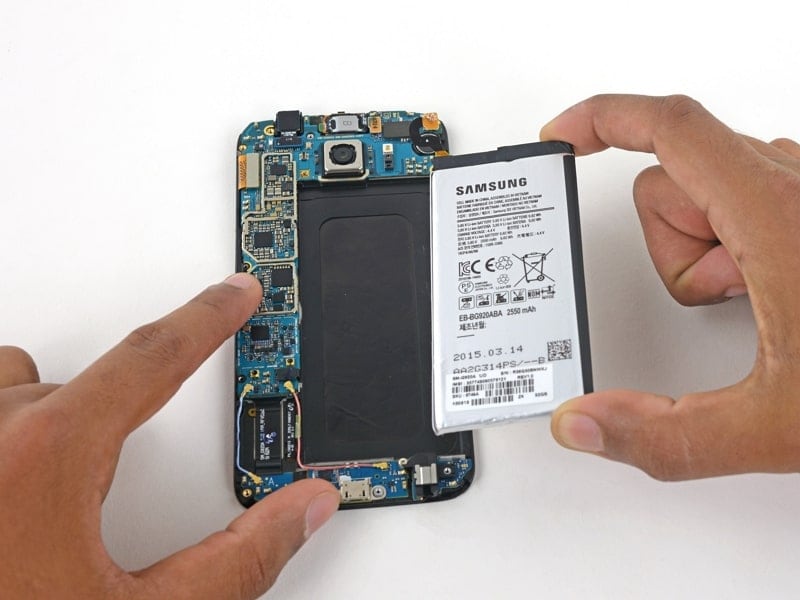
Part 8: How to fix a dead Android phone by changing the battery
Another solution that can help you fix the dead Android phone is changing its battery. The battery of an Android device can last up to 3 years. When its capacity drops to a bare minimum, it is best to change the battery of your Android. Upon trying to restart your Tecno Pop 7 Pro, if it does not, you might need to replace your battery. All Android phone batteries are removable, which should be regulated with proper supervision.
Part 9: How to repair dead Android phone by contacting official support
If you are unable to discover any proper solution for how to flash dead Android phones, you might have to consult the respective customer support of the Android phone manufacturers. Consult customer support to discover why the phone is dead and how it can be flashed. The respective personnel will assist you in resolving the issue, which might require monetary input from your side.
Conclusion
A dead Android phone might be the cause of worry, but the techniques given above to flash your dead Android device safely are very helpful. These methods have been tried and tested by users all over the world and thus, we recommend them to you. If your phone is dead or has become unresponsive, do not panic. Depending on your phone’s brand, here are ways to guide you on how to fix the dead Android phone and how to flash dead Android phone using PC.
It has been observed that Wondershare Dr.Fone – System Repair (Android) assists in the best way. Resolve all your concerns involving your dead Android phone and flash it to make it operable again.
Carefully follow the instructions given, and you will be able to reboot your dead Android phone successfully.
How to Quickly Fix Bluetooth Not Working on Tecno Pop 7 Pro
One of the key features of an Android device these days is the Bluetooth technology. This is such an important part of the phone that many of us take for granted, but as soon as the feature stops working, it can cause all kinds of problems.
Fortunately, despite there being many reasons why a problem could occur to your Bluetooth feature, there are also plenty of fixes. Today, we’re going to share with you the complete guide that details everything you need to know to get your Bluetooth up and running once again as quickly as possible.
Let’s get straight into it!
Part 1. About Bluetooth Not Working on Android
Of course, the most common problem to occur with Bluetooth technology in your Tecno Pop 7 Pro is when it doesn’t connect to the Tecno Pop 7 Pro device you’re trying to link it to. This could be anything from a Bluetooth headset or headphones, to a portable speaker or even an in-car audio system.
However, the problems don’t stop there. You may have problems with turning your Bluetooth settings on through your actual device. Perhaps the software simply isn’t loading, or maybe the Bluetooth feature keeps turning itself off randomly.
Due to the complicated nature of Bluetooth technology, there could be many reasons as to why your Bluetooth feature is playing up in this way, but that doesn’t mean it can’t be fixed. For the rest of this guide, we’re going to explore the nine need-to-know ways you can fix the Bluetooth problems not working on your Tecno Pop 7 Pro as quickly as possible.
Part 2. 9 fixes for Bluetooth not working on Android
2.1 One click to fix Android Bluetooth issues due to Android system
Since Bluetooth is an internal technology, this indicates there’s a problem with the software or firmware of your Tecno Pop 7 Pro. If something’s broken, this means you need to fix it. Fortunately, there’s a quick and easy way to do this using software known as Dr.Fone - System Repair (Android).
Dr.Fone - System Repair (Android) is a powerful Android repair tool which is hailed as many as being on the best software applications in the industry. With all the tools you need to repair your phone not just for Bluetooth errors, but basically any internal firmware problems, this is a one-shot-tool that gets the job done.
Dr.Fone - System Repair (Android)
Android repair tool to fix Bluetooth issues in one click
- Can fix most internal software and firmware issues
- Trusted by over 50+ million people around the world
- Supports over 1,000+ unique Android brands, manufacturers, and devices
- Incredibly user-friendly and easy-to-use
- Compatible with all Windows computers
3981454 people have downloaded it
To ensure you have the best experience while using the Dr.Fone - System Repair (Android) software, here’s a complete step-by-step guide on how it works when fixing your Android’s Bluetooth problems.
Step One Make your way over to the Wondershare website and download the Dr.Fone - System Repair (Android) software to either your Mac or Windows computer. Install the downloaded file by following the on-screen instructions. Once installed, open the software, so you’re on the Main Menu.
Step Two Connect your Tecno Pop 7 Pro to your computer using the USB cable, wait a couple of seconds, and then click the System Repair option. On the Menu on the left, click Android Repair, and then press Start.
Step Three Next, use the drop-down menus to make sure all the information about your specific device is correct, including your device, operating system number, and carrier information. Click Next to confirm your selections.
Step Four When prompted, put your phone into Download Mode needed for repairs. You can do this by following the on-screen instructions which will depend on which device you have and the available buttons.
Step Five The software will now begin the repair process. This will happen automatically, and all you’ll need to do is make sure your device doesn’t disconnect during this process, and your computer doesn’t turn off.

When the repair process has been completed, you’ll receive the screen below, which means you can try again if the process didn’t work, or you can disconnect your Tecno Pop 7 Pro and start using it and your Bluetooth features.
2.2 Restart Android and turn on Bluetooth again

One of the most common solutions in technology is simply to turn it on and off again, which is the case to happen here. By restarting your device, you can clear out any problems you may be suffering from to help it get up and running again. Here’s how;
- Turn your Tecno Pop 7 Pro off by holding down the Power button
- Wait for several minutes and then turn your phone on again
- Wait for your phone to completely power up, so you’re on the Main Menu
- Navigate Settings > Bluetooth and then enable the setting
- Try to connect your Bluetooth device to what you were trying to do before
2.3 Clear the Bluetooth cache

Every service on your Tecno Pop 7 Pro using a feature called a cache. This is where information is stored to help the feature run properly and give you the best experience. However, over time this can get messy and can cause problems with your Bluetooth feature.
By clearing the cache, you can restart the service and hopefully clear up any issues or problems you may be experiencing.
- On your phone, navigate Settings > Application Manager, and you’ll see all the apps and services on your phone. Locate and select the Bluetooth service.
- Select the Storage option
- Tap the Clear Cache option
- Go back of the Menu and restart your phone
- Now turn your Bluetooth feature on and turn connecting it to your preferred device
2.4 Remove paired devices

Sometimes, you may have a problem with the Tecno Pop 7 Pro device you’re trying to connect to via Bluetooth, especially if this is a device you’ve updated. To counter and repair this, you’re going to need to remove the paired devices saved with your device and then reconnect them.
Here’s how;
- From the Main Menu of your Tecno Pop 7 Pro, head to Settings > Bluetooth > Connected Devices.
- Turn Bluetooth on, and you’ll see all the connections your Tecno Pop 7 Pro is paired with
- Go through these settings and remove/delete/forget every connection on your device
- Now when you go to connect to a device using Bluetooth, repair the Tecno Pop 7 Pro device, enter the passcode, and use a fresh paired connection.
2.5 Use Bluetooth in safe mode

If you’re having problems with your connection and paired devices, sometimes you may have conflicting software faults in your device that are causing the problems. If this is the case, you’ll need to boot your Tecno Pop 7 Pro in Safe Mode.
This is an operating state in which your phone will run the bare minimum services it needs to perform. If your Bluetooth works in Safe Mode, you know you have an app or a service that’s causing the problem.
Here’s how to find out;
- Hold the power button down, so the Android power menu turns on
- Long-press the power button again and the restart in Safe Mode option will come up
- The phone will automatically boot into Safe Mode
- Wait a minute on the Main Menu
- Now turn on your Bluetooth and connect it to your preferred device
2.6 Turn on the discoverable feature

To ensure your Bluetooth can connect to other devices, it’s important to make sure you’re making your device discoverable to other Bluetooth devices. If it’s hidden, other devices won’t be able to find it, and sometimes it can bug and prevent connections.
Here’s how to turn on your Bluetooth discoverable feature;
- From the home screen of your Android, navigate to the Menu> Settings > Bluetooth
- Toggle the Bluetooth switch, so it’s on
- Under the available settings, tick the box that allows your Bluetooth device to be discoverable
- Turn your Bluetooth feature on and connect to the Tecno Pop 7 Pro device you’re trying to connect too
2.7 Exclude Bluetooth issues of the other device

Sometimes, you might not even have a problem with your Tecno Pop 7 Pro, but rather the Bluetooth device you’re trying to connect to, whether that’s a Bluetooth speaker, an in-car entertainment system, or any other kind of Bluetooth device.
By testing out another Bluetooth device to see if it will work with your preferred device, you can rule this out from being the issue.
- Disconnect your Tecno Pop 7 Pro from the Bluetooth device and turn your Bluetooth off
- Now take another Bluetooth device and connect this to the Tecno Pop 7 Pro device you’re trying to connect too. This could be another Android device, or even a computer or iOS device
- If the new device doesn’t connect to your Bluetooth device, you’ll know there’s a problem with your Bluetooth device, not your Tecno Pop 7 Pro
- If the Tecno Pop 7 Pro devices connect, you’ll know there’s a problem with your Tecno Pop 7 Pro
2.8 Place both devices within close proximity

One of the common misconceptions of Bluetooth is just how far the wireless range is of the service. You need to make sure your devices are well and truly close to each other to make sure a stable connection can be formed.
The further away the Tecno Pop 7 Pro devices are from each other, the less likely the connection will remain secure. As a rule of thumb, Bluetooth can work up to 100 meters, but to play it safe, always try and keep your devices under 50m apart.
2.9 Avoid interference of other Bluetooth sources

The final consideration you’ll want to think about is that Bluetooth radio waves, or wireless waves, can interfere with each other. This means they can bounce off each other or get muddled up and make things confusing from your devices.
With this in mind, you’ll want to make sure you’re limiting the amount of Bluetooth activity in the area where you’re trying to use a device. While uncommon, this could be the problem.
To fix this issue, turn off all the Bluetooth connections in the area. This includes computers, laptops, mobile phones, tablets, and any other Bluetooth devices you may have. Then, try connecting your Tecno Pop 7 Pro to the Tecno Pop 7 Pro device you were trying to use. If it works, you know you were experiencing Bluetooth interference.
Fixing Persistent Pandora Crashes on Tecno Pop 7 Pro
Pandora, an app bringing music to our fingertips, is a beloved platform for streaming tunes on Android devices. Despite its popularity, users might encounter occasional hurdles with the app, such as unexpected hanging, lagging, or even crashing. These interruptions can disrupt our musical journey.
In this article, you’ll explore practical solutions to the problem of “why does Pandora keep stopping.” Following the steps and tips, you can regain smooth and uninterrupted access to your favorite tunes. Have a hassle-free and enjoyable music streaming experience with Pandora on your Tecno Pop 7 Pro.

Part 1: Basic Troubleshooting and Fixes
Pandora, the music streaming app cherished by Android users, accompanies you on your musical journey. It offers an array of melodies at our fingertips. However, occasional crashes can disrupt this harmonious experience. This results in an annoying experience where Pandora keeps stopping on Android phones.
Crashes often result from glitches or bugs within the app’s code. These unexpected errors can cause Pandora to freeze, lag, or abruptly shut down, hindering its smooth operation. When faced with intermittent crashes, several basic fixes can help restore Pandora’s functionality:
- Closing the app. Simply closing and reopening Pandora might resolve transient issues.
- Restarting the phone. A reboot of your Tecno Pop 7 Pro can clear temporary glitches affecting Pandora.
- Updating the app. Ensure you have the latest version of Pandora installed. Updating the app can rectify bugs from older versions.
- **Reinstalling the app.**If the problem persists, uninstall Pandora and reinstall it from the Google Play Store. This process can refresh the app’s data and settings, potentially resolving persistent issues.
If these basic fixes fail to address the continuous crashing of the Pandora app, or if the crashes persist over an extended period, the next section will provide advanced solutions. These initial troubleshooting steps aim to tackle common and temporary issues that could impede Pandora’s performance. If the problem persists, it might necessitate more intricate resolutions or further investigation into the app’s underlying technicalities.
Part 2: Causes Behind Constant Pandora App Crashes and Solutions
Several underlying factors might be at play when persistent crashes plague your Pandora app. This section explores these.
Poor Internet Connection
A stable internet connection is pivotal for seamless app functionality. Crashes in Pandora can stem from poor connectivity. Check your internet connection . Ensure you’re connected to a reliable network. Restart your router or switch between Wi-Fi and mobile data to troubleshoot connectivity issues.

Corrupted/Broken Devices
If you notice that all other apps are crashing , your device’s system may also have a problem. In this case, simple app reinstalls/restarts can fix the problem.
Thankfully, Wondershare Dr.Fone solves device corruption leading to app crashes. This powerful toolkit addresses deep-seated issues causing app crashes, such as corruption within the Tecno Pop 7 Pro device that impacts Pandora’s performance. The Dr.Fone’s System Repair feature acts as a reset button for your Tecno Pop 7 Pro, resolving underlying system-level problems that cause app crashes.
Here’s how you can use it to resolve the issue of why the Pandora app keeps crashing on Android. First, of course, ensure that your device is connected.
- Step 1: Launch Dr.Fone on your computer. Access System Repair.
safe & secure
4,851,928 people have downloaded it
- Step 2: Choose Android on the next page.

- Step 3: Click Start to initiate Android System Repair.
- Step 4: Check if the Tecno Pop 7 Pro device details presented onscreen are correct. You may edit them accordingly for any mistakes.
- Step 5: Follow the onscreen instructions to place your phone into Download mode. Then, Dr.Fone will download the firmware.
- Step 6: After downloading, click Fix Now. Then, type in “000000” on the appearing window text box. Click Confirm.

- Step 7: Once finished, click Done. Your Pandora app should not crash once you reinstall it again by now.
Cache Buildup
Accumulated cache data can hamper app performance, leading to frequent crashes. Clear the cache of the Pandora app. Usually, you can see this option under Settings > Apps > Clear Data. Additionally, you can optimize your device’s RAM and storage space by deleting unnecessary files or closing unused apps.

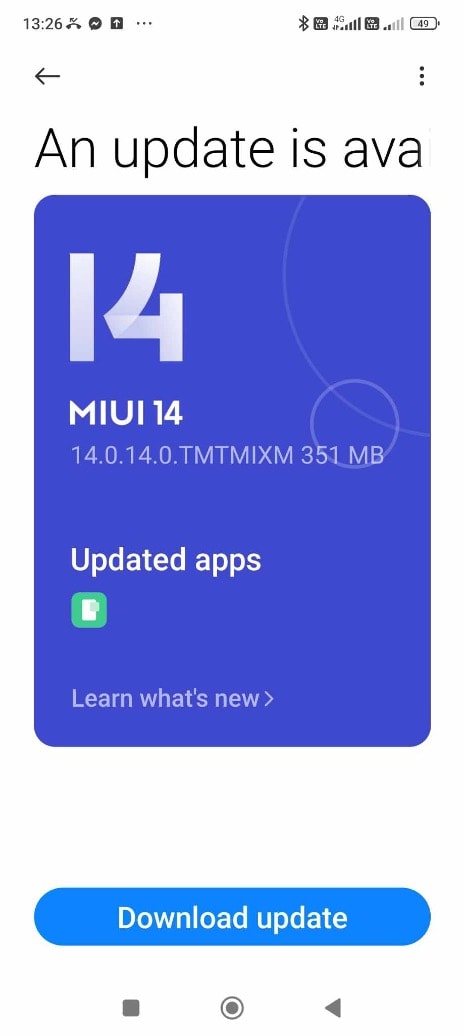
Device Compatibility Issues
Outdated system software can create compatibility issues, causing app instability. Ensure your device’s system software is up-to-date. Check for and install any pending system updates in your device’s settings. Updated software often includes bug fixes and improvements that can rectify compatibility-related crashes.
You can systematically troubleshoot and resolve the issues by addressing the potential culprits behind constant Pandora app crashes, ensuring a smoother and uninterrupted music streaming experience. If the problems persist, contacting Pandora support or seeking professional assistance might be advisable to delve deeper into the technical aspects of the app’s performance issues.
Part 3: What To Do if None of the Fixes Work
If the suggested fixes don’t work, and you still wonder “why does Pandora keeps stopping on Android,” then it might be time to take a look at these alternatives:
- **Consider trying other music streaming apps.**Explore alternative music streaming applications available on the Google Play Store. Several reliable options offer similar services to Pandora, providing an opportunity to continue enjoying music while bypassing the persistent app issues.
- **Contact customer support.**Reach out to Pandora’s customer support for tailored assistance. They may offer specific troubleshooting steps or insights into the app’s technical glitches.
- Consider a new phone. Upgrade to a new phone if the crashes persist despite troubleshooting, and your device is outdated or incompatible. This might help resolve the issue by providing a more stable environment for app usage.
Conclusion
In conclusion, navigating Pandora app crashes on your Tecno Pop 7 Pro demands a systematic approach. Keeping regular maintenance, such as clearing cache, optimizing RAM, and ensuring timely device updates, can mitigate app crashes and uphold smooth performance. This way, you can resolve the issue of why Pandora keeps stopping.
When persistent issues arise, especially if other apps are affected similarly, Wondershare Dr.Fone emerges as a reliable solution. Its comprehensive toolkit, including System Repair, can effectively address deep-seated issues. By embracing proactive measures and leveraging Dr. Fone’s prowess, users can enhance their device’s performance and ensure an uninterrupted music streaming experience on Pandora and other apps.
safe & secure
3,362,023 people have downloaded it
Also read:
- [New] Boost Views Top 10 Free Tools for Custom YouTube Thumbnails
- [New] In 2024, Navigating Vimeo’s Subscription Options for Content Creators
- [Updated] 2024 Approved Discover the Premier Shopping Hubs for Bespoke Gift Wraps & Cases
- [Updated] In 2024, Unmute Your Social Platform's Audio A Quick Fix Guide
- [Updated] Profile Perfection 101 Expert Strategies for Facebook Biography Enhancement for 2024
- 2024 Approved The Essential Guide to YouTube Time Tracking
- How to Fix Unfortunately, Contacts Has Stopped Error on Vivo Y78+ | Dr.fone
- How To Restore a Bricked Samsung Galaxy XCover 6 Pro Tactical Edition Back to Operation | Dr.fone
- How To Restore a Bricked Tecno Phantom V Flip Back to Operation | Dr.fone
- In 2024, How to Bypass Android Lock Screen Using Emergency Call On Nokia C12?
- Memes that Spark Global Conversation for 2024
- Nokia C110 Not Receiving Texts? 10 Hassle-Free Solutions Here | Dr.fone
- Recover Excel 2007 Files from Virus-Infected Pen Drives for Free
- Strategies for Apps That Wont Download From Play Store On Infinix Smart 7 | Dr.fone
- Title: How to Flash Dead Tecno Pop 7 Pro Safely | Dr.fone
- Author: Abel
- Created at : 2025-01-06 16:19:50
- Updated at : 2025-01-10 17:45:58
- Link: https://fix-guide.techidaily.com/how-to-flash-dead-tecno-pop-7-pro-safely-drfone-by-drfone-fix-android-problems-fix-android-problems/
- License: This work is licensed under CC BY-NC-SA 4.0.