
How to Flash Dead Vivo Y36 Safely | Dr.fone
How to Flash Dead Vivo Y36 Safely
- Fix malfunctioning Android to normal in one click.
- Highest success rate to fix all Android issues.
- Step-by-step guidance through the fixing process.
- No skills required to operate this program.
A phone is considered to be dead when it becomes completely unresponsive and refuses to switch on. Similarly, an Android phone is said to be dead when it does not boot up. You may try to switch it on several times by pressing the power button but in vain. You will see no sign of the phone’s logo or anything like a welcome screen. The Android phone’s screen remains black and does not illuminate when you try to turn it on. Interestingly, even when you charge this dead device, it does not show that it is getting charged.
Many people regard this as a battery issue, and many think of it as a temporary software crash. Some users also seem to believe that this is because of a virus attack. However, if you are looking for ways that tell how to fix a dead Android phone, you must understand that a dead phone or device can be cured by flashing custom firmware safely. If you are keen to know how to flash a dead Android phone or how to flash dead Android phones using PC, here are ways to help you.
Given below are eight techniques to flash your Vivo Y36 safely, depending upon which phone you are using. It may seem time-consuming and tedious, but we can assure you that it works. So, move ahead and read on to learn about flashing new firmware, your Vivo Y36, MTK Android, and Vivo Y36 safely.
 safe & secure
Part 1: Can a Dead Phone Be Flashed?
Flashing a dead Android phone might be skeptical for many users who have been in such a situation. Although it is possible to flash a dead Android phone, it is essential to be aware of the reasons that lead you into such a situation. Before a remedy, diagnosing the problem is a necessity for retaining the Vivo Y36 device.
From battery issues to physical damage to the Vivo Y36 device, there can be many reasons your Vivo Y36 died. The reasons for a dead Android phone are not restricted to these points. There can be software-related issues or firmware issues that might cause such havoc on your Android.
Part 2: How to flash Vivo Y36 in one click
While you are worried about how to flash Vivo Y36 instantly with a single click, Dr.Fone - System Repair (Android) swiftly makes its way with a galore of options for you. This amazing tool from Wondershare can fix a plethora of Android system issues such as crashing of apps, black screen of death, failed system update, etc. Moreover, it can also get your device out of boot loop, unresponsive bricked Android mobiles as well as stuck at the Vivo Y36 logo.
Dr.Fone - System Repair (Android)
One-click solution to flash Vivo Y36
- The high success rate in fixing Vivo Y36 Android devices.
- All the latest Vivo Y36 devices are supported by this software.
- One-click operation of this tool helps you how to flash Vivo Y36 easily.
- Being very intuitive, it doesn’t need you to be tech-savvy to use this software.
- It is one of its kind and the first one-click Android repair software on the market.
3981454 people have downloaded it
Step-by-step Tutorial
We are going to explain how to flash a dead Android phone using a PC using Dr.Fone - System Repair (Android)
Note: Before you understand how to flash Dead Android phone, take a backup of your data and then proceed to avoid any data loss.
Phase 1: Prepare your Vivo Y36
Step 1: Once you have downloaded and installed Dr.Fone, launch it. From the main menu, tap on ‘System Repair’ and get your Vivo Y36 connected to it.

Step 2: Click ‘Android Repair’ from the available options, and then press the ‘Start’ button to fix the Dead Android phone by flashing it.

Step 3: On the Vivo Y36 device information screen, pick the appropriate device brand, name, model, and other details followed by tapping the ‘Next’ button.

Phase 2: Put the Android device in Download mode to start repair.
Step 1: It is essential to boot your Vivo Y36 in Download mode before repairing.
- If the Vivo Y36 device has a ‘Home’ button: Turn it off and then hold down the ‘Volume Down’, ‘Home’, and ‘Power’ buttons altogether for 5-10 seconds. Un-hold all of them and hit the ‘Volume Up’ button for entering ‘Download’ mode.

- In the absence of a ‘Home’ button: Switch off the Android device and hold the ‘Volume Down’, ‘Bixby’, and ‘Power’ buttons for 5 to 10 seconds, then release them. Hit the ‘Volume Up’ button for entering the ‘Download’ mode.

Step 2: Press the ‘Next’ button for initiating firmware download.

Step 3: Once the firmware gets downloaded and verified Dr.Fone - System Repair (Android) starts to flash your Dead Android phone. All the Android system issues will be fixed soon after.

safe & secure
Part 3: How to flash Vivo Y36 dead phone with Odin?
In this segment, we will learn how to fix the dead Android phone, i.e., Vivo Y36 phones using Odin software. Odin is software used internally by Vivo Y36 to generally unblock devices and perform a more utility-based job, namely, flashing new firmware in place of the old one. There are different variants available, so choose the one which is supported by your Galaxy phone. Here is a step-by-step explanation of how to flash dead Android phone (Vivo Y36) using Odin software.
Step 1: Install the driver software on the computer. You can find the best driver software for your device and PC on the official Vivo Y36 website. You may also download Vivo Y36 Kies on your PC. Once you have downloaded and installed the driver software, restart the PC.
Step 2: Now download suitable firmware for your device in the form of a zip folder that you can open and store on your desktop.

Make sure the file is .bin, .tar, or .tar.md5 only as these are the only file types recognized by Odin.


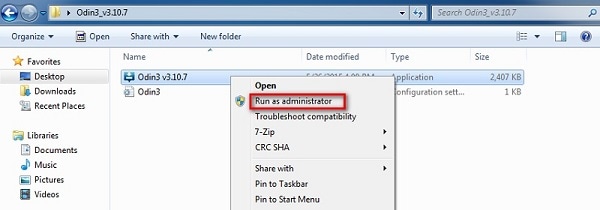
Step 3: In this step, download the latest version of Odin on your PC and move it to the desktop, and then right-click on the downloaded Odin file to select “Run as Administrator”.

Step 4: Now, boot your dead device to Download Mode by pressing the power, volume down, and home button together. When the phone vibrates, release the power button only.

Step 5: Gently press the volume up button, and you will see the Download Mode Screen.

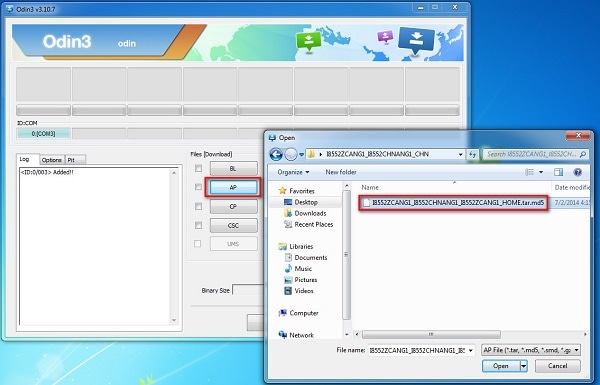
Step 6: Now, you may use a USB to connect your Vivo Y36 to the PC. Odin will recognize your device, and in the Odin window, you will see a message saying “Added”.

Step 7: In this step, find the tar.md5 file you downloaded by clicking on “PDA” or “AP” on the Odin window and then click “Start”.
Finally, once the flashing process is complete, your Vivo Y36 phone will reboot and start normally, and you may see a “Pass” or “Reset” message on the Odin window on the PC.
Part 4: How to flash MTK Android dead phone with SP Flash tool?
SP Flash tool, also known as SmartPhone Flash tool is a popular freeware tool used to flash custom ROM or firmware in MTK Android phones. It is a very successful tool and is extremely easy to use.
Let us look at the steps given below to learn how to flash dead Android phones using PC with the help of the SP Flash tool.
Step 1: To start with, download and install the MTK driver on your PC and then download the ROM/firmware you wish to use for flashing purposes.
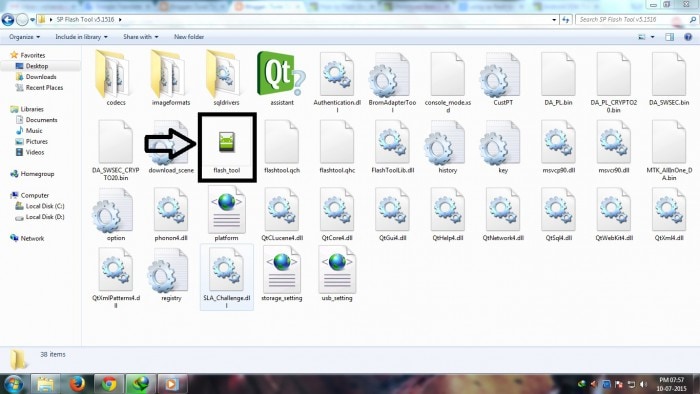
Step 2: Once done, you should download the SP Flash tool and extract it on your PC and move on to launch the Flash_tool.exe file to open the SP Flash tool window.
Step 3: Now, on the SP Flash tool window, click on “Download” and select “Scatter-loading”.

Step 4: The last step would be to locate the file downloaded by you and click “Open” and then finally, select “Download” on the SP Flash tool window.
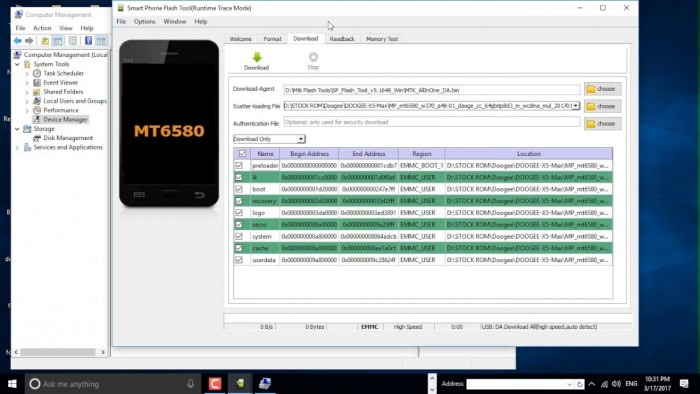
After completing the above steps, connect your dead device to the PC with a USB cable and wait for it to get recognized. The flashing process will take a few minutes to finish and then you will see a green circle indicating “OK Download”.
That’s it! Now simply disconnect your phone and wait for it to reboot.
Part 5: How to flash Vivo Y36 dead phone with the Phoenix tool?
Phoenix tool, better known as PhoenixSuit, is a tool similar to the SP False tool and Odin. It works very well with Vivo Y36 and is the best answer to “How to fix dead Android phone?”, “How to flash dead Android phone using PC?”, etc.
Let’s look at the steps of flashing the Vivo Y36 dead phone with the Phoenix tool.
First, download and install the Vivo Y36 PC Suite driver on your PC. Then you will need to download the PhoenixSuit tool and then launch it.

Now, on the toolbar, click “Tools” and select “Data Package Download” from the drop-down list.

Then move to download the firmware for your dead Vivo Y36 and save it in a new Folder. Once done, go back to the Phoenix tool window and click on “File” and select “Open Product”.

Simply, feed in the details and then click “OK”.

After this, click on “Flashing” and select “Firmware update” and then browse to select the appropriate product code and then click “OK” again.
Then move on to select “Dead Phone USB Flashing” from the Firmware Update Box.

Lastly, just click on “Refurbish” and connect your phone to the PC using a USB cable.
That was it, the flashing process may take up to a few minutes after which your dead Vivo Y36 will restart automatically.
Part 6: How to flash a dead phone that won’t turn on via factory reset?
Using tools for flashing Android devices can be a solution; however, it is heavily restricted to the Vivo Y36 device models. For a generalized solution, there can be other options that you can go with. Factory resetting an Android device by putting it in Recovery Mode is one way. To know how to flash a dead Android phone using factory reset, go through the steps featured below:
Step 1: To initiate the process, you will have to put your Vivo Y36 in Recovery Mode. Generally, Android phones are put in Recovery Mode by holding the “Power” and “Volume Up” keys for a few seconds after turning them off. The key combinations can vary according to your Vivo Y36.
Step 2: As the Android boot menu opens on your screen, use the “Volume Down” and “Volume Up” keys to scroll up and down the menu. On accessing the “Wipe Data/Factory Reset” option, use the “Power” key to select the particular option.
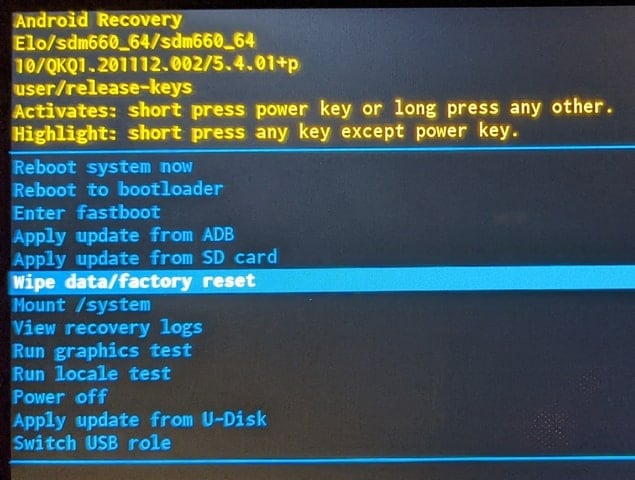
Step 3: Continue to select the “Yes” option for confirming the factory reset of the Android device. The phone will automatically reboot after successfully factory resetting.
Part 7: How to flash a dead Android phone by checking screen faulty
The screen of your Vivo Y36 may be faulty, due to which it is not launching. While seeking the right way of how to fix a dead Android phone, you can force restart your phone using the Volume buttons according to your device model.
If the Android vibrates on restarting and the screen does not lighten up, the problem can be directed to a hardware fault. The screen is broken and needs physical assistance to resolve the issue.

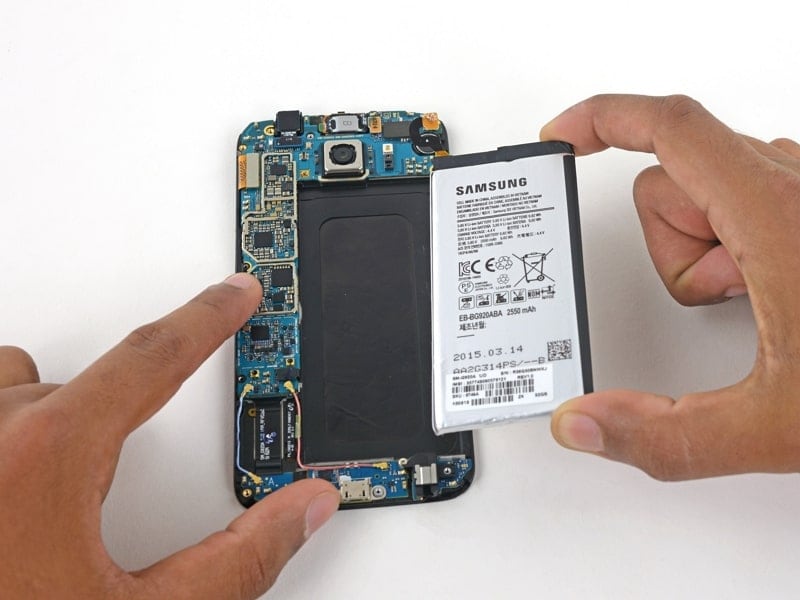
Part 8: How to fix a dead Android phone by changing the battery
Another solution that can help you fix the dead Android phone is changing its battery. The battery of an Android device can last up to 3 years. When its capacity drops to a bare minimum, it is best to change the battery of your Android. Upon trying to restart your Vivo Y36, if it does not, you might need to replace your battery. All Android phone batteries are removable, which should be regulated with proper supervision.
Part 9: How to repair dead Android phone by contacting official support
If you are unable to discover any proper solution for how to flash dead Android phones, you might have to consult the respective customer support of the Android phone manufacturers. Consult customer support to discover why the phone is dead and how it can be flashed. The respective personnel will assist you in resolving the issue, which might require monetary input from your side.
Conclusion
A dead Android phone might be the cause of worry, but the techniques given above to flash your dead Android device safely are very helpful. These methods have been tried and tested by users all over the world and thus, we recommend them to you. If your phone is dead or has become unresponsive, do not panic. Depending on your phone’s brand, here are ways to guide you on how to fix the dead Android phone and how to flash dead Android phone using PC.
It has been observed that Wondershare Dr.Fone – System Repair (Android) assists in the best way. Resolve all your concerns involving your dead Android phone and flash it to make it operable again.
Carefully follow the instructions given, and you will be able to reboot your dead Android phone successfully.
Quick Fixes for Why Is My Vivo Y36 Black and White
Why is My Vivo Y36 in black and white? This sudden shift in display colors can be perplexing and impact user experience. This issue affects various devices, including Vivo Y36 and other Android models. The abrupt shift to monochrome can impact your daily use. It can make apps and content appear dull.
If you’re asking why is my Android phone in black and white, then you’re in luck. Dive into the article below to unravel the causes behind your phone’s black-and-white display. Discover insights on addressing this unexpected issue, enhancing your overall mobile experience.

Part 1. Phone Screen in Black and White? Easy Fixes for Android Devices
Discovering your Vivo Y36 going monochrome can be annoying. The section below answers the question: why did my Vivo Y36 phone go black and white? It involves a combination of software adjustments and careful troubleshooting. Follow the practical solutions below to restore vibrant colors to your device.

Accessibility Settings
Accidental activation of accessibility settings may turn your display monochromatic. The “Grayscale“ or “Color Inversion“ option in the Accessibility or Vision section of your phone’s settings might be enabled. It can cause a black-and-white display. Here’s the solution:
- Step 1: Open your phone’s settings. Navigate to the Accessibility or Vision section.

- Step 2: Disable the Grayscale or Color Inversion option.
App Conflicts
Certain third-party apps can cause conflicts, leading to a black-and-white display . Newly installed apps might be the culprit, affecting your device’s color settings. Some apps also have grayscale modes that can impact the overall display. Here’s how to fix it:
- Step 1: Identify and uninstall recently installed apps.
- Step 2: Check individual app settings for grayscale modes.
System Glitches
System glitches or software bugs can trigger display issues. It can result in a black-and-white screen. Outdated software versions may contain bugs affecting color output as well. Regularly checking for software updates can prevent or resolve such glitches. Here’s how.
- Step 1: Go to your phone’s settings. Check for software updates in the Software update or System update section.

- Step 2: Update your device if there is a software update available. Ensure your device is running the latest software version.
Battery Saving Modes
Battery-saving modes can also alter display settings to conserve energy. It can sometimes result in a black-and-white screen. These modes limit power consumption by reducing color output. Reviewing and adjusting these settings can restore the normal color display. Follow the steps below.
- Step 1: Open your Vivo Y36’s Settings. Navigate to the Battery or Battery & Performance section.

- Step 2: Check and adjust battery-saving settings, including toggling power-saving modes on or off.
Hardware Issues
In rare cases, hardware issues may cause a black-and-white display. Physical damage, loose connectors, or problems with the display hardware can impact color reproduction. Identifying and addressing these hardware issues may be crucial for resolving the problem. Here’s what you should do.
- Step 1: Check for physical damage, loose connectors, or display hardware issues.

- Step 2: Seek professional assistance or contact the Vivo Y36 device manufacturer if hardware problems are suspected.
Consider a reliable third-party tool if your phone persists in black and white despite troubleshooting attempts. Tools such as Dr.Fone System Repair Android offer advanced solutions for complex system issues. They ensure your phone regains its vibrant display without a hitch.
Part 2. Using a Dedicated Tool: Dr.Fone for Fixing Black and White Display Problems
Dr.Fone is a reliable solution for addressing black-and-white display issues on Android devices. For a stress-free repair experience, follow these simple steps using Dr.Fone - System Repair (Android).
![]()
Dr.Fone - System Repair (Android)
Repair Android System Errors without Any Trouble.
- Fix your Android to normal, no skills required.
- Fix various Android system issues, stuck in boot loop , black screen , or won’t turn on , looping on start, etc.
- The high success rate in resolving Android system issues.
- Compatible with a wide range of Android devices and OS versions
- User-friendly interface with easy-to-follow steps.
3981454 people have downloaded it
- Step 1: Download and install Dr.Fone. Launch the program and click on System Repair on the main window. Connect your Vivo Y36 to the computer using the correct cable. Choose Android among the options.
safe & secure
3,601,336 people have downloaded it
- Step 2: Provide accurate device information, including brand, name, model, country/region, and carrier details. Confirm the warning and click Next.
- Step 3: Follow the on-screen instructions and wait for the program to download the firmware. Once downloaded and verified, Dr.Fone automatically initiates the repair process on your Vivo Y36.
- Step 4: After a while, your Vivo Y36 will have all system issues fixed. Click Done to complete the process or choose Try again if the problem persists, allowing you to repeat the steps.
Note
It’s highly recommended to back up your Android data before using Dr.Fone for repair.
How Dr.Fone Can Help You Beyond Display Issues
Beyond resolving black-and-white display problems, Dr.Fone serves as a comprehensive tool for all Android issues. The platform can enhance your device functionality.
Key Features
Here are key features that make Dr.Fone an invaluable resource:
- Fix All Kinds of Android Problems
Dr.Fone is designed to address a wide range of Android issues. These include black screens, malfunctioning Play Store, app crashes, boot loops , and bricked Android devices . Its versatility makes it a go-to solution for diverse system challenges.
- Wide Device Compatibility
With support for over 1000 Android models, Dr.Fone ensures compatibility with a vast array of devices. The platform is versatile and a widely applicable tool for Android users.
- High Success Rate
Dr.Fone boasts a high success rate in resolving Android issues. It provides users with confidence in its effectiveness and reliability.
Additional Functionalities
Below are additional functionalities of Dr.Fone that support your device to keep it in top shape.
- **Phone Manager.**Fone acts as a comprehensive phone manager. It allows you to transfer contacts, SMS, photos, videos, and more between your Vivo Y36 and computer. The feature simplifies data management and ensures seamless organization.
- Phone Backup. The tool enables selective backup of Android data on a computer. It provides you with the flexibility to safeguard essential information. The selective backup feature ensures efficient use of storage and allows for easy restoration when needed.
- **Screen Unlock Without Losing Data.**Fone offers a secure way to unlock the screen of Android devices without losing data. You can regain access to your devices without compromising valuable data, whether due to forgotten passwords, pattern locks, or PINs.
Part 3. Tips for Maintaining Your Phone Display Brilliance
Maintaining a vibrant phone display enhances user experience and ensures optimal visual clarity. Follow these tips to keep your phone’s display at its best:

Adjust Brightness Mindfully
Optimize brightness settings based on ambient lighting. Avoid excessively high brightness levels, which can strain your eyes and impact battery life.
- Update Regularly
Keep your phone’s software up-to-date to benefit from performance enhancements, bug fixes, and display optimizations provided by system updates.
- Be Mindful of Background Apps
Close unused background apps to free up system resources and prevent unnecessary strain on your phone’s display and overall performance.
- Use Static Wallpapers
Dynamic wallpapers and live backgrounds consume more power. Opt for static wallpapers to reduce battery drain and maintain consistent display performance.
- Avoid Extreme Temperatures
Exposure to extreme hot and cold temperatures can affect your phone’s display and overall performance. Store your device in a moderate environment.
- Implement Screen Timeout
Set a screen timeout to turn off the display when not in use automatically. This conserves battery life and prevents unnecessary wear on the screen.
- Clean Your Screen Regularly
Fingerprints, dust, and smudges can affect display clarity. Clean your screen regularly with a microfiber cloth to ensure a crisp and vibrant view.
- Secure Your Phone
Implement security measures to prevent unauthorized access. This protects your data and ensures the display remains secure and untouched.
- Enable Night Mode
Many phones offer a night mode that reduces blue light emission. It promotes better sleep and reduces eye strain, especially during nighttime use.
- Implement App-Specific Settings
Some apps have specific display settings. Explore and adjust these settings within individual apps to enhance your visual experience and reduce strain.
Conclusion
The guide highlights the “Why is My Vivo Y36 black and white“ query. It offers practical solutions for Android and Vivo Y36 users. By addressing common issues such as accessibility settings, app conflicts, and system glitches, you can restore their vibrant displays. Maintaining your phone display involves mindful practices, from adjusting brightness to regular updates.
The guide provided solutions for display issues and showcased the versatility of Dr.Fone System Repair Android. It’s a holistic solution for users seeking a seamless and reliable Android experience, addressing diverse concerns with precision and efficiency.
Vivo Y36 Camera Not Working Unexpected Error? Fix It Now
For all its glory and goodness, the Android OS often has its users pulling their hair in frustration at just how buggy the OS can be at times. So, if you’re having one of those days today, we are here to help. Camera app is one of the most used apps on smartphones today. People only launch the app when they want to take a photo, for everything else there’s a dedicated photo gallery app. What happens when you launch the camera app only to realize it threw an error and you missed your photo moment? Don’t throw the phone, not yet. Let us help you out.

Part I: Why Is Android Camera Not Working?
There are a few reasons why the camera app is not working on your Vivo Y36.
Low Memory
Camera app does rely heavily on system resources, so in case you have too many apps open and for some reason the OS is not able to manage the resources appropriately for the camera app to function as it should, you will get a camera error.
Low Storage
The camera app needs storage space to save the photos it takes. So, in case your phone is running low on storage space, the camera app would likely malfunction as it would have no way to store the photos it would be taking.
General Bugs And Glitches
OS bugs and general glitches within the OS and the camera app can cause camera not working issue anytime during everyday operation. This is part and parcel of any technology.
Hardware Issues
In the rarest cases, there might have developed an actual hardware issue with the camera system on your Vivo Y36. The likely culprit is misuse and abuse, such as a dropped phone or maybe the phone was too hot for extended periods of time, causing hardware issues.
Part II: How To Fix Android Camera Not Working Issue?
So, how to get the Android camera not working problem solved? There are a few ways you can try fixing the camera not working issue on your Vivo Y36 right where you are, without needing to take the Vivo Y36 device to the manufacturer’s service center.
II.I: Restart The Handset
One of the first things to do any time an app or your phone or tablet does not work like it should, restarting the Vivo Y36 device refreshes everything just enough to resolve most commonly occurring issues.

Use the power button on your smartphone to restart your Android handset and see if this resolves the issue.
II.II: Close And Relaunch The Camera App
If the camera app (or any app for that matter) has been in the background for a while and then it is brought to the foreground, there are always chances of it crashing for any reason, or not working as expected. So, closing the app completely and relaunching it is recommended.
Step 1: Launch the app switcher on your specific Android device the way your device manufacturer suggests you to. Usually, it is a swipe up and hold gesture to get into the app switcher.

Step 2: Next, you can choose to close just the camera app or, better yet, close all apps by tapping the Close All button. Flicking any app upwards (quick upward swipe) is how you close an app. If there is no Close All button anywhere, repeat the gesture for all open apps.
II.III: Check App Permissions
These days, thanks to strides in the privacy initiatives, apps need permissions before they can function the way they do. Most of the times, apps such as camera do have the necessary permissions, but sometimes it is possible that the permissions are set incorrectly. To check if the camera app has the requisite permissions, do the following:
Step 1: Go to Settings > Apps > Camera > Permissions.

Step 2: Tap Camera.

Step 3: See if the selected option is Allow Only While Using This App. If not, select it.
II.IV: Clear The Camera App Cache
Clearing the camera app cache is sometimes helpful. To do that:
Step 1: Go to Settings > Apps > Camera and tap Storage Usage.

Step 2: Tap Clear Cache.

II.V: Clear The Photo Gallery App Cache
The camera app is closely tied to the photo gallery app that comes baked in into Android OS. That is because photos that the camera app takes are stored in the photo gallery app. Consequently, if there were any issues in the photo gallery app, that could lead to the camera app not working on Android problem. Here’s how to clear the photo gallery app cache:
Step 1: Go to Settings > Apps > Photos > Storage Usage.

Step 2: Tap Clear Cache.
II.VI: Check For App Updates
This does not happen always, but sometimes, with known bugs and issues, there may be an update released that fixes those bugs and issues that prevent some users from using a given app reliably. Checking for updates is a good step to make sure that your camera app is updated to the latest version possible.
Step 1: Go to Play Store and tap your profile picture on the right.

Step 2: Tap Manage Apps and Device.

Step 3: If there are updates available, Tap Update All to update all apps.
II.VII: Cool The Phone Down
We do not realize the immense power that is packed into the thin smartphone form factor these days. If you have been using the phone to video chat for a while now, you might not realize that the phone has become hot, especially if you are using a desk stand. Same for shooting high-resolution videos; the phone does get quite hot shooting high-resolution videos.
If this is the case, close all apps and let the phone cool down. You might even want to shut the phone off to help cool it faster.
II.VIII: Nudge The Camera System
You may want to tap your camera system (the lenses and surrounding area) gently to see if that gets the camera working. In case it did, this is indicative of a hardware issue, and you should get it checked at the service center at your earliest convenience.
II.IX: Fix Android Camera Not Working Issue In One Click (With Dr.Fone)
Now, if the above fixes have not worked, you might want to repair your Android OS once before you make that appointment with the service centre. And, we have just the app to help you fix your camera not working on Android problem quickly.
Wondershare Dr.Fone is a multi-module app that works on both Windows and macOS and is the only app you will ever need to resolve nearly all of your smartphone and tablet issues that you are likely to encounter. Need to take backups? Dr.Fone Phone Backup has you covered with the ability to take and restore even selective backups, and to any location such as your computer or an external disk as well. Want to transfer WhatsApp chats to a new phone? Use WhatsApp Transfer to do just that! Bought a new phone? Use Phone Transfer to transfer contents from old phone to new, and then use Dr.Fone Data Eraser to securely wipe your old phone before giving it away!
Today, we will use Dr.Fone’s System Repair (Android) module to fix Android camera not working issue quickly.
Download Dr.Fone here.
safe & secure
Step 1: Launch Dr.Fone app on your PC or Mac.
Step 2: Click System Repair module and then Android.

Step 3: For now, don’t bother with the scenarios given and click Start to go to the next screen.
Step 4: Your Android device will be detected by Dr.Fone. If anything seems incorrect, use the dropdown options to change it, and click Next.
Step 5: Your phone needs to be put into Download mode before it can be repaired. Follow the instructions shown onscreen and click Next.
Step 6: Dr.Fone automatically downloads the most recent firmware for your device and when it is ready, waits for your input. Click Fix Now to start the repair process.

Step 7: You will need to enter a 6-digit code (digit zero, six times – 000000) to confirm and begin the repair process.

When the repair is complete, Dr.Fone shows the final screen as below:
safe & secure
Conclusion
The camera app on your smartphone is one of the most important apps you use. This is not a game; this is an app that makes previous memories possible for you. So, when you get any of those incorrigible errors that are impossible to make sense of, what do you do? This guide gives you 9 fixes to fix Android camera not working error quickly and easily.
Also read:
- [New] Digital Broadcasting Battle Comparing Facebook LIVE, YouTube Live, & Twitter Spaces
- [New] Master the Art of Subtitling A Brief Blueprint for Your FB Video Uploads
- [Updated] Highlighted 20 Anime Melodies at Start
- 2024 Approved Seamless Skype Call Recordings A Cross-Platform Approach
- 2024'S Ultimate Selection of High-Performance Gaming Mousepads
- 2024年度最高のYouTubeダウンローダー: 強力な7つの無料配信ソフト推奨!
- Download Gratuiti Protetta Immagini Window 11 - Sicurezza E Privacy Dei Tuoi Dati
- How to Fix the Soft Bricked Poco C51? | Dr.fone
- How to Quickly Fix Bluetooth Not Working on Samsung Galaxy A34 5G | Dr.fone
- Quick Fixes for Why Is My Oppo Reno 10 Pro 5G Black and White | Dr.fone
- Reasons for Itel A05s Stuck on Boot Screen and Ways To Fix Them | Dr.fone
- Reasons for Oppo A78 5G Stuck on Boot Screen and Ways To Fix Them | Dr.fone
- Reliable User Guide to Fix Samsung Galaxy F34 5G Running Slow and Freezing | Dr.fone
- Resolving YouTube Sound Issues in Windows 10: A Step-by-Step Guide
- Restore Missing App Icon on Motorola Defy 2 Step-by-Step Solutions | Dr.fone
- Will Pokémon Go Ban the Account if You Use PGSharp On Xiaomi Redmi Note 12 Pro 5G | Dr.fone
- Title: How to Flash Dead Vivo Y36 Safely | Dr.fone
- Author: Abel
- Created at : 2025-01-09 18:53:27
- Updated at : 2025-01-10 18:01:18
- Link: https://fix-guide.techidaily.com/how-to-flash-dead-vivo-y36-safely-drfone-by-drfone-fix-android-problems-fix-android-problems/
- License: This work is licensed under CC BY-NC-SA 4.0.