
How to Hide/Fake Snapchat Location on Your Tecno Spark 20C | Dr.fone
How to Hide/Fake Snapchat Location on Your Tecno Spark 20C
The GPS functionality is very prominent these days. Especially when various apps or websites are making use of your geological location to deliver more relevant content. Be it, social networking apps or gaming apps, for instance, Snapchat, and Pokemon Go respectively.
Talking about Snapchat, this app offers you different badges and filters depending upon your Geographical location. It actually utilizes the GPS feature of your device to determine where you are located. This can sometimes be annoying as you may wish to access a filter or badge that is not available at your Geological location. Now, this is where you need the Snapchat spoof location app. You not only can hide your actual location from Snapchat. Instead, cast a fake location on Snapchat map, and eventually, you can easily access the badges/filters at your convenience!
Sounds interesting, right? Let’s understand more about the tutorials on how to hide/fake location on Snapchat map.
Part 1. What Snapchat is using your location for?
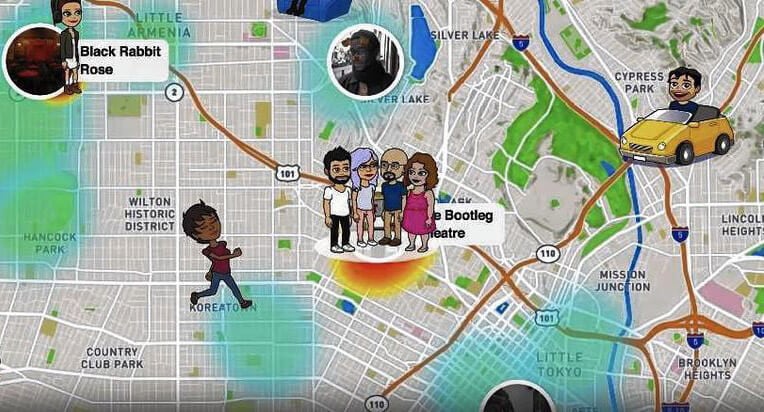
Snapchat basically utilizes your location for the SnapMap feature that furnishes the location-based filters etc. over your device. This SnapMap feature was unveiled in 2017. If you haven’t deliberately enabled it yet or you’re unaware of this feature, implies that you’re still “off the grid”. If you wish to enable this feature, you literally need to authorize Snapchat “3x times” and the last, fourth one to authorize your device.
With the SnapMap feature enabled, you can easily get to know about the whereabouts of your friends, and in turn, there’re allowed to know yours. As long as the Snapchat app is running over your screen, the SnapMap location of your Bitmoji gets updated dynamically. But as soon as you quit the app, the last known location of your Bitmoji is displayed over the SnapMap.

Part 2. Why people want to hide/fake location on Snapchat?
When it comes to fake Snapchat location there can be several reasons behind that. Here are some scenarios where people do wish to hide/fake location on Snapchat. Let’s explore.
- Sometimes, you may wish to utilize the cute filter that you saw your favorite celebrity putting up when he/she was in Sydney, Australia (or any other location).
- Or, you may wish to simply spoof location Snapchat for fun and be popular among your friends that you know some really cool tricks.
- Perhaps, you wish to stay ahead one step ahead in the dating game. For instance, you’re planning to move to a location a hundred miles away, and wish to have a person to spend quality time with when you reach there.
- Another reason is that is absolutely fun to trick people into believing that you’re spending your leisure time on an expensive tour. For instance, you can check in to a classy restaurant (you’ve never been to in real) in Dubai by mocking the GPS location.
- Even better for the kids who wish to fake GPS location to hide their real location over the location-sharing SnapMap feature from their parents, family, or friends.
Part 3. How to hide location on Snapchat
When it comes to disabling or hiding the location on Snapchat, the tutorial is extremely easy. Snapchat itself offers you a setting called Ghost mode. You just need to enable it. Here’s how to get it done.
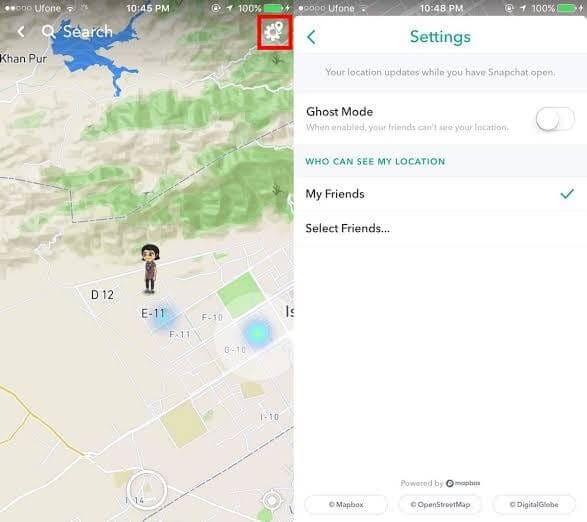
First, get into the Snapchat app and then visit either the Discover screen or the Camera or Friends. Next, tap on the magnifying glass and hit on Map.
As soon as the SnapMap screen loads up, you need to access the settings by hitting the Gear icon on the top right corner.

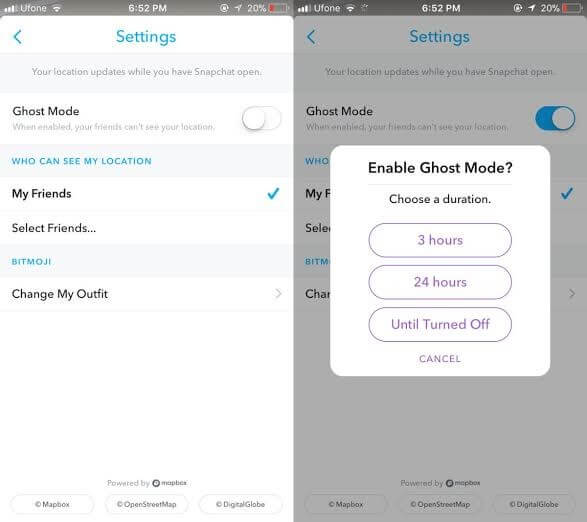
Then, make use of the settings to set up your privacy and hit on the “Ghost Mode” toggle switch to turn it on. A pop-up window will appear with 3 different settings:
- 3 hours : Ghost mode is turned on for 3 straight hours.
- 24 hours : Ghost mode is turned on for 24 straight hours.
- Until Turned Off : Ghost mode is turned on until you manually turn it off.
Selecting either of the aforementioned settings will hide your location from SnapMap. Implies, other than you no one will be able to locate you over SnapMap.
Part 4. How to fake Snapchat location on iPhone
4.1. Change Snapchat location to anywhere using a Smart Tool (easy)
You can easily spoof location on Snapchat using the tool Dr.Fone - Virtual Location (iOS) . This tool is easy to operate and works perfectly when it comes to spoofing any location. Here is how to fake GPS Snapchat iPhone without jailbreak.
Step 1: To begin with this Snapchat location spoofer, simply head to the official website of Dr.Fone – Virtual Location (iOS). Download the software package from there and then install it afterwards.

Step 2: After successful downloading, open the tool. Now, you need to opt for the “Virtual Location” module from the main interface. Post doing this, click on the “Get Started” button.

Step 3: You can notice your current virtual location on the map in the next window. If you can’t, simply go to the “Current Virtual Location” icon available on the lower right side of the screen. Click on it and it will show your current virtual location.

Step 4: It’s time to activate the “Teleport Mode”. To do this, all you need is to click on the first icon given on the upper right side. After this, you need to enter the location where you desire to teleport in the blank field given on the upper left. Hit on “Go” when you’re done.

Step 5: A few moments later, the system will perceive the desired location you have entered. A pop-up box will come up where the distance will be shown. Click on the “Move Here” option in the box.

Step 6: This is it! The location has been changed to the desired one now. Now, whenever you click the “Current Virtual Location” icon, you will see the new location.

Also, on your iOS device, you can now Fake Snapchat location or in any other location-based app.

4.2. Change Snapchat Location using Xcode (complex)
Now, if we talk about fake location for Snapchat map on iPhone, it’s not as easy as it looks. You need to be an extremely tech-savvy person to fake Snapchat location without jailbreaking your Tecno Spark 20C. You simply can’t download a Snapchat location spoofer app over your Tecno Spark 20C and fake it. But fret not, we’re glad to bring you a detailed tutorial with which you can easily perform location spoofing on Snapchat and that too, without jailbreaking your Tecno Spark 20C.
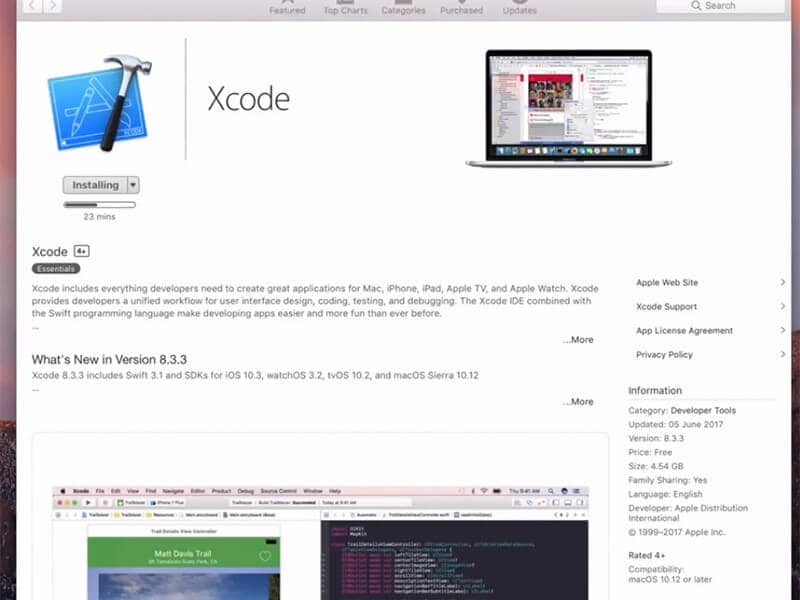
Step 1: Install Xcode and Set up a Dummy app
Grab your Mac computer first and then head over to the App Store. Now, look for the Xcode application and get it installed on your computer.
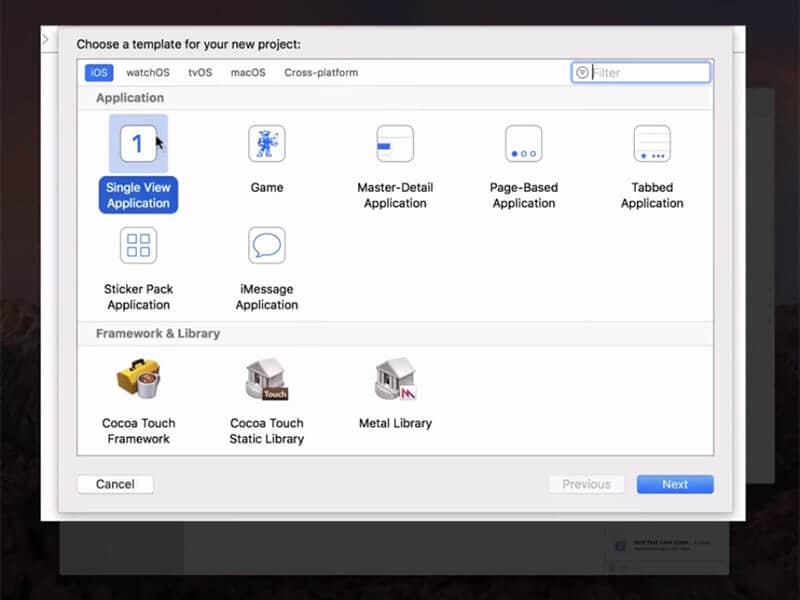
Once the application is installed, launch it over. The Xcode window will come up over your screen. Now, set up a new project and select “single view application” followed by hitting “Next”.
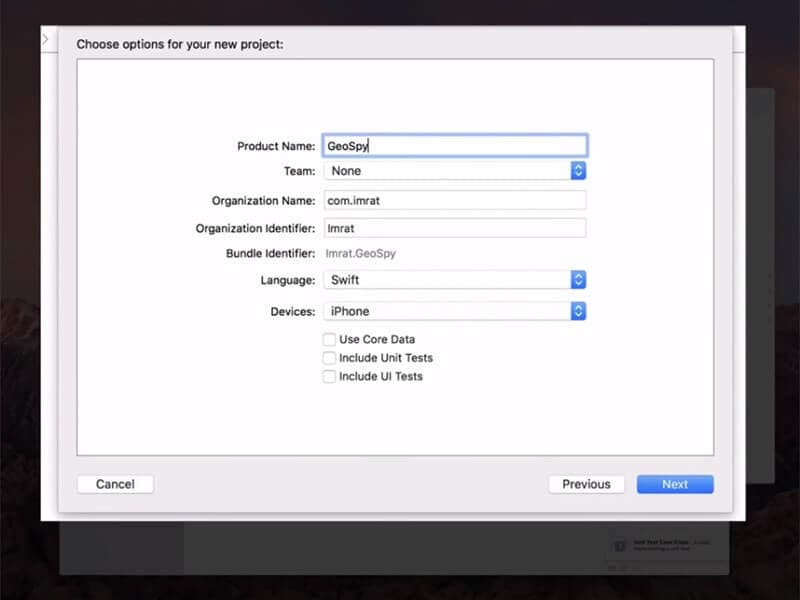
Then, give a name to your project, for instance, “GeoSpy” and hit on the “Next” button.
Step 2: Setup GIT on Xcode
On the upcoming screen, Xcode will throw up a pop-up message stating “Please tell me who you are” and some GIT commands that you need to execute.
For this, fire up the “Terminal”over your Mac and then execute the commands as follows:
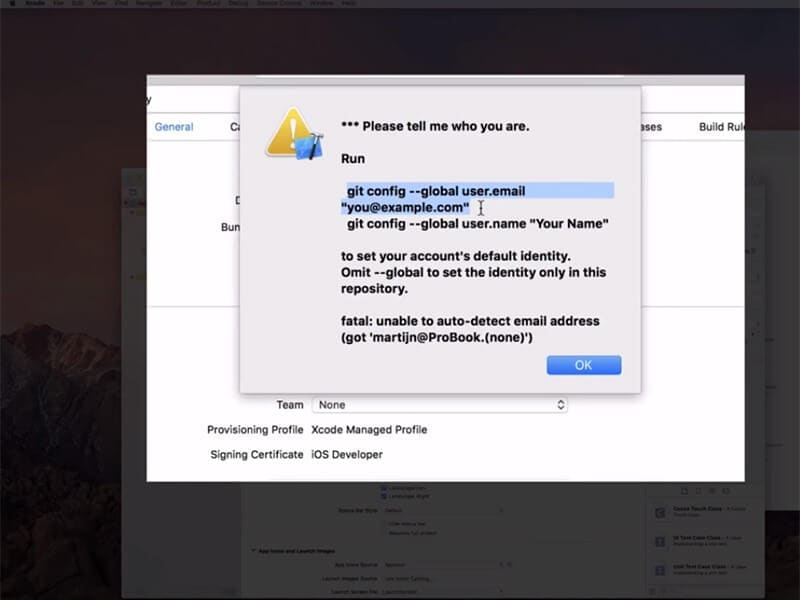
- git config –global user.email “you@example.com “
- git config –global user.name “your name”
Note: Change the values for “you@example.com ”and “your name” with your information.

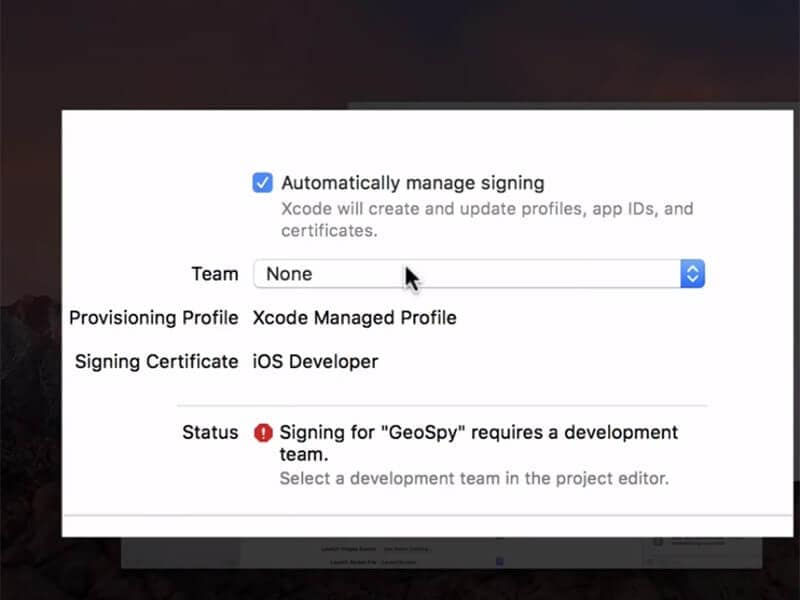
Next, you need to make sure that to set up a development team and meanwhile, connect your Tecno Spark 20C to your Mac computer.
Once done, opt it in as the build device and while you do it, ensure to keep it unlocked.
Lastly, if everything is performed correctly, Xcode will now process some symbol files, please be patient and wait for it to complete.
Step 3: Move Bitmoji
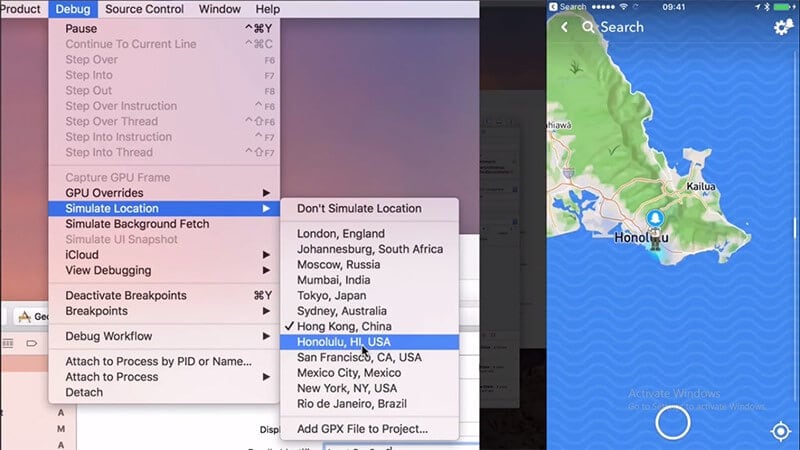
Now, you’re all set to fake location for Snapchat map. For this, simply hit on the “Debug” menu and then opt for “Simulate Location” from the drop-down window. Lastly, select the location from the list as per your preference and you’re done.
Part 5. How to fake Snapchat location on Android
Last but not least, the next method to fake Snapchat location is for Android devices. For this, you need to download a Snapchat spoof app (easily available over Google Play Store) on your Tecno Spark 20C. Here’s all that you need to do.
Head to the Google Play Store and then look for the “fake GPS” app. You may be provided with several similar options, be it free or paid. If you get along with any other app, it may require your Tecno Spark 20C to be rooted.
You need to opt for the “Fakegps free” app for Snapchat. This app doesn’t require you to root your Android. But ensure that you are running on Android version 6.0 or higher.
Install the Fake GPS Free app for Snapchat and then launch it afterwards. On the main screen, you’ll be asked to“ENABLE MOCK LOCATIONS”. Hit on it and you’ll be redirected to the“Developer options” screen.
Here, you need to simply tap on the “Select Mock Location App” option and opt for “FakeGPS Free” from the list of options appearing.

Note: You may need to enable the “Developer options” first to access these settings. For this, head to the “Settings”>“About Phone”> hit on “Build Number” – x7 times.
Once done with enabling mock location, hit the back button on your touch screen to retreat back to the Fake GPS Free app.
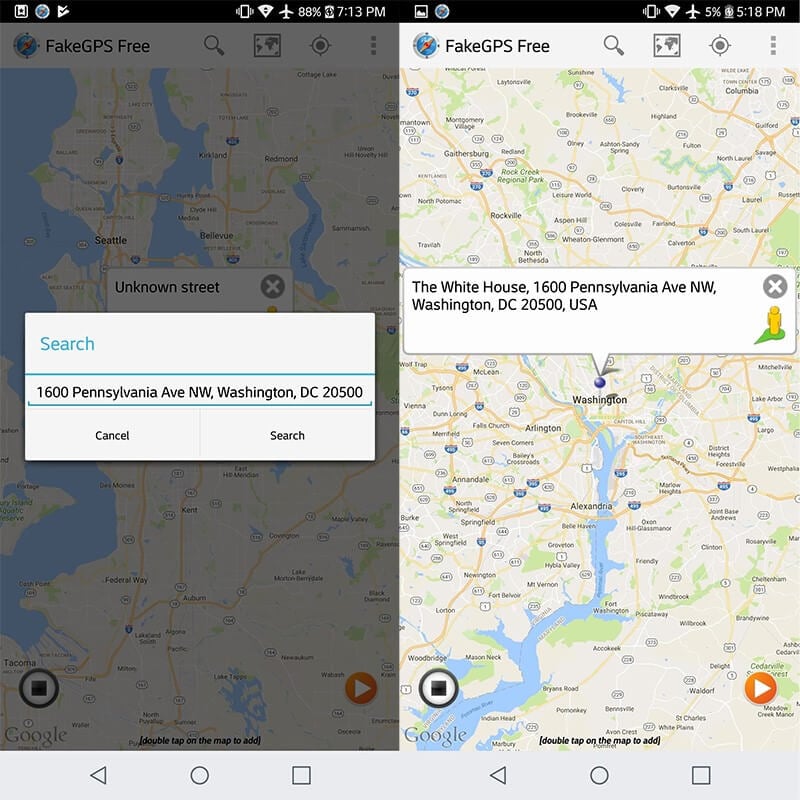
Now, hit on the “Search” icon over the top to find the desired location. Or, simply double tap over the map on your desired location to drop the pin.
Lastly, hit the “play” button available over the right bottom of your screen to activate the fake GPS location for Snapchat.
Final Words
While reaching towards the end of the article, we are pretty sure that you now fully understand what it takes to fake Snapchat location on Android or iPhone. The aforementioned ways are fully tested and work even without rooting or jailbreaking your devices respectively. Happy Spoofing!
How to Change Location on TikTok to See More Content On your Tecno Spark 20C
TikTok is a famous entertainment application that shows exciting content worldwide. It is now a popular application with a recorded 3 billion downloads while surpassing the popularity of Facebook and Twitter in 2018. But, sadly, the application keeps on being the victim of restrictions and bans in different countries worldwide.
This limits content broadcast in different regions, making TikTok lovers deprived of entertainment. But, if you know how to change location on TikTok, you can surpass all these restrictions easily. The article will help you learn how to change your TikTok location by presenting the following aspects:
Part 1: How Does TikTok Detect your Location
According to the TikTok privacy policy, your location through TikTok is tracked based on your IP address, SIM card, and GPS. It happens right after you make your account on TikTok through your phone number. In this way, TikTok also happens to avoid scammers and fraudsters. In some cases, your location is also automatically tracked by giving a location tag to your posts.
The IP address and browsing history on the TikTok, time zone setting and mobile carrier are also collected by the TikTok as “Technical Information.” In case you want to know if TikTok ensures your safety as well? The answer is no. If you give your location access to TikTok, it increases the chances of getting hacked.
Your information becomes easily accessible to everyone. Moreover, it is also mentioned in the privacy statement of TikTok that they will share your details with public authorities, enforcement agencies, and other organizations. TikTok can share your sensitive information with governments and commercial parties.
If you don’t want to add your location on TikTok, you will have to deny the permissions on your phone. Hence, knowing how to change location on TikTok is necessary.
Part 2: Why We Need to Change Location on TikTok
We have discussed how TikTok gets to know about your location in the first part. Now, we will share why do we need to change location on TikTok:
- To Add Diversity to the Audience
The algorithm of TikTok is built so that it will only show the content of your region or country. Therefore, if you want to make money through your content on TikTok, it might not be possible for you. So, you may want to target the audience of another region that is willing to buy the content.
- Access Better Content
Even if TikTok offers exciting content that has made the app popular, you can only access the available content for your region. Therefore, if you want to enjoy more content from the other areas, you should change your location on TikTok to access unlimited content.
- Use the App without Hurdles
Countries like Afghanistan and India have banned the TikTok application, and Indonesia and Bangladesh have censored it. Moreover, the United States is also thinking of the same due to user privacy concerns and security threats. However, if your country has already banned TikTok, you can still access the content with a fake location if you know how to change location in TikTok.
- Protect your Privacy
If you are not using a VPN or any other way to change your location, TikTok can access your device easily. The organization behind TikTok can access the applications on your phone, your messages, and places you go to. So, when you change your location, it will remove the chances of being tracked.
Part 3: How to Change your Location in TikTok on Different Devices?
We have discussed why it is essential to know how to change the location of TikTok. Now, we will move forward and discuss the methods involved in changing the TikTok location on various devices:
1. For iOS and Android Devices
If you are interested in changing your location on your iOS and Android devices, the following methods are aligned for you:
Method 1: A tested way - Dr.Fone - Virtual location
Dr.Fone – Virtual Location is an application designed for Android and iOS devices. This application assists in teleporting the GPS location to any other location easily. With this location changer, you can fake your location and enjoy the content of different regions without having to travel anywhere. The following steps will guide you on how to change the TikTok country location with Dr.Fone – Virtual location:
 safe & secure
Step 1: Access the Location Changer
The first step demands you download Dr. Fone’s Virtual location and install it. Next, launch the program and click “Virtual location” from all the available options. Next, connect your Tecno Spark 20C or iPhone through any USB cable with your PC and tap on “Get Started.”
Step 2: Access your Current Location
A new window will be opened, and your real location will be displayed on the Dr.Fone map. If you can’t see it, click on the “Center On” icon at the right sidebar to show the location.
Step 3: Activate the Teleport Mode
Now, click on “Teleport Mode” by pressing the first icon on the upper-right side. Now, provide the place you want to teleport to in the search bar. Next, press the “Go” button and press the “Move Here” button from the popup box.
Step 4: Your Location is Changed
Now, the location of your iOS or Android phone has been fixed to the given location. So you can now enjoy your fake location content on TikTok while bypassing all the restrictions efficiently.
Method 2: Changing Language on TikTok to Access Content from Other Regions
TikTok only shows the content of languages that are native to your region. Fortunately, you are allowed to change the language on TikTok and access the content of that region. However, this method only shows the content of the selected area.
Therefore, you can’t add the language of any such region which has banned the application. Instead, follow the given steps to change your language on TikTok and access the content peacefully:
Step 1: Open the TikTok application and select “Profile,” written on the lower right-hand corner of the interface.

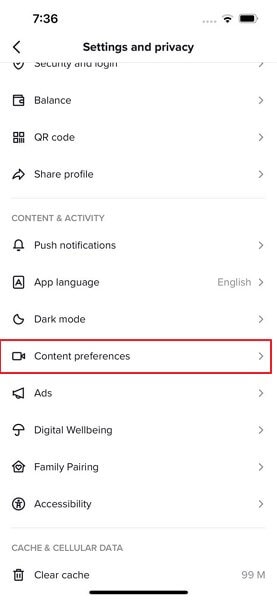
Step 2: Now, click on the three dots mentioned in the right-hand corner and access the “Settings and Privacy” of your TikTok account. Now, choose the “Content Preferences” option written under the “Content & Activity” section.
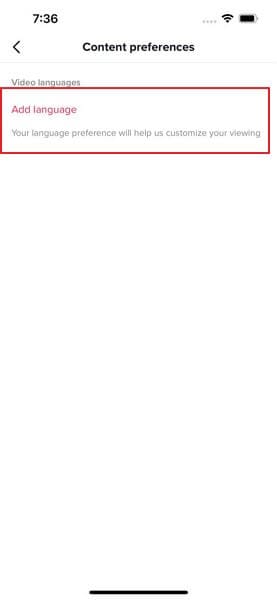
Step 3: Now, add the language that is native to your target region. Now, you will be able to access the content of the particular region.
Method 3: Changing your SIM Card to Change Location on Tiktok
TikTok uses the region code of your SIM card to display the content of your region on the feed. Therefore, it will be helpful if you buy a SIM card from another area and use it on Your Tecno Spark 20C to watch that region’s content quickly. This process is as simple as choosing a fake location and buying a SIM card from that region.
You can do so by ordering an international SIM card through Amazon and putting your SIM in the mobile phone. Now, delete the cache and app data. Then, open TikTok and enjoy various content. Unfortunately, you will have to buy a phone with a dual SIM. Moreover, some SIM cards might not work in your region unless you buy a mobile plan.
2. For Computer
Now, let’s discuss how to change your location on TikTok from your Computer. For this, we have introduced a VPN service that fakes the location on TikTok and helps you access content from different regions.
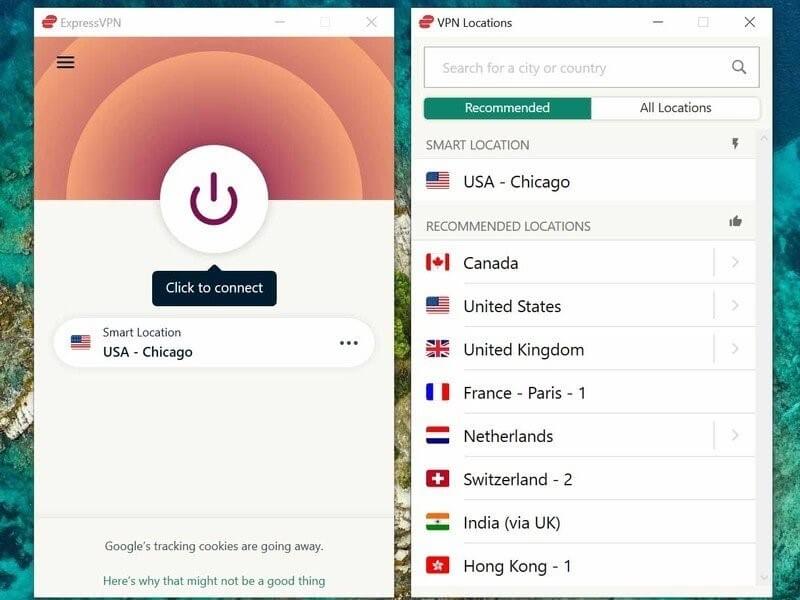
ExpressVPN
ExpressVPN is a top-notch VPN that provides blazing-fast speed for browsing, streaming, and playing games with unlimited bandwidth. You can connect to the service anywhere as the application’s high-speed servers work across 94 countries. In addition, it protects user data by offering the best security and encryption.
With the given following steps, you can set up ExpressVPN on your computer and access unlimited TikTok content:
Step 1: Launch the ExpressVPN software and tap on the “On” button to utilize the service. Now, press the “Smart Location” option.
Step 2: Select the VPN server location from the “All Location” tab or “Recommended” tab.
Step 3: Once you are connected, you will be able to use TikTok and watch content from the selected region with enhanced privacy and security.
Part 4: FAQs about TikTok Location
1. Is it not legal to change the TikTok location?
It is legal to do so unless you are not misusing the application and watching objectional content from the region.
2. How to turn off the GPS on TikTok?
For Android devices, open the “Settings: and reach the “Location” tab. Now, press on the “App Permission” option and search for TikTok. Now, click on “Don’t Allow.”
For the iOS device, open the “Settings” app and click on “Privacy.” Further, click on “Location Services” and find TikTok. Change the TikTok location setting to “Never.”
3. Is it safe to use TikTok with a VPN?
Yes, TikTok will not be able to detect that you are using a VPN. Therefore, you will not be banned from using the application. It is safe to access TikTok with a VPN because it hides your IP address and location.
Conclusion
We have extensively concluded different methods involved in How to change location on TikTok. For iOS and Android devices, you can do so with the help of Dr.Fone - Virtual Location . Besides, you can manually change your language or SIM card to access the content of the particular region. If you use a computer, you can use ExpressVPN and change the location of your device while hiding your IP address.
safe & secure
How To Pause Life360 Location Sharing For Tecno Spark 20C
Life360 has become a household name in location-sharing apps, renowned for its ability to connect family and friends seamlessly across Android and iOS platforms. This app enhances safety and fosters a sense of closeness among its users.
However, there are moments when you might crave a bit of privacy or a break from constant connectivity. Whether for a surprise, personal space, or a digital detox, the need to discreetly pause Life360 arises. This article delves into the nuances of how to pause Life360. It will also provide insightful tips on how to do it without alerting others.
Part 1: What Is Life360 and How To Pause Life360 From the App
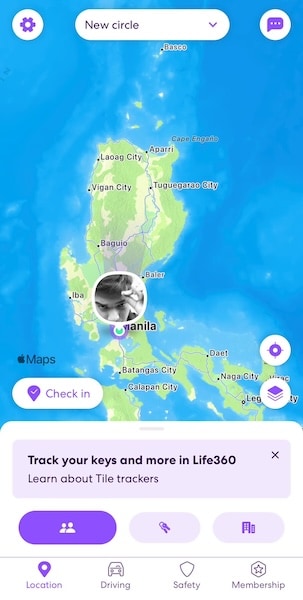
Life360 is not just an app; it’s a digital lifeline connecting people with their loved ones. It’s primarily designed for family and close friends. By offering real-time location sharing, it ensures that members of your “Circle” (a group within the app) know where you are at any given moment. This feature is handy for parents monitoring their children’s whereabouts or friends coordinating meet-ups.
The Purpose of Life360
At its core, Life360 is about safety and connectivity. The app includes features like location history, driving reports, and even crash detection, making it a versatile tool for modern families. It provides several benefits, like:
- Safety assurance. Knowing the whereabouts of your loved ones, especially in emergencies, can be invaluable.
- Convenience. Planning gatherings or ensuring a family member has arrived safely at a destination becomes more manageable.
- Emergency response. The app can alert users to potential emergencies involving Circle members.
Reasons of Pausing Life360
However, there are instances where learning how to pause Life360 becomes necessary:
- Battery health. Constant GPS tracking can drain your phone’s battery significantly. Temporarily pausing the app can help conserve battery life.
- Privacy. Sometimes, you might want some privacy about your location. Thus, some people would like to pause their Life360 location sharing.
Methods To Pause Life360 From the App
Now, the question is, can you pause your location on Life360? Pausing Life360 can be done for a specific circle or the entire app. This section will show you some general steps to pause your location for the app. You can do it only for a specific circle or the whole app. Here’s how you can do those.
Pausing Location for a Specific Circle
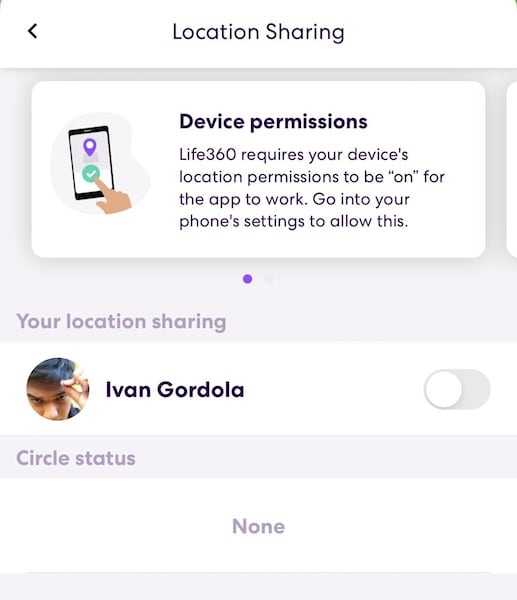
Open Life360 and go to the main screen. Select the Circle you want to pause. Then, tap on Settings (usually represented by a gear icon) in the upper-right corner. Look for an option like Location Sharing and toggle it off. This action pauses your location sharing only for the selected Circle.
Pausing the Whole App
Regarding this method, pausing the location sharing for all your circles usually involves going through your phone’s S ettings and disabling location services for Life360. If you don’t want to do that, you can turn off location sharing for all your circles through the steps provided above.
By understanding and utilizing these features wisely, you can maintain your connection with your loved ones while managing your digital boundaries and battery health effectively. Remember, the aim is to balance connectivity with personal needs.
Part 2: How To Pause Life360 From Settings
Life360 offers flexibility within its app and through your device’s settings. Understanding how to use these options can provide additional control over location sharing. Explore the various ways how to pause Life360 outside the app itself.
Pause Life360 From Android Settings
First, navigate to your Tecno Spark 20C’s Settings. Then, look for the section listing all installed apps. This is usually named as “Apps.” Locate Life360 on the list of apps and open it. You should be able to see a Force Stop button at the bottom of the screen.
By selecting Force Stop, you temporarily halt the app’s function without uninstalling it. This operation stops location sharing until you open the app again.
Pause Life360 From iOS Settings
To pause the Life360 location on iOS, you’ll have to open the Settings app on your iOS device. Browse through your apps and select Life360. Alternatively, you can use the search bar and type “Life360”. Once in the app’s menu, change location services to While Using the App. Thus, it will not share your location unless you open the app.

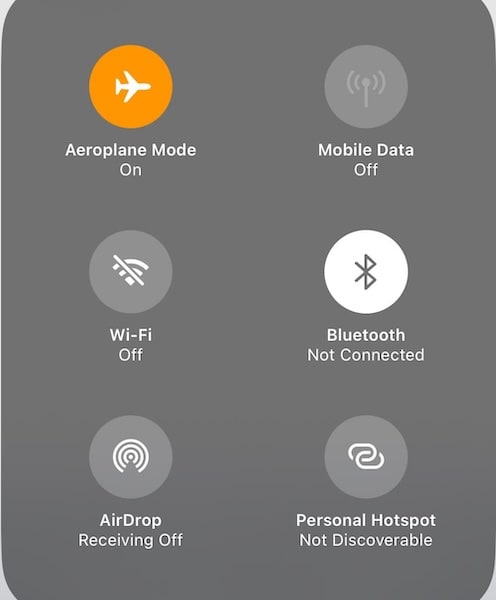
Pause by Using Airplane Mode
This can be done from the quick settings panel on both Android and iOS devices. Turning on Airplane Mode disables all wireless connections, including cellular data and GPS, effectively pausing Life360. The great thing is that Life360 will only show your last known location to your circles. It will not say that “location services are off,” unlike the first two methods.
Pause by Uninstalling
Removing the app from your device will stop it from sharing your location. The beauty of this method is that it won’t automatically notify your circles or remove you from them. However, some members might notice that your location updates are unavailable.
Each method serves a different purpose and offers varying levels of discretion. Whether conserving battery, seeking privacy, or temporarily disconnecting, these methods provide a way to pause Life360 location without drawing unwanted attention. Remember, communicating with your Circle members about your need for privacy to maintain trust is always a good idea.
Part 3: How To Pause Life360 With a Virtual Location Spoofer
Sometimes, pausing your location sharing on Life360 may raise questions or concerns among your circle members, particularly if they are close family or friends. If you’re planning a surprise or need private time without arousing suspicion, a virtual location spoofer can be handy. This method will teach you how to pause your location on Life360 without them knowing.
Wondershare’s Dr.Fone toolkit is more than just a data recovery solution. Among its various features, the Virtual Location changer is particularly useful for those looking to spoof their location. This feature allows you to simulate being in a specific location without actually being there. It’s a clever way to maintain privacy or plan a surprise without giving away your real whereabouts.
How To Use Dr.Fone To Spoof Your Location on Life360
To learn how to pause location on Life360 without them knowing using Dr.Fone, follow the steps below:
- Step 1: Download and install the Dr.Fone on your device. Connect your phone to your PC to begin the process. After launching the software, access Virtual Location from the Toolbox interface. Then, click Get Started to continue.
- Step 2: After launching the function, you’ll notice the One-Stop Route function at the top-right section. This feature is crucial for setting up your virtual movement.

- Step 3: To define how your virtual location behaves, you can decide how often the app simulates a Round trip or Loop trip. Once you’ve set parameters like Speed, click Move Here to start the simulation.

Note: TheRound trip and Loop trip are particularly useful for creating the impression of movement in a specific area. Parameters can make your virtual movement more believable.
Conclusion
This article explored various methods of pausing location sharing on Life360. Life360 is essential for many who share their locations with friends and family. The options are diverse, from simple app-based methods to more advanced settings adjustments and even a virtual location spoofer like Dr.Fone.
While it’s always recommended to maintain open communication with your Circle about pausing location sharing, there are times when privacy or surprise plans necessitate discretion. For those moments, Dr.Fone - Virtual Location emerges as a reliable solution for location spoofing and other phone management needs. Remember, using these tools responsibly is key to maintaining trust in your relationships.
Also read:
- [New] In 2024, Starting Points for Motion Visual Creation
- [New] Navigating the Economic Landscape of Short Video Royalties
- [Updated] 2024 Approved Inventory List A Range of Video Recording Devices
- [Updated] In 2024, Is Vidma the Ultimate Screen Recording Tool?
- 2024 Approved Navigating LUT Use in Professional Video Editing
- 2024 Approved Swiftly Navigate iOS Magnification Features
- Blueprint for Effective Metaverse Engagement
- Easy Steps to Fix When Discord's Screen Overlay Won't Work Anymore
- In 2024, Immortalizing Moments Live Photo to Dynamic Video
- In-Depth Assessment: How Does Google's Pixel Navigate Photography Challenges?
- Innovative Techniques for PPTs and Webcams, 2023 Edition
- Is the New Microsoft Surface Studio 2 a Smart Investment? Review Inside!
- Step-Up Performance on Your Wrist with Samsung Galaxy Watch Active2 - Reviewing Enhanced Capabilities Over the Previous Model
- SunBriteTV 55 Outdoor Brawny 4K Display with Superior HDR Technology
- Switching Mac Screenshot Types Easily
- Ultimate Fix for Windows 10'S Tricky Error 0xC19001E1 – Proven Methods Inside
- Ultimate Fixes for Call of Duty: Black Ops Cold War's Gameplay Freeze Problem
- Unstuck Cortana: Expert Advice for Restoring AI Assistant
- Unveiling Google Pixel N6: Capturing Quality or Clickbait?
- Title: How to Hide/Fake Snapchat Location on Your Tecno Spark 20C | Dr.fone
- Author: Abel
- Created at : 2025-02-18 16:35:29
- Updated at : 2025-02-20 16:14:11
- Link: https://fix-guide.techidaily.com/how-to-hidefake-snapchat-location-on-your-tecno-spark-20c-drfone-by-drfone-virtual-android/
- License: This work is licensed under CC BY-NC-SA 4.0.