
How to Quickly Fix Bluetooth Not Working on Oppo A2 | Dr.fone
How to Quickly Fix Bluetooth Not Working on Oppo A2
One of the key features of an Android device these days is the Bluetooth technology. This is such an important part of the phone that many of us take for granted, but as soon as the feature stops working, it can cause all kinds of problems.
Fortunately, despite there being many reasons why a problem could occur to your Bluetooth feature, there are also plenty of fixes. Today, we’re going to share with you the complete guide that details everything you need to know to get your Bluetooth up and running once again as quickly as possible.
Let’s get straight into it!
Part 1. About Bluetooth Not Working on Android
Of course, the most common problem to occur with Bluetooth technology in your Oppo A2 is when it doesn’t connect to the Oppo A2 device you’re trying to link it to. This could be anything from a Bluetooth headset or headphones, to a portable speaker or even an in-car audio system.
However, the problems don’t stop there. You may have problems with turning your Bluetooth settings on through your actual device. Perhaps the software simply isn’t loading, or maybe the Bluetooth feature keeps turning itself off randomly.
Due to the complicated nature of Bluetooth technology, there could be many reasons as to why your Bluetooth feature is playing up in this way, but that doesn’t mean it can’t be fixed. For the rest of this guide, we’re going to explore the nine need-to-know ways you can fix the Bluetooth problems not working on your Oppo A2 as quickly as possible.
Part 2. 9 fixes for Bluetooth not working on Android
2.1 One click to fix Android Bluetooth issues due to Android system
Since Bluetooth is an internal technology, this indicates there’s a problem with the software or firmware of your Oppo A2. If something’s broken, this means you need to fix it. Fortunately, there’s a quick and easy way to do this using software known as Dr.Fone - System Repair (Android).
Dr.Fone - System Repair (Android) is a powerful Android repair tool which is hailed as many as being on the best software applications in the industry. With all the tools you need to repair your phone not just for Bluetooth errors, but basically any internal firmware problems, this is a one-shot-tool that gets the job done.
Dr.Fone - System Repair (Android)
Android repair tool to fix Bluetooth issues in one click
- Can fix most internal software and firmware issues
- Trusted by over 50+ million people around the world
- Supports over 1,000+ unique Android brands, manufacturers, and devices
- Incredibly user-friendly and easy-to-use
- Compatible with all Windows computers
3981454 people have downloaded it
To ensure you have the best experience while using the Dr.Fone - System Repair (Android) software, here’s a complete step-by-step guide on how it works when fixing your Android’s Bluetooth problems.
Step One Make your way over to the Wondershare website and download the Dr.Fone - System Repair (Android) software to either your Mac or Windows computer. Install the downloaded file by following the on-screen instructions. Once installed, open the software, so you’re on the Main Menu.

Step Two Connect your Oppo A2 to your computer using the USB cable, wait a couple of seconds, and then click the System Repair option. On the Menu on the left, click Android Repair, and then press Start.

Step Three Next, use the drop-down menus to make sure all the information about your specific device is correct, including your device, operating system number, and carrier information. Click Next to confirm your selections.

Step Four When prompted, put your phone into Download Mode needed for repairs. You can do this by following the on-screen instructions which will depend on which device you have and the available buttons.

Step Five The software will now begin the repair process. This will happen automatically, and all you’ll need to do is make sure your device doesn’t disconnect during this process, and your computer doesn’t turn off.

When the repair process has been completed, you’ll receive the screen below, which means you can try again if the process didn’t work, or you can disconnect your Oppo A2 and start using it and your Bluetooth features.
2.2 Restart Android and turn on Bluetooth again

One of the most common solutions in technology is simply to turn it on and off again, which is the case to happen here. By restarting your device, you can clear out any problems you may be suffering from to help it get up and running again. Here’s how;
- Turn your Oppo A2 off by holding down the Power button
- Wait for several minutes and then turn your phone on again
- Wait for your phone to completely power up, so you’re on the Main Menu
- Navigate Settings > Bluetooth and then enable the setting
- Try to connect your Bluetooth device to what you were trying to do before
2.3 Clear the Bluetooth cache

Every service on your Oppo A2 using a feature called a cache. This is where information is stored to help the feature run properly and give you the best experience. However, over time this can get messy and can cause problems with your Bluetooth feature.
By clearing the cache, you can restart the service and hopefully clear up any issues or problems you may be experiencing.
- On your phone, navigate Settings > Application Manager, and you’ll see all the apps and services on your phone. Locate and select the Bluetooth service.
- Select the Storage option
- Tap the Clear Cache option
- Go back of the Menu and restart your phone
- Now turn your Bluetooth feature on and turn connecting it to your preferred device
2.4 Remove paired devices

Sometimes, you may have a problem with the Oppo A2 device you’re trying to connect to via Bluetooth, especially if this is a device you’ve updated. To counter and repair this, you’re going to need to remove the paired devices saved with your device and then reconnect them.
Here’s how;
- From the Main Menu of your Oppo A2, head to Settings > Bluetooth > Connected Devices.
- Turn Bluetooth on, and you’ll see all the connections your Oppo A2 is paired with
- Go through these settings and remove/delete/forget every connection on your device
- Now when you go to connect to a device using Bluetooth, repair the Oppo A2 device, enter the passcode, and use a fresh paired connection.
2.5 Use Bluetooth in safe mode

If you’re having problems with your connection and paired devices, sometimes you may have conflicting software faults in your device that are causing the problems. If this is the case, you’ll need to boot your Oppo A2 in Safe Mode.
This is an operating state in which your phone will run the bare minimum services it needs to perform. If your Bluetooth works in Safe Mode, you know you have an app or a service that’s causing the problem.
Here’s how to find out;
- Hold the power button down, so the Android power menu turns on
- Long-press the power button again and the restart in Safe Mode option will come up
- The phone will automatically boot into Safe Mode
- Wait a minute on the Main Menu
- Now turn on your Bluetooth and connect it to your preferred device
2.6 Turn on the discoverable feature

To ensure your Bluetooth can connect to other devices, it’s important to make sure you’re making your device discoverable to other Bluetooth devices. If it’s hidden, other devices won’t be able to find it, and sometimes it can bug and prevent connections.
Here’s how to turn on your Bluetooth discoverable feature;
- From the home screen of your Android, navigate to the Menu> Settings > Bluetooth
- Toggle the Bluetooth switch, so it’s on
- Under the available settings, tick the box that allows your Bluetooth device to be discoverable
- Turn your Bluetooth feature on and connect to the Oppo A2 device you’re trying to connect too
2.7 Exclude Bluetooth issues of the other device

Sometimes, you might not even have a problem with your Oppo A2, but rather the Bluetooth device you’re trying to connect to, whether that’s a Bluetooth speaker, an in-car entertainment system, or any other kind of Bluetooth device.
By testing out another Bluetooth device to see if it will work with your preferred device, you can rule this out from being the issue.
- Disconnect your Oppo A2 from the Bluetooth device and turn your Bluetooth off
- Now take another Bluetooth device and connect this to the Oppo A2 device you’re trying to connect too. This could be another Android device, or even a computer or iOS device
- If the new device doesn’t connect to your Bluetooth device, you’ll know there’s a problem with your Bluetooth device, not your Oppo A2
- If the Oppo A2 devices connect, you’ll know there’s a problem with your Oppo A2
2.8 Place both devices within close proximity

One of the common misconceptions of Bluetooth is just how far the wireless range is of the service. You need to make sure your devices are well and truly close to each other to make sure a stable connection can be formed.
The further away the Oppo A2 devices are from each other, the less likely the connection will remain secure. As a rule of thumb, Bluetooth can work up to 100 meters, but to play it safe, always try and keep your devices under 50m apart.
2.9 Avoid interference of other Bluetooth sources

The final consideration you’ll want to think about is that Bluetooth radio waves, or wireless waves, can interfere with each other. This means they can bounce off each other or get muddled up and make things confusing from your devices.
With this in mind, you’ll want to make sure you’re limiting the amount of Bluetooth activity in the area where you’re trying to use a device. While uncommon, this could be the problem.
To fix this issue, turn off all the Bluetooth connections in the area. This includes computers, laptops, mobile phones, tablets, and any other Bluetooth devices you may have. Then, try connecting your Oppo A2 to the Oppo A2 device you were trying to use. If it works, you know you were experiencing Bluetooth interference.
Stuck at Android System Recovery Of Oppo A2 ? Fix It Easily
In this article, you will learn what is Android system recovery, and how to fix Android stuck at system recovery step by step. To get out of Android system recovery more easily, you need this Android repair tool.
You know your Oppo A2 is stuck in recovery mode when you cannot turn on the Oppo A2 device. If you try to turn it on, it shows a message that says, “Android System Recover.” This situation can be quite debilitating for most Android users. Most of the time, you don’t know whether you have lost all of your important Android data. It is even more worrying because of the fact that you cannot turn on your device at all, especially when you don’t know how to fix it.
Part 1. What is Android System Recovery?
Despite all the worry that surrounds an unwanted Android system recovery screen, it is actually a feature that can be quite helpful to your Oppo A2 when it’s needed. It can be useful when you want to hard reset the Android device without having to access the settings. This can be very useful if your device is not working very well or if your touch screen is experiencing problems. It can also be very helpful when you are having a problem accessing the settings on your device.
For these reasons, it is actually a good thing, although when it does happen unexpectedly, you may want to know how to fix it.
Part 2. How to get to Android System recovery
Now that you know how useful the Android System can be, you may want to know how to utilize this feature to get out of some of the problems we mentioned above. Here’s how you can safely get to the Android recovery system on your Oppo A2.
Step 1: Hold down the power key and then select “Power Off” from the options on the screen. If, however, your screen is unresponsive, keep holding the power key for several seconds until the Oppo A2 device is completely turned off.

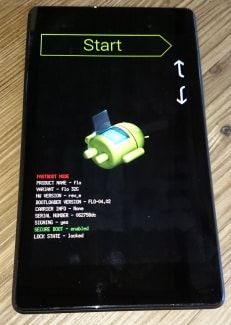
Step 2: Next, you need to hold down the Power and the Volume Key. You should able to see the Android image and a bunch of information about your device. There should also be a “Start” at the top right corner of the screen.
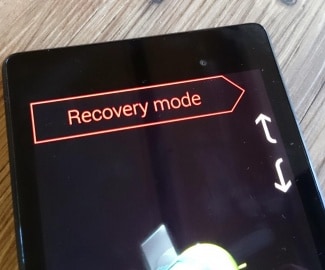
Step 3: Press the Volume up and Volume down keys and use the Power key to select menu options. Press the Volume down key twice to see “Recovery Mode” in red at the top of the screen. Press the Power key to select it.
Step 4: The white Google logo will appear immediately followed by the Android logo again as well as the words “No Command” at the bottom of the screen.

Step 5: Finally, press and hold both the Power and the Volume up Key for around 3 seconds and then let go of the Volume up Key but keep holding the Power Key. You should see the Android system recovery options at the top of the screen. Use the Volume keys to highlight and the Power key to select the one you want.

Part 3. Android Stuck at System Recovery? How to fix in one click?
Sometimes during the System Recovery process, the process can glitch, and you’ll lose data on your device, rendering it unusable. However, another solution to fix this is to repair your device using the Dr.Fone - System Repair tool.
Dr.Fone - System Repair (Android)
One-stop solution to fix Android stuck at System recovery
- It’s the #1 software for PC-based Android repair
- It’s easy to use with no technical experience required
- Supports all latest Oppo A2 devices
- Easy, one-click fix Android stuck at system recovery
3981454 people have downloaded it
Here’s a step by step guide on how to use it yourself;
Note: Be aware that this process can erase all your personal files on your device, so ensure you’ve backed up your Oppo A2 before continuing.
Step #1 Head over to the Dr.Fone website and download the software for your Windows computer.
Once installed on your computer, open onto the main menu and connect your Oppo A2 using the official USB cable. Select the System Repair option.
Step #2 Select the ‘Android Repair’ option from the next screen.
Insert your device information, including the brand, carrier details, model and country and region you’re in to ensure you’re downloading the correct firmware.
Step #3 Follow the onscreen instructions on how to put your device in Download Mode.
Your device should already be in this mode but follow the instructions to make sure. There are methods available for devices, both with and without home buttons.
Step #4 The firmware will now start downloading. You’ll be able to track this process in the window.
Ensure your device, and your computer stays connected the entire time, and make sure your internet connection remains stable.

After downloading, the software will automatically start to repair your device by installing the firmware. Again, you can track the progress of this on the screen, and you’ll need to ensure your device remains connected throughout.
You’ll be notified when the operation is complete and when you’re able to disconnect your phone and use it as normal, free from it being stuck on the Android system recovery screen!

Part 4. Android Stuck at System Recovery? How to fix in a common way?
If, however, your device is stuck on system recovery mode, here’s how you can easily get it out of system recovery. The process is slightly different for different Android devices, so you should check your device’s manual before attempting this process.
Step 1: Power off the Oppo A2 device, and just to be sure, take out the battery to ensure that the Oppo A2 device is fully turned off. Then reinsert the battery.
Step 2: Press and hold down the Home button, Power Button, and the Volume up Key simultaneously until the Oppo A2 device vibrates.
Step 3: Once you feel the vibration, release the power button but continue to hold down the Home and Volume up Key. The Android recovery screen will display. Release the Volume up and Home buttons.
Step 4: Press the Volume down key to select the “Wipe Data/ Factory Reset option and then press the Power button to select it.
Step 5: Next, you need to press the Volume down button to highlight “Delete All User Data” and then press the Power button to select it. The device will reset and present the “Reboot System Now” option.
Step 6: Finally, press the Power button to reboot the phone in normal mode.
Part 5. Backup and Restore Android System
Losing data on your Oppo A2 is a common occurrence, and since Android devices don’t really have an automatic full backup solution, it is important to know how to backup and restore your device system. Here’s how to easily do that.
Step 1: Enter the recovery mode on your Oppo A2, as described in Part 2 above. Use the Volume and Power keys to select the “Backup & Restore” option on the screen.
Step 2: Tap on the backup option or use the Volume and Power keys if your screen is unresponsive. This will begin backing up your system to the SD card.
Step 3: After the process is complete, choose “Reboot” to restart the Oppo A2 device.
Step 4: You can then simply check Recovery > backup directory on your SD card. You can rename it to easily find it later during the restore process.
To restore the system from the backup created, follow these simple steps.
Step 1: Once again, enter recovery mode as described in part 2 above and then choose Backup & Restore from the menu list.
Step 2: Press “Restore” to begin the recovery process from the Backup file we created
Step 3: You will be notified when the system restore is complete.
Android system recovery mode can be quite useful, especially when your system is unresponsive. As we have also seen, it is important to know how to get into and out of System Recovery mode if you are going to backup and restore your Android system. It is also quite easy to do both of these things.
How to Exit Android Factory Mode On Oppo A2?
You’ve often heard that recovery mode will solve just about any problem your Oppo A2 is experiencing. This is mostly true and one of the components of Android’s recovery mode, factory mode or factory reset is one of the most efficient ways to solve various problems on your device. While factory mode is often a good thing, there are times when your device can enter factory mode on its own. Other times, you can safely enter factory mode but not know how to get out.
Fortunately for you, this article will explain all aspects of factory mode and especially how to safely exit factory mode.
Part 1. What is Android Factory Mode?
Factory mode or what is commonly known as factory reset is one of the options available for you when your Oppo A2 is in recovery mode. Several options are available for you once you enter Recovery mode on your device but few are as effective as the wipe data/ factory reset option. This option is useful in solving a whole host of problems that your device could be experiencing.
If you have been using your Oppo A2 for a while now and its performance to be less than ideal, a factory reset might be a good solution. That is however not the only problem a factory reset or factory mode can solve. It will also work for a number or Android errors that you may experience, problems caused by faulty firmware updates and also tweaks made on your device that may not have worked as expected.
It is however important to note that a factory reset or factory mode does often result in the loss of all your data. Therefore a backup is necessary to protect against this data loss risk.
Part 2. Backup your Android Device First
Before we can see how to safely enter and exit factory mode, it is important to have a full backup of your device. We mentioned that a factory mode will likely erase all the data on your device. A backup will ensure that you can get your phone back to its original state before the factory mode.
In order to do a full and complete backup of your device you need to have a tool that will not only ensure that you backup everything on your device but one that makes it easy for you to accomplish this. One of the best tools in the market is Dr.Fone - Backup & Resotre (Android) . This software is designed to enable you to create a full backup of your device.
Dr.Fone - Backup & Restore (Android)
Flexibly Backup and Restore Android Data
- Selectively backup Android data to computer with one click.
- Preview and restore backup to any Android devices.
- Supports 8000+ Android devices.
- There is no data lost during backup, export or restore.
3,428,803 people have downloaded it
Follow these very simple steps to use this MobileTrans Phone Transfer software to create a full backup of your device.
Step 1. Launch Dr.Fone on your computer and choose “Backup & Restore”
Run the software on your computer and you can see all features displayed in the primary window. Choose this one: Backup & Restore. It allows you to get your device backed up entirely with one click.
Step 2. Plug in with your device
Then plug in with your device to the computer. When your devic is detected, click on Backup.

Step 3. Select the file types to backup
The program will display all the file types it can support to backup. Just select the ones you would like to backup and hit Backup.

Step 4. Start backing up your device to the computer
After choosing the file’s type for backup, click “Backup” to begin backing up your device to your computer. It will take you a few minutes, depending on the storage of the data.

Note: You can use the feature of “Restore From Backup” to restore the backup file to your device, when you have the need later.
Part 3: One Click Solution to fix Android stuck in factory mode
From the above parts, you are well aware about what is factory mode. As we discussed, this mode fixes most troubles with Android devices.
But for situations when your Oppo A2 gets stuck in this very same factory mode, the most feasible solution for you is Dr.Fone - System Repair (Android) . This tool fixes all Android system issues including unresponsive or bricked device, stuck on Oppo A2 logo or factory mode or blue screen of death with a single click.
Dr.Fone - System Repair (Android)
One click fix to Android stuck in factory mode
- You can easily fix your Android stuck in factory mode with this tool.
- The one-click solution’s ease of operation is appreciable.
- It has carved a niche being the first Android repair tool in the market.
- You don’t need to be a pro in technology to use this program.
- It is compatible with all latest Oppo A2 devices like Galaxy S9.
3,645,867 people have downloaded it
In this part we will explain how to exit Android recovery mode using Dr.Fone - System Repair (Android) . Prior to proceeding, you got to remember that device backup is paramount to keep your data safe. This process might erase your Oppo A2 data.
Phase 1: Ready your device and connect it
Step 1: Installation completion needs to be followed by running Dr.Fone on your system. Over the program window, tap ‘Repair’ afterwards and get the Android device connected.
Step 2: Select the ‘Android Repair’ option from the list to fix Android stuck in factory modeissue. Hit the ‘Start’ button soon after.
Step 3: Select Android device details on the Oppo A2 device information window, followed by tapping the ‘Next’ button.
Step 4: Enter ‘000000’ for confirmation then proceed.

Phase 2: Get in ‘Download’ mode for repairing the Android device
Step 1: It’s important to put the Android device in ‘Download’ mode, here are the steps to do so –
- On a ‘Home’ button-less device – turn off the Oppo A2 device and push down the ‘Volume Down’, ‘Power’ and ‘Bixby’ buttons for about 10 seconds and un-hold. Now, hit the ‘Volume Up’ button to get into ‘Download’ mode.

- For a device with ‘Home’ button – switch it off and hold down the ‘Power’, ‘Volume Down’ and ‘Home’ buttons together for 10 seconds and release. Click the ‘Volume Up’ button for entering ‘Download’ mode.
Step 2: Press ‘Next’ for initiating firmware downloading.
Step 3: Dr.Fone –Repair (Android) starts Android repair as soon as download and verification of firmware is done. All Android issues along with Android stuck in factory mode will be fixed now.
Part 4. Common Solutions to Exit Factory Mode on Android
Having a backup of all your data will eliminate the risk of losing any of your data. You can now safely exit factory mode using one of the 2 methods below. These two methods will work on a rooted device.
Method 1: Using “ES File Explorer”
To use this method, you will need to have installed file explorer on your device.
Step 1: Open “ES File Explorer” and then press the icon on the top left corner
Step 2: Next, go to “Tools” and then turn on “Root Explorer”
Step 3: Go to Local> Device> efs> Factory App and then open factorymode as text in the “ES Note Editor” Turn it ON
Step 4: Open keystr as text in the “ES Note Editor” and change it to ON. Save it.
Step 5: Reboot the Oppo A2 device

Method 2: Using Terminal Emulator
Step 1: Install Terminal emulator
Step 2: Type “su”
Step 3: Then Type the following;
rm /efs/FactoryApp/keystr
rm /efs / FactoryApp/ Factorymode
Echo –n ON >> / efs/ FactoryApp/ keystr
Echo –n ON >> / efs/ FactoryApp/ factorymode
chown 1000.1000/ efs/FactoryApp/keystr
chown 1000.1000/ efs/FactoryApp/ factorymode
chmod 0744 / efs/FactoryApp/keystr
chmod 0744 / efs/ FactoryApp/ factorymode
reboot
You can also exit factory mode on unrooted device by going to Settings> Application manager> All and the search for Factory Test and “Clear Data”, “Clear Cache”
As much as factory mode can be a useful solution to a number of problems, it can be quite annoying when it pops up unexpectedly. Now you are equipped with 2 effective solutions to help you safely exit factory mode if ever you find yourself in this situation.
Also read:
- [Updated] In 2024, Capturing the Globe From Novice to Experienced Travel Videographer
- [Updated] In 2024, Instant How-To Converting Photos to Your YouTube Channel's Thumbnails
- 2024 Approved Speaking to Tomorrow - iPhone Voice Memo
- Astral Horror | Free Book
- Finding Your Video Complement The Process of Collaborative Pairing
- Here Are Some Reliable Ways to Get Pokemon Go Friend Codes For Tecno Spark 10C | Dr.fone
- How to Fix Unfortunately, Contacts Has Stopped Error on Realme C51 | Dr.fone
- How to Flash Dead Realme V30T Safely | Dr.fone
- How to Quickly Fix Bluetooth Not Working on Vivo S17 Pro | Dr.fone
- How to Recover Deleted iPhone 13 Camera Roll Photos and Photo Stream Pictures? | Stellar
- How To Restore a Bricked Infinix Hot 40 Back to Operation | Dr.fone
- How To Use Special Features - Virtual Location On Oppo K11x? | Dr.fone
- In 2024, Can I use iTools gpx file to catch the rare Pokemon On Apple iPhone 14 Plus | Dr.fone
- In 2024, The Teacher's Compendium on Multimedia Pedagogy
- Play Store Stuck on Downloading Of Infinix Note 30 5G? 7 Ways to Resolve | Dr.fone
- Quick Fixes for Why Is My Oppo K11x Black and White | Dr.fone
- Title: How to Quickly Fix Bluetooth Not Working on Oppo A2 | Dr.fone
- Author: Abel
- Created at : 2025-01-03 18:13:28
- Updated at : 2025-01-10 16:19:02
- Link: https://fix-guide.techidaily.com/how-to-quickly-fix-bluetooth-not-working-on-oppo-a2-drfone-by-drfone-fix-android-problems-fix-android-problems/
- License: This work is licensed under CC BY-NC-SA 4.0.