
How to Resolve Nokia C12 Plus Screen Not Working | Dr.fone
How to Resolve Nokia C12 Plus Screen Not Working

Nothing is more frustrating than your phone’s touch screen becoming unresponsive. Given the importance of smartphones in daily work, a phone with a touch screen not working can badly affect your routine. It is an issue found in most smartphone brands, even among Nokia C12 Plus phones, known for their efficient performance. If your Nokia C12 Plus screen is not working, it can be an exhausting experience.
Luckily for your, multiple ways are available to resolve this issue. This article will list six fixes for resolving the Nokia C12 Plus not working issue. It will also discuss the reasons behind this issue in detail and provide a list of tips to avoid it in the future.
Part 1: What Causes Nokia C12 Plus Screen Unresponsive?
Answering what causes Nokia C12 Plus screen unresponsiveness is difficult. Many reasons, ranging from minor bugs to serious hardware issues, can cause it. To find out the exact or near exact reason, you will have to review your device’s activity before this issue occurs. You can use the following common reasons behind the Nokia C12 Plus 6T touch screen not working as the basis of your investigation:
1. Touchscreen Calibration
Excessive smartphone use can cause the touchscreen to go out of the required settings. It means until the touch screen is not recalibrated properly, the touch not working issues will continue to pop up.
2. Battery Issue
If your device’s battery is damaged or is at the end of its lifespan, it can cause the touch screen not responding issues. Moreover, the low battery and issue with the charging port can also lead to this problem.
3. Corrupted System Files
The presence of corrupted system files is also a significant cause of such issues. These corrupted files can also lead to serious performance issues on your phone.
4. Conflicting Settings
It is also possible that the conflicting settings in your device are causing this issue. These settings can range from touch sensitivity to screen refresh rate. Unless these conflicts are removed, the touchscreen performance will continue to degrade.
Part 2: The Common Solutions to Solve a Nokia C12 Plus Screen Unresponsive
Fixing the Nokia C12 Plusscreen not working is easy as long as it is not a serious hardware issue. While there are multiple ways to solve this problem, we have chosen the 6 most common and easy solutions. Listed below are the 6 common solutions to solve a Nokia C12 Plus screen unresponsive:
Solution 1. Restart the Nokia C12 Plus Phone
As with any other issue or device, the first fix you should always try first is to restart your device. It is the best solution to fix the Nokia C12 Plus not working issue if temporary bugs and glitches are the reason behind it. When you restart your device, it flushes out all temporary bugs and glitches while resetting your device’s processes. Use this guide to restart your Nokia C12 Plus device:
Instruction: Press and hold the “Power” button for a couple of seconds until it turns off. Wait a few moments and then use the “Power” button to turn on the Nokia C12 Plus device. In some of the Nokia C12 Plus devices, you also have to use the “Volume Down” button along with the “Power” button to restart the Nokia C12 Plus device.
Solution 2. Check the Charging Port and Battery
The issues with the battery of your Nokia C12 Plus 5 can also lead to Nokia C12 Plus not working. It can be due to your device’s low or near-empty battery. While in some cases, serious issues with the battery can also be behind this problem. Similarly, the reason behind your phone’s touch not working can be charging port issues.
Thus, you should check and clean your device’s charging port and see if it resolves the problem. Moreover, turn off your device, charge it, and then restart it to check if the touch screen not working issue is gone.
Solution 3. Contact the Nokia C12 Plus Customer Support
Contacting Nokia C12 Plus customer support can also help resolve the Nokia C12 Plus screen not working problem. It is especially helpful if you are unable to find the cause and want to seek an expert opinion. The Nokia C12 Plus customer support will help you find the issue and recommend a solution.
It is an excellent option if your Nokia C12 Plus device’s touch is not working due to hardware issues. They can help guide you to a suitable service center to fix your phone and resolve this issue.

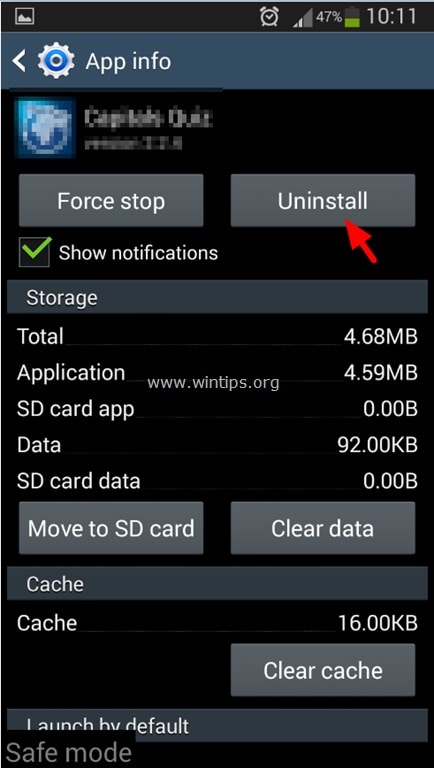
Solution 4. Wipe the Cache of Your Nokia C12 Plus Device
A common reason for Nokia C12 Plus Nord being stuck on the loading screen is the filled cache partition. If you do not clean out the cache partition of your Nokia C12 Plus device, its performance will degrade. As a result, your device will experience issues like the touch screen not working or getting stuck at the loading screen. Here is how you can clear the cache of your Nokia C12 Plus device:
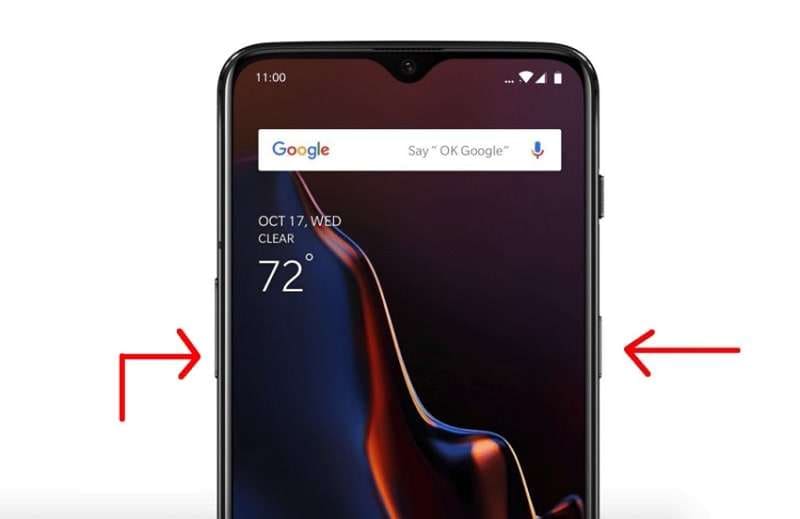
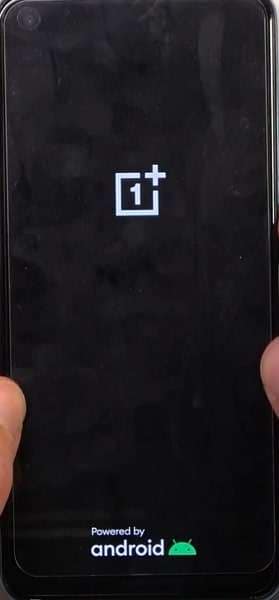
Step 1: Turn off your device by pressing and holding the “Power” button. Once it is turned off, press and hold the “Power” and “Volume Down” buttons until you see the Nokia C12 Plus logo.
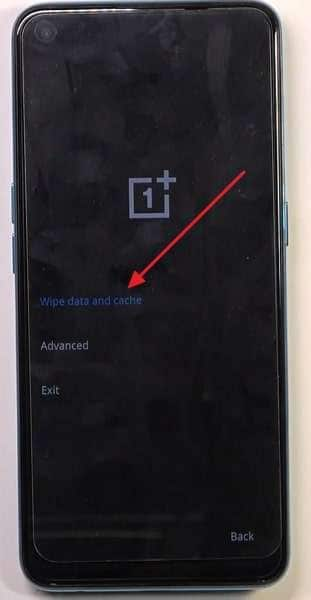
Step 2: Now, enter your phone’s PIN or pattern and choose a language. After selecting the language, choose “Wipe data and cache.”
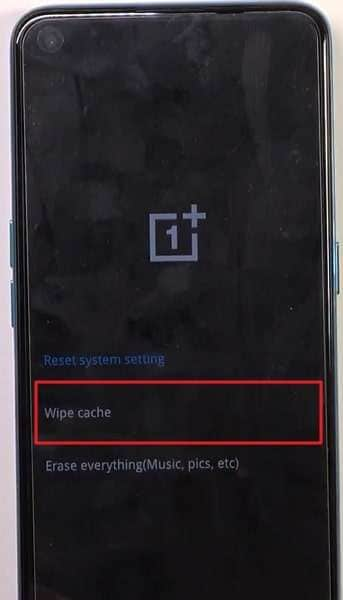
Step 3: Select “Wipe cache” on the next screen and confirm the action through “Yes” in the ensuing window. Once the process is complete, choose “Reboot” to restart your device.
Solution 5. Reset to Factory Settings
Sometimes, clearing the cache partition doesn’t help resolve the touchscreen issue. In that case, You have to factory reset your Nokia C12 Plus device. It is the best and last solution if other fixes haven’t worked and you can’t pinpoint the reason. Factory resetting your Nokia C12 Plus will delete all phone data. Thus, you should create a proper backup before trying this fix. Follow these steps to factory reset your Nokia C12 Plus in no time:
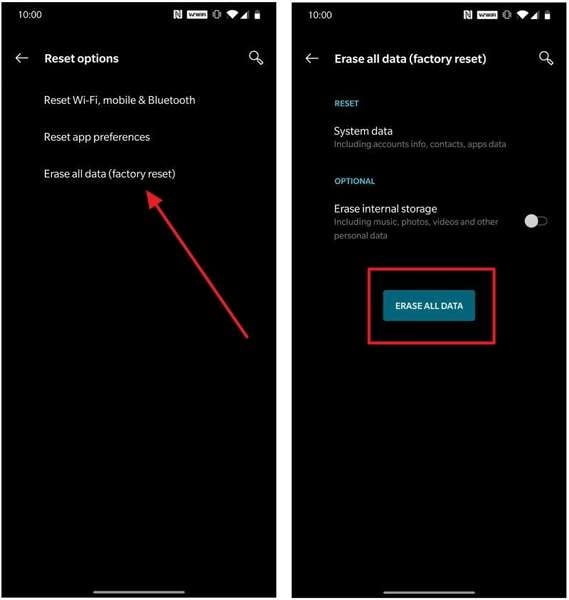
Step 1: Launch Settings on your Nokia C12 Plus device and tap “System” to select “Reset Options.”
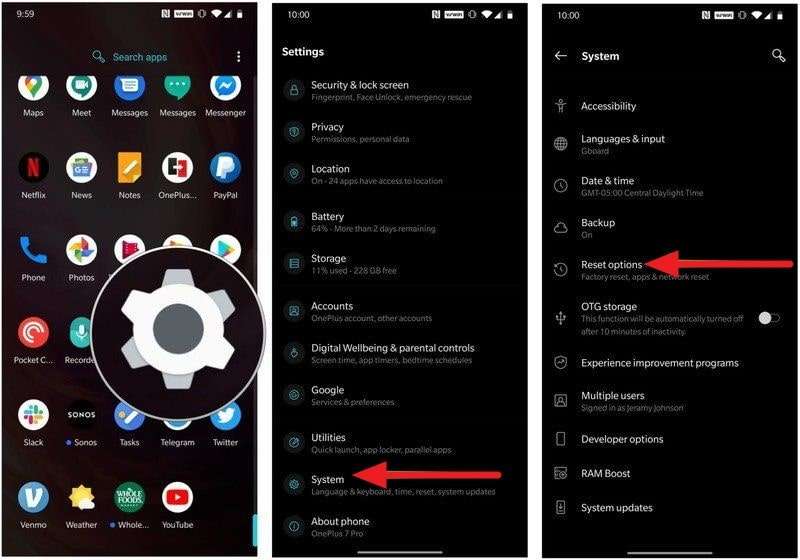
Step 2: In the “Reset Options,” select “Erase all data (factory reset)” and confirm the action by again pressing “Erase All Data.” It will start the factory reset process.
Solution 6. Replace the Old Screen with A New Screen
If none of the above-mentioned fixes have worked so far, you should replace the touch screen. Replacing the touch screen is recommended in case of hardware and severe software issues. However, it can be quite an expensive fix as new touch screens aren’t cheap. The prices for new touchscreens differ depending on the model. These prices start from $20 and go up to hundreds of dollars.
Part 3: How to Avoid Nokia C12 Plus Screen being Unresponsive?
Protecting your Nokia C12 Plus device against system issues like touch not working is not difficult. While it is true that you can’t 100% avoid such problems, the risks can still be reduced to a great extent. To prevent your Nokia C12 Plus screen from being unresponsive, here are some tips you can follow:
- ****Regular Updates:****You should always ensure that your Nokia C12 Plus device runs on the latest software version available. It can help prevent bugs or glitches that might cause the screen to become unresponsive.
- ****Device Protection:****It is also essential that you use a good quality phone case and screen protector. These will protect your Nokia C12 Plus device from physical damage. Drops, bumps, or scratches can damage the screen and make it unresponsive.
- ****Delete Unnecessary Apps:****If you have too many apps on your Nokia C12 Plus devices, it can cause screen unresponsiveness issues. Thus, you should only install the apps you need and delete the apps that are no longer needed.
- ****Use Dr.Fone 13:****Having a professional tool like Fone in your arsenal helps a lot in protecting against system issues. If a system issue is able to pass through, Dr.Fone has the ability to resolve the issue in a matter of seconds. Moreover, it is a complete smartphone tool with data transfer, location changer, and system repair features.
A new version of Dr.Fone is expected to release in the latter half of this month. The new version will include many improvements, advanced features, and increased device support. Furthermore, it will also have a better and more user-friendly interface.

Conclusion
To sum up this article, it can be said that issues like Nokia C12 Plus not working are part of life. These issues can occur anytime and are hard to completely protect against. Thus, having a problem solver like Wondershare Dr.Fone is the best choice. It will not only help you safeguard against system issues but also resolve them if they occur.
Proven Ways to Fix There Was A Problem Parsing the Package on Nokia C12 Plus
Unable to install your favorite Apps from Google Play Store because there was a problem parsing the package?
The Parse Error or there was a problem parsing the package error is very common with Android devices. Android is a versatile platform and, therefore, a very popular OS. It is an open software and allows users to download and use various types of apps from the Play store. Android is also a cheaper alternative as compared to other Operating Software.
Since many of us are well versed with most of the Android devices, parse error, or there is a problem parsing the package is an error is not something new and uncommon.
The error message usually pops up on the Nokia C12 Plus device screen when we try to download and install an App, for example, “There is a problem parsing the package Pokémon Go ”.
The error message which appears reads as follows:
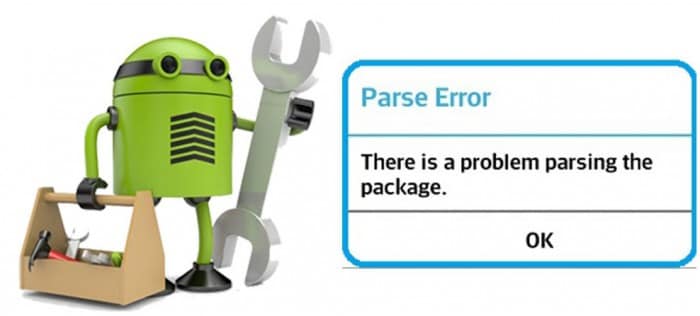
“Parse error: There is a problem parsing the package”.
Android users who have experienced this would know that the parse error leaves us with only one option, i.e., “OK” as shown in the image below.
There was a problem parsing the package may occur due to several reasons, most of which are listed and explained below. Furthermore, there is a list of solutions to choose from to eliminate the “there is a problem parsing the package” error.
Read on to find out more.
Part 1: Reasons for the parsing error
Parse Error, better known as “there was a problem parsing the package” error is very common and normally surfaces when we try to download and install new Apps onto our Android devices from Google Play Store.
The reason for the error message to pop-up are many but none of them can be blamed singularly for the “there is a problem parsing the package” error. Given below is a list of the most probable reasons for Parse Error to stop an App from installing. Examine them carefully before moving on to the solutions to fix the “there was a problem parsing the package” error.
• Updating the OS may cause some disturbances in the manifest files of different Apps leading to Parse Error.
• Sometimes, the APK File, i.e., Android Application Package, gets infected due to improper or incomplete App installation causing “there is a problem parking the package” error.
• When Apps are downloaded and installed from unknown sources, due permission is needed. In the absence of such permission, the chances of the Parse Error to occur increase.
• Certain Apps are not compatible or supported by the latest and updated Android versions.
• Anti-virus and other cleaning Apps are also a major reason for the “there was a problem parsing the package” error.
The causes listed above are not App specific. The Parse Error may occur due to any one or more of these reasons, but what is more important is to try to get rid of the problem.
Let us move on to learn ways to fix the there was a problem parsing the package error.
Part 2: 8 Solutions to fix the parsing error
“There is problem parking the package” error can be dealt with easily if only we do not panic and deliberately follows the steps explained in this segment. Here are 7 of the most reliable and trustworthy methods to fix the Parse Error.
They are easy, user-friendly, and do not take much of your time. So don not waste any more of your time and try them now.
2.1 One Click to Fix ‘There is a Problem Parsing the Package
If you’re still encountering the Parsing error, there may be a problem with the Nokia C12 Plus device data on your device, which means you’ll need to repair it. Luckily, there’s a simple, one-click solution you can follow called Dr.Fone - System Repair .
Dr.Fone - System Repair (Android)
Android repair tool to fix all android system issues in one click
- Simple, clean, and user-friendly interface
- No technical knowledge required
- Easy one-click repair to fix ‘there is a problem parsing the package’ error
- Should repair most parsing problems with apps, like ‘there is a problem parsing the package Pokemon Go’ error
- Supports most Nokia C12 Plus devices and all the latest models like Galaxy S9/S8/Note 8
3981454 people have downloaded it
If this sounds like the solution you’re looking for, here’s a step by guide on how to use it yourself;
Note: Please note that this repair process can erase all data on your phone, including your personal information. This is why it’s so important to back up your Nokia C12 Plus before proceeding.
Step #1 Head over to the Dr.Fone website and download the software. Install the downloaded software and open it. From the main menu, select the System Repair option.

Input your device and firmware information to confirm you’re installing the right version of the operating system.

Step #2 Follow the onscreen instructions on how to get into Download Mode to start the Repair process.

Once complete, the firmware will start downloading.

Step #3 Once the firmware has downloaded, it will automatically install it to your device.
When this is completed, you’ll be free to disconnect your Nokia C12 Plus and use it how you please without the ‘there is a problem with the parsing package’ error.

2.2 Allow installation from unknown sources
When we install Apps from other sources and not Google Play Store, there might be a glitch in using such Apps. To overcome this problem, turn on “Allow App installation from other sources”. Follow the steps given below for better understanding:
• Visit “Settings” and select “Applications”.
• Now tick mark on the option saying allow App installation from unknown sources.
2.3 Enable USB debugging
USB debugging is not considered necessary by many users but these methods give you an edge over others while using an Android device as it lets you access things on your phone, etc which you could not earlier.
To enable USB Debugging to fix “There is a problem parsing the package” error, follow these steps:
• Visit “Settings” and select “About Device”.
• Now click on “Build Number” not once but continuously for seven times.

• Once you see a pop-up saying “You are now a developer”, go back to “Settings”.

• In this step, select “Developer Options” and turn on “USB Debugging”.

This should solve the problem. If not, move on to the other techniques.
2.4 Check APK File
An incomplete and irregular App installation may cause the .apk file to get corrupted. Make sure you download the file completely. If need be, delete the existing App or its .apk file and reinstall it from Google Play Store for it to be compatible with your device’s software and to use the App smoothly.
2.5 Check App Manifest File
Manifested App files are nothing but .apk files which are improvised by you. Such changes may cause the Parse Error to occur more frequently. Modifications in the App file can be made by changing its name, App settings, or more advanced customizations. Make sure you roll back all changes and restore the App file to its original state to prevent it from getting corrupted.
2.6 Disable Antivirus and other cleaner Apps
Antivirus software and other cleaning Apps are very helpful in blocking unwanted and harmful Apps from damaging your device. However, sometimes such Apps also prevent you from using other safe Apps.
We do not suggest that you delete the Antivirus App permanently. Temporary uninstallation will be useful here. To do so:
• Visit “Settings” and then select “Apps”.
• Select the antivirus App to click on “Uninstall” and then tap “OK”.
Now download and install the desired App again. Once this is done, do not forget to install the Antivirus App again.
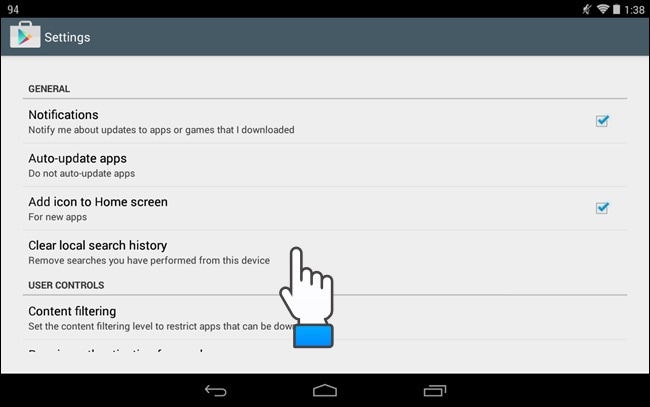
2.7 Clear Cache cookies of Play Store
Clearing Play Store Cache cleans the Android Market platform by deleting all clogged up unwanted data. Follow the steps given below to delete Play Store cache:
• Tap on Google Play Store App.
• Now visit Play Store’s “Settings”.

• Select “General Settings” to “Clear local search history”.
2.8 Factory Reset Android
Factory Resetting your device to fix the Parse Error should be the last thing you try. Make sure you take a back-up of all your data on your Google Account or a Pen Drive because this technique erases all media, contents, data, and other files, including your device settings.
Follow the steps given below to factory reset your device:
• Visit “Settings”.
• Now select “Backup and Reset”.

• In this step, select “Factory data reset” and then “Reset Device” to confirm Factory Reset.
The whole process of factory resetting your Nokia C12 Plus might sound tedious, risky, and cumbersome but it helps to fix the Android SystemUI has stopped error 9 out of 10 times. So, think carefully before using this remedy.
Parse Error: There was a problem parsing the package is an error message that has troubled many Android users. The good part is that the above-stated fixes not only solve the problem but also prevent it from occurring in the future. So, keep them in mind the next time you or anyone you know faces such an issue.
Fix Unfortunately Settings Has Stopped on Nokia C12 Plus Quickly
All of you, sooner or later, must have found the “Unfortunately Settings has stopped” error on your Nokia C12 Plus. The problem can occur if the Settings keeps stopping or crashing. Many times, you may try to open the Settings but it doesn’t even open. Or possibly, it may freeze after getting opened thereby hampering the Nokia C12 Plus device’s performance.

Well! There can be a number of reasons why this thing happens. For instance, custom ROM installations, not enough space in the Nokia C12 Plus device or perhaps an outdated version of Android. If you are struggling with the same issue and want to know what to do when Android Settings is not responding, this post will help you. We have explained everything in detail along with the solutions. So, scroll down and get things sorted.
- Part 1: Clear the cache of Settings and Google Play Service
- Part 2: Clear the Android phone’s RAM and retry
- Part 3: Uninstall the Google update
- Part 4: Uninstall the custom ROM or re-flash the stock ROM
- Part 5: Wipe cache partition to restore Settings
- Part 6: Factory reset your Android
- Part 7: Check and update Android OS
Part 1: Clear the cache of Settings and Google Play Service
It is possible that the corrupted cache files are responsible for this error. Hence, as the first tip, we would like you to clear the Settings cache if that is what triggers the “Unfortunately Settings has stopped” issue. Clearing it would definitely make Settings run appropriately. And The steps to clear the cache of the Google Play Services app are similar. Here is how to clear the cache of Settings:
- Open “Settings” on your Nokia C12 Plus and choose “Apps & Notifications”/”Apps”/”Application Manager” (the option may differ on different devices).
- In the list of applications, look for “Settings” and open it.
- Now, select “Storage” followed by “Clear Cache”.

Note: In some phones, the “Clear Cache” option may come after tapping on “Force Stop”. Therefore, go accordingly without getting confused.
Part 2: Clear the Android phone’s RAM and retry
As the next tip, we would like to suggest you clear your device’s RAM by ceasing the running apps in the background. RAM, if at the increased level, is responsible for the Nokia C12 Plus device’s freezing, poor performance, and most probably is the reason behind crashing Settings. Also, if the apps in the background keep running, they might conflict with the Settings and stop it to perform properly. Therefore clearing RAM is important when Android Settings is not responding. Here is how to do it.
- Firstly, you need to go to the Recent apps screen. For this, long-press the Home key.
Note: Please note that different devices have different ways to go to the Recent apps screen. Do it according to the Nokia C12 Plus device you own. - Now, swipe the apps and tap on the clear option. You will be able to notice the amount of RAM cleared

Part 3: Uninstall the Google update
Uninstalling Google Play Store updates has also responded well to many users. It has worked in the case of the “Unfortunately Settings has stopped” error. So, we would also like to suggest you use this tip if the others don’t work. Here are the steps to be followed for this.
- Open “Settings” on your Android and tap on “Application manager” or “Apps” or “Application.
- Now, head to all the apps and select “Google Play Store” from there.
- Tap on “Uninstall Updates” and restart your device to check if the crashing Settings issue has been resolved.

Part 4: Uninstall the custom ROM or re-flash the stock ROM
Using a custom ROM on your device brings up this problem due to incompatibility or improper installation. Therefore, you should either uninstall the custom ROM or re-flash the stock ROM. in order to re-flash the stock ROM of your Nokia C12 Plus, the best way would be Dr.Fone - System Repair (Android). It offers one-click functionality to flash stock ROM and that too with full security. Supporting all Nokia C12 Plus devices, it ranks among its counterparts when it comes to fixing crashing Phone app issues or any other Android system issue. It is loaded with the beneficial features which are discussed below.
Dr.Fone - System Repair (Android)
Android repair tool to fix “Unfortunately, Settings Has Stopped”
- You needn’t be a tech-savvy to use this
- Supports a wide range of Android devices easily, 1000+ being more precise
- One-click tool and supports any sort of Android system issue
- Higher success rate along with millions of trusted users
- Trustworthy and offers an extremely easy interface
4,635,310 people have downloaded it
How to fix crashing Settings using Dr.Fone - System Repair (Android)
Step 1: Download Tool
Visit the official website of Dr.Fone and download the toolbox from there. Go for the installation process and wait until the installation gets over. Launch it now and choose the “System Repair” tab from the main window.
Step 2: Get the Phone Connected
With the help of a USB cable, plug your Nokia C12 Plus into the PC. Upon proper connection, hit on the “Android Repair” option from the left panel.

Step 3: Feed Correct Information
In the next window, you need to fill in some necessary information like the name and model of the mobile device. Enter details like country and career. Check once and hit on “Next”.
Step 4: Enter Download Mode
Now, you need to take your device into Download mode. For this, you need to follow the onscreen instruction according to your device. Click “Next” and you will notice the firmware downloading progress on your screen.

Step 5: Repair the Issue
Once the firmware is completely downloaded, your Nokia C12 Plus will automatically start getting repaired. Stay there and you will receive a notification that the repair is done.
Part 5: Wipe cache partition to restore Settings
Like RAM, wiping cache is also vital so as to make the Nokia C12 Plus device’s operation smoother. And when you are getting the “Unfortunately Settings has stopped” error, it might be due to the collected cache. To remove it, you will need to enter the recovery mode. And the steps for recovery mode range from device to device. For instance, Nokia C12 Plus users have to press the “Home”, “Power” and “Volume Up” buttons. Similarly, HTC and LG device users are supposed to press the “Volume Down” and “Power” buttons. For Nexus, it is “Volume Up, Down” and Power key combinations. Therefore, before going further, make sure what device you own and enter the recovery mode according to it. Now, follow the detailed guide below to wipe the cache partition in order to fix crashing Settings.
- Primarily, turn off the Nokia C12 Plus device and enter the recovery mode by pressing the respective key combinations.
- You will notice a Recovery screen on your device.
- On showing up the recovery screen, look for the “Wipe Cache partition” option and use the “Volume Down” and “Volume Up” buttons to scroll down and up respectively.
- On reaching the required option, press the “Power” button to start wiping.
- Once finished, click the reboot option and the Nokia C12 Plus device will be rebooted, fixing the issue hopefully.

Part 6: Factory reset your Android
You can also opt for Factory resetting your device to fix the issue of Settings keeps stopping. By removing everything from the Nokia C12 Plus device, it will make your device run properly. If you have important data on your device, please make sure to create a backup before taking action if you don’t want to lose it. The steps are as follows.
- In the “Settings, go to “Backup and Reset”.
- Tap on “Factory data reset” followed by “Reset device”.
- Wait for the completion of the process and check if Settings is stopping or not after it gets rebooted.

Part 7: Check and update Android OS
A lot of times minor issues crop up due to the operating systems that get outdated. It is because the Nokia C12 Plus device needs to get updated from time-to-time for proper functioning otherwise it will not be able to match up with the fading technologies thereby coming up with issues like “Unfortunately Settings has stopped”. We recommend here you check for the available update and update your device. For this follow the guide below.
- Go to “Settings” and tap “About Phone” on your device.
- Now, hit on “System Update” and the Nokia C12 Plus device will look for any available update.
- If there is any, go along with the prompts to install it and make your phone even smarter.

Conclusion
If your Nokia C12 Plus shows the “Unfortunately Settings has stopped” error, don’t worry. This problem can come from many things like old software or cache issues. You can try easy fixes like clearing cache or updating your system. Sometimes, removing custom ROMs might be needed.
For iOS users facing similar problems, we recommend using Dr.Fone-System Repair (iOS) . It’s known for fixing many iOS problems without losing any data. Remember, a well-working device is just a few steps away!
 safe & secure
Also read:
- [New] Facebook Video Freeze-Up Solutions for Secure Browser Users
- 2024 Approved Balancing Acts in YouTube Music Mixes
- Alternate Avenues A Compilation of Non-GTA Games
- Brighten iPhone's Night Scenes Using Simple Tricks
- How to Fix the Soft Bricked OnePlus 12R? | Dr.fone
- How to Fix Unfortunately, Contacts Has Stopped Error on Motorola Razr 40 Ultra | Dr.fone
- How To Fix Unresponsive Phone Touchscreen Of Huawei Nova Y71 | Dr.fone
- How to Repair corrupt MP4 and AVI files of Magic V2 with Video Repair Utility on Mac?
- How To Restore a Bricked Samsung Galaxy A23 5G Back to Operation | Dr.fone
- In 2024, Easy Tutorial for Activating iCloud from iPhone 13 mini Safe and Legal
- In 2024, How to Stop Life360 from Tracking You On Poco C51? | Dr.fone
- Proven Ways to Fix There Was A Problem Parsing the Package on Oppo Reno 11 5G | Dr.fone
- Quick Fixes for Why Is My Nokia C110 Black and White | Dr.fone
- Reliable User Guide to Fix Gionee F3 Pro Running Slow and Freezing | Dr.fone
- Solving Your Game Streaming Sound Issues: Ultimate Guide to Repairing OBS Mic Malfunctions
- Title: How to Resolve Nokia C12 Plus Screen Not Working | Dr.fone
- Author: Abel
- Created at : 2025-01-07 17:13:23
- Updated at : 2025-01-10 16:27:35
- Link: https://fix-guide.techidaily.com/how-to-resolve-nokia-c12-plus-screen-not-working-drfone-by-drfone-fix-android-problems-fix-android-problems/
- License: This work is licensed under CC BY-NC-SA 4.0.