
How To Restore a Bricked Nokia G22 Back to Operation | Dr.fone
How To Restore a Bricked Nokia G22 Back to Operation
In moments of lag or freezing on your Android, you might brick Your Nokia G22, which can be unsettling. This is more than just the loss of a device. A bricked cell phone also involves potential data erasure. Yet, it’s crucial to understand the true implications of a bricked phone. This page tackles how to address the issue of a bricked Android phone.
This comprehensive guide aims to the reasons behind Android phones becoming bricked. By reading below, you’ll learn effective methods to unbrick a mobile phone without the risk of data loss.
Part 1. What are Brick Phones: At a Glance
The term “bricked phone“ is used when a device becomes non-functional. This is typically due to a critical software or firmware error. There are two distinct scenarios for encountering a bricked phone: a soft brick and a hard brick.
- Soft Brick. A soft brick entails a phone that’s not operational due to software glitches or conflicts but is not irreparable.
- Hard Brick.A hard brick signifies a more dire situation. This is where the phone becomes inoperable, resembling an actual brick in terms of functionality.
The Common Causes of a Cell Phone Bricking
Below are the common causes why a cell phone bricks.
Failed Updates
When a firmware or system update fails, it can lead to a bricked phone. Updates involve intricate changes to the phone’s software. If interrupted or incompatible, the Nokia G22 device may get stuck in a state of partial functionality. This can result in a soft brick.
Failed Flashing
Flashing involves installing custom firmware or software onto a device. If the flashing process is interrupted or if the firmware used is not compatible with the Nokia G22 device’s hardware, it can cause a hard brick. The device’s essential software components may become corrupted, rendering the phone unusable.
Rooting
Rooting, which grants users superuser access to their device’s OS, can lead to bricking if not done right. Rooting often involves making deep system changes, and errors can disrupt the phone’s core functionality.
Installing Bad Apps
Installing malicious, incompatible, or poorly coded apps can lead to a soft brick situation. In severe cases, they can trigger a boot loop or render the phone unresponsive.
Others
Several less common factors can also contribute to bricking. Overclocking, attempting to modify the bootloader, or tampering with system files can lead to disastrous consequences. Hardware issues, such as faulty memory or battery problems, might also manifest as bricked devices.
Part 2. Unbricking Methods and Tools
Below are solutions that you can employ to fix various brick phone scenarios.
Reverting Android Device to Factory Defaults (Soft Brick)
A universal approach to trying to recover a brick phone exists for all Android phones. This is, consider restoring your device to its factory settings. You can find instructions specific to your phone model online. Although this procedure erases all your data, it’s possible to regain the use of your brick phone.
Get in Touch With the Manufacturer (Hard Brick and Soft Brick)
Normally, smartphone warranties span from 1 to 2 years. If your phone remains unrooted and falls within that coverage period, consider reaching out to the manufacturer. This direct approach could lead to your phone being repaired or replaced with a new one at no cost to you.
Seek Professional Assistance (Hard Brick and Soft Brick)
When your phone falls outside the warranty coverage, consider seeking help from a reputable repair shop. However, be aware that any lost data cannot be attributed to their efforts. Fortunately, you can recover lost data using reliable data recovery software once your phone is operational again.
Use a Dedicated App To Fix Bricked Mobile Phones (Hard Brick and Soft Brick)
Among the array of tools designed for unbricking and recovery, one standout is Wondershare Dr.Fone - System Repair (Android). With an exceptional recovery rate, it stands out as one of the top contenders for data retrieval. Its performance is notable when applied to modern brick phones, making it a highly effective choice for these devices.
Part 3. Unbricking Mobile Phones With Dr.Fone - System Repair (Android)
Dr.Fone - System Repair (Android) empowers you to resolve a range of prevalent Android problems. This Android repair tool eliminates the need to hunt for suitable firmware to flash your phone. By utilizing Dr.Fone – System Repair (Android), you can recover data on Your Nokia G22 with a few clicks.

 safe & secure
4,039,461 people have downloaded it
Key Features
Below are some of the standout features of Dr.Fone - System Repair (Android)
Address Android Challenges Like a Professional
From common scenarios like black screens and boot loops to even bricked Android devices, this tool has you covered. Dr.Fone has simplified the process so that anyone can fix Android problems.
Support for Over 1000 Android Models
This software is designed to fix glitches including most modern Android devices. Whether your Nokia G22 is an unlocked variant or tied to carriers, you can restore it back to normal in just a matter of minutes.
Trial Access at No Cost
Dr.Fone - System Repair (Android) offers free access for you to test the initial steps and verify device compatibility. This cost-effective feature ensures value for money every step of the way.
Main Advantages of Using Dr.Fone – System Repair (Android)
Dr. Fone – System Repair (Android) is a great solution with numerous tools to help you manage your Nokia G22 in various ways. Here are some of the advantages of using the app for fixing bricked phones.
- Fone – System Repair (Android) comes with a clean UI making navigation and usage easy. The user-friendly design offers a seamless experience for beginners and professionals alike.
- Utilizing the app for system repair is an effortless and speedy process. It doesn’t take up much time to revive your bricked phoneso you can use it right away.
- The System Repair toolkit only needs you to click on a few buttons. Combined with its clean UI and speedy process, using the app is a breeze.
Part 4. How To Revive a Bricked Phone Using Dr.Fone – System Repair (Android)
Below are the steps to recover data on a bricked mobile phone.
- Step 1: Download and install Dr.Fone – System Repair (Android) on your computer. Launch the app and select System Repair. Next, choose Select Android as the Nokia G22 device type. Then, connect to your Nokia G22. Choose Phone Brick as the Android problem and click Start.

- Step 2: Select the correct device information. Choose the Brand, Name, Model, Country, and Carrier. Tick the box next to I agree button and click Next to proceed to the next step.

- Step 3: Click on the Phone with Home button or Phone without Home button depending on your device. Follow the on-screen instructions and click Next to proceed with reviving your brick phone.

- Step 4: Once the Nokia G22 device enters Download Mode, the firmware will automatically start downloading. Follow the on-screen prompts and wait for the system to initiate the repair process. Once it concludes, the completion message will appear on the main window. Click Done to close the tool or click Try again to repeat the process.

safe & secure
4,311,328 people have downloaded it
Conclusion
Fixing a bricked phone may seem daunting, but solutions are within reach. This page explained the distinctions between soft and hard brick scenarios. It also identified common causes and revealed effective methods for unbricking.
Among these, Dr.Fone – System Repair (Android) emerges as a dependable ally. The tool offers a comprehensive toolkit for recovery and data rescue. The power to reclaim lost data lies in your hands. Act, follow the methods outlined, and recover your brick phone.
Troubleshooting Guide: How to Fix an Unresponsive Nokia G22 Screen

Smart devices have become an integral part of our lives, and Nokia G22 phones are increasingly popular due to their advanced features and affordable prices. These phones offer numerous benefits, including high-quality cameras, fast processors, long-lasting batteries, and sleek designs.
However, like any other electronic device, Nokia G22 phones can sometimes encounter issues that may impede their functionality. One common problem that users face is an unresponsive screen, which can be frustrating and disruptive to daily activities.
This article will discuss some valuable solutions for dealing with Nokia G22 phone screen unresponsiveness. We will provide step-by-step instructions for troubleshooting and getting your phone back in working order. Whether you’re a novice or an experienced user, these tips and tricks will help you navigate this problem and get back to using your phone without any issues. So, let’s dive in and explore how to fix a Nokia G22 phone with an unresponsive screen.
What causes the Nokia G22 Screen unresponsive?
The Nokia G22 screen may become unresponsive due to various reasons. Here are some common situations and their possible causes:
During Use/Gaming: The screen may become unresponsive due to overheating when using or gaming on a Nokia G22 phone. This can be caused by running too many apps simultaneously or playing games for an extended period, especially on models such as the Nokia G22 9 Pro, which generates much heat during gaming.
**No Response When Touching the Screen:**Sometimes, the Nokia G22 screen may not respond when touched due to a faulty touch screen or display. This can happen due to physical damage or a manufacturing defect. Some Nokia G22 Nord 2 users have reported this issue.
After Dropping the Phone: If a Nokia G22 phone has been dropped, the screen may become unresponsive due to physical damage or a loose connection. This can happen to any model, including the Nokia G22.
Overheating, physical damage, and manufacturing defects are some common causes of Nokia G22 screen unresponsiveness, which may occur during use/gaming, no response when touching the screen, or after dropping the phone.
The common solutions to solve a Nokia G22 Screen unresponsive
Here are the three most common solutions to deal with phone screens being unresponsive, regardless of the brand:
Restart the Nokia G22 device

Restarting the Nokia G22 device is a simple and quick solution to an unresponsive phone screen. To restart the phone, press and hold the power button until the screen turns off, then press and hold the power button again to turn the phone back on.
Check the Charging Port and Battery
Sometimes, an unresponsive screen can be caused by a dead battery or a faulty charging port. To check for these issues:
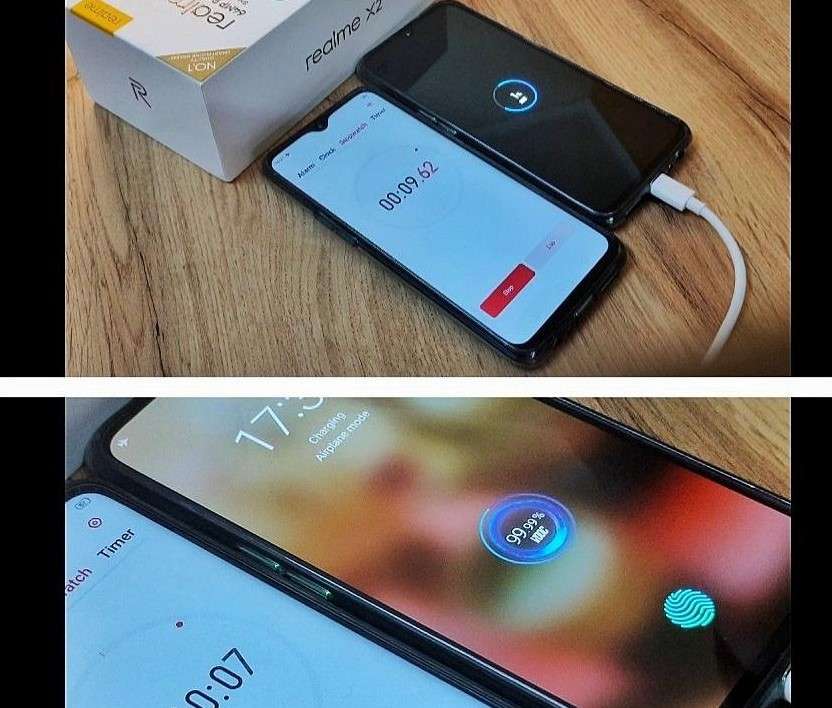
Step 1: Plug the phone into a charger and wait for at least 30 minutes to see if the battery charges.
Step 2: Try a different charger or cable to see if the issue is with the charging accessories.
Contact the Pros

If the above solutions don’t work, contacting a professional is best. A trained technician can diagnose and fix the problem. Contact the phone manufacturer or an authorized repair center to get help with your phone.
For different Nokia G22 models, there may be additional solutions to consider:
Check the Phone’s Temperature

Sometimes, a Nokia G22 phone’s screen, specifically Nokia G22 8 Pro, may become unresponsive due to overheating. To check the phone’s temperature:
Step 1: Go to Settings > Battery > Battery Temperature.
Step 2: If the phone is overheating, let it cool down before using it again.
Reset to Factory Settings
A factory reset may help fix the problem if none of the above solutions work. Note that this will erase all data and settings on the phone, so be sure to back up your data before resetting. To reset the phone:
Step 1: Go to Settings > Additional Settings > Backup and Reset > Erase All Data.
Step 2: Follow the on-screen instructions to reset the phone.
Replace a New Screen

If the phone’s screen is physically damaged or cracked, it may need to be replaced. To replace the screen:
- Contact a professional repair center or the manufacturer for replacement parts and installation.
How to avoid Nokia G22 Screen being unresponsive?
To avoid Nokia G22 screen being unresponsive, here are some suggestions based on the possible causes:
Check Software Updates on Time
Make sure to regularly check for and install software updates on your Nokia G22 phone. These updates often include bug fixes and security patches that can help prevent issues like overheating and screen unresponsiveness.
Check Hardware from Time to Time
Regularly inspect your phone’s hardware components such as charging ports, battery, and screen for any signs of damage or wear and tear. If you notice any issues, get them fixed promptly to prevent them from causing further damage.
Avoid extreme temperatures
Keep your Nokia G22 device in a temperature-controlled environment. High temperatures can cause the screen to become unresponsive, and low temperatures can cause it to freeze.
Keep the screen clean
Dirt and debris on the screen can cause it to become unresponsive. Use a microfiber cloth to clean the screen regularly.
Reduce the number of running apps
Running too many apps at once can overload the system and cause the screen to become unresponsive. Close any apps you’re not using to free up system resources.
Use Wondershare Dr.Fone to Repair or Manage Your Data
Wondershare Dr.Fone is a helpful tool that can help manage and repair your phone’s data. It can be used to back up your data, transfer files between devices, and even fix issues like an unresponsive screen. Dr.Fone has the DF13 version to be launched, which includes more features to help manage your phone’s data effectively.
By following these suggestions, you can help prevent screen unresponsiveness on your Nokia G22 phone. Download Dr.Fone at https://drfone.wondershare.com/ to manage your phone’s data effectively and fix any issues that may arise.
safe & secure
Conclusion
Nokia G22 phones offer numerous benefits, including high-quality cameras, fast processors, long-lasting batteries, and sleek designs. However, like any other electronic device, Nokia G22 phones can sometimes encounter issues, such as an unresponsive screen. The causes of an unresponsive screen may include overheating, physical damage, and manufacturing defects.
To deal with an unresponsive screen, users can try restarting the Nokia G22 device, checking the charging port and battery, or contacting a professional. Additional solutions for specific Nokia G22 models include checking the phone’s temperature, resetting to factory settings, or replacing a new screen. To avoid an unresponsive screen, users can check software updates on time, inspect the phone’s hardware, avoid extreme temperatures, keep the screen clean, and reduce the number of running apps. Dr.Fone is a helpful tool that can help manage and repair your phone’s data.
Why Does My Nokia G22 Keep Turning Off By Itself? 6 Fixes Are Here
Android users are usually very happy with their smartphones; however, sometimes they do complain about their phones switching off abruptly. This is a weird situation to be in because one moment you are using your phone, and the next moment it suddenly turns itself off, and when you happen to turn it back on, it functions smoothly, but only for a while.
Phones shutting off problem not only disrupts your work but also tests your patience if you are in the middle of executing an important task, playing your favorite game, typing an e-mail/message, or attending a business call, etc.
We often hear Android users ask for solutions for this problem at different forums. If you are one of them and clueless about why My Nokia G22 keeps shutting off, here are ways that can help you.
So the next time you ask, “Why does My Nokia G22 keep shutting off?”, refer to this article and follow the techniques given hereunder.
Part 1: Possible reasons for phone turning off by itself
We understand your trouble when you ask, “Why does My Nokia G22 keep turning off?” thus, here we have four of the possible reasons that might be causing the glitch and help you understand the problem better.
The first one is related to updating the phone’s software or any of the Apps if the download process is interrupted and not duly completed, the phone can act abnormally causing it to switch off at frequent intervals.
Then there are certain Applications that are not supported by the Android software. While using such Apps, the phone may turn off abruptly. This usually happens when you install Apps from unknown sources which are not compatible with Android.
Also, if your battery is low or has become too old, your phone may shut off and not work as smoothly.
Lastly, you can also check if you use a protective cover for your phone. Sometimes, the cover is so tight that it presses the power button continuously turning the phone off.
Now, once you have analyzed the problem, it is easier to move on to the solutions.
Part 2: Check the battery status on Android
If your phone turns off now and then while you are using it and even refuses to start when you press the power button, we suspect that there is a problem with your phone’s battery. Well, Luckily for Android users, there is a test that can be run on the phone to check the battery’s operations and health. Not many users are aware of it, and thus, we have compiled what you need to do the next time you wonder why does My Nokia G22 keeps shutting off itself.
First, open the dialer on your Nokia G22 shown in the screenshot below.
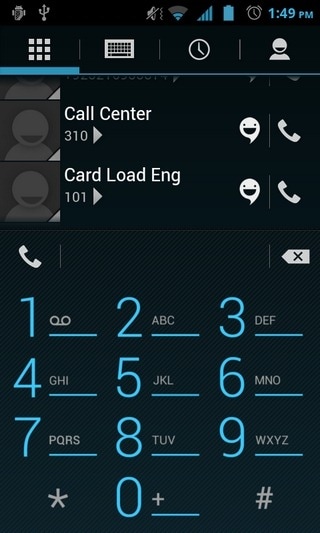
Now dial *#*#4636#*#* just like dialing a usual phone number and wait for the “Battery Info” screen to pop up.
Note: Sometimes, the above-mentioned code may not work. In such cases, try dialing *#*#INFO#*#*. The following screen will appear now.
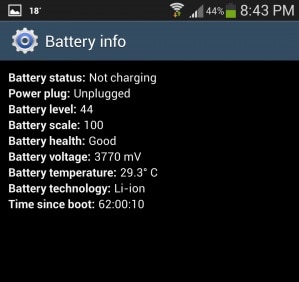
If the battery looks good as you can see in the screenshot above and everything else seems normal, it means that your battery is healthy and need not be replaced. You may now move on to the next step to cure your device.
Part 3: One-click to fix Android phone keeps turning off
We understand how annoying it is to find your Nokia G22 turning off randomly on its own. So, when the age-old remedies to fix the phone keeps turning off turns futile, you need to go for a reliable tool like Dr.Fone - System Repair (Android) .
Apart from tackling the Android phone keeps turning off the issue, it can also resolve all Android problems. The issues include system update fail, device stuck on logo, unresponsive, or bricked device with a blue screen of death.
Your trouble with ‘why does My Nokia G22 keep shutting off?’ can be resolved easily using Dr.Fone - System Repair (Android). But, before that, you need to ensure that the Android device has been backed up properly to eliminate the risk of data erasing.
![]()
Dr.Fone - System Repair (Android)
Repair Android System Errors without Any Trouble.
- Fix your Android to normal, no skills required.
- Fix various Android system issues, stuck in boot loop , black screen , or won’t turn on , looping on start, etc.
- The high success rate in resolving Android system issues.
- Compatible with a wide range of Android devices and OS versions
- User-friendly interface with easy-to-follow steps.
3981454 people have downloaded it
Below are the steps that help easily fix Android device keeps turning off on its own:
Phase 1: Preparing your Nokia G22 and connecting it
Step 1: On your computer, install and launch Dr.Fone. Now, click the ‘System Repair’ button over Dr.Fone window and connect the Android device to your computer.

Step 2: Here, you need to press the ‘Start’ button right after hitting the ‘Android’.
Step 3: Pick your Nokia G22 details over the Nokia G22 device information interface. Click the ‘Next’ button afterward.
Phase 2: Enter ‘Download’ mode to repair and resolve ‘why does My Nokia G22 keep turning off’
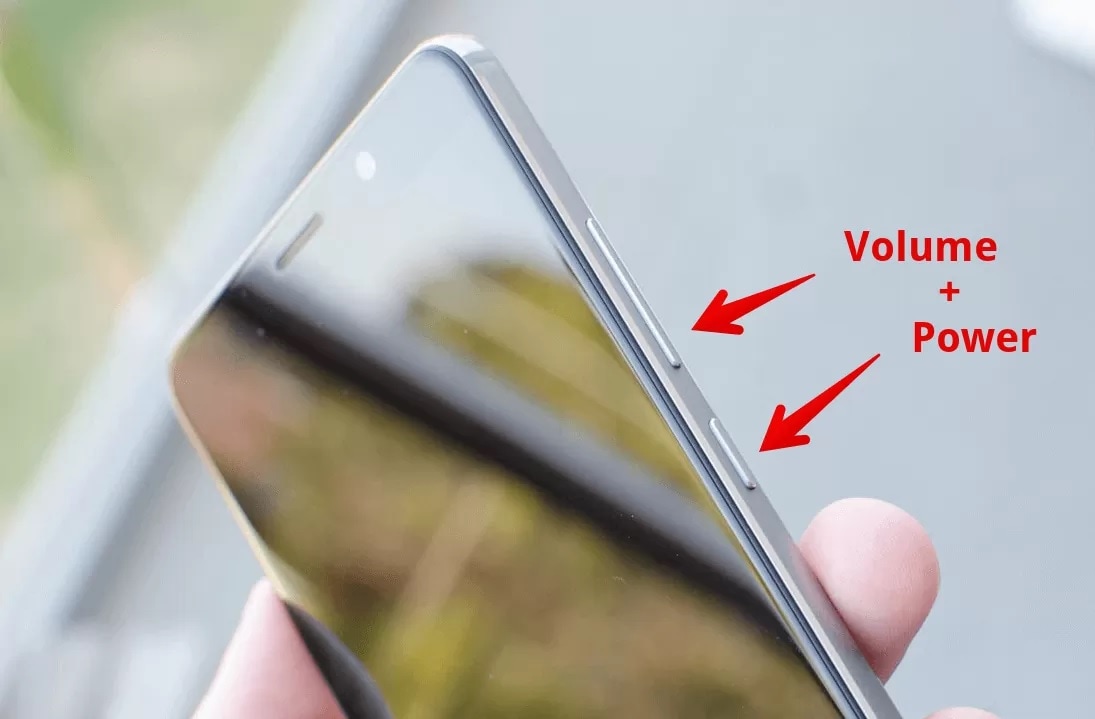
Step 1: On your Nokia G22, go to ‘Download’ mode following the instructions.
For a device with the ‘Home’ button – Turn off the mobile and then hold down the ‘Home’, ’Volume Down’, and ’Power’ buttons together nearly for 10 seconds. Leave them all and then click the ‘Volume Up’ button to get into the ‘Download’ mode.
For a device lacking ‘Home’ button – After switching off the Android mobile, hold down ‘Bixby’, ‘Power’, ‘Volume Down’ key still 10 seconds. Now, un-hold them and tap the ‘Volume Up’ button to enter the ‘Download’ mode.

Step 2: Hitting the ‘Next’ button will start the Android firmware download.

Step 3: Now, Dr.Fone - System Repair (Android) will verify the firmware once downloaded. Within some time the Android system gets repaired.
safe & secure
Part 4: Update software to the latest version to fix Android phone keeps turning off
Software glitches or outdated operating systems can trigger automatic shutdowns on Android phones. Updating your Nokia G22’s software version can be an effective solution to fix the issue of the phone repeatedly turning off. Regular software updates provided by the phone manufacturer often include bug fixes, performance improvements, and security patches. These updates can address underlying problems that may be causing the random shutdowns, ensuring a more stable and reliable phone performance.
To update the software on your Nokia G22, follow these steps:
Go to “Settings” on your Nokia G22 and navigate to the “System” or “Software Update” section (the exact wording may vary depending on your device model and Android version). Look for the option to “Check for updates” to see if any new software updates are available.

Part 5: Cool down your phone to avoid your phone keeps turning off
When a phone overheats, it can trigger an automatic shutdown as a protective mechanism to prevent damage to the Nokia G22 device’s internal components. Overheating occurs when the phone’s internal temperature rises significantly, typically due to excessive heat generated by the processor and other hardware components during intensive tasks or prolonged usage.
To prevent the phone from turning off due to overheating, you can take various measures, such as limiting intensive usage, avoiding direct sunlight and hot environments, and using the phone on hard surfaces to aid heat dissipation.

Part 6: Narrow down the randomly turning off issue in Safe Mode
Starting your phone in Safe Mode is a good way to narrow down whether or not the problem is occurring because of some heavy and incompatible Apps as Safe Mode allows only built-in Apps to function. If you can use your phone in Safe Mode, consider deleting the unnecessary Apps which may be burdening the phone’s processor.
To boot into Safe Mode:
Long press the power button to see the following options on the screen.
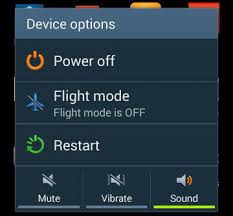
Now tap on “Power Off” for about 10 seconds and click “OK” on the message that pops-up as shown below.
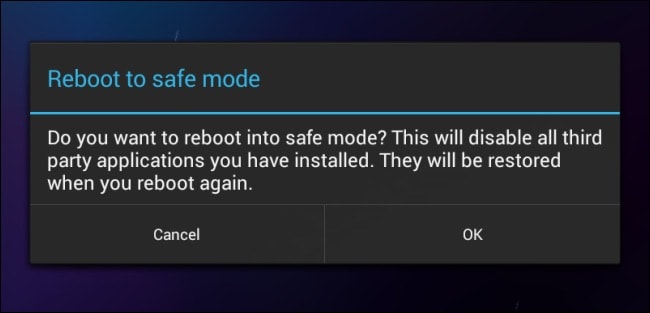
Once done, the phone will reboot and you will see “Safe Mode” on the main screen.
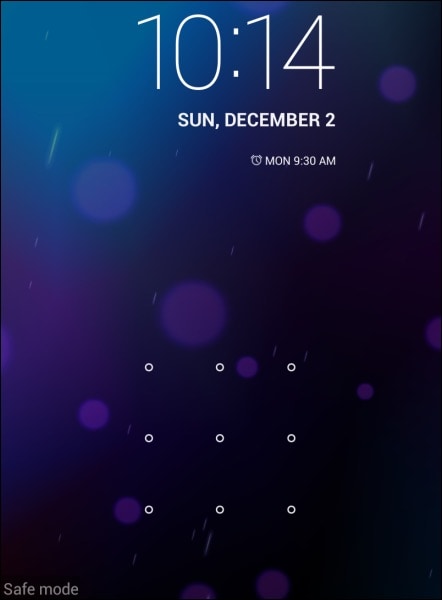
That’s all. Well, booting to Safe Mode is easy and it also helps you to identify the real problem.
Part 7: Back up your data and perform a factory reset
Note: You must take a back-up of all your data because once you perform a factory reset on your device, all media, contents, data, and other files are wiped out, including your device settings.
Wondershare Dr.Fone is a great way to back up all your data to prevent it from getting lost after resetting the phone. It works brilliantly as it backs up all data and allows users to retrieve it fully or selectively. You can backup all files from your Android to PC in just a click and restore them later. Try this software for free before purchasing it to understand it’s working better. It does not tamper with your data and only requires you to follow the simple steps given below to backup your Android data:
Wondershare Dr.Fone
Flexibly Back up and Restore Android Data
- Back up Android data to the computer with one click.
- Preview and selectively restore the backup to any Android device.
- Supports 8000+ Android devices.
- There is no data lost during backup, export, or restoration.
3,981,454 people have downloaded it
To start with, download and run the backup software on the PC.
Once you have the main screen of the software with multiple options that will appear before you, choose the “My Backup” option.
Now connect the Android phone to the PC and make sure that USB debugging is turned on. Then hit “Back Up Now” and wait for the next screen to open.

You will see the file types that will be backed up. Wait for the backup process to complete.

There you go, you have successfully backed up data.

safe & secure
Now moving on to factory reset your phone:
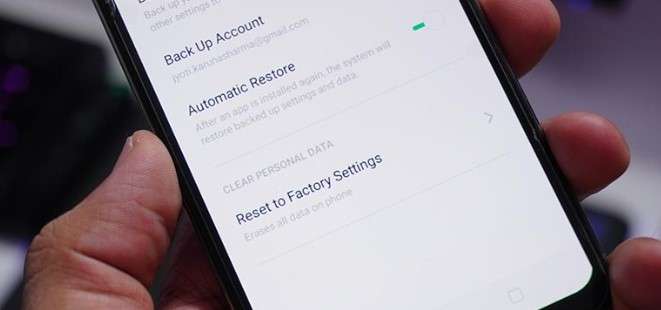
Simply visit “Settings” on your Nokia G22 by clicking the settings icon as shown below.
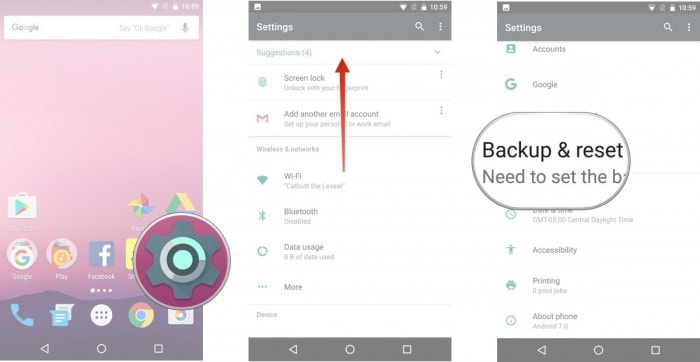
And then select the “Backup and Reset” option.
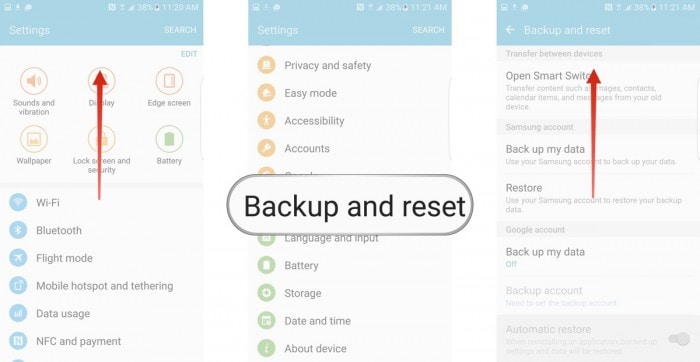
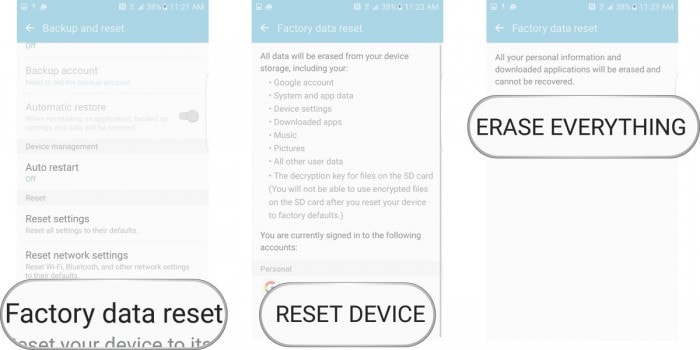
Once selected, tap on “Factory data reset” and then “reset device” as shown in the picture below.
Finally, tap on “ERASE EVERYTHING” as shown below to Factory Reset your device.
Note: Once the factory reset process is complete, your device will automatically restart and you will have to set it up once again. You can restore the backup data on your Nokia G22 once you factory reset it, again using the Dr.Fone toolkit.
Now for all those of you who are wondering why does My Nokia G22 keeps turning off by itself, please understand that the reasons behind the problem are simple, and so are its fixes. All you need to do is examine the problem carefully and move on to the fixes given in this article. Dr.Fone toolkit Android Data Backup & Restore feature provides an excellent platform for you to store all your data safely on your PC and retrieve it whenever you like so that you can go ahead to solve the error yourself without stressing about data loss.“Why does My Nokia G22 keep shutting off?” might be common questions but can be dealt with ease if you follow the methods explained above.
So, do not hold back, go ahead, and try these tricks. They have helped many and will be useful for you too.
safe & secure
Also read:
- 2024 Approved How to Reclaim Full Volume From Partially Muted FB Tracks
- 2024 Approved Pigments & Perceptions Mastering Image Colorization
- A Busy Home’s Guide to Synchronizing Schedules with These 7 Exceptional Shared Calendars
- Converti File WMA in Formato FLAC Online E Gratuito Con Movavi
- How To Fix Unresponsive Touch Screen on Realme Narzo 60 5G | Dr.fone
- How To Restore a Bricked Oppo F25 Pro 5G Back to Operation | Dr.fone
- In 2024, Ultimate Budget-Friendly GoPro Adds
- In 2024, Unlocking the Power of Smart Lock A Beginners Guide for Realme Narzo N55 Users
- Infinix Note 30i Stuck on Screen – Finding Solutions For Stuck on Boot | Dr.fone
- Mastering ChatGPT: Discover the 5 Most Powerful Custom Command Techniques
- Play Store Stuck on Downloading Of Huawei P60? 7 Ways to Resolve | Dr.fone
- Quick Fixes for Why Is My Honor Magic V2 Black and White | Dr.fone
- Quick Fixes for Why Is My OnePlus Ace 2V Black and White | Dr.fone
- Simple Solutions to Fix Android SystemUI Has Stopped Error For Realme V30 | Dr.fone
- The Ultimate List of NETGEAR Router Models : Expert Picks & Reviews
- Title: How To Restore a Bricked Nokia G22 Back to Operation | Dr.fone
- Author: Abel
- Created at : 2025-01-01 23:10:52
- Updated at : 2025-01-03 16:49:31
- Link: https://fix-guide.techidaily.com/how-to-restore-a-bricked-nokia-g22-back-to-operation-drfone-by-drfone-fix-android-problems-fix-android-problems/
- License: This work is licensed under CC BY-NC-SA 4.0.