
How To Restore a Bricked Vivo X Fold 2 Back to Operation | Dr.fone
How To Restore a Bricked Vivo X Fold 2 Back to Operation
In moments of lag or freezing on your Android, you might brick Your Vivo X Fold 2, which can be unsettling. This is more than just the loss of a device. A bricked cell phone also involves potential data erasure. Yet, it’s crucial to understand the true implications of a bricked phone. This page tackles how to address the issue of a bricked Android phone.
This comprehensive guide aims to the reasons behind Android phones becoming bricked. By reading below, you’ll learn effective methods to unbrick a mobile phone without the risk of data loss.

Part 1. What are Brick Phones: At a Glance
The term “bricked phone“ is used when a device becomes non-functional. This is typically due to a critical software or firmware error. There are two distinct scenarios for encountering a bricked phone: a soft brick and a hard brick.
- Soft Brick. A soft brick entails a phone that’s not operational due to software glitches or conflicts but is not irreparable.
- Hard Brick.A hard brick signifies a more dire situation. This is where the phone becomes inoperable, resembling an actual brick in terms of functionality.
The Common Causes of a Cell Phone Bricking
Below are the common causes why a cell phone bricks.
Failed Updates
When a firmware or system update fails, it can lead to a bricked phone. Updates involve intricate changes to the phone’s software. If interrupted or incompatible, the Vivo X Fold 2 device may get stuck in a state of partial functionality. This can result in a soft brick.
Failed Flashing
Flashing involves installing custom firmware or software onto a device. If the flashing process is interrupted or if the firmware used is not compatible with the Vivo X Fold 2 device’s hardware, it can cause a hard brick. The device’s essential software components may become corrupted, rendering the phone unusable.
Rooting
Rooting, which grants users superuser access to their device’s OS, can lead to bricking if not done right. Rooting often involves making deep system changes, and errors can disrupt the phone’s core functionality.
Installing Bad Apps
Installing malicious, incompatible, or poorly coded apps can lead to a soft brick situation. In severe cases, they can trigger a boot loop or render the phone unresponsive.
Others
Several less common factors can also contribute to bricking. Overclocking, attempting to modify the bootloader, or tampering with system files can lead to disastrous consequences. Hardware issues, such as faulty memory or battery problems, might also manifest as bricked devices.
Part 2. Unbricking Methods and Tools
Below are solutions that you can employ to fix various brick phone scenarios.
Reverting Android Device to Factory Defaults (Soft Brick)
A universal approach to trying to recover a brick phone exists for all Android phones. This is, consider restoring your device to its factory settings. You can find instructions specific to your phone model online. Although this procedure erases all your data, it’s possible to regain the use of your brick phone.
Get in Touch With the Manufacturer (Hard Brick and Soft Brick)
Normally, smartphone warranties span from 1 to 2 years. If your phone remains unrooted and falls within that coverage period, consider reaching out to the manufacturer. This direct approach could lead to your phone being repaired or replaced with a new one at no cost to you.
Seek Professional Assistance (Hard Brick and Soft Brick)
When your phone falls outside the warranty coverage, consider seeking help from a reputable repair shop. However, be aware that any lost data cannot be attributed to their efforts. Fortunately, you can recover lost data using reliable data recovery software once your phone is operational again.
Use a Dedicated App To Fix Bricked Mobile Phones (Hard Brick and Soft Brick)
Among the array of tools designed for unbricking and recovery, one standout is Wondershare Dr.Fone - System Repair (Android). With an exceptional recovery rate, it stands out as one of the top contenders for data retrieval. Its performance is notable when applied to modern brick phones, making it a highly effective choice for these devices.
Part 3. Unbricking Mobile Phones With Dr.Fone - System Repair (Android)
Dr.Fone - System Repair (Android) empowers you to resolve a range of prevalent Android problems. This Android repair tool eliminates the need to hunt for suitable firmware to flash your phone. By utilizing Dr.Fone – System Repair (Android), you can recover data on Your Vivo X Fold 2 with a few clicks.

 safe & secure
4,039,461 people have downloaded it
Key Features
Below are some of the standout features of Dr.Fone - System Repair (Android)
Address Android Challenges Like a Professional
From common scenarios like black screens and boot loops to even bricked Android devices, this tool has you covered. Dr.Fone has simplified the process so that anyone can fix Android problems.
Support for Over 1000 Android Models
This software is designed to fix glitches including most modern Android devices. Whether your Vivo X Fold 2 is an unlocked variant or tied to carriers, you can restore it back to normal in just a matter of minutes.
Trial Access at No Cost
Dr.Fone - System Repair (Android) offers free access for you to test the initial steps and verify device compatibility. This cost-effective feature ensures value for money every step of the way.
Main Advantages of Using Dr.Fone – System Repair (Android)
Dr. Fone – System Repair (Android) is a great solution with numerous tools to help you manage your Vivo X Fold 2 in various ways. Here are some of the advantages of using the app for fixing bricked phones.
- Fone – System Repair (Android) comes with a clean UI making navigation and usage easy. The user-friendly design offers a seamless experience for beginners and professionals alike.
- Utilizing the app for system repair is an effortless and speedy process. It doesn’t take up much time to revive your bricked phoneso you can use it right away.
- The System Repair toolkit only needs you to click on a few buttons. Combined with its clean UI and speedy process, using the app is a breeze.
Part 4. How To Revive a Bricked Phone Using Dr.Fone – System Repair (Android)
Below are the steps to recover data on a bricked mobile phone.
- Step 1: Download and install Dr.Fone – System Repair (Android) on your computer. Launch the app and select System Repair. Next, choose Select Android as the Vivo X Fold 2 device type. Then, connect to your Vivo X Fold 2. Choose Phone Brick as the Android problem and click Start.

- Step 2: Select the correct device information. Choose the Brand, Name, Model, Country, and Carrier. Tick the box next to I agree button and click Next to proceed to the next step.

- Step 3: Click on the Phone with Home button or Phone without Home button depending on your device. Follow the on-screen instructions and click Next to proceed with reviving your brick phone.

- Step 4: Once the Vivo X Fold 2 device enters Download Mode, the firmware will automatically start downloading. Follow the on-screen prompts and wait for the system to initiate the repair process. Once it concludes, the completion message will appear on the main window. Click Done to close the tool or click Try again to repeat the process.

safe & secure
4,311,328 people have downloaded it
Conclusion
Fixing a bricked phone may seem daunting, but solutions are within reach. This page explained the distinctions between soft and hard brick scenarios. It also identified common causes and revealed effective methods for unbricking.
Among these, Dr.Fone – System Repair (Android) emerges as a dependable ally. The tool offers a comprehensive toolkit for recovery and data rescue. The power to reclaim lost data lies in your hands. Act, follow the methods outlined, and recover your brick phone.
Spotify Keeps Crashing: A Complete List of Fixes You Can Use on Vivo X Fold 2

Does your Spotify keep crashing? You’re not alone. This problem is widespread and can happen to anyone. Fortunately, there are ways to rectify it quickly and easily. We’ve prepared a guide to fixing your Spotify crashing problem.
In our guide, you’ll find out why your Spotify keeps crashing. Moreover, you’ll get a list of fixes for your Spotify closing problem and detailed instructions. Once you’ve read our guide, you’ll successfully solve the problem of Spotify crashing on Android.
Part 1. Why Spotify Keeps Crashing

Some people have encountered a problem with their Spotify accounts. Spotify can sometimes keep crashing and closing due to several reasons. For example, it can happen due to your phone not being compatible with the app. This can happen if your operating system isn’t updated to the newest version.
Another reason the Spotify app keeps crashing could be an antivirus or a VPN blocking Spotify from working. Moreover, your device might be out of storage space, causing your phone to slow down and crash apps.
Several other reasons for this problem include network issues, a weak Wi-Fi signal, or the battery saving mode. Furthermore, your apps and files might be corrupted, or an app on your phone might block Spotify from working correctly.
Part 2. Spotify Keeps Crashing: Best Fixes
As you can see, there are numerous reasons for your Spotify crashing. Fortunately, all of them are easy fixes, and there’s no need to worry. We’ve prepared a list of 11 ways to fix your Spotify. With these fixes and detailed instructions, you’ll be able to eliminate your Spotify problem with ease.
1. Fix the Spotify Closing Issue by Repairing Your System
The reason for your Spotify crashing may be more significant than just a bug. Your device system might be behind it. If that’s the case, you might need to repair your system before trying to fix Spotify.
If you want to repair your mobile device’s system quickly and efficiently, try Wondershare Dr.Fone.
Wondershare Dr.Fone is an app that gives you complete control over your phone. You can manage it, back it up, recover files, and repair your system. The system repair option will fix your Android in just a few clicks and allow you to use Spotify freely. The steps go as follows:
- Step 1: Install and open Wondershare Dr.Fone on your computer and connect your Android.
- Step 2: Go to the Toolbox section and select System Repair.

- Step 3: Choose the Android
- Step 4: See which Android errors Wondershare Dr.Fone can fix and click Start.
- Step 5: Select the **Brand,**Name, Model, Country, and Carrier In the Carrier section, choose OPEN if your device is unlocked.
- Step 6: Tick the “I agree with the warning, and I am ready to proceed”checkbox and click Next.
- Step 7: Put your Android in Download Mode. You can find the steps below these instructions.
- Step 8: The program will automatically download once you put the phone in Download Mode.

- Step 9: Once the firmware downloads, click Fix Nowto install it on your Android.

- Step 10: Type “000000” in the dialog box and click Confirm.

- Step 11: That will start the system reparation, which you can follow on the screen.

- Step 12: Once it finishes, click Doneto complete the system repair.
There are two ways to enter Download Mode: one for Android devices with the Home button and another for those without it.
The steps for entering Download Mode on an Android phone with the Home button are as follows:
- Step 1: Turn off your phone.
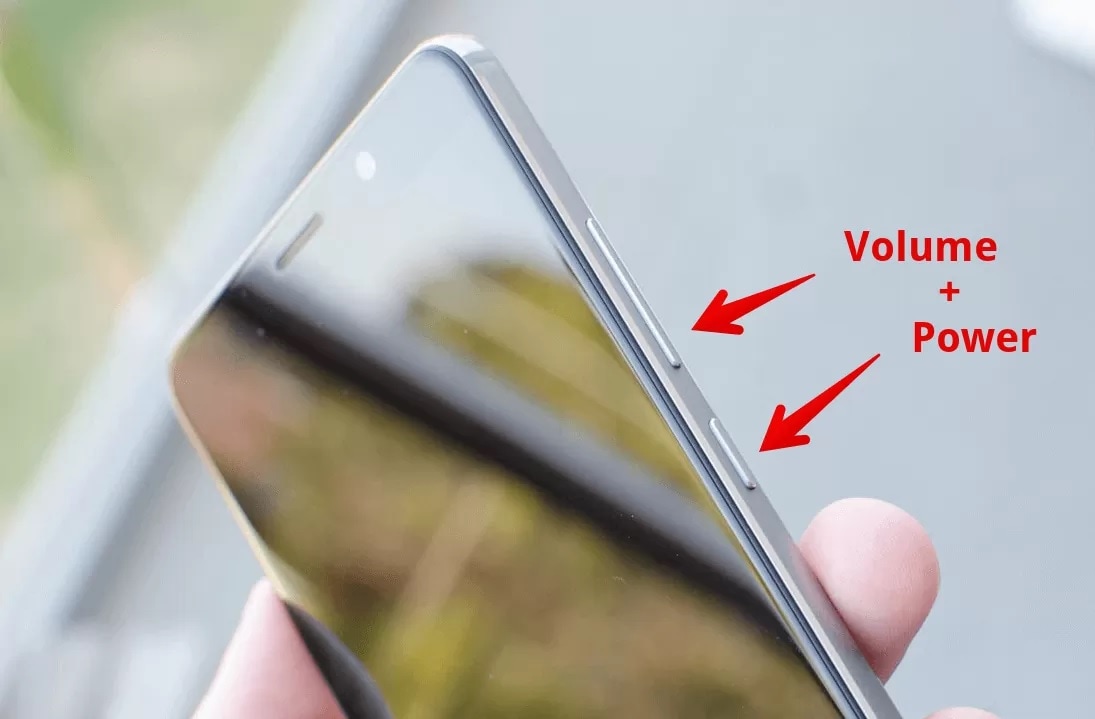
- Step 2: Press and hold the Volume Down,Home, and Power buttons simultaneously.
- Step 3: Press the Volume Upbutton to enter Download Mode.
The steps for entering Download Mode on Android devices without the Home button are as follows:

- Step 1: Turn off your phone.
- Step 2: Press and hold the Volume Down, Bixby, andPower buttons simultaneously.
- Step 3: Press the Volume Upbutton to enter Download Mode.
2. Force-Close the App
You can force-close Spotify and open it again to make it work properly. That is an easy fix if your Spotify has developed a bug. If that is the case, follow the next steps:
- Step 1: Try opening Spotify.
- Step 2: If it’s not working, open App Switcher or Recent Apps. Different Android devices open it differently. Thus, you can swipe up from your Home screen, or if you have three buttons at the bottom, press Recent Apps.

- Step 3: Find Spotify in Recent Appsand click X or swipe up over it to force-close it.
- Step 4: Try opening Spotify again.
3. Re-Login to Your Spotify
The Spotify app may be working fine. Maybe you’re having problems with your Spotify account. If so, you can try logging out and logging in again to see if that works. That isn’t a big problem; sometimes Spotify accounts start bugging. You can re-login to your Spotify account by following these steps:
- Step 1: Open Spotify.
- Step 2: Tap Settingsin the upper right corner.

- Step 3: Scroll to the bottom of the settings and tap Log Out.

- Step 4: Tap Log In.

- Step 5: Enter your login credentials.
- Step 6: Tap Loginagain, and you’re in.

4. Restart Your Device
Another way to stop Spotify from crashing can be restarting your Android. The steps may vary slightly depending on the Vivo X Fold 2 device, but they’re mostly the same. Follow these steps to restart your device:
- Step 1: Press and hold the Power button(you must press and hold both the Power and Volume Up buttons on a newer Android device).
- Step 2: Tap Restart. That will restart your Android, and you can try opening Spotify again.

5. Set Up Your Time and Date
Another possible reason for your Spotify closing problem could be the incorrect time and date on your Android. That is also an easy fix; you must set it correctly and try opening the app again. Set up your time and date with these steps:
- Step 1: Open Settingson your Android.
- Step 2: Go to Systemor General Management (depending on your Android model).
- Step 3: Go to Date and Time.
- Step 4: Tap Set Dateand set the correct date.

- Step 5: Go to Set Timeand set the right time.

6. Update Your System Software
Your Spotify app might keep crashing because your system is outdated. Try updating it to the latest version to try and fix the crashing problem. The steps for the Android system update are as follows:
- Step 1: Open Settings.

- Step 2: Go to System or About Phone.

- Step 3: Select System Update.
- Step 4: If there’s an available update, tap

7. Update Your App
If your system is updated, then Spotify might need an update. The app might malfunction if you’re using an older version. Thus, updating the app might solve the Spotify crashing problem. You can update Spotify by following these steps:
- Step 1: Go to the Play Store.

- Step 2: Search and open Spotify in the Play Store.
- Step 3: Tap Update

8. Free up Storage
Spotify can start crashing if your Android’s storage space is at capacity. That can also cause other apps to crash, not only Spotify. Therefore, check the storage space and free up as much as possible. Follow these steps:
- Step 1: Open
- Step 2: Go to Device Maintenance > Storageor go directly to Storage.

- Step 3: Here, you can see how much of your storage space is available and what’s taking up the most space.

- Step 4: Then, you can go ahead and clear as much space as you can.
9. Reinstall Spotify
There’s another solution if the Spotify app keeps crashing. You can try uninstalling and reinstalling it again on your Android. That will reset the app and might solve your problem. Follow the next steps to reinstall Spotify:
- Step 1: Find the Spotify app on your Android.
- Step 2: Hold the app icon.
- Step 3: Then, press Uninstall.

- Step 4: Press OK.
- Step 5: Then, open the PlayStore and find Spotify.
- Step 6: Tap Installto reinstall the app again.

- Step 7: Once it installs, log in to test if it’s working.
10. Check if Spotify Is Down
If your Spotify keeps crashing and closing, it might not be your device’s problem. Sometimes, Spotify’s server can be down, and many people face the same issue. If that’s the case, you can check with your friends if their Spotify is working or check online if Spotify is down. To do that, follow these steps:
- Step 1: Open your web browser.
- Step 2: Type “Is Spotify down” in the search bar.

- Step 3: You’ll see several websites that check real-time app servers and if they’re down.

- Step 4: Go to one or two and see what they say. If Spotify is down, you’ll need to wait for them to fix the problem.
11. Clear the Cache
When using different apps and websites, your device caches data from those sources. Since there’s no need to pile up your Spotify cache, you can clear it. Follow these steps:
- Step 1: Open Settings.

- Step 2: Go to Apps.
- Step 3: Find Spotify and tap it.

- Step 4: Tap Storageor Storage usage.

- Step 5: Tap Clear Cache.

safe & secure
Conclusion
If your Spotify app keeps crashing, several reasons might be behind it. For instance, your storage space might be at capacity, your system might need an update, your phone might have a software bug, or the Spotify server might be down.
We’ve given you 11 solutions to fix the Spotify crashing problem. However, if your system needs repairing, you can try Wondershare Dr.Fone for quick and easy repair. This solution and all others will surely help you fix the crashing problem.
Want to Uninstall Google Play Service from Vivo X Fold 2? Here is How
In this article, you will learn the pros and cons of uninstalling Google Play services, as well as a free root tool to help you do this.
Acts as a one-stop destination to download various kinds of apps from the Play Store. The Play service also provides a way to manage these apps without much hassle. From uninstalling to updating an app, all of this can be done with Google Play service. Nevertheless, there are times when users wish to uninstall Google Play services. To start with, it takes a lot of storage and makes it pretty tough for users to manage their devices. To help you, we will let you know how to uninstall Google Play Store in this informative post.
Part 1: Reason you might want to get rid of Google Play Service
Before we proceed and discuss different ways on how to update Play Store after uninstalling updates, it is important to cover the basics. We have heard plenty of users who wish to uninstall Google Play services, but are not sure of the repercussions. One of the main reasons is that it consumes a lot of space on phone’s storage. Not just that, it only consumes plenty of battery as well.
If your device is giving the insufficient storage warning, then you need to start by clearing your phone’s data. It is observed that the Google Play Service accumulates most of the data in a device. This leads to users looking for different ways to how to uninstall Google Play Store.
Part 2: What will it affect to uninstall Google Play Service?
If you think that Google Play Service only provides a platform to download new apps, then you are wrong. It provides several other functions that might alter the way you use your smartphone. It is linked with other essential Google services as well, like Google Maps, Gmail, Google Music, etc. After uninstalling the Google Play Service, you might face trouble using various essential apps.
Furthermore, it might tamper with the overall functionality of your device as well. For instance, you could encounter network issues, messaging problems, app crashing, and more. Since the Play Service is closely associated with Android system, it might have a prominent effect on your phone. If you have a rooted device, then you can easily install custom ROM and resolve these issues. Though, for a non-rooted device, overcoming these problems could be a big hurdle.
Part 3: How to disable Google Play Service?
By now, you already know all the repercussions of getting rid of Google Play Services permanently. Before you learn how to update Play Store after uninstalling updates, be sure whether you wish to uninstall Google Play Services or not. You can also choose to simply disable the services as well. If you face any severe issue afterward, then you can always enable the services manually.
To disable the Google Play Services, just go to your phone’s Settings > Applications > All and open Google Play Services. You will get to know about the app’s detail and a few other options here. Just tap on the “Disable” button. It will generate another pop-up message. Confirm it by tapping on the “Ok” button. This will disable Google Play Services on your device. Later, you can follow the same drill to enable it as well.

Now when you know how to uninstall Google Play Store on your device, you can easily customize it. Get rid of any kind of problem you are facing due to lack of storage or battery issues related to Google Play services after following these instructions. Feel free to drop a comment below if you face any setback while following this tutorial.
Also read:
- [New] Top 15 Stabilizers & Platforms for Dynamic GoPro Use for 2024
- [Updated] 2024 Approved Exclusive Movies Behind the Best Chart
- Creating Popular Jujutsu Kaisen TikTok Content for 2024
- How to Fix the Soft Bricked Oppo A58 4G? | Dr.fone
- How to Resolve Vivo T2x 5G Screen Not Working | Dr.fone
- How To Revive Your Bricked Realme C55 in Minutes | Dr.fone
- How To Revive Your Bricked Xiaomi 13 Ultra in Minutes | Dr.fone
- Maximizing Your Mac Preview Experience Step-by-Step
- Title Genius A Comprehensive Guide for 2024
- Title: How To Restore a Bricked Vivo X Fold 2 Back to Operation | Dr.fone
- Author: Abel
- Created at : 2024-12-30 21:18:23
- Updated at : 2025-01-03 17:16:48
- Link: https://fix-guide.techidaily.com/how-to-restore-a-bricked-vivo-x-fold-2-back-to-operation-drfone-by-drfone-fix-android-problems-fix-android-problems/
- License: This work is licensed under CC BY-NC-SA 4.0.