
:max_bytes(150000):strip_icc():format(webp)/coverjointwitter-6f13b51d1be04d8bb3f5221ef5a057c7.jpg)
How To Restore a Bricked Vivo Y78+ Back to Operation | Dr.fone
How To Restore a Bricked Vivo Y78+ Back to Operation
In moments of lag or freezing on your Android, you might brick Your Vivo Y78+, which can be unsettling. This is more than just the loss of a device. A bricked cell phone also involves potential data erasure. Yet, it’s crucial to understand the true implications of a bricked phone. This page tackles how to address the issue of a bricked Android phone.
This comprehensive guide aims to the reasons behind Android phones becoming bricked. By reading below, you’ll learn effective methods to unbrick a mobile phone without the risk of data loss.

Part 1. What are Brick Phones: At a Glance
The term “bricked phone“ is used when a device becomes non-functional. This is typically due to a critical software or firmware error. There are two distinct scenarios for encountering a bricked phone: a soft brick and a hard brick.
- Soft Brick. A soft brick entails a phone that’s not operational due to software glitches or conflicts but is not irreparable.
- Hard Brick.A hard brick signifies a more dire situation. This is where the phone becomes inoperable, resembling an actual brick in terms of functionality.
The Common Causes of a Cell Phone Bricking
Below are the common causes why a cell phone bricks.
Failed Updates
When a firmware or system update fails, it can lead to a bricked phone. Updates involve intricate changes to the phone’s software. If interrupted or incompatible, the Vivo Y78+ device may get stuck in a state of partial functionality. This can result in a soft brick.
Failed Flashing
Flashing involves installing custom firmware or software onto a device. If the flashing process is interrupted or if the firmware used is not compatible with the Vivo Y78+ device’s hardware, it can cause a hard brick. The device’s essential software components may become corrupted, rendering the phone unusable.
Rooting
Rooting, which grants users superuser access to their device’s OS, can lead to bricking if not done right. Rooting often involves making deep system changes, and errors can disrupt the phone’s core functionality.
Installing Bad Apps
Installing malicious, incompatible, or poorly coded apps can lead to a soft brick situation. In severe cases, they can trigger a boot loop or render the phone unresponsive.
Others
Several less common factors can also contribute to bricking. Overclocking, attempting to modify the bootloader, or tampering with system files can lead to disastrous consequences. Hardware issues, such as faulty memory or battery problems, might also manifest as bricked devices.
Part 2. Unbricking Methods and Tools
Below are solutions that you can employ to fix various brick phone scenarios.
Reverting Android Device to Factory Defaults (Soft Brick)
A universal approach to trying to recover a brick phone exists for all Android phones. This is, consider restoring your device to its factory settings. You can find instructions specific to your phone model online. Although this procedure erases all your data, it’s possible to regain the use of your brick phone.
Get in Touch With the Manufacturer (Hard Brick and Soft Brick)
Normally, smartphone warranties span from 1 to 2 years. If your phone remains unrooted and falls within that coverage period, consider reaching out to the manufacturer. This direct approach could lead to your phone being repaired or replaced with a new one at no cost to you.
Seek Professional Assistance (Hard Brick and Soft Brick)
When your phone falls outside the warranty coverage, consider seeking help from a reputable repair shop. However, be aware that any lost data cannot be attributed to their efforts. Fortunately, you can recover lost data using reliable data recovery software once your phone is operational again.
Use a Dedicated App To Fix Bricked Mobile Phones (Hard Brick and Soft Brick)
Among the array of tools designed for unbricking and recovery, one standout is Wondershare Dr.Fone - System Repair (Android). With an exceptional recovery rate, it stands out as one of the top contenders for data retrieval. Its performance is notable when applied to modern brick phones, making it a highly effective choice for these devices.
Part 3. Unbricking Mobile Phones With Dr.Fone - System Repair (Android)
Dr.Fone - System Repair (Android) empowers you to resolve a range of prevalent Android problems. This Android repair tool eliminates the need to hunt for suitable firmware to flash your phone. By utilizing Dr.Fone – System Repair (Android), you can recover data on Your Vivo Y78+ with a few clicks.

 safe & secure
4,039,461 people have downloaded it
Key Features
Below are some of the standout features of Dr.Fone - System Repair (Android)
Address Android Challenges Like a Professional
From common scenarios like black screens and boot loops to even bricked Android devices, this tool has you covered. Dr.Fone has simplified the process so that anyone can fix Android problems.
Support for Over 1000 Android Models
This software is designed to fix glitches including most modern Android devices. Whether your Vivo Y78+ is an unlocked variant or tied to carriers, you can restore it back to normal in just a matter of minutes.
Trial Access at No Cost
Dr.Fone - System Repair (Android) offers free access for you to test the initial steps and verify device compatibility. This cost-effective feature ensures value for money every step of the way.
Main Advantages of Using Dr.Fone – System Repair (Android)
Dr. Fone – System Repair (Android) is a great solution with numerous tools to help you manage your Vivo Y78+ in various ways. Here are some of the advantages of using the app for fixing bricked phones.
- Fone – System Repair (Android) comes with a clean UI making navigation and usage easy. The user-friendly design offers a seamless experience for beginners and professionals alike.
- Utilizing the app for system repair is an effortless and speedy process. It doesn’t take up much time to revive your bricked phoneso you can use it right away.
- The System Repair toolkit only needs you to click on a few buttons. Combined with its clean UI and speedy process, using the app is a breeze.
Part 4. How To Revive a Bricked Phone Using Dr.Fone – System Repair (Android)
Below are the steps to recover data on a bricked mobile phone.
- Step 1: Download and install Dr.Fone – System Repair (Android) on your computer. Launch the app and select System Repair. Next, choose Select Android as the Vivo Y78+ device type. Then, connect to your Vivo Y78+. Choose Phone Brick as the Android problem and click Start.

- Step 2: Select the correct device information. Choose the Brand, Name, Model, Country, and Carrier. Tick the box next to I agree button and click Next to proceed to the next step.

- Step 3: Click on the Phone with Home button or Phone without Home button depending on your device. Follow the on-screen instructions and click Next to proceed with reviving your brick phone.

- Step 4: Once the Vivo Y78+ device enters Download Mode, the firmware will automatically start downloading. Follow the on-screen prompts and wait for the system to initiate the repair process. Once it concludes, the completion message will appear on the main window. Click Done to close the tool or click Try again to repeat the process.

safe & secure
4,311,328 people have downloaded it
Conclusion
Fixing a bricked phone may seem daunting, but solutions are within reach. This page explained the distinctions between soft and hard brick scenarios. It also identified common causes and revealed effective methods for unbricking.
Among these, Dr.Fone – System Repair (Android) emerges as a dependable ally. The tool offers a comprehensive toolkit for recovery and data rescue. The power to reclaim lost data lies in your hands. Act, follow the methods outlined, and recover your brick phone.
How To Unbrick a Dead Vivo Y78+

Discovering your phone died, especially among Vivo Y78+ models, can be disheartening. Looking online for ways to unbrick your Oneplus 8T can take up so much of your time. The unavailability of your device can disrupt your routine and connectivity. However, unbricking is the crucial solution to regain the functionality of your Vivo Y78+ device.
This guide teaches effective methods to unbrick your Vivo Y78+. The page will also discuss the early warning signs and healthy habits to prolong your Vivo Y78+. Read below to learn more.
Part 1. Early Warning Signs of a Hard-bricked One Plus Device
When a phone “bricks,” the Vivo Y78+ device becomes completely unusable and non-functional. It essentially turns into a “brick.” A bricked Vivo Y78+ device can be preceded by certain warning signs that you should be attentive to. Here are some of them below.
- **Corrupted Device and Boot Failures.**If your Vivo Y78+ freezes or fails to boot up properly, it can indicate underlying software issues that might lead to bricking.
- **Inability to Enter Fastboot Mode.**If you find it increasingly challenging to access the fastboot mode, it could signify impending trouble.
- **Consistent Black Screens.**Experiencing recurring black screens could indicate problems within the operating system. In the long run, this might escalate to bricking.
- **Unexpected Reboots and Crashes.**Frequent and unprovoked reboots, app crashes, and system instability might point toward software inconsistencies. Similar to consistent black screens, this could eventually lead to bricking.
Common Reasons for Your Vivo Y78+ Phone To Be Bricked
Understanding the factors that can trigger bricking in Vivo Y78+ devices is essential for preventing such scenarios.
Failed Updates or Interrupted Installations
When a firmware update is interrupted due to power loss, sudden device shutdown, or other disruptions, it can result in incomplete software installation and potential bricking.
Unauthorized User Modifications
Engaging in root access, flashing custom ROMs, or applying unsupported system modifications can destabilize the Vivo Y78+ device’s software, paving the way for bricking.
Incorrect Bootloader Unlocking
Mishandling the process of unlocking the bootloader, a crucial step for customization can lead to system inconsistencies and eventual bricking.
Compatibility Issues With Custom Software
Installing unofficial custom software, such as custom recoveries or third-party kernels, might not be compatible with the Vivo Y78+ device’s hardware or official software. That can cause conflicts that can lead to bricking.
Malware or Virus Infiltration
The presence of malicious software can cause significant disruptions to the Vivo Y78+ device’s functioning. It can lead to bricking if left unchecked.
Part 2. How To Unbrick One Plus Device Using Various Methods
The solutions below to unbrick your Oneplus are helpful methods to revive your device. Here’s an overview of these methods.
Method 1. Restore With Recovery Mode
Restoring using Recovery Mode can solve most problems that cannot be solved with a normal phone restart. Here’s how.
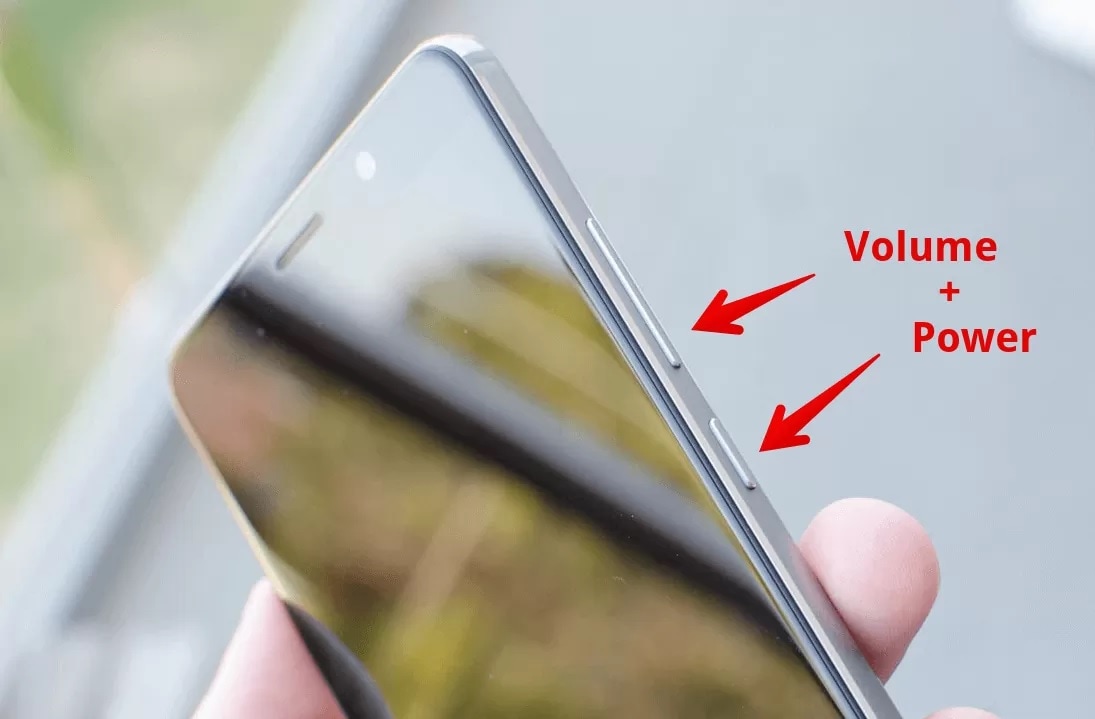
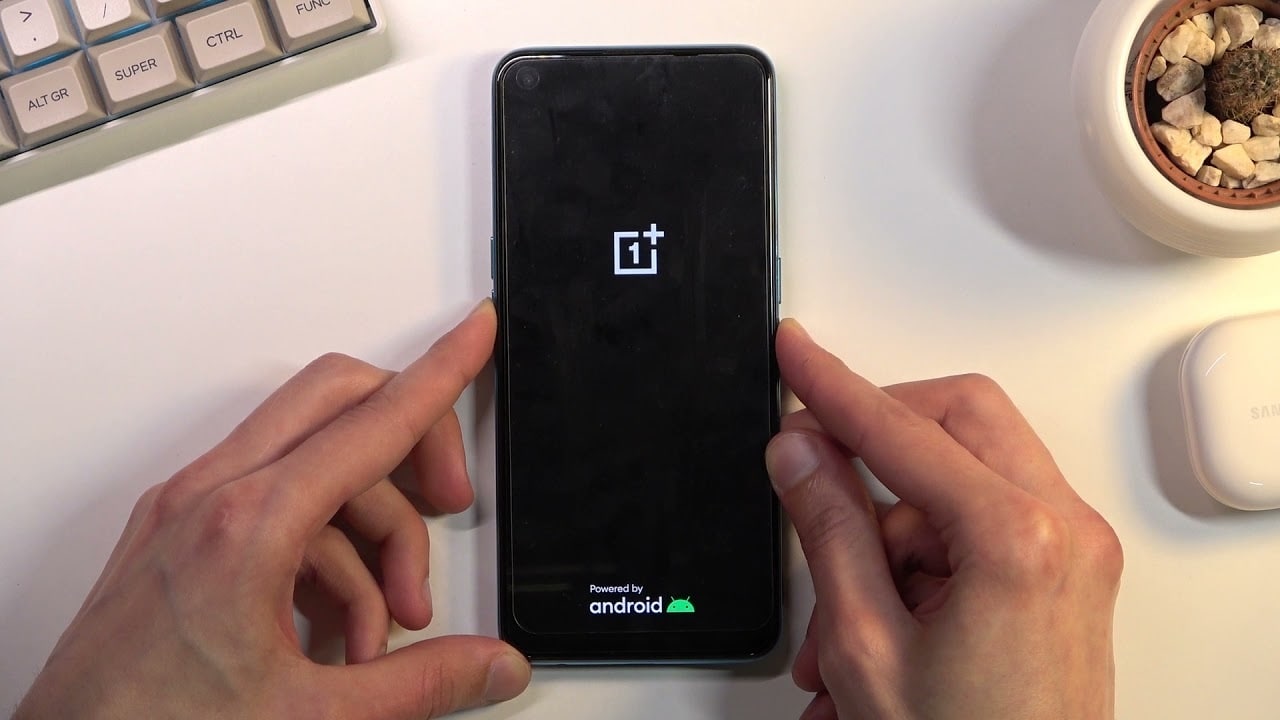
- Step 1: Turn off your Vivo Y78+ device. Press and hold the Power button and Volume Down until the Vivo Y78+ logo is displayed.
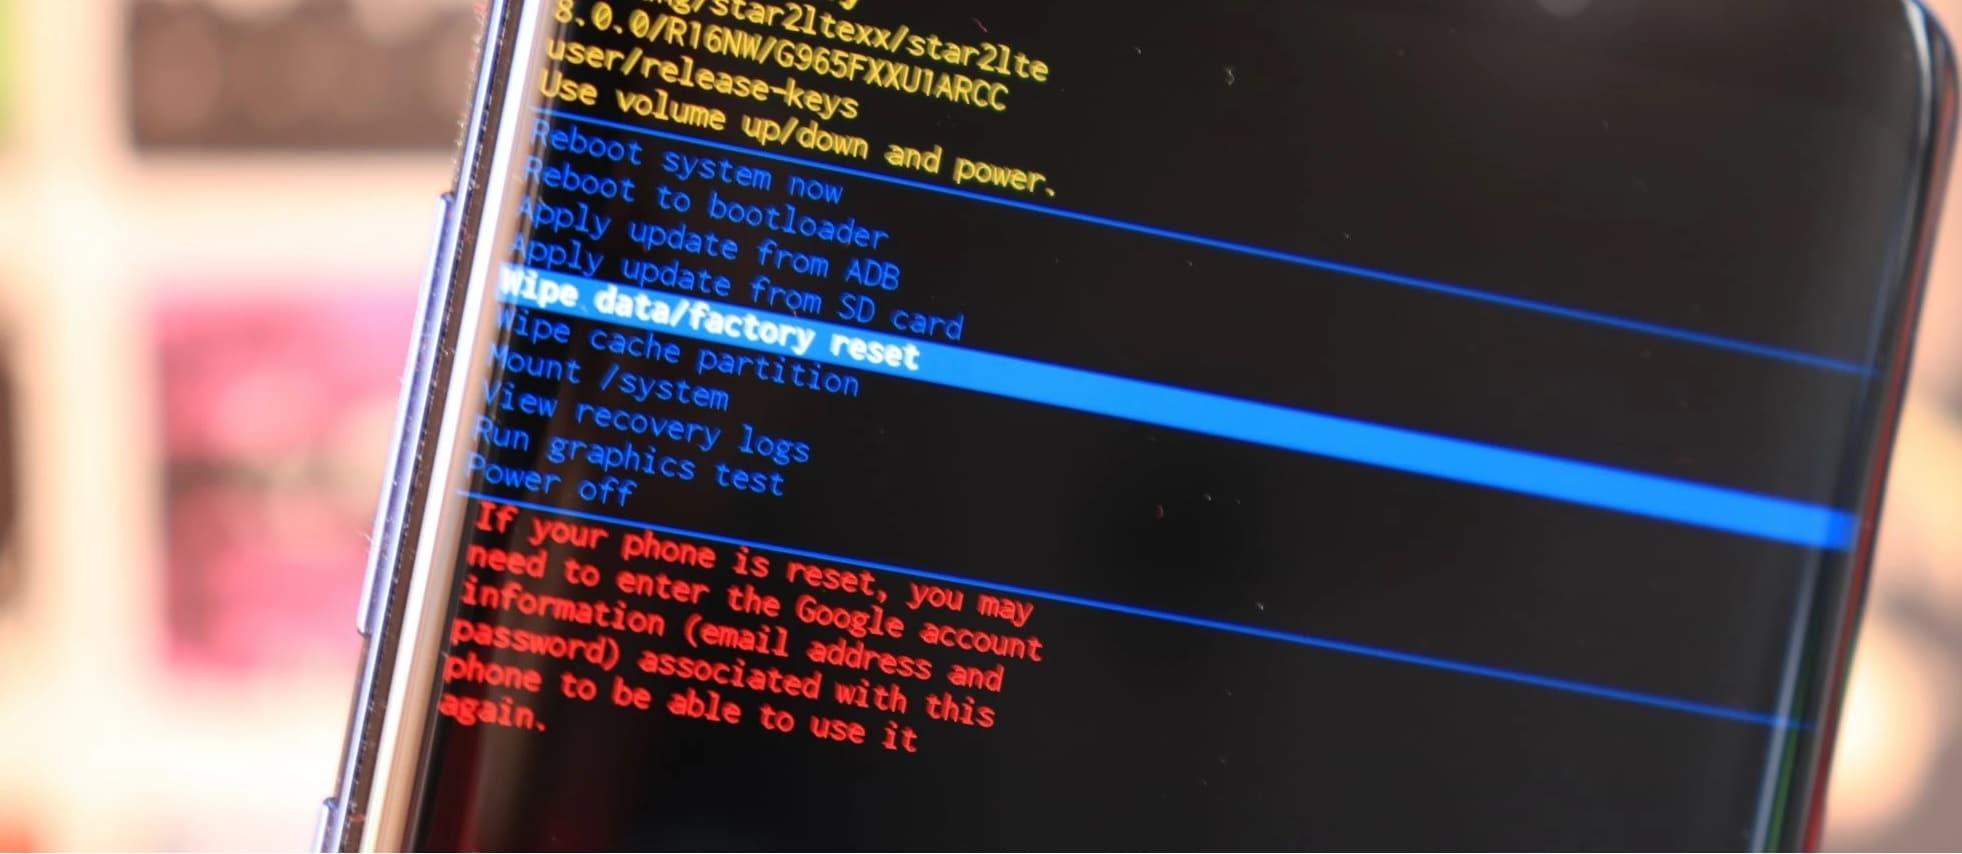
- Step 2: Move through the menu using the Volume Up and Volume Down buttons until you reach Recovery Mode. Press the Power button to choose it.
- Step 3: Select the Wipe data/factory reset option. Choose Yes to proceed and wait for the process to finish. Choose Reboot system now to see the results.
Method 2. Contact the Manufacturer
Engaging Vivo Y78+’s official support can provide insights and potential solutions. This is advantageous if your device is under warranty.
Method 3. Professional Repair Shops
Certified repair shops have the expertise to diagnose and address bricking issues, offering tailored solutions.
Method 4. Software Tools
Leveraging specialized software tools like Wondershare Dr.Fone - System Repair (Android) simplifies the process, even for non-technical users.
Part 3. Healthy Habits To Consider To Prolong Your One Plus
Maintaining the longevity of your Vivo Y78+ device requires adopting proactive habits. Here are vital tips to consider.
- **Regular Software Updates.**Keep your Vivo Y78+ up to date with the latest firmware releases. These updates often include security patches, bug fixes, and feature enhancements contributing to overall device stability.
- **Battery Care.**Avoid frequent deep discharges and overcharging. Use original charging accessories and refrain from exposing the Vivo Y78+ device to extreme temperatures.
- **App Management.**Review and uninstall apps you no longer use. This reduces clutter and conserves system resources, promoting smoother device operation.
- **Cache and Storage Cleanup.**Clear app caches and delete unnecessary files from your device. It optimizes storage space and prevents sluggishness caused by excessive data accumulation.
- **Screen Protection.**Apply a screen protector and sturdy phone case to shield your device from scratches, cracks, and impacts. This safeguards the physical integrity of your Vivo Y78+.
- **Safe Charging Practices.**Avoid using your device while charging, as this generates excess heat. Also, refrain from using non-certified chargers, which can harm the battery and device components.
- **Avoid Overloading the Vivo Y78+ device.**Limit multitasking and avoid running too many apps simultaneously. This minimizes strain on the Vivo Y78+ device’s RAM and processor, ensuring smoother performance.
- **Privacy and Security.**Implement robust, unique passwords and enable biometric authentication methods. Regularly review app permissions to enhance data privacy.
Tips: Unlock Your One Plus 6, 8T, or 10 Pro With Dr.Fone - Screen Unlock (Android)
Dr.Fone - Screen Unlock (Android) is powerful software designed to unlock Vivo Y78+ devices quickly. This tool is compatible with various Vivo Y78+ models, including the Vivo Y78+ 6, Vivo Y78+, and Vivo Y78+ 10 Pro, ensuring a wide support reach.
![]()
Dr.Fone - Screen Unlock (Android)
Unlock Vivo Y78+ Without Password
- Unlock your Vivo Y78+ quickly and securely
- Easily remove passwords and screen locks of all types
- Enjoy a streamlined experience with no technical background required
- Feel confident with solutions backed by a high success rate
3,016,652 people have downloaded it
How To Unlock Your One Plus With Dr.Fone - Screen Unlock (Android)
Below is a guide on unbricking the Vivo Y78+ models using Dr.Fone - Screen Unlock (Android).
Step 1: Access Screen Unlock > Android
Navigate to the Screen Unlock section and select Android. Proceed by clicking on the Unlock Android Screen option.

Step 2: Choose Your Device Brand and Initiate Data Wipe
Identify your device brand for unlocking the screen. After selecting your device brand, you will be prompted to enter a specific mode. Once in this mode, Dr.Fone will commence the Android screen unlock process.

Step 3: Successful Screen Unlock
Allow the unlock process to run its course. If unsuccessful, click ‘Try Again’ for a second attempt. Upon successful screen unlock, click ‘Done’.

 safe & secure
You May Also Like:
How To Fix iPhone Bricked After iOS 17/iOS 16/iOS 15 Update
iPhone Got Bricked? Here Is The Real Fix To Unbrick It!
How to Fix It If Your Vivo Y78+ Phone Got Bricked?
How to Fix the Soft Bricked Android Phone?
Conclusion
For Vivo Y78+ owners, your device’s revival rests in your hands. By embracing the abovementioned methods, you can reclaim your device from its bricked state. Act decisively to unbrick your Vivo Y78+ device and relish its seamless performance again.
For those who find themselves locked out of their Vivo Y78+ devices, there’s a reliable solution at your fingertips. Try Dr.Fone - Screen Unlock (Android) to regain access to your device swiftly and securely.
safe & secure
Authentication Error Occurred on Vivo Y78+? Here Are 10 Proven Fixes
There are times when users get an authentication error while they connect to a Wifi network. The problem is mostly found in Android whenever a device tries to establish a connection to Wifi. If your device is also experiencing an authentication problem Wifi, then don’t worry. It can easily be resolved. In this post, we will make you familiar with the root cause for the Vivo Y78+ Wifi problem and how you can resolve whenever authentication error occurred on your device.
Part 1: Any idea about the Wi-Fi authentication problem?
Wi-Fi authentication has to be done every time you wish to connect to a Wi-Fi network over your smartphone or laptop. To authenticate yourself and connect to the protected Wi-Fi network, you need to have the password of it. But if after you’re putting in the correct password and still experiencing the wifi authentication problem. Here’s what you need to know.
Authentication error occurs when the “deal” between the Wi-Fi router and device fails due to certain reasons. First, the Vivo Y78+ device sends the password of the network and the “connect” request in an encrypted format to the Wi-Fi router. Then, the router decrypts the password and compares the password saved on it. Now, if the password matches, it sends affirmation for the “connect” request, and then the Vivo Y78+ device is allowed to connect to the network.
Part 2: Why Authentication Error Occurred when Connecting to Wifi?
There could be plenty of reasons for facing an authentication error on your device. Most of the time, it occurs whenever a Wifi router seems to malfunction. Furthermore, if your phone has been recently updated, then chances are that there could be an issue with its drivers. A security attack can also make your device malfunction as well. An unstable connection or a router blockage can also be a reason for this issue.
In this scenario, whenever you try to connect to a Wifi network (even after supplying the correct password and username), it doesn’t connect to it. Instead, it displays an authentication error occurred promptly. Thankfully, there are plenty of ways to overcome the authentication problem Wifi. In the next section, we have provided three different solutions to fix the Vivo Y78+ Wifi problem (as it mostly happens on Android devices).
Part 3: 10 Solutions to Fix Wifi Authentication Error
Before we make you familiar with different fixes for the Wifi authentication error, it is important to check your router beforehand. Chances are that you could be getting the authentication error because your router is not functioning properly. You can restart it and try to connect any other device to it as well to check it. After making sure that there is no problem with your network or router, follow these suggestions to overcome the authentication error occurred issue.
Check if extra characters added in Wi-Fi password
Ensure that no other extra characters are being added in the Wi-Fi password while you’re entering it. Key in the password carefully while viewing the characters, and then check if the authentication error occurs or not.
One-Click to Fix Wifi Authentication Error by Android System Repair
Android system repair is considered the most effective way to fix Wifi Authentication Error. As the bottom-layer Android system files may be corrupted unconsciously with days of phone use, the Wifi Authentication Error may be one of the symptoms.
So Android repair requires programming knowledge to do it?
No! With Dr.Fone - System Repair (Android), you can do Android repair in just a few steps and get all issues like Wifi Authentication error fixed easily.
Dr.Fone - System Repair (Android)
An easy-to-operate tool to fix Android system issues like a Wifi authentication error
- Fixes all Android system issues like a black screen of death, Wifi authentication error, etc.
- One-click to fix the Wifi authentication error. No technical skills required.
- Supports all the new Vivo Y78+ devices like Galaxy S8, S9, etc.
- Easy-to-follow instructions provided on each of the screens.
3981454 people have downloaded it
Here are the steps to fix Wifi Authentication Error by Android system repair:
Note: Android repair is effective to permanently fix Wifi Authentication Error, but may wipe out the existing phone data. Backup all the important Android data to PC before you go on.
- After the Dr.Fone tool is downloaded, install, and launch it. You can see the following screen.

- Connect your Vivo Y78+ to the computer, and select “Android Repair” in the middle.
- Select all the details that match your device, and click “Next”.
- Next up, you should boot your Vivo Y78+ in download mode by following the on-screen instructions.
- Allow the program to download the corresponding firmware. After that, the Android repair will start and get the Wifi Authentication Error fixed in minutes.

Use static IP address instead of DHCP
DHCP, or Dynamic Host Configuration Protocol is the default IP address assignment for the Wi-Fi settings on many devices. Whereas DHCP can cause IP address conflict during the dynamic IP address assignment. So, you’d better change “DHCP” to “Static” to see if the authentication error persists.
Step 1: Head to the “Settings” of your Vivo Y78+ and then opt for “Wireless and Networks” followed by “WLAN/WiFi”.
Step 2: Now, hit on the WiFi network that is showing “authentication error occurred”.
Step 3: Depending on your Vivo Y78+ model, look for “IP Settings” and tap on it. Now, switch the “DHCP” to “Static”.
Step 4: Note down the static IP address fields and wipe off all the fields. Punch it in again and then save it.

Check carefully for duplicate Wi-Fi names before you connect
Perhaps, you might connect to a WiFi with a similar name. There are good chances that some users do not modify their WiFi network name and possibly, your neighbor may have the same WiFi network, service provider. Therefore, ensure you connect to the correct WiFi network.
Reset the Wifi network
One of the easiest ways to fix the authentication problem of Wifi is to reset the network. To do this, you would be required to forget the respective network first and then connect to it again. This can be done by simply following these steps.
1. Firstly, you need to forget a Wifi network. To do it, go to your phone’s Settings > WiFi and network. From here, you can see a list of all the Wifi hotspots that your phone connects to. Select the network you wish to forget.

2. When you would select a network, it will provide the basic information related to it. Just tap on the “Forget” button and agree to the pop-up message. This will erase the network’s information from your device.

3. Afterward, turn on your Wifi again and tap to the network you wish to connect to. Simply provide the credentials and tap on the “Connect” button to reestablish the connection. This way, you can reset the network successfully.

Modify network connection
If the above solution won’t work, then you would be required to walk the extra mile to fix the Vivo Y78+ Wifi problem. After you reset a network connection, if still getting issues regarding the authentication of the network, you need to modify the connection. In this technique, you will be changing the IP settings on your phone to alter the way it establishes a secure connection. You can do it by following these steps.
1. To start with, visit your phone’s Settings and open the Wifi page.

2. This will display a list of all the Wifi networks that are associated with your device. Just long-tap on the Wifi network that you wish to modify. It will open another pop-up window. From here, tap on the option of “Manage network settings”. Sometimes, users also get an option of “Modify network settings” here as well. Simply select it to proceed.

3. It will display basic information related to your Wifi network. Just tap on the “Show advanced options” button to access more options related to the network setting.

4. From the IP Settings menu, change the field from DHCP to Static. This will let you establish a static connection between your device and the router.

5. As soon as you will change it to static, you will get different fields related to your network’s IP address, gateway, DNS, and more. Simply fill these fields and tap on the “Save” button once you are done.

Now, try to connect to the Wifi hotspot again. You would be able to overcome the authentication problem of Wifi.
Change Network Security Type
It has been observed that, when we connect to Wifi, our device chooses a wrong security type. This clashes with the default security protocol of the router and authentication error occurred due to this. If your device is facing the same issue, then it can be fixed by simply changing its security type. To do this, follow these instructions:
1. To change the security type of a network, you need to “Add the network”. If you already have the Wifi network saved, then simply forget the network by following the above-mentioned tutorial.
2. Now, turn on your device’s Wifi and tap on the option of “Add network”. Here, you would be asked to give a network name and select the security type. To manually select it, tap on the “Security” option.

3. From here, you will get a list of various security protocols that you can pick. Select “WPA/WPA2-PSK” and save your selection.

Now, try to connect to the network again. Most likely, it will let you fix the authentication error on your device.
Update Android firmware to the latest
There are instances where an outdated OS version of your Vivo Y78+ may create a hindrance in establishing a connection between your device and the WiFi network. You need to update your Android firmware to the latest version and then check if the problem persists or not.
Step 1: Launch “Settings” of your Vivo Y78+ and then get into the “About Phone” option.
Step 2: Now, opt for the “System Update” option. If the update is available, get your device updated to the latest OS version.
Restart the router and reset Android network settings
Sometimes, the WiFi router may hang up while establishing a connection and therefore, the wifi authentication problem occurs. Try restarting your Wi-Fi router and then check if your device connects successfully. If this doesn’t work, try to reset your Android Network Settings .
Bonus tip: Turn Airplane mode on/off
By simply turning on the Airplane mode (and later turning it off), you can easily fix the authentication problem Wifi most of the time. You can find a toggle button for Airplane mode on the notification bar of your phone. If you can’t find it there, then go to your phone’s Settings > Connection > More Networks and turn on the feature of “Airplane Mode”.

Let it do for a while. Afterward, turn it off and try to connect to the Wifi network again.
After following these quick and easy suggestions, you would be able to fix the Vivo Y78+ Wifi problem for sure. Even if you use any other Android device, then its authentication error can easily be resolved after these effective solutions. Go ahead and give these expert solutions a try and let us know about your experience as well. If you have any other solution to fix the authentication problem Wifi, then share it with us as well in the comments.
Also read:
- Spotify Keeps Crashing A Complete List of Fixes You Can Use on Nokia C300 | Dr.fone
- Strategies for Apps That Wont Download From Play Store On Realme GT 5 Pro | Dr.fone
- Proven Ways to Fix There Was A Problem Parsing the Package on Samsung Galaxy A25 5G | Dr.fone
- How to Resolve Tecno Spark 10 5G Screen Not Working | Dr.fone
- In 2024, 10 Best Fake GPS Location Spoofers for Realme GT 5 Pro | Dr.fone
- How to Fix the Soft Bricked Oppo K11 5G? | Dr.fone
- Itel A70 Camera Not Working Unexpected Error? Fix It Now | Dr.fone
- Samsung Galaxy M14 5G Bootloop Problem, How to Fix it Without Data Loss | Dr.fone
- How to Quickly Fix Bluetooth Not Working on Motorola Moto G23 | Dr.fone
- How To Unbrick a Dead Oppo Reno 10 Pro+ 5G | Dr.fone
- Poco M6 5G Camera Not Working Unexpected Error? Fix It Now | Dr.fone
- In 2024, 10 Best Fake GPS Location Spoofers for Vivo Y56 5G | Dr.fone
- Play Store Stuck on Downloading Of Xiaomi Redmi Note 12 Pro+ 5G? 7 Ways to Resolve | Dr.fone
- Reasons for Vivo Y56 5G Stuck on Boot Screen and Ways To Fix Them | Dr.fone
- Infinix Note 30i Stuck on Screen – Finding Solutions For Stuck on Boot | Dr.fone
- How to Resolve Vivo Y02T Screen Not Working | Dr.fone
- My Videos Arent Playing on Motorola Edge 40 Neo – What Can I Do? | Dr.fone
- How To Revive Your Bricked Nokia G22 in Minutes | Dr.fone
- Strategies for Apps That Wont Download From Play Store On Motorola Moto G84 5G | Dr.fone
- Restore Missing App Icon on Tecno Camon 20 Pro 5G Step-by-Step Solutions | Dr.fone
- Spotify Keeps Crashing A Complete List of Fixes You Can Use on Nokia C12 | Dr.fone
- How To Fix Unresponsive Phone Touchscreen Of Itel P55T | Dr.fone
- How to Quickly Fix Bluetooth Not Working on Motorola Moto G04 | Dr.fone
- How to Fix It Samsung Galaxy F04 Wont Turn On | Dr.fone
- Quick Fixes for Why Is My Motorola Moto G04 Black and White | Dr.fone
- Oppo Find X6 Pro Stuck on Screen – Finding Solutions For Stuck on Boot | Dr.fone
- Strategies for Apps That Wont Download From Play Store On Itel A60 | Dr.fone
- How To Fix Unresponsive Phone Touchscreen Of Xiaomi Redmi Note 12T Pro | Dr.fone
- How To Fix Part of the Touch Screen Not Working on OnePlus Nord 3 5G | Dr.fone
- OnePlus Ace 3 Stuck on Screen – Finding Solutions For Stuck on Boot | Dr.fone
- How to Fix the Soft Bricked Samsung Galaxy M14 5G? | Dr.fone
- How to Fix the Soft Bricked Xiaomi 14 Pro? | Dr.fone
- Restore Missing App Icon on Poco X6 Pro Step-by-Step Solutions | Dr.fone
- How To Activate and Use Life360 Ghost Mode On Honor Magic 5 | Dr.fone
- How to Quickly Fix Bluetooth Not Working on Motorola Moto G73 5G | Dr.fone
- In 2024, Why Your WhatsApp Live Location is Not Updating and How to Fix on your Itel P55 | Dr.fone
- How to Change/Add Location Filters on Snapchat For your Infinix Note 30i | Dr.fone
- How To Unbrick a Dead Xiaomi Redmi K70E | Dr.fone
- How To Fix Unresponsive Phone Touchscreen Of Realme C51 | Dr.fone
- Spotify Keeps Crashing A Complete List of Fixes You Can Use on Samsung Galaxy A15 5G | Dr.fone
- How to Quickly Fix Bluetooth Not Working on Poco C55 | Dr.fone
- How to Flash Dead Itel A05s Safely | Dr.fone
- Play Store Not Working On Honor X9b? 8 Solutions Inside | Dr.fone
- Samsung Galaxy F04 Bootloop Problem, How to Fix it Without Data Loss | Dr.fone
- How To Use Special Features - Virtual Location On OnePlus 11R? | Dr.fone
- Complete Guide on Unlocking Apple iPhone X with a Broken Screen? | Dr.fone
- Wondering the Best Alternative to Hola On Asus ROG Phone 7 Ultimate? Here Is the Answer | Dr.fone
- Does Moto G04 has native MOV support?
- How does the stardust trade cost In pokemon go On Apple iPhone 6? | Dr.fone
- 9 Quick Fixes to Unfortunately TouchWiz has stopped Of Infinix Note 30 VIP Racing Edition | Dr.fone
- In 2024, Unlock Xiaomi 14 Ultra Phone Password Without Factory Reset Full Guide Here
- In 2024, Will Pokémon Go Ban the Account if You Use PGSharp On OnePlus Nord CE 3 5G | Dr.fone
- Ultimate Guide from iPhone 6s iCloud Activation Lock Bypass
- In 2024, How to use Snapchat Location Spoofer to Protect Your Privacy On Oppo A1 5G? | Dr.fone
- New In 2024, 5 Different Animation Styles A Simple but Complete Guide
- How to Fix iPhone XR Passcode not Working?
- 11 Ways to Fix it When My Oppo Reno 11 Pro 5G Wont Charge | Dr.fone
- In 2024, Step-by-Step Tutorial How To Bypass Tecno Phantom V Fold FRP
- How To Transfer Data From iPhone 6 To Other iPhone 11 Pro Max devices? | Dr.fone
- How to Soft Reset ZTE Nubia Z60 Ultra phone? | Dr.fone
- How to Fix Realme C33 2023 Find My Friends No Location Found? | Dr.fone
- In 2024, Can I use iTools gpx file to catch the rare Pokemon On Samsung Galaxy F54 5G | Dr.fone
- Title: How To Restore a Bricked Vivo Y78+ Back to Operation | Dr.fone
- Author: Abel
- Created at : 2024-05-19 03:59:03
- Updated at : 2024-05-20 03:59:03
- Link: https://fix-guide.techidaily.com/how-to-restore-a-bricked-vivo-y78plus-back-to-operation-drfone-by-drfone-fix-android-problems-fix-android-problems/
- License: This work is licensed under CC BY-NC-SA 4.0.
