
How To Revive Your Bricked Nokia C12 Pro in Minutes | Dr.fone
How To Revive Your Bricked Nokia C12 Pro in Minutes
Nokia C12 Pro has established a notable presence within the custom development arena. This trait holds for Nokia C12 Pro. Today, it’s still one of the most popular budget smartphones available. The popular smartphone offers the freedom to flash custom ROMs, attain administrative privileges, access countless customization options, and much more.
Yet, delving into these capabilities comes with its share of risks. The potential for your Nokia C12 Pro to brick is high if you don’t know what you’re doing. This page teaches you how to unbrick your Nokia C12 Pro if it happens.
Part 1. Potential Causes of a Nokia C12 Pro Becoming Bricked
The factors that lead to your Nokia C12 Pro to brick vary. The possible solutions also depend upon the underlying causes. At times, the manufacturer’s intervention remains the only viable remedy. Below are the most frequent causes of bricking.
- The presence of malicious malware can harm your Nokia C12 Pro. This can result in a ‘bricked’ state devoid of functionality.
- Altering the bootloader, system partition, or other critical software components risks triggering a bricking event.
- Bricking can also occur due to errors during the update process. Whether through automatic or manual downloads, any interruption during software updates can cause your Nokia C12 Pro to brick.
- Using inappropriate methods when performing root access can also result in bricking. Performing root access is dangerous as it grants entry to the Nokia C12 Pro device’s root directory housing the operating system.
Every Android device is susceptible to experiencing a system failure that leads to a bricked state. The risk remains consistent whether your device is from Nokia C12 Pro, Nokia C12 Pro, Nokia C12 Pro, or any other brand. That’s why it’s strongly advised against modifying their smartphones, especially when you don’t know what you’re doing.
Part 2. Techniques To Unbrick a Nokia C12 Pro
When faced with a bricked Nokia C12 Pro, below are various techniques to revive it. Whether through software resets or hardware interventions, these methods can help breathe life back into your device.
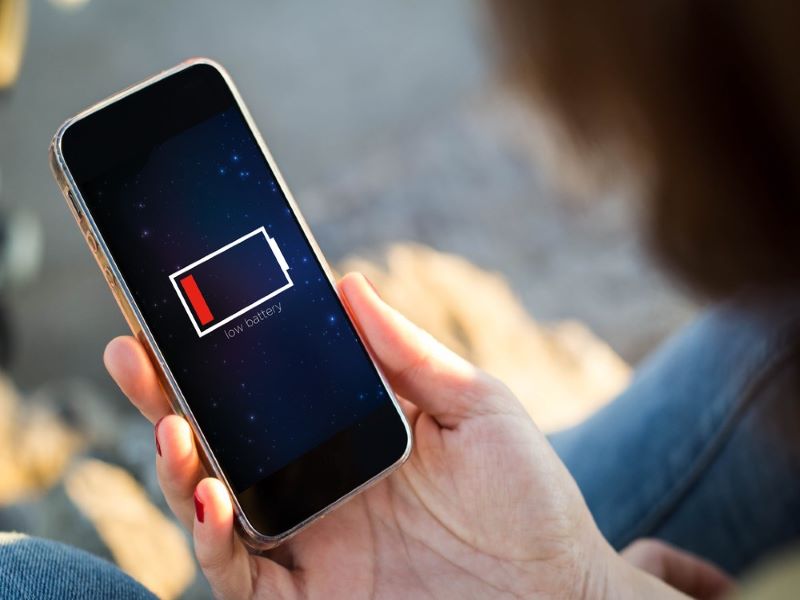
Discharge the Battery
A particular suggestion involves allowing the Nokia C12 Pro device’s battery to discharge fully, enabling proper functionality of the Flash Tool software. This process typically spans a few days and is recommended by some specialists.
Perform a Factory Reset
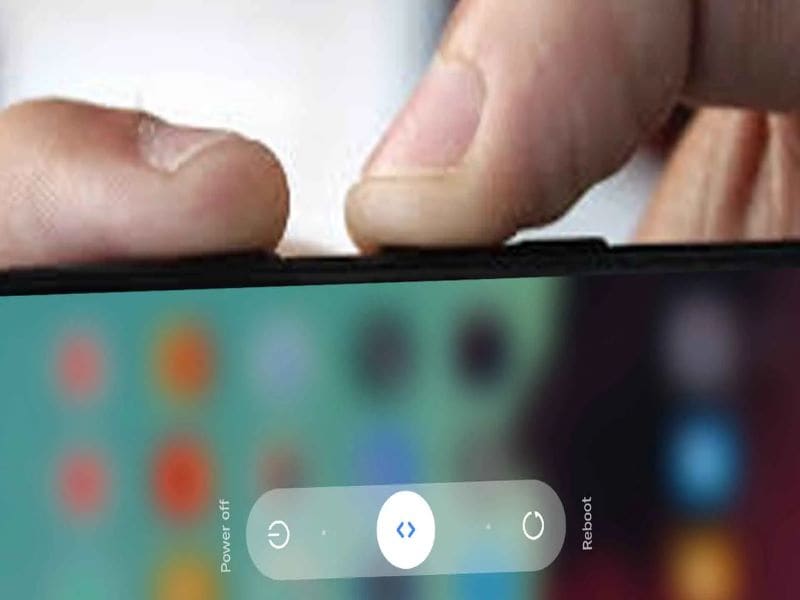
Accessing the Nokia C12 Pro device settings is impossible if your Nokia C12 Pro bricks. For this reason, it is recommended to enter Recovery Mode. Here’s how.
- Step 1: Press and hold the Power button and select the Restart option. During the reboot, press the Volume Up and Power keys simultaneously.
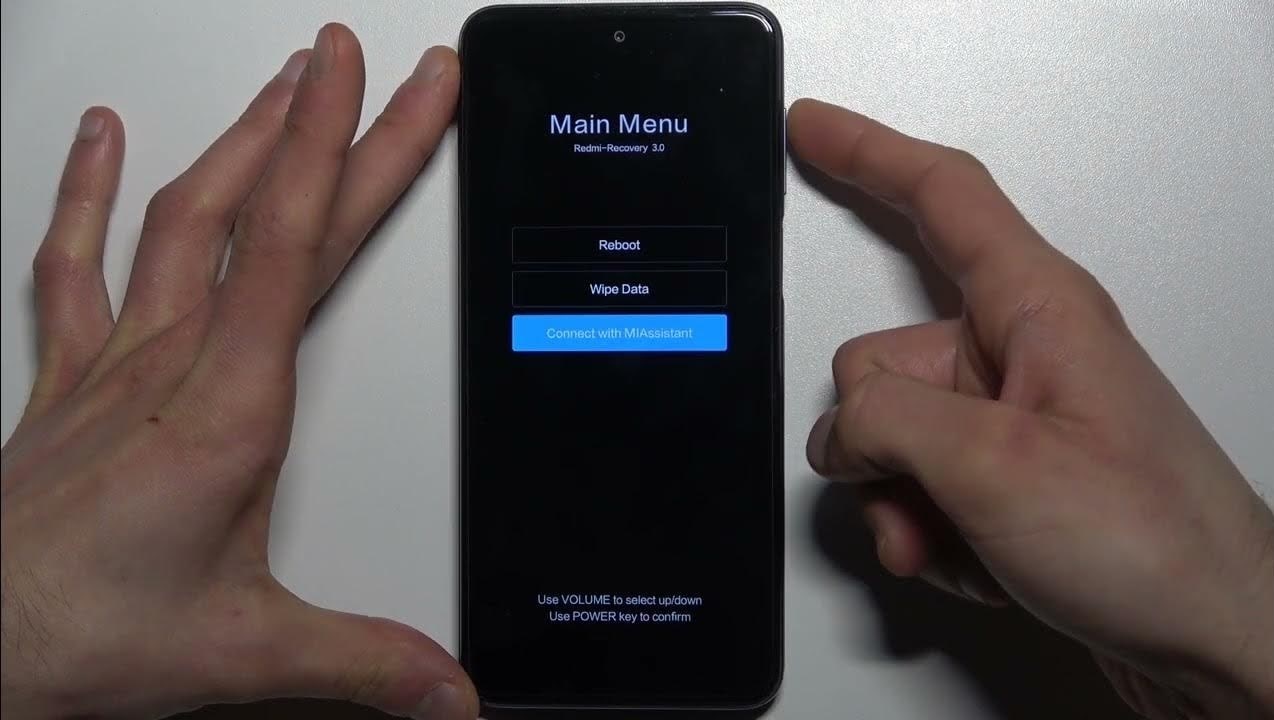
- Step 2: The main menu will show three options: Reboot, Wipe Data, and Connect with MIAssistant. Choose Reboot.
Explore Dedicated Software Tools To Fix Bricked Phones
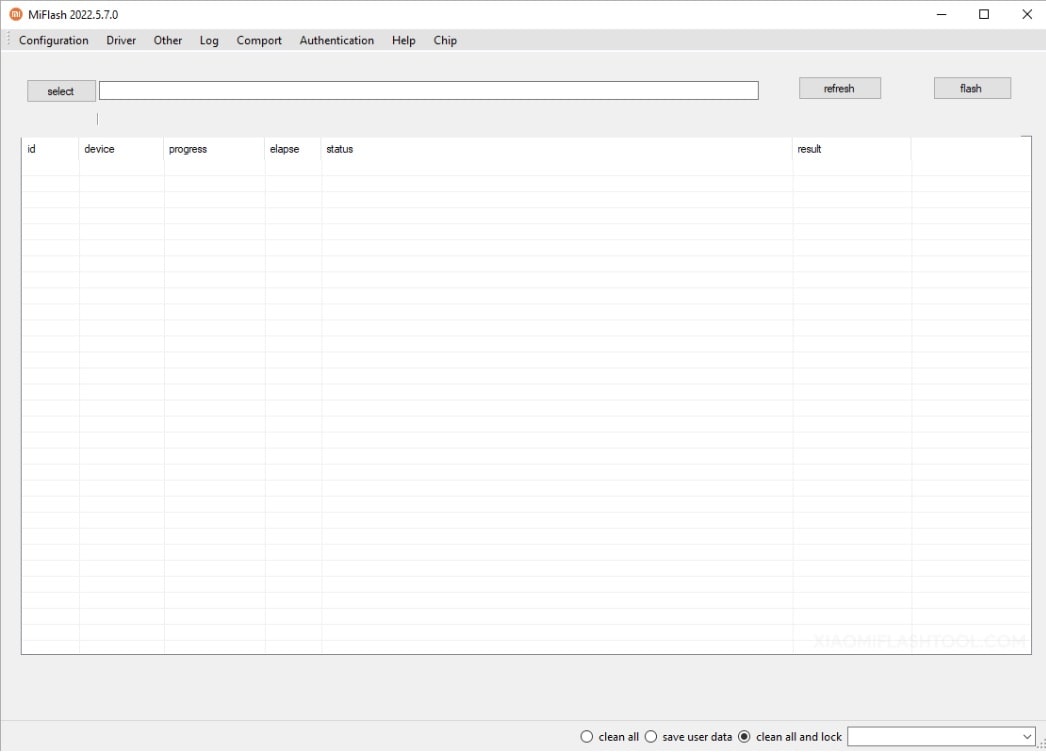
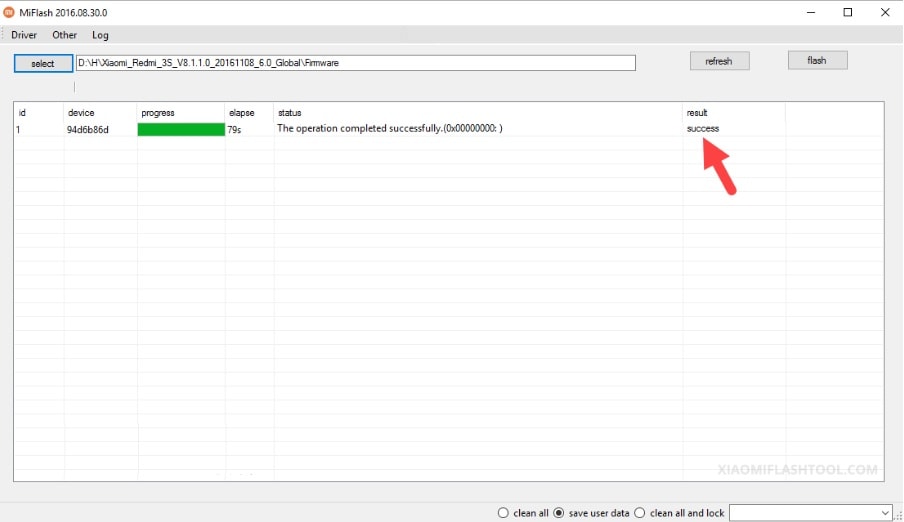
Nokia C12 Pro offers its official software tools, such as the Nokia C12 ProFlash Tool. It’s designed for advanced users familiar with flashing firmware onto their devices. Here’s how.
- Step 1: Download and install the Nokia C12 ProFlash Tool .
- Step 2: Download the Stock Firmware of Nokia C12 Pro and extract it on your computer. Press and Hold the Power and Volume Down buttons for at least 5-10 seconds to enter Fastboot Mode.

- Step 3: Connect your Nokia C12 Pro to the computer using a USB cable. Launch Nokia C12 ProFlash Tool and locate the Firmware you have downloaded on the computer. Click the refresh > flash to begin the flashing process.
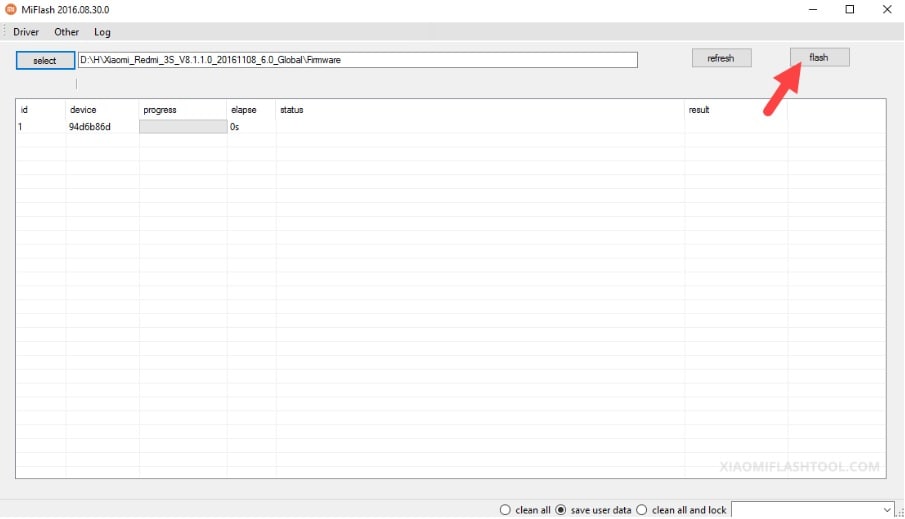
- Step 4: The SUCCESS result should appear in the Nokia C12 ProFlash Tool once the flashing process is done.
However, if the Nokia C12 ProFlash Tool did not unbrick your Nokia C12 Pro, consider using Wondershare Dr.Fone - System Repair (Android). The platform allows you to unbrick your Nokia C12 Pro with a few clicks.
Part 3. Reviving Your Nokia C12 Pro Using Wondershare Dr.Fone - System Repair (Android)
Dr.Fone - System Repair (Android) equips Nokia C12 Pro users with the ability to tackle soft brick and hard brick issues. This specialized Android repair tool enables you to restore your Nokia C12 Pro through a streamlined process, requiring just a few simple clicks.

 safe & secure
3,227,773 people have downloaded it
Key Features
Dr.Fone - System Repair (Android) offers several benefits to unbrick your Nokia C12 Pro easily. Below are its key features.
- Fix Common Nokia C12 Pro Problems in Minutes. This tool provides comprehensive solutions for common issues like black screen, Play Store not working, boot loops, or even bricked Android devices .
- Compatibility with Over 1000 Android Models. This app fixes glitches across modern Android devices. The software is compatible with an extensive range of models. Whether your Nokia C12 Pro is unlocked or carrier-bound, restoration is not a problem.
- Unparalleled Software Flexibility. Dr.Fone - System Repair (Android) also boasts an added capacity to mend iOS devices. This versatile tool is your all-inclusive solution for mobile devices, ensuring convenience whether you own an iOS or Android device.
Advantage of Dr.Fone - System Repair (Android) for Unbricking Nokia C12 Pro
Here are three benefits to choosing Dr.Fone - System Repair (Android) for unbricking a Nokia C12 Pro. You’ll further believe Dr.Fone is a reliable assistant when reviving your bricked Nokia C12 Pro.
Simplified Firmware Management
Dr.Fone eliminates the tedious search for appropriate firmware when unbricking your Nokia C12 Pro. The platform automatically downloads the correct firmware for your device. The hassle of identifying and manually procuring firmware is removed, saving time and ensuring a smoother unbricking process.
User-Friendly Approach
One of Dr.Fone’s key strengths is its user-friendly design. It caters to users with varying levels of technical expertise by employing a step-by-step process. This approach guides users through the repair process with clarity. It reduces the requirement for advanced technical knowledge.
Free Version for Evaluation
Dr.Fone - System Repair (Android) offers a free version for everyone. It allows users to test its capabilities before committing to a purchase. This trial version grants users the opportunity to assess the tool’s effectiveness and suitability for unbricking their Nokia C12 Pro. This instills confidence before investing in a full license.
How To Unbrick Nokia C12 Pro Using Dr.Fone - System Repair (Android)
Dr. Fone’s features are perfect for unbricking Nokia C12 Pro devices. Below are the procedures to restore your Nokia C12 Pro from its bricked state.
![]()
Dr.Fone - System Repair (Android)
Repair Android System Errors without Any Trouble.
- Fix your Android to normal, no skills required.
- Fix various Android system issues, stuck in boot loop , black screen , or won’t turn on , looping on start, etc.
- The high success rate in resolving Android system issues.
- Compatible with a wide range of Android devices and OS versions
- User-friendly interface with easy-to-follow steps.
3981454 people have downloaded it
- Step 1: Download and install Dr.Fone - System Repair (Android) on your computer. After launching the application, click System Repair. Then, click Android as the Nokia C12 Pro device type. Connect your Nokia C12 Pro. Indicate Phone Brick as the Android issue and initiate the process by clicking Start.

- Step 2: Select the appropriate device information corresponding to your Nokia C12 Pro. Choose Brand, Name, Model, Country, and Carrier. Confirm by checking the I agree button, then proceed to the next step by clicking Next.

- Step 3: Given that the Nokia C12 Pro lacks a Home button, click the Phone without Home button option. Follow the prompts displayed on-screen and proceed by clicking Next to initiate the process of restoring your bricked phone.

- Step 4: As your Nokia C12 Pro enters Download Mode, the firmware download will start automatically. Follow the on-screen instructions. Wait for the system to initiate the repair procedure automatically. Upon completion, a message will pop up on the main window. Click Done to exit the tool. You can click Try again to repeat the process if needed.

You May Also like:
How To Fix iPhone Bricked After iOS 17/iOS 16/iOS 15 Update
How to Fix It If Your Nokia C12 Pro Phone Got Bricked?
Conclusion
Don’t let a bricked Nokia C12 Pro stand in your way. Use the array of techniques from basic troubleshooting to advanced software tools to breathe life back into your device. Unbrick your Nokia C12 Pro to its full functionality using the methods provided or Dr.Fone’s adept assistance.
Lastly, you can still refer to Nokia C12 Pro for repairs. It remains the primary solution in numerous cases. Utilizing your warranty can alleviate the associated costs. Seeking assistance from a specialized technician is also a viable route to consider for a thorough device assessment.
9 Quick Fixes to Unfortunately TouchWiz has stopped Of Nokia C12 Pro
“Unfortunately TouchWiz home has stopped” is the talk of the town due to annoying TouchWiz UI, a front-end user interface developed by Nokia C12 Pro. Not to mention, the Nokia C12 Pro has borne a whole lot of heat from its agitated users over the years and the reason is pretty much obvious due to the pre-installed bloatware apps and the theme launch “TouchWiz home”. That not just brutally annoys users and eats up a heck of internal storage space but lags up too often due to low speed and stability. As a result users end up with “Unfortunately TouchWiz home has stopped” and “Unfortunately, TouchWiz has stopped”. Apparently, there are several flaws in the design and functioning of this launcher and hence, Touchwiz keeps stopping or becomes unresponsive.
Part 1: Common scenarios when TouchWiz keeps stopping
Here in this section, we will introduce some scenarios that can be blamed for why TouchWiz is not working. Check out the following points:
- More often than not, the TouchWiz keeps stopping after an Android update. When we update our Nokia C12 Pro device, the old data and cache usually conflicts with TouchWIz thereby cropping up this mess.
- When you disable some built-in apps, you might get in trouble with TouchWiz. Doing this sometimes can hamper the TouchWiz operation and raise the “**unfortunately TouchWiz home has stopped**” error message.
- Many times installing some third-party apps and widgets can cause this problem. The apps like launchers can be conflicting with TouchWiz home launcher and therefore cease it to work. Also, a glitched widget is responsible for the same i.e. forces stop the TouchWiz.
Part 2: 9 Fixes to “Unfortunately TouchWiz has stopped”
Fix “TouchWiz keeps stopping” by repairing Android system
When your TouchWiz keeps stopping and you aren’t able to proceed further, the best way to handle the situation is to repair the Android system. And the best that can help you to serve the purpose is Dr.Fone - System Repair (Android). It has the ability to fix any sort of Android system issue without any complications. To fix this issue, the tool only takes few minutes of yours and performs smoothly. Moreover, you don’t have to worry if you aren’t tech pro. This tool requires no special technical know-how. Here are the advantages you get with this tool.
Dr.Fone - System Repair (Android)
One click tool to fix “Unfortunately TouchWiz has stopped”
- A very easy tool that fixes problems in just one click
- Provides full support all day all night as well as offers 7 day money back challenge
- Enjoys higher success rate and considered as first tool carrying such amazing functionalities
- Able to fix wide variety of Android issues including app crashing, black/white screen of death
- Fully secured and no harm regarding any virus infection
3,211,972 people have downloaded it
Step 1: Download the Program
The one-click repairing process begins with downloading Dr.Fone from its official website. When it is downloaded, follow the installation steps. Upon successful installation, launch the tool on your PC.
Step 2: Connect your Nokia C12 Pro Device
After you open the software, hit on the “System Repair” button from the main interface. With the help of a genuine USB cable, get your Nokia C12 Pro phone and connect it with the computer.

Step 3: Choose the Tab
Now, from the next screen, you are supposed to choose “Android Repair” tab. It is given on the left panel.
Step 4: Enter Right Information
Please keep your mobile details handy as you will need them in the next window. You will need to enter the correct brand, model, and country name etc. for better detection of your device.
Step 5: Confirm Actions
This process may result in removing your data hence we strongly recommend you to keep a backup of your data.
Tip: You can use Dr.Fone – Phone Backup (Android) to backup your Nokia C12 Pro device in case you’re wondering how.
Step 6: Take your Device in Download mode
You will get some instructions on your screen to keep your device in Download mode. Follow them according to the Nokia C12 Pro device you own and hit “Next”. When you do this, the program will detect your device and let you download the latest firmware.


Step 7: Repair Device
Now, when the firmware is downloaded, the program will itself begin to repair your device. Wait and keep the Nokia C12 Pro device connected until you get the notification for process completion.
Clear the cache data the TouchWiz
Maximum Android devices are designed to deleted cache data upon getting updated to the newest Android system. However, Nokia C12 Pro stands as an exception in such case. And therefore, many times TouchWiz starts stopping right after upgrading. Thus, due to the collection of cache data, TouchWiz can display error. This calls for removing the cache from TouchWiz and run things smoothly. Here is how to do this:
- Tap on “Apps” from the Home screen firstly.
- Launch “Settings” afterwards
- Look for “Applications” and tap on it followed by “Application Manager”.
- When Application Manager gets opened, swipe towards right to get into the “All” screen.
- Now, choose “TouchWiz” and tap “Clear Cache”.
- Now, tap “Clear Data” followed by “OK”.
- Now restart your device.

Please note that this will delete all your Home screens post this method.
Disable Motion & gesture settings
The functions regarding Motions and Gestures can be responsible for why TouchWiz home has stopped in your device. Usually the Nokia C12 Pro devices running on Android version less than Marshmallow are prone to encountering this issue. Or the Nokia C12 Pro devices having modest specs often fall prey to the issue. When you disable these settings, you might get out of the problem.
Change the Animation Scale
When you use TouchWiz, it may consume higher memory usage for high amount of graphic maintenance. As a result, the “**unfortunately TouchWiz home has stopped**” error might crop up. Taking this into consideration, you should try reconfiguring the animation scale and get rid of the error. Here’s how:
Clear Cache Partition
In case the above steps didn’t figure out the problem, here is the next tip. This method can be counted as one of the most effective one. Because it is able to fix minor issues in Android devices, we recommend you for “**TouchWiz home has stopped**” issue too. Let us know how you can do it:
- Turn off your Nokia C12 Pro device.
- Start pressing and holding “Volume Up” and “Power” buttons simultaneously.
- Keep doing this until you see the Android screen. This will take your device into recovery mode.
- You will observe some options on the screen. Take help of Volume buttons, scroll down to choose “Wipe Cache Partition”. Press Power button to confirm and the Nokia C12 Pro device will be rebooted.

Check now if the error is eliminated. If unfortunately not, please try the following solution.
Enable the easy mode
For some users, enabling Easy Mode has been of great assistance. This feature aims to make the user experience more efficient by simply eliminating complex features. The Easy Mode removes those features that confuse the users by messing up the screen. Hence, we suggest you to switch to this mode in order to remove “**TouchWiz not working**” problem. The steps are:
- Open “Settings” and go to “Personalization”.
- Hit on “Easy Mode” now.

Hope the TouchWiz won’t keep stopping error does not pop up anymore!
Boot your phone to safe mode
Here is the next solution to be followed when TouchWiz keeps stopping. As we already said, third-party apps can cause this issue, booting your device in the Safe mode will disable those apps temporarily. Hence you need to boot your Nokia C12 Pro device to Safe mode and check if the reason is any third-party app.
- Switch off your device to initiate.
- Press “Power” button and keep doing this until device’s logo appears on the screen.
- When you see logo appearing, instantly release the button and start holding “Volume Down” button.
- Keep holding until rebooting finishes.
- You will now witness “Safe mode” on the bottom screen. You can now release the button.

Reset Factory settings
If the above method went futile and you’re still at the same place, then factory reset is the next logical step to be taken. We suggest this method because it will take your device to its factory state. As a result, TouchWiz will probably get normal and work perfectly.
Along with this, we would also suggest you go take backup of your data so that you won’t lose any of the personal information from your device after performing factory reset. For your convenience, we have stated the backup steps too in the following guide. Have a look:
- Run “Settings’ in your device and go to “Backup & Reset”.
- Notice if “Back up my data” is enabled or not. If not, turn it on and create backup.
- Now, scroll for “Factory Data reset” option and confirm it by clicking “Reset Phone”.

- Wait a few minutes and your device will reboot.
Install a new launcher to replace TouchWiz
We believe that you will find the above methods helpful. However, if still in case your TouchWiz is not working, we advice you that you should install a new theme launcher in your device. It will be a wise option to ditch TouchWiz in such scenario rather than tolerating the problem. Hope this advice will help you.
Nokia C12 Pro Screen Unresponsive? Here’s How to Fix It
Nokia C12 Pro phones have become increasingly popular due to their advanced features, sleek designs, and affordable prices. These phones offer many benefits, including high-quality cameras, long battery life, and fast processing speeds. However, sometimes users may encounter problems such as a Nokia C12 Pro touch screen not working, which can be frustrating and difficult.
This article aims to provide solutions for Nokia C12 Pro phone users experiencing screen unresponsiveness. We will explore various reasons this issue may occur and discuss step-by-step instructions for fixing the problem. So, if your Nokia C12 Pro touchscreen is not working, don’t worry – we’ve got you covered!
What Causes A Nokia C12 Pro Screen Unresponsive?
There are several reasons why a Nokia C12 Pro phone’s screen may become unresponsive. Some common causes include software issues, hardware problems, or issues with the touchscreen itself. It’s essential to identify the root cause of the problem to fix it properly.
Below are some possible causes of Nokia C12 Pro screen unresponsiveness, along with explanations of each.
Soft-bricked software: Soft-bricking refers to the state where the phone is stuck in an infinite boot loop or unable to boot. It can occur due to corrupt system files, outdated firmware, or unsuccessful updates. For example, some Nokia C12 Pro Y2 and 5A users have reported their screens getting stuck on the boot logo after a software update, rendering the Nokia C12 Pro device unusable.
Equipment is worn out: Hardware problems can also cause Nokia C12 Pro screens to become unresponsive. It can be due to worn-out equipment, such as a damaged LCD screen, malfunctioning touch sensor, or loose ribbon cables. These issues can also occur in any Nokia C12 Pro model, including the Y2 and 5A.
**Touchscreen problems:**Sometimes, the touchscreen itself can become unresponsive for various reasons. For instance, Nokia C12 Pro Y2 and 5A users may face this issue if they have accidentally dropped their phone, exposed it to water, or used an incompatible screen protector. It can result in a damaged or malfunctioning touchscreen, making it difficult or impossible to operate the phone.
The Common Solutions To Solve A Nokia C12 Pro Screen Unresponsive
In the previous section, we identified the possible causes of Nokia C12 Pro screen unresponsiveness, including soft-bricked software, hardware problems, and touchscreen issues. While the underlying reasons for screen unresponsiveness can be varied and complex, some common solutions can help resolve the issue. Here are three of the most common solutions to address tablet screen unresponsiveness, no matter the Nokia C12 Pro model.
1. Restart The Device
Restarting the phone is typically the initial solution that comes to mind when we encounter the Nokia C12 Pro black screen problem. It’s a simple and widely used method to address the issue, as the black screen problem could be caused by a software glitch, which can often be resolved by freeing up the phone’s memory.
It is the most commonly used method to fix Nokia C12 Pro’s touch screen and power button issues, such as unresponsiveness. By restarting the Nokia C12 Pro device, background processes are disabled, and memory is freed up, allowing programs to run smoothly and potentially resolve the problem. To restart a Nokia C12 Pro device, press the Power and Volume Up buttons simultaneously, and release the Power button once the Nokia C12 Prologo appears.
2. Leave The Phone And Let The Battery Drain Completely
Sometimes, the tablet screen may become unresponsive due to a software issue preventing the Nokia C12 Pro device from functioning correctly. Leaving the Nokia C12 Pro device unused and draining the battery helps resolve these issues. After fully discharging the battery, the Nokia C12 Pro device can be recharged and turned back on, potentially resolving the issue.
3. Contact Custom Service
If restarting the Nokia C12 Pro device or allowing the battery to drain doesn’t resolve the issue, seeking professional assistance is recommended. The manufacturer may provide additional troubleshooting steps or recommend sending the Nokia C12 Pro device in for repair or replacement. It’s important to check the warranty before contacting customer service, which may affect repair or replacement options.
In addition to the common solutions we discussed earlier, some model-specific solutions can help resolve the screen unresponsiveness issue on Nokia C12 Pro Y2 and Nokia C12 Pro 5A.
4. Optimize Device Performance
One solution is to optimize the Nokia C12 Pro device performance by clearing the cache, removing unwanted apps, and disabling unnecessary features. This method can help free up memory and resolve the issue.
You can clear your cached data using the default settings.
- Select Settings> Storage > Cached Data.
- To clear the cache, select Clear Cache.

5. Back Up And Factory Reset
Another solution is to back up the Nokia C12 Pro device and perform a factory reset, which can help reset the Nokia C12 Pro device to its original state and remove any software glitches that may be causing the screen unresponsiveness. The factory settings on your phone will restore any data saved by third-party applications and some of the phone’s settings when it was first built. Note that this method erases all data from the Nokia C12 Pro device, so it should only be considered a last resort.
In the following steps, we will show you how to format the Nokia C12 Pro Redmi 5A to erase all your data and restore it to its factory state.
- Open the Settings.
- Navigate to the Additional settings section of the Nokia C12 Pro Redmi 5A settings.
- Please scroll down the screen until you reach the Backup & reset option, then click to access it.
- ClickErase all data (factory reset) to restore the network settings and applications, or completely reset the Nokia C12 Pro Redmi 5A.
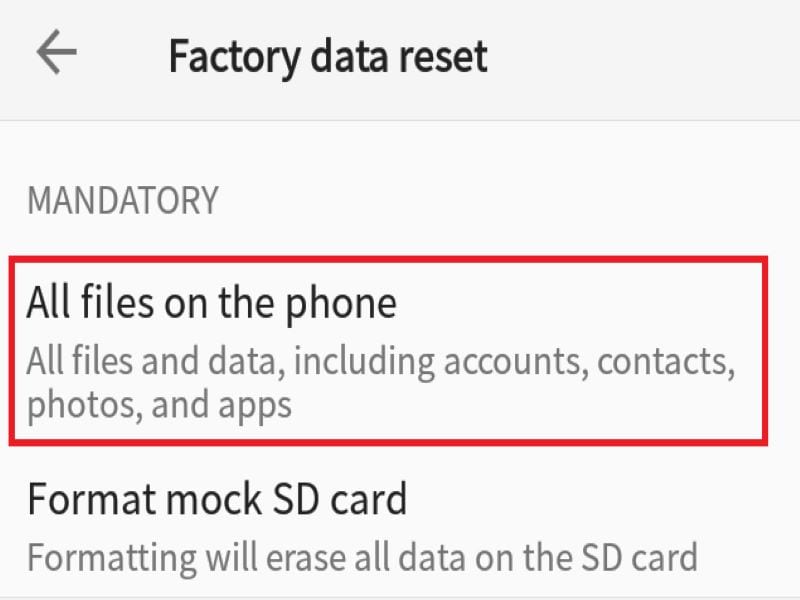
- Select All files on the phoneto make a complete format of the Nokia C12 Pro Redmi 5A.
6. Using Dr. Fone Repair
If none of the above solutions worked, you can try using Dr. Fone Repair. This software is designed to fix various software issues on Android phones, including Nokia C12 Pro devices. It can fix issues such as screen stuck on boot, black screen, and other software-related problems. Dr. Fone Repair is easy to use and can protect your data and files on your phone.
Here’s how to fix repair screen unresponsiveness or any software-related issues on Nokia C12 Pro Y2 and Nokia C12 Pro 5A using Dr. Fone Repair:
- Begin by installing and opening Dr.Foneon your PC.
- Once opened, select the ‘System Repair’ option and connect your Android smartphone to your PC via USB cable.
- On the next screen, choose “Android****Repair“ from the list of available options.
- Click on the “Start“ button to initiate the repair process.
- You will then be prompted to enter the required device information such as the Nokia C12 Pro device name, model number, and firmware version.
- Once you have entered the necessary information, click on the ‘Next’ button to proceed.
- Follow the on-screen instructions carefully to repair your Nokia C12 Pro.

How To Avoid A Nokia C12 Pro Screen Unresponsive?
To avoid facing a Nokia C12 Pro screen unresponsive issue, users can take several preventative measures. One important step is to update the Nokia C12 Pro phone regularly to ensure the software is up to date and all bugs and glitches are fixed. Users can also use tools like Dr. Fone to regularly manage and repair data, including clearing cache and removing unwanted apps. It is also important to use quality charging cables and avoid exposing the Nokia C12 Pro device to extreme temperatures or humidity, which can damage the internal components and potentially cause screen unresponsiveness. Finally, users can avoid dropping or mishandling the Nokia C12 Pro device, leading to physical damage and causing the screen to become unresponsive. Users can help prevent screen unresponsiveness by taking these steps and ensuring their Nokia C12 Pro device runs smoothly and reliably.
safe & secure
Conclusion
Encountering a Nokia C12 Pro screen unresponsive issue can be a common problem for some Nokia C12 Pro phone users. However, with the solutions we have provided in this article, you can effectively solve the problem and get your phone back up and running in no time. It’s important to remember to regularly back up your data and take preventative measures, such as avoiding harmful malware and keeping your phone updated, to avoid experiencing this issue in the future.
By using reliable software, like Dr.Fone Repair, you can ensure that your Nokia C12 Pro phone is well-maintained and operating smoothly. With these solutions and tips, you can enjoy the benefits of your Nokia C12 Pro phone without any interruptions.
Also read:
- [Updated] Swift Sharing Twitter to WhatsApp Videos
- 2024'S Leading Choices for Impenetrable Phone Casing
- How to Factory Reset Itel P55 5G in 5 Easy Ways | Dr.fone
- How to Quickly Fix Bluetooth Not Working on Itel P55 | Dr.fone
- How To Restore a Bricked Oppo Find N3 Flip Back to Operation | Dr.fone
- In 2024, IPhone HDR A Step-by-Step Journey to Perfect Shots
- In 2024, Tutorial to Change Realme Note 50 IMEI without Root A Comprehensive Guide
- Latest way to get Shiny Meltan Box in Pokémon Go Mystery Box On Infinix Smart 8 Plus | Dr.fone
- Play Store Not Working On Xiaomi Redmi Note 12T Pro? 8 Solutions Inside | Dr.fone
- Play Store Not Working On Xiaomi Redmi Note 13 Pro 5G? 8 Solutions Inside | Dr.fone
- Quick Fixes for Why Is My Xiaomi Redmi A2 Black and White | Dr.fone
- Resolving FPS Dips & Lag Surges in Call of Duty: Black Ops IV
- Samsung Galaxy M14 5G Screen Unresponsive? Heres How to Fix It | Dr.fone
- Simple Solutions to Fix Android SystemUI Has Stopped Error For Oppo Find X6 | Dr.fone
- Spotify Keeps Crashing A Complete List of Fixes You Can Use on Oppo Reno 9A | Dr.fone
- Troubleshooting Tips for Resolving 'Device Configuration Incorrect' Warning Code 1
- Unleash Creativity Unlimited Samples of 50 YouTube Banners for Free, In 2024
- Title: How To Revive Your Bricked Nokia C12 Pro in Minutes | Dr.fone
- Author: Abel
- Created at : 2024-12-17 19:44:43
- Updated at : 2024-12-24 19:15:49
- Link: https://fix-guide.techidaily.com/how-to-revive-your-bricked-nokia-c12-pro-in-minutes-drfone-by-drfone-fix-android-problems-fix-android-problems/
- License: This work is licensed under CC BY-NC-SA 4.0.