
How To Revive Your Bricked Vivo G2 in Minutes | Dr.fone
How To Revive Your Bricked Vivo G2 in Minutes
Vivo G2 has established a notable presence within the custom development arena. This trait holds for Vivo G2. Today, it’s still one of the most popular budget smartphones available. The popular smartphone offers the freedom to flash custom ROMs, attain administrative privileges, access countless customization options, and much more.
Yet, delving into these capabilities comes with its share of risks. The potential for your Vivo G2 to brick is high if you don’t know what you’re doing. This page teaches you how to unbrick your Vivo G2 if it happens.
Part 1. Potential Causes of a Vivo G2 Becoming Bricked
The factors that lead to your Vivo G2 to brick vary. The possible solutions also depend upon the underlying causes. At times, the manufacturer’s intervention remains the only viable remedy. Below are the most frequent causes of bricking.
- The presence of malicious malware can harm your Vivo G2. This can result in a ‘bricked’ state devoid of functionality.
- Altering the bootloader, system partition, or other critical software components risks triggering a bricking event.
- Bricking can also occur due to errors during the update process. Whether through automatic or manual downloads, any interruption during software updates can cause your Vivo G2 to brick.
- Using inappropriate methods when performing root access can also result in bricking. Performing root access is dangerous as it grants entry to the Vivo G2 device’s root directory housing the operating system.
Every Android device is susceptible to experiencing a system failure that leads to a bricked state. The risk remains consistent whether your device is from Vivo G2, Vivo G2, Vivo G2, or any other brand. That’s why it’s strongly advised against modifying their smartphones, especially when you don’t know what you’re doing.
Part 2. Techniques To Unbrick a Vivo G2
When faced with a bricked Vivo G2, below are various techniques to revive it. Whether through software resets or hardware interventions, these methods can help breathe life back into your device.
Discharge the Battery
A particular suggestion involves allowing the Vivo G2 device’s battery to discharge fully, enabling proper functionality of the Flash Tool software. This process typically spans a few days and is recommended by some specialists.
Perform a Factory Reset
Accessing the Vivo G2 device settings is impossible if your Vivo G2 bricks. For this reason, it is recommended to enter Recovery Mode. Here’s how.
- Step 1: Press and hold the Power button and select the Restart option. During the reboot, press the Volume Up and Power keys simultaneously.
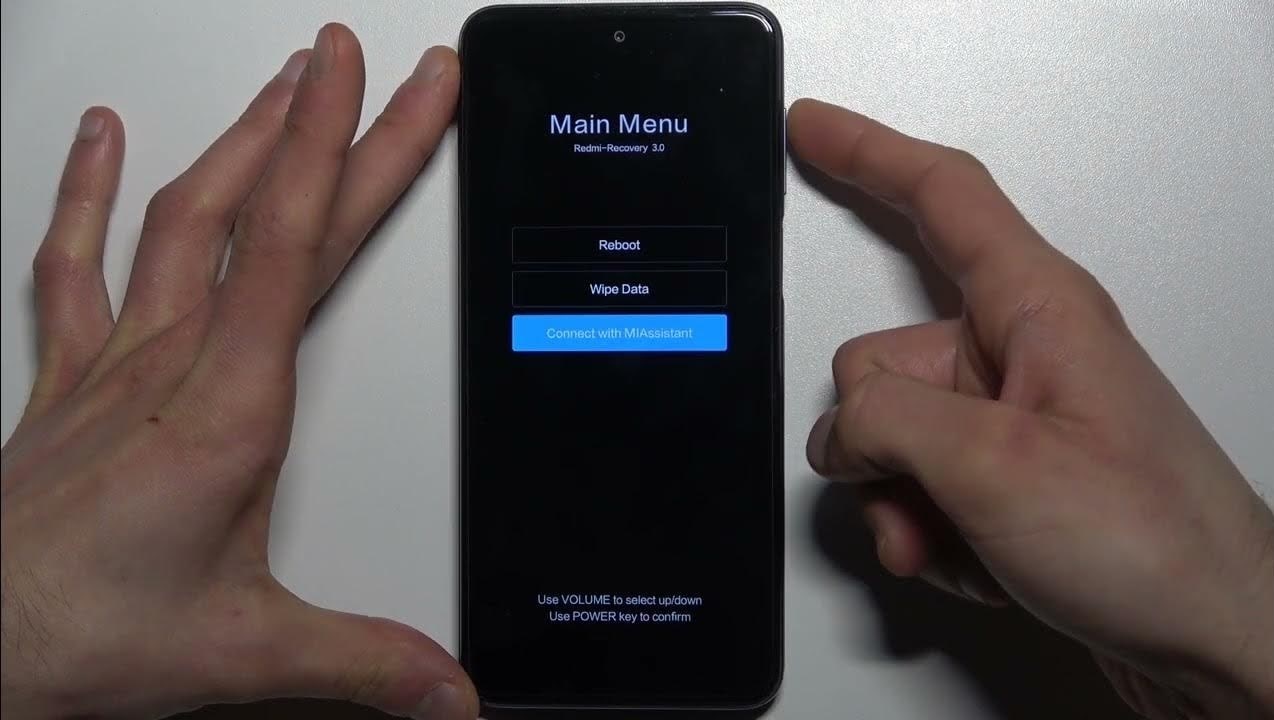
- Step 2: The main menu will show three options: Reboot, Wipe Data, and Connect with MIAssistant. Choose Reboot.
Explore Dedicated Software Tools To Fix Bricked Phones
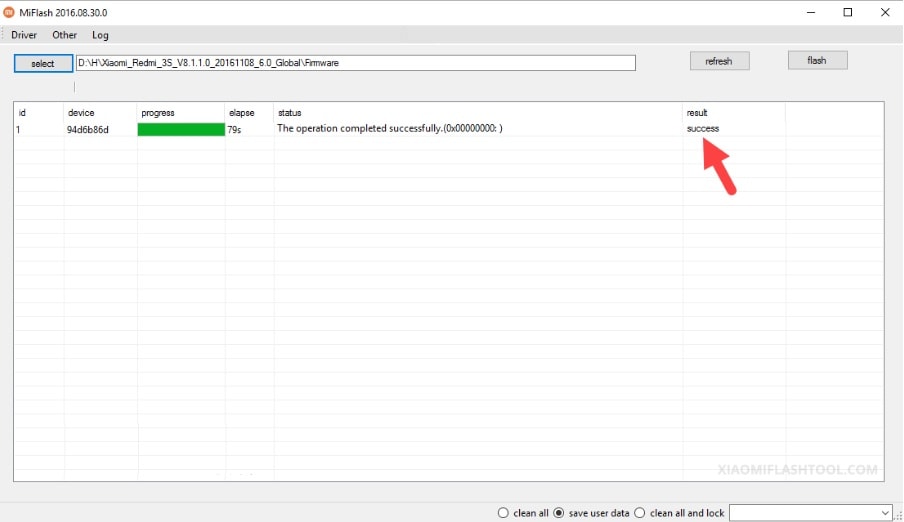
Vivo G2 offers its official software tools, such as the Vivo G2Flash Tool. It’s designed for advanced users familiar with flashing firmware onto their devices. Here’s how.
- Step 1: Download and install the Vivo G2Flash Tool .
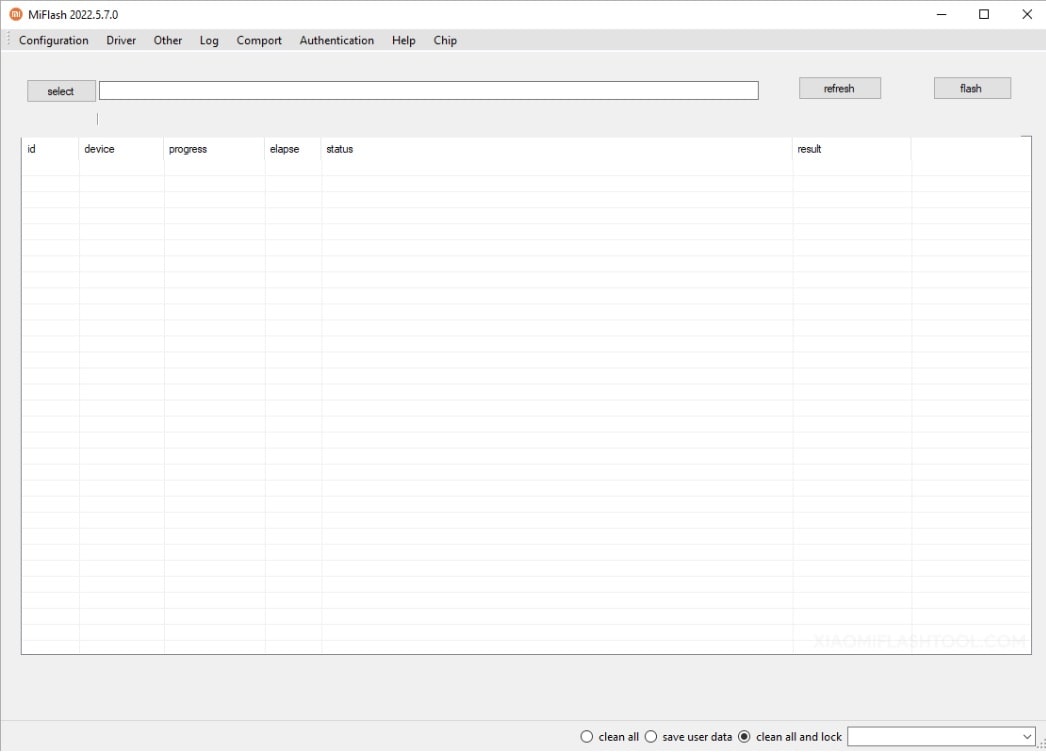
- Step 2: Download the Stock Firmware of Vivo G2 and extract it on your computer. Press and Hold the Power and Volume Down buttons for at least 5-10 seconds to enter Fastboot Mode.

- Step 3: Connect your Vivo G2 to the computer using a USB cable. Launch Vivo G2Flash Tool and locate the Firmware you have downloaded on the computer. Click the refresh > flash to begin the flashing process.
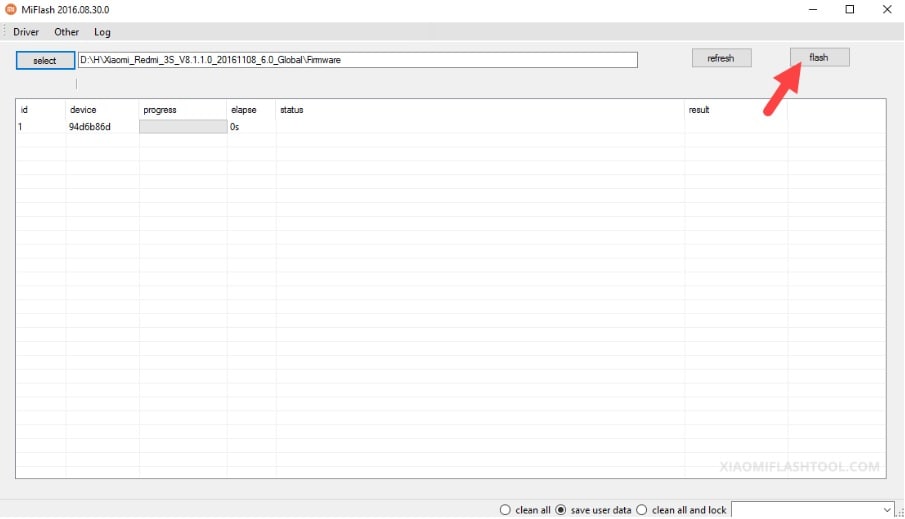
- Step 4: The SUCCESS result should appear in the Vivo G2Flash Tool once the flashing process is done.
However, if the Vivo G2Flash Tool did not unbrick your Vivo G2, consider using Wondershare Dr.Fone - System Repair (Android). The platform allows you to unbrick your Vivo G2 with a few clicks.
Part 3. Reviving Your Vivo G2 Using Wondershare Dr.Fone - System Repair (Android)
Dr.Fone - System Repair (Android) equips Vivo G2 users with the ability to tackle soft brick and hard brick issues. This specialized Android repair tool enables you to restore your Vivo G2 through a streamlined process, requiring just a few simple clicks.

 safe & secure
3,227,773 people have downloaded it
Key Features
Dr.Fone - System Repair (Android) offers several benefits to unbrick your Vivo G2 easily. Below are its key features.
- Fix Common Vivo G2 Problems in Minutes. This tool provides comprehensive solutions for common issues like black screen, Play Store not working, boot loops, or even bricked Android devices .
- Compatibility with Over 1000 Android Models. This app fixes glitches across modern Android devices. The software is compatible with an extensive range of models. Whether your Vivo G2 is unlocked or carrier-bound, restoration is not a problem.
- Unparalleled Software Flexibility. Dr.Fone - System Repair (Android) also boasts an added capacity to mend iOS devices. This versatile tool is your all-inclusive solution for mobile devices, ensuring convenience whether you own an iOS or Android device.
Advantage of Dr.Fone - System Repair (Android) for Unbricking Vivo G2
Here are three benefits to choosing Dr.Fone - System Repair (Android) for unbricking a Vivo G2. You’ll further believe Dr.Fone is a reliable assistant when reviving your bricked Vivo G2.
Simplified Firmware Management
Dr.Fone eliminates the tedious search for appropriate firmware when unbricking your Vivo G2. The platform automatically downloads the correct firmware for your device. The hassle of identifying and manually procuring firmware is removed, saving time and ensuring a smoother unbricking process.
User-Friendly Approach
One of Dr.Fone’s key strengths is its user-friendly design. It caters to users with varying levels of technical expertise by employing a step-by-step process. This approach guides users through the repair process with clarity. It reduces the requirement for advanced technical knowledge.
Free Version for Evaluation
Dr.Fone - System Repair (Android) offers a free version for everyone. It allows users to test its capabilities before committing to a purchase. This trial version grants users the opportunity to assess the tool’s effectiveness and suitability for unbricking their Vivo G2. This instills confidence before investing in a full license.
How To Unbrick Vivo G2 Using Dr.Fone - System Repair (Android)
Dr. Fone’s features are perfect for unbricking Vivo G2 devices. Below are the procedures to restore your Vivo G2 from its bricked state.
![]()
Dr.Fone - System Repair (Android)
Repair Android System Errors without Any Trouble.
- Fix your Android to normal, no skills required.
- Fix various Android system issues, stuck in boot loop , black screen , or won’t turn on , looping on start, etc.
- The high success rate in resolving Android system issues.
- Compatible with a wide range of Android devices and OS versions
- User-friendly interface with easy-to-follow steps.
3981454 people have downloaded it
- Step 1: Download and install Dr.Fone - System Repair (Android) on your computer. After launching the application, click System Repair. Then, click Android as the Vivo G2 device type. Connect your Vivo G2. Indicate Phone Brick as the Android issue and initiate the process by clicking Start.

- Step 2: Select the appropriate device information corresponding to your Vivo G2. Choose Brand, Name, Model, Country, and Carrier. Confirm by checking the I agree button, then proceed to the next step by clicking Next.

- Step 3: Given that the Vivo G2 lacks a Home button, click the Phone without Home button option. Follow the prompts displayed on-screen and proceed by clicking Next to initiate the process of restoring your bricked phone.

- Step 4: As your Vivo G2 enters Download Mode, the firmware download will start automatically. Follow the on-screen instructions. Wait for the system to initiate the repair procedure automatically. Upon completion, a message will pop up on the main window. Click Done to exit the tool. You can click Try again to repeat the process if needed.

You May Also like:
How To Fix iPhone Bricked After iOS 17/iOS 16/iOS 15 Update
How to Fix It If Your Vivo G2 Phone Got Bricked?
Conclusion
Don’t let a bricked Vivo G2 stand in your way. Use the array of techniques from basic troubleshooting to advanced software tools to breathe life back into your device. Unbrick your Vivo G2 to its full functionality using the methods provided or Dr.Fone’s adept assistance.
Lastly, you can still refer to Vivo G2 for repairs. It remains the primary solution in numerous cases. Utilizing your warranty can alleviate the associated costs. Seeking assistance from a specialized technician is also a viable route to consider for a thorough device assessment.
Simple Solutions to Fix Android SystemUI Has Stopped Error For Vivo G2
In this article, you will learn possible causes of Android SystemUI stopping error and 4 methods to fix this issue. Get Dr.Fone - System Repair (Android) to fix Android SystemUI stopping more easily.
Android SystemUI isn’t responding or Android, unfortunately, the process com.android.systemui has stopped is a not a rare error and is observed in all Android devices these days. The error usually pops up on your device while you are using it with a message on the screen saying Android. Unfortunately, the process com.android.systemui has stopped.
The Android SystemUI isn’t responding error message may also read as “Unfortunately, SystemUI has stopped”.
Android SystemUI error can be very confusing as it leaves affected users with only one option, i.e., “OK”, as shown in the images above. If you click on “OK” you will continue to use your device smoothly, but only until the SystemUI isn’t responding error pops-up on your main screen again. You may restart your device, but the Android SystemUI has stopped the problem continues to annoy you until you find a permanent solution for it.
If you are also among the various users who see Android, unfortunately, the process com.android.systemui has stopped error, then do not worry. SystemUI isn’t responding. Error is not a serious issue and can be tackled easily by carefully examining the reasons behind the problem.
Looking for suitable solutions to fix Android SystemUI has stopped error? Then read on to find out all about Android SystemUI isn’t responding error and the most effective ways to fix it.
Part 1: Why Android SystemUI Has stopped happens?

Android device owners would agree that OS updates are very helpful as they fix the bug problem and improve the overall working of your device. However, sometimes these updates may be infected due to which they do not download and install properly. A corrupted OS update may cause Android; unfortunately, the process com.android.systemui has stopped error. All Android updates are directly designed around the Google App, and thus, the problem will persist until the Google App is also updated. Sometimes, even the Google App update may cause such a glitch if it is not successfully downloaded and installed.
Another reason for the Android SystemUI isn’t responding error to occur, maybe because of flashing a new ROM or due to improper firmware update installation. Even when you restore the backed up data from cloud or your Google Account, such Android, unfortunately, the process com.android.systemui has stopped error may show up.
It is not possible to say for sure which one of the above-mentioned reasons is causing your device to show Android SystemUI is not responding error. But what we can do is move on to fixing the Android SystemUI by following any one of the three methods given the following segments.
Part 2: How to fix “com.android.systemui has stopped” in one click
As we’ve learned that Android system UI isn’t responding issue is primarily because of the Android OS updates not installed properly or were corrupted. Hence, there comes the need for a powerful Android system repair tool that can help you rectify such annoying errors.
To serve the purpose, we would like to introduce, Dr.Fone - System Repair (Android) . It is one of its kind of applications and is highly recommended as it has a proven success rate to resolve almost all Android system issues.
It’s now time to understand how to fix Android ‘unfortunately, the process com.android.systemui has stopped’ or in simple words, Android system UI isn’t responding.
Note: Before we proceed to Android repair, please ensure to make a backup of all your data . This is because the Android repair process may wipe out all the data on your device to fix the Android OS issues.
Phase 1: Connect and prepare your Vivo G2
Step 1 – Download the Dr.Fone toolkit over your PC. Install it and launch it over. Opt for the “System Repair” tab from the main screen and get your Vivo G2 connected to the PC.

Step 2 – You need to select “Android Repair” from the left panel and then hit the ‘Start’ button.
Step 3 – Next, you need to select the correct information about your device (i.e., brand, name, model, country/region, and carrier details). Check the warning down below and hit “Next”.
Phase 2: Boot Android in ‘Download’ mode to perform the repair.
Step 1 –You’re now required to boot your Android in Download mode. Here’s what you need to do to put your Android in DFU mode.
If your Android has a Home button:
- Turn off your device. Hold down “Volume Down + Home + Power” buttons altogether for about 10seconds. Let go of the buttons afterward and hit the Volume Up to boot in download mode.

In case your Android has no Home button:
- Turn off your device. Hold down “Volume Down + Bixby + Power” buttons altogether for about 10seconds. Let go of the buttons afterward and hit the Volume Up to boot in download mode.
Step 2 – Once done, hit “Next” to initiate the downloading of the firmware.

Step 3 – As soon as the download completes, the Android repair will automatically be started by the program.

Step 4 – In a just a matter of a few minutes, your Android system UI isn’t responding issue will be resolved.
Part 3: Uninstall Google updates to fix Android SystemUI issue
All Android SystemUI isn’t responding errors are circled the Google App as the Android platform is heavily dependent on it. If you have recently updated your Google App and the Android, unfortunately, the process com.android.systemui has stopped error keeps popping up at regular intervals, make sure you uninstall Google App updates as soon as possible.
Follow the steps given below to fix the Android SystemUI has stopped issue by rolling back the Google App updates:
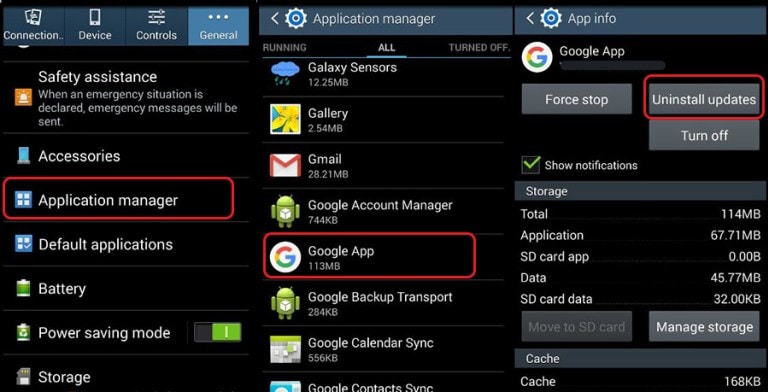
- Visit “Settings” and select “Apps” or “Application Manager”.
- Now swipe to view “All” Apps.
- From the list of Apps, select “Google App”.
- Finally, tap on “Uninstall Updates” as shown hereunder.
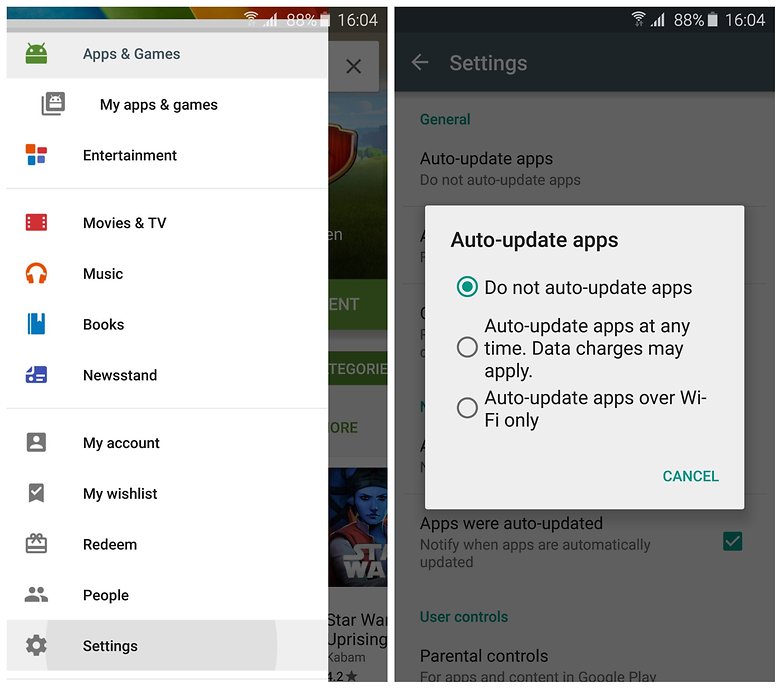
Note: To prevent the Android SystemUI isn’t responding error to occur in the future, do not forget to change your Google Play Store settings to “Do Not Auto-Update Apps”.
Part 4: Wipe Cache partition to fix Android SystemUI error
Android, unfortunately, the process com.android.systemui has stopped error can also be fixed by clearing your cache partitions. These partitions are nothing but storage locations for your modem, kernels, system files, drivers, and built-in Apps data.
It is advisable to clear Cache portions regularly to keep your UI clean and free of glitches.
Android SystemUI isn’t responding error can be overcome by clearing the cache in recovery mode.
Different Android devices have different ways to put it in recovery mode. Refer to your device’s manual to enter the recovery mode screen on your device and then follow the steps given below to fix Android; unfortunately, the process com.android.systemui has stopped error by clearing the cache partition:
- Once you are the recovery mode screen, you will see several options as shown in the screenshot.

- Use the volume down key to scroll down and select ”Wipe cache partition” as shown below.

- After the process is completed, select “Reboot System” which is the first option in the recovery mode screen.
This method will help you de-clutter your device and erase all the clogged up unwanted files. You may lose App related data too, but that is a small price to pay to fix the Android SystemUI isn’t responding error.
If the Android SystemUI has stopped the problem persists, there is only one way out. Read on to find out about it.
Part 5: Fix Android SystemUI error by factory reset
Factory Resetting your device to fix Android; unfortunately, the process com.android.systemui has stopped error is a desperate measure and should be the last thing to do on your list. Take this step only when the above mentored two techniques fail to work.
Also, make sure you take a back-up of all your data and contents stored in your Vivo G2 on the cloud, Google Account or an external memory device because once you perform a factory reset on your device, all media, contents, data and other files are wiped out, including your device settings.
Follow the steps given below to factory reset your device to solve the Android SystemUI isn’t responding problem:
- Visit “Settings” by clicking the settings icon as shown below.

- Now select “Backup and Reset”.

- In this step, select “Factory data reset” and then “Reset Device”.
- Finally, tap on “ERASE EVERYTHING” as shown below to Factory Reset your device.

After the factory reset process is completed, your device will automatically restart, and you will have to set it up once again.
The whole process of factory resetting your Vivo G2 might sound tedious, risky, and cumbersome, but it helps to fix the Android SystemUI has stopped error 9 out of 10 times. So, think carefully before using this remedy.
Android SystemUI isn’t responding or Android, unfortunately, the process com.android.systemui has stopped error is commonly seen by users on their devices. It is not a random error and is linked to either the software, Google App, cache partition, or data stored in the Vivo G2 device. It is fairly simple to deal with this issue as all you need to do is install or roll back your Android OS update, uninstall Google App updates, clear cache partition, or factory reset your device to clear all data, files, and settings stored in it. The methods listed and explained above are the best ways to fight the problem and to prevent it from troubling you in the future. These methods have been adopted by affected users all over the world who recommend them because they are safe and involve minimum risks as compared to other tools to solve the Android SystemUI has stopped error. So go ahead and try them now!
Play Store Not Working On Vivo G2? 8 Solutions Inside
A functional Google Play Store is crucial for Android users to access, update, and install apps. Unfortunately, common issues like your Google Play Store not working can disrupt this experience. If you find your Play Store misbehaving more often than not, don’t fret.
In this guide, discover reliable solutions when your Google Play Store is not responding. The article will teach you how to tackle these problems and ensure a seamless app experience. Don’t let technical glitches hinder your digital journey—follow these troubleshooting steps for a swift resolution. Explore the page below to learn more.

Part I. 7 Common Google Play Store Issues Users Encounter
The Google Play Store serves as the epicenter for Android users. It facilitates seamless access to a vast array of apps. However, encountering issues with the platform can impact the functionality of your device. Below are 7 common issues on why your Google Play Store is not responding.
Inability To Open the Play Store
The inability to open the Play Store leaves you without access to new apps or updates. The issue is often accompanied by error messages, which can leave you scratching your head.
Crashing Issues
Frequent crashes undermine the stability of the Play Store. Users attempting to browse or download apps may find themselves abruptly kicked out of the application. It can disrupt your intended tasks and cause annoyance in the long run.
Not Responding Errors
The dreaded “Not Responding” message can bring usability to a standstill. Users navigating the Play Store may experience delays or complete unresponsiveness. It can lead to a frustrating and unproductive experience.
Download and Installation Failures
When downloads and installations fail, you will be unable to enjoy new apps or updates. This issue can be annoying when trying to access crucial software improvements or security updates.
Authentication and Account Issues
Problems with authentication and account access can lock users out of their Google accounts on the Play Store. It prevents users from purchasing or downloading apps. The issue not only hampers functionality but also raises security concerns.
Update Problems
Difficulties in updating apps can leave users with outdated software. It can potentially compromise security and miss out on new features. The issue diminishes the user experience by depriving you of the latest enhancements.
Connection and Network Errors
Persistent connection and network errors impede the Play Store’s ability to fetch data. It hinders users from browsing and downloading apps. The issue is frustrating in areas with unstable internet connectivity.
Part II. Why Does the Google Play Store Keep Stopping?
If you’re wondering why does Google Play Store keeps stopping on your phone, there can be several factors. Here are some of them below.

- **Network issues.**Unstable or poor internet connections can disrupt the communication between the Vivo G2 device and the Play Store. It can lead to frequent crashes.
- **Outdated Play Store version.**Running an outdated version of the Play Store may result in compatibility issues. The lack of essential updates can cause the application to stop unexpectedly.
- Cache and data accumulation. Over time, cached data and accumulated data in the Play Store can become corrupted. It can hinder the smooth operation of your phone and contribute to sudden stops.
- Google account problems. Authentication issues, incorrect credentials, or other problems with the linked Google account can disrupt the Play Store’s functionality. This can also lead to repeated crashes.
- **System glitches and bugs.**Inherent glitches and bugs within the Android operating system may affect the Play Store’s performance. They can cause your device to stop unexpectedly.
Part III.7 Quick Solutions To Resolve Play Store Not Working Issues
Encountering issues with the Google Play Store can be frustrating. It disrupts your ability to download, update, or access essential apps. Here are seven quick solutions when your Google Play Store unfortunately has stopped.

Clear Cache and Data
Revitalize your Google Play Store by addressing performance issues. Clearing cache and data can be a crucial step when troubleshooting malfunctions or glitches in the app. Here’s how.
- Step 1: Head to your device’s Settings and navigate to Apps or Application Manager.
- Step 2: Locate and select Google Play Store. Within Storage, choose Clear Cache and Clear Data. Confirm your action and restart the Play Store.

Update Play Store
Enhance your Play Store’s functionality by ensuring it’s up-to-date. This method suits those who haven’t updated their Google Play Store for a long time. Follow the steps below.
- Step 1: Open the Play Store app and tap the three horizontal lines in the top-left corner to access the menu.
- Step 2: Select Settings and scroll down to find the Play Store version. Install any available updates.

Check Internet Connection
Ensure a stable internet connection on your device. Switch between Wi-Fi and mobile data to identify connectivity issues. Restart your router or modem if problems persist.
Reset App Preferences
Restore your device’s app settings to default for improved functionality. Below are the steps.
- Step 1: Go to your device’s Settings and select Apps or Application Manager.
- Step 2: Tap the three dots in the top-right corner and choose Reset app preferences.

Re-add Google Account
Resolve Play Store issues by re-adding your Google account. Follow these steps in Settings to remove and re-add your Google account, ensuring a seamless and error-free experience.
- Step 1: Navigate to Settings and choose Accounts or Users & Accounts.
- Step 2: Select Google and remove the account. Re-add the Google account and verify if the Play Store functions properly.

Uninstall Play Store Updates
This method troubleshoots Play Store problems by uninstalling updates. Here’s how.
- Step 1: Access Settings and go to Apps or Application Manager.
- Step 2: Find Google Play Store and tap on Uninstall Updates. Confirm the action and restart the Play Store.

Perform a System Update
Ensure your device’s overall stability by performing a system update to ensure the stable operation of the Play Store. Follow the steps below.
- Step 1: Access Settings, scroll down, and select System or Software Update.
- Step 2: Next, choose System update or Check for Updates and install any available system updates**.**

If you’re still asking yourself why my Google Play Store is not opening after conventional methods prove ineffective, it may lead you to explore third-party tools. As a final recourse, considering reputable tools like Wondershare Dr.Fone - System Repair introduces a fresh approach to troubleshooting your device.
Part IV. How To Repair Play Store Not Working With an Alternative
Repairing your Google Play Store can be swift and effective with Dr.Fone - System Repair. This tool offers advanced features to diagnose and fix various system issues without the advanced skills required. It provides a quick and efficient resolution for a malfunctioning Google Play Store. Follow these three simple steps to get started:
- Step 1: Begin by downloading and installing Dr.Fone - System Repair (Android) on your computer.
safe & secure
4,207,329 people have downloaded it
- Step 2: Launch the program and connect your Vivo G2 to the computer using a USB cable. Choose the Vivo G2 device type and click Start to initiate the repair process.
- Step 3: Dr.Foneshould automatically detect the brand of your device. Next, choose the Name, Model, Country, and Carrier. Tick the checkmark and click Next to continue. Follow the on-screen instructions and wait for the repair process to complete.
- Step 4: Simply click Done on the prompt window displaying a confirmation message to exit the tool if your Vivo G2 starts successfully. In the event that the Vivo G2 device fails to start, select Try Again to initiate the process once more.
Bonus: What Else Can Dr.Fone - System Repair Do?
Beyond its utility in fixing Google Play Store malfunctions, Dr.Fone is known for its user-friendly interface and high success rate. Its ability to address a wide range of Android issues offers a comprehensive solution to various system-related problems. Below are the platform’s key highlights.
Key Features
- Fixes diverse Android issues. Dr.Fone - System Repair excels in resolving a multitude of Android problems. This includes a black screen, a boot loop, and bricked Android devices. Its comprehensive approach ensures you can rely on a single tool to tackle a wide range of system-related issues.
- Support for over 1000 Android models. Dr.Fone supports over 1000 Android models. The broad coverage ensures diverse devices can use the software to troubleshoot and repair their Android systems.
- User-Friendly interface. Dr.Fone is designed with simplicity in mind. It offers an easy-to-use interface that caters to both novice and experienced users.
- High success rate. The software boasts a high success rate in resolving Android issues. Its effectiveness in tackling various problems has garnered trust among users. It’s one of the go-to solutions for those seeking reliable and efficient system repairs.
safe & secure
4,131,376 people have downloaded it
Conclusion
Addressing issues when your Google Play Store does not work is crucial for an uninterrupted Android experience. Follow the outlined steps to regain control and enjoy a seamless app experience. Don’t let frustrations linger; take immediate action for a hassle-free Google Play Store.
Lastly, having Dr.Fone - System Repair at your side offers a reliable solution for a wide range of Android concerns. Don’t worry if your Google Play store is not responding, and Dr.Fone can fix it in minutes.
Also read:
- [New] A Beginner's Guide to Elevating Auditory Experiences on YouTube for 2024
- [New] In 2024, Unleash Your Inner Documentarian Comprehensive Guide for Recording Sims 4 Gameplay Triumphantly
- [Updated] In 2024, Expand Your Video Editing Experience No Inshot Required
- [Updated] The 2023 Update Facebook's New Landscape Explained
- How to Change Lock Screen Wallpaper on Samsung Galaxy F14 5G
- How To Fix Unresponsive Phone Touchscreen Of Realme Narzo 60 5G | Dr.fone
- In 2024, Behind the Scenes of LOL - Top 3 Broadcast Techniques
- In 2024, Ultimate Guide from Realme GT 5 FRP Bypass
- OnePlus 12 Not Receiving Texts? 10 Hassle-Free Solutions Here | Dr.fone
- Play Store Stuck on Downloading Of Lava Yuva 3? 7 Ways to Resolve | Dr.fone
- Samsung Galaxy M14 4G Bootloop Problem, How to Fix it Without Data Loss | Dr.fone
- Unlocking the Power of Smart Lock A Beginners Guide for Oppo A59 5G Users
- Title: How To Revive Your Bricked Vivo G2 in Minutes | Dr.fone
- Author: Abel
- Created at : 2024-12-11 16:10:19
- Updated at : 2024-12-16 19:17:52
- Link: https://fix-guide.techidaily.com/how-to-revive-your-bricked-vivo-g2-in-minutes-drfone-by-drfone-fix-android-problems-fix-android-problems/
- License: This work is licensed under CC BY-NC-SA 4.0.