
HTC U23 Camera Not Working Unexpected Error? Fix It Now | Dr.fone
HTC U23 Camera Not Working Unexpected Error? Fix It Now
For all its glory and goodness, the Android OS often has its users pulling their hair in frustration at just how buggy the OS can be at times. So, if you’re having one of those days today, we are here to help. Camera app is one of the most used apps on smartphones today. People only launch the app when they want to take a photo, for everything else there’s a dedicated photo gallery app. What happens when you launch the camera app only to realize it threw an error and you missed your photo moment? Don’t throw the phone, not yet. Let us help you out.

Part I: Why Is Android Camera Not Working?
There are a few reasons why the camera app is not working on your HTC U23.
Low Memory
Camera app does rely heavily on system resources, so in case you have too many apps open and for some reason the OS is not able to manage the resources appropriately for the camera app to function as it should, you will get a camera error.
Low Storage
The camera app needs storage space to save the photos it takes. So, in case your phone is running low on storage space, the camera app would likely malfunction as it would have no way to store the photos it would be taking.
General Bugs And Glitches
OS bugs and general glitches within the OS and the camera app can cause camera not working issue anytime during everyday operation. This is part and parcel of any technology.
Hardware Issues
In the rarest cases, there might have developed an actual hardware issue with the camera system on your HTC U23. The likely culprit is misuse and abuse, such as a dropped phone or maybe the phone was too hot for extended periods of time, causing hardware issues.
Part II: How To Fix Android Camera Not Working Issue?
So, how to get the Android camera not working problem solved? There are a few ways you can try fixing the camera not working issue on your HTC U23 right where you are, without needing to take the HTC U23 device to the manufacturer’s service center.
II.I: Restart The Handset
One of the first things to do any time an app or your phone or tablet does not work like it should, restarting the HTC U23 device refreshes everything just enough to resolve most commonly occurring issues.

Use the power button on your smartphone to restart your Android handset and see if this resolves the issue.
II.II: Close And Relaunch The Camera App
If the camera app (or any app for that matter) has been in the background for a while and then it is brought to the foreground, there are always chances of it crashing for any reason, or not working as expected. So, closing the app completely and relaunching it is recommended.
Step 1: Launch the app switcher on your specific Android device the way your device manufacturer suggests you to. Usually, it is a swipe up and hold gesture to get into the app switcher.

Step 2: Next, you can choose to close just the camera app or, better yet, close all apps by tapping the Close All button. Flicking any app upwards (quick upward swipe) is how you close an app. If there is no Close All button anywhere, repeat the gesture for all open apps.
II.III: Check App Permissions
These days, thanks to strides in the privacy initiatives, apps need permissions before they can function the way they do. Most of the times, apps such as camera do have the necessary permissions, but sometimes it is possible that the permissions are set incorrectly. To check if the camera app has the requisite permissions, do the following:
Step 1: Go to Settings > Apps > Camera > Permissions.

Step 2: Tap Camera.

Step 3: See if the selected option is Allow Only While Using This App. If not, select it.
II.IV: Clear The Camera App Cache
Clearing the camera app cache is sometimes helpful. To do that:
Step 1: Go to Settings > Apps > Camera and tap Storage Usage.

Step 2: Tap Clear Cache.

II.V: Clear The Photo Gallery App Cache
The camera app is closely tied to the photo gallery app that comes baked in into Android OS. That is because photos that the camera app takes are stored in the photo gallery app. Consequently, if there were any issues in the photo gallery app, that could lead to the camera app not working on Android problem. Here’s how to clear the photo gallery app cache:
Step 1: Go to Settings > Apps > Photos > Storage Usage.

Step 2: Tap Clear Cache.
II.VI: Check For App Updates
This does not happen always, but sometimes, with known bugs and issues, there may be an update released that fixes those bugs and issues that prevent some users from using a given app reliably. Checking for updates is a good step to make sure that your camera app is updated to the latest version possible.
Step 1: Go to Play Store and tap your profile picture on the right.

Step 2: Tap Manage Apps and Device.

Step 3: If there are updates available, Tap Update All to update all apps.
II.VII: Cool The Phone Down
We do not realize the immense power that is packed into the thin smartphone form factor these days. If you have been using the phone to video chat for a while now, you might not realize that the phone has become hot, especially if you are using a desk stand. Same for shooting high-resolution videos; the phone does get quite hot shooting high-resolution videos.
If this is the case, close all apps and let the phone cool down. You might even want to shut the phone off to help cool it faster.
II.VIII: Nudge The Camera System
You may want to tap your camera system (the lenses and surrounding area) gently to see if that gets the camera working. In case it did, this is indicative of a hardware issue, and you should get it checked at the service center at your earliest convenience.
II.IX: Fix Android Camera Not Working Issue In One Click (With Dr.Fone)
Now, if the above fixes have not worked, you might want to repair your Android OS once before you make that appointment with the service centre. And, we have just the app to help you fix your camera not working on Android problem quickly.
Wondershare Dr.Fone is a multi-module app that works on both Windows and macOS and is the only app you will ever need to resolve nearly all of your smartphone and tablet issues that you are likely to encounter. Need to take backups? Dr.Fone Phone Backup has you covered with the ability to take and restore even selective backups, and to any location such as your computer or an external disk as well. Want to transfer WhatsApp chats to a new phone? Use WhatsApp Transfer to do just that! Bought a new phone? Use Phone Transfer to transfer contents from old phone to new, and then use Dr.Fone Data Eraser to securely wipe your old phone before giving it away!
Today, we will use Dr.Fone’s System Repair (Android) module to fix Android camera not working issue quickly.
Download Dr.Fone here.
 safe & secure
Step 1: Launch Dr.Fone app on your PC or Mac.

Step 2: Click System Repair module and then Android.

Step 3: For now, don’t bother with the scenarios given and click Start to go to the next screen.

Step 4: Your Android device will be detected by Dr.Fone. If anything seems incorrect, use the dropdown options to change it, and click Next.

Step 5: Your phone needs to be put into Download mode before it can be repaired. Follow the instructions shown onscreen and click Next.

Step 6: Dr.Fone automatically downloads the most recent firmware for your device and when it is ready, waits for your input. Click Fix Now to start the repair process.

Step 7: You will need to enter a 6-digit code (digit zero, six times – 000000) to confirm and begin the repair process.

When the repair is complete, Dr.Fone shows the final screen as below:

safe & secure
Conclusion
The camera app on your smartphone is one of the most important apps you use. This is not a game; this is an app that makes previous memories possible for you. So, when you get any of those incorrigible errors that are impossible to make sense of, what do you do? This guide gives you 9 fixes to fix Android camera not working error quickly and easily.
HTC U23 Not Connecting to Wi-Fi? 12 Quick Ways to Fix
Nowadays, it’s pretty much essential to have your HTC U23 or smartphone connected to the internet. Whether you’re watching videos, looking something up, or using any kind of app, you need the internet for these applications to function correctly.
This is why it can so annoying when it gets to a point where the internet connection isn’t working. However, the problem of a web page not loading correctly is just the tip of the iceberg.
There are plenty of problems you could experience, whether it’s the Wi-Fi network keeps disconnecting on its own without any warning, perhaps a security issue where the passcode or IP address isn’t being registered properly, or even if the connection is just being super slow, even if there’s no reason too.
Luckily, despite there being so many problems out there, there are also many solutions. Today, we’re going to share with you the complete definitive guide to help you get your HTC U23 connected and free from problems and issues.
Part 1: Restart your HTC U23
Begin by powering off your HTC U23 and unplugging your router. Wait for about a minute before plugging in the router and turning on your device. This simple reset can often restore stable connections and fix Android wifi not working.

Part 2: Turn on Airplane mode and turn off
Turn on Airplane Mode for a few seconds, then turn it off. This maneuver refreshes your device’s network connections and might rectify the Android not connecting to wifi issue.

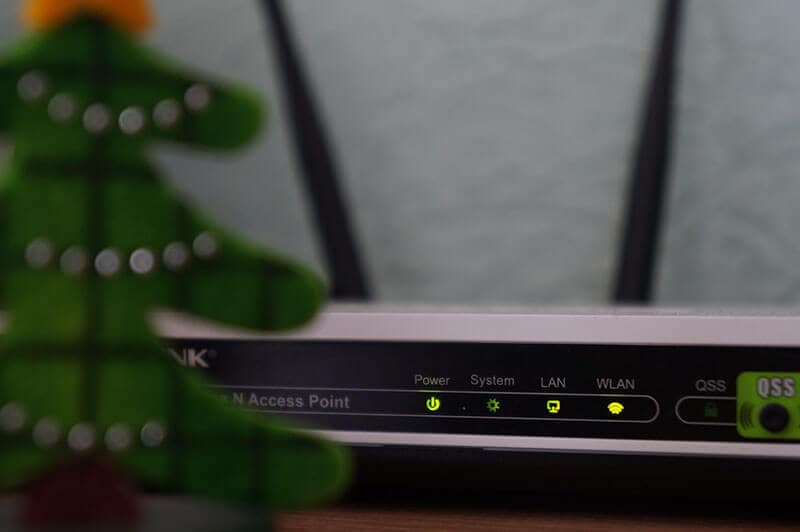
Part 3. Check Wi-Fi Router settings
The third step you’ll want to take is making sure the internet router in your house is working properly and is actually sending internet data to your HTC U23. Of course, if you have other internet-enabled devices connected to the same router and they’re working fine, you know this isn’t the problem.
However, if you’ve got a problem with Wi-Fi not working on your Android and other devices in your home or office, you know you’ve got a router problem. Here’s how to solve it.
- Go to your internet router and check the indicator lights
- While this depends on your device, a green or blue light will mean the connection is good, whereas a red light indicates a problem
- Press the Restart button on your router and wait ten minutes before reconnecting your device and connecting again
- Call up your internet provider to see if there’s an internet connection issue in your area
- Open your web browser and log into your router settings to ensure your HTC U23 is connected to the Wi-Fi network and is allowed to send and receive data
Part 4. Boot your Android in safe mode
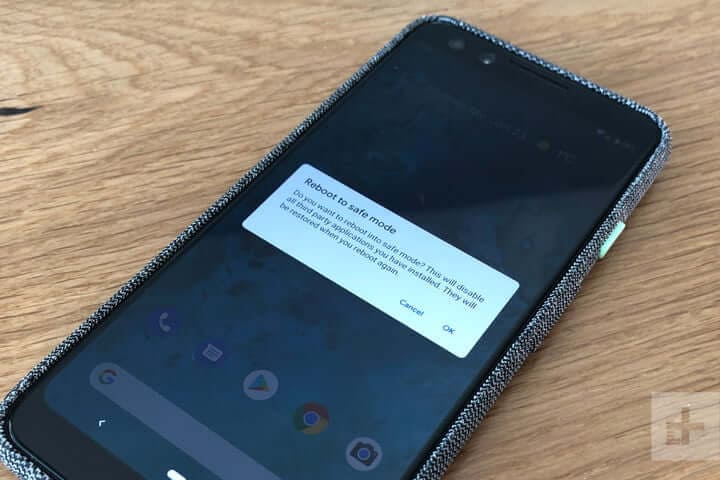
If you’re unable to connect to the internet, but other devices have no issues, you may find the issues is coming from within your HTC U23 itself. Fortunately, there are ways you can see whether this is the problem.
The best way to do this is to boot your device in Safe Mode. The process for doing this will depend on the make and model of your HTC U23, but the basic process goes as follows;
- Turn off your HTC U23 by holding down the Power button and tapping Power Off. Wait a few minutes to ensure the HTC U23 device is completely off
- Press and hold the Power button to turn your phone on, but the press and hold both the volume up and volume down buttons at the same time
- You will see the words ‘Safe Mode’ appear on your screen as the HTC U23 device loads
- Now you will be booted in Safe Mode. Try connecting to the internet again to see if it works
If your device connects to the internet while in Safe Mode, you’ll know you have a problem with an app or service that’s running on your device. If this is the case, you’ll need to go through your apps and delete them and then reinstall them one at a time until you find the app or service that is causing your internet problems.
Part 5. Check the Android Wi-Fi adapter
If you’re using a Wi-Fi adapter on your device to connect to the internet, you’ll need to make sure this is working. This could be an adapter on your HTC U23 itself, especially if you’re using an older device, or if you’re using an adapter to boost the ranger of your router network.
You need to check both of these to make sure your connection is working properly.
- If using an Android Wi-Fi adapter, make sure all the HTC U23 device drivers are up to date, and if you’re using an app, make sure the app is updated, and all the settings allow an internet connection
- If you’re using a router adapter, make sure it’s set up properly, and your HTC U23 is connected to the adapter using the correct passwords. Try connecting another device to see if the internet connection is working on there
- Whichever method you’re using, try disconnecting your HTC U23 and forgetting the network, and then reconnecting and entering the right password to refresh the connection
Part 6. Check SSID and IP address on Android
To make a Wi-Fi connection work, your HTC U23 needs to match two codes that connect and relate to your router to establish the connection and work correctly. These are known as the SSID and the IP address.
Every wireless device will have its own codes and making sure they’re matched to the network you’re connecting to is crucial to ensuring the internet is working on your HTC U23. Here’s how to check on your HTC U23 to make sure everything is correct.
- Tap the Settings menu option, followed by Wi-Fi on your HTC U23
- Turn on your Wi-Fi network and connect it to your router
- Find the router name (SSID) and make sure it’s exactly the same as the SSID written on your router
- Once connected, tap the Wi-Fi network and you will see the IP address. Check both your phone and the router codes to make sure this number matches
When these numbers are matching, if your Android is still not connecting to wifi, you’ll know this wasn’t the problem.
Part 7. Fix Android system issues in one click
If none of the solutions above are working, this could indicate a real problem with the firmware and operating system of your HTC U23. Fortunately, a fast solution to get everything working again is to completely repair the software of your phone.
You can do this easily using powerful Android recovery software known as Dr.Fone - System Repair (Android) . This is the leading repair tool on the market and is designed to fix and repair any firmware and software problems you may be having.
Dr.Fone - System Repair (Android)
A one-click tool to fix Wi-Fi not working on Android
- Can repair Android from any problem including the black screen of death
- A trusted software application used by 50+ million people around the world
- The most user-friendly mobile repair application available right now
- Supports over 1,000+ Android models and devices
- A world-class customer support team to help you whenever you need them
3,483,527 people have downloaded it
To help you have the best and the most accurate experience when using the Dr.Fone - System Repair (Android) application, here’s a complete step-by-step guide on how to use it.
Step One Make your way over to the Wondershare website and download the Dr.Fone - System Repair (Android) software. Install it onto your computer by following the on-screen instructions.
Once installed, connect your HTC U23 to your computer using a USB cable, and open the software, click “System Repair”.
Step Two Click the “Android” option in the menu and then click “Start” to begin the Repair process.
Step Three On the next screen, go through the options and use the drop-down menus to make sure the information is correct for your individual device. Accept the terms and conditions of the software, and then click the “Next” button.
Step Four Confirm you want the software to carry out the repair process by typing the ‘000000’ code into the pop-up box and pressing Confirm. Make sure you read everything displayed in this box beforehand to know what’s happening.
Step Five Now put your phone into Download Mode by following the on-screen instructions, so your device is ready for the repair process. The method for getting your phone into Download Mode will vary depending on your device, so make sure you’re following the right instructions.

Step Six Once the software has detected your device in Download Mode, it will automatically begin the repair process. You need to make sure your device stays connected throughout this time, and your computer stays on.

The whole process is automatic, so you won’t need to do anything until it’s finished. Once completed, you can disconnect your phone and start connecting it to the internet as normal!
safe & secure
Part 8. Check the Wi-Fi connectivity on another phone

When experiencing problems with your Wi-Fi network, it’s worth noting the problem might not be with your phone, but rather the Wi-Fi network itself. This is why it’s important to make sure you check the connection on another device.
Of course, if you’re already using another phone on your Wi-Fi network, you know this isn’t the case. However, if you’re not sure, here’s what you need to do;
- Get another Android or iOS phone or tablet
- Open the Settings menu and connect to the Wi-Fi network you’re having problems with
- Enter the password and connect to the network
- Open a web browser on the phone and try loading a web page
- If the page loads, you know the Wi-Fi network isn’t the problem
- If the page doesn’t load, you know you’ve got a problem with your Wi-Fi network
Part 9. Change the password of the Wi-Fi

Each Wi-Fi network router will give the opportunity to choose and change the password you have to let devices connect to your network. It’s important you try changing this because you never know if someone else has accessed your network and could be blocking your device. Here’s how it works;
- Log onto your computer and open your Wi-Fi settings
- Depending on the brand and method of your individual router, navigate to the Wi-Fi password settings menu
- Change the password to something complicated using all available digits and characters
- Save the password and restart the router to disconnect all devices
- Now connect your HTC U23 to the router using the new password
Part 10. Reset network settings on Android
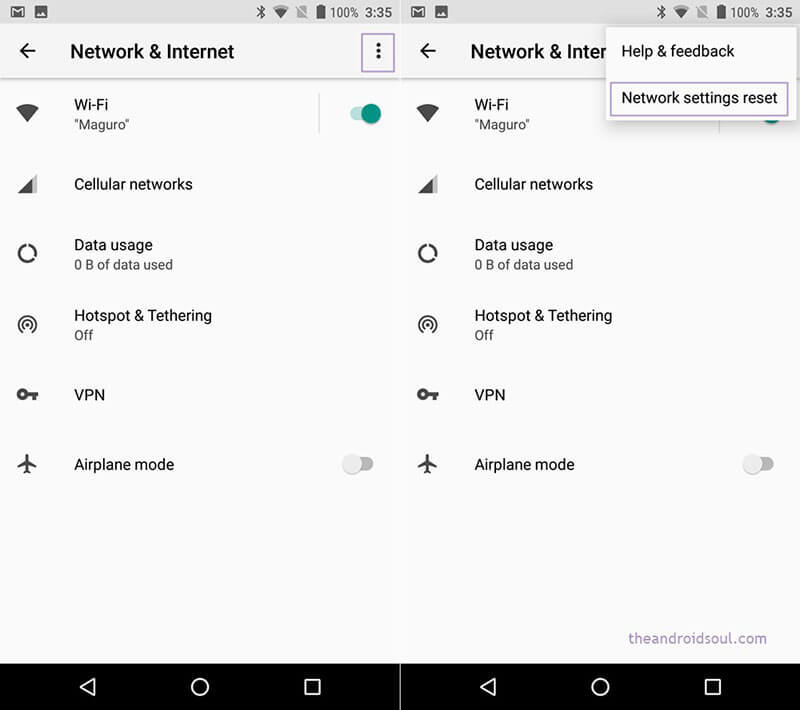
Just like the method above where you’ll be effectively resetting the network settings on your router, if this hasn’t worked, you’ll be able to reset the network settings on your HTC U23, hopefully removing the bugs and allowing you to connect.
Here’s how you can do this easily on your HTC U23;
- From the home screen of your HTC U23, open the Settings menu
- Tap the Backup & Reset option
- Tap the Reset Network Settings option
- Tap the Reset Network option
- If you need to, enter the PIN number or passcode for the Android device, and the HTC U23 device will confirm the reset has taken place
- Reconnect your HTC U23 to your Wi-Fi network for the changes to take effect
Part 11. Clear partition cache in recovery mode
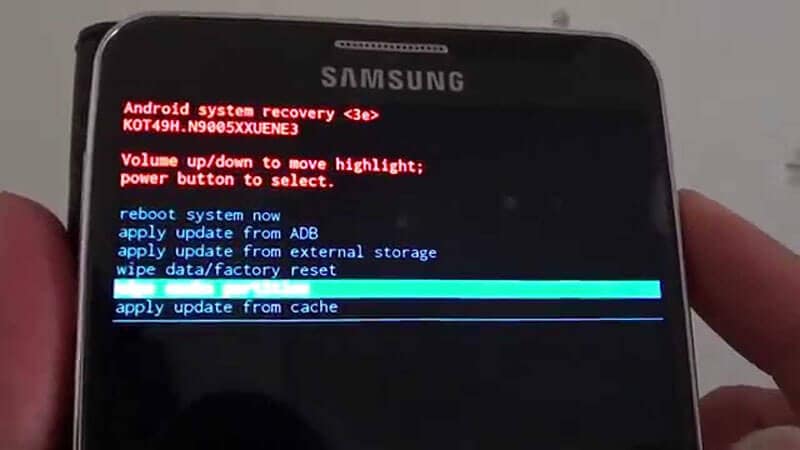
As you continue to use your HTC U23, the partition cache will fill up with data your device needs and doesn’t need. However, by clearing your device’s partition cache, you can make clear up some space which should help your device have enough memory to connect to the internet.
- Turn off your HTC U23
- Turn it on by holding down the power button, volume button, and home button
- When your phone vibrates, let go of the Power button, but continue to hold the volume button
- When a menu is displayed, use the volume buttons to navigate the menu
- Select the Android System Recovery option, followed by Wipe Cache Partition
- Restart your device and connect to the internet
Part 12. Reset factory settings

If worse comes to worst, another option you have is to factory reset your HTC U23. As we’ve spoken about above, while using your phone from the day you started using it, your device will fill up with files and data which can become messy and causes bugs.
However, by factory resetting your device, you can start again from the factory default from which you first received it, ultimately clearing the bugs. Make sure you back up your device before proceeding because it will erase your personal files.
- Open the Settings menu on your HTC U23
- Navigate to System > Advanced > Reset Options
- Tap the Reset phone option, and enter your PIN code if required
- Tap Erase Everything
- Wait for your phone to complete the process
- Restart your device and connect to the internet
safe & secure
8 Workable Fixes to the SIM not provisioned MM#2 Error on HTC U23
SIM cards are small chips that act as a connecting medium between your cell phone and your carrier. It is programmed to help your carrier identify your cell phone account with certain information. And eventually, you are enabled to make calls and to make use of mobile internet. Now, if your device is showing “SIM not provisioned” on Android then it signifies that the connection to carrier network cannot be established or perhaps, your carrier isn’t able to identify your cell phone account.
Part 1. Why does the error “SIM not provisioned MM#2” pop up?
There can be numerous reasons behind the pop up that reads “SIM not provisioned” on Android. But basically, it most probably affects the users who have registered a new SIM card. If you get to experience this issue in other situations or if the SIM is not working in Android, then the problem is with the SIM card and needs to be replaced. Anyways, here is a list of situations when the “SIM not provisioned” error may bother you.
- You got a new SIM card for your new phone.
- You are transferring your contacts into the new SIM card.
- In case, the carrier network provider’s authorization server is unavailable.
- Perhaps, you’re out of the reach of the carrier coverage area and that too, without active roaming agreement.
- Though new SIM cards work flawlessly. But it is often necessary to get your SIM card activated due to security reasons.
Just in case, you haven’t bought any new SIM card and the one you were using was working fine until now, then the most probable reasons behind it could be listed below:
- If your SIM card is too old, possibly it might have gone dead, try replacing it.
- Perhaps, the SIM card was not properly inserted into the slot or there might be some dirt between the SIM and smartphone pins.
A yet another reason could be that your SIM card got deactivated by your carrier provider as it could have been locked to a particular phone. Now, if you insert such a SIM card to another device or a new device even, you may get to witness a message that reads “SIM not valid”.
2.1 One click to fix the “SIM not provisioned MM#2” error on Android
Without talking any further, let’s straightly get to the first and the easiest way to repair SIM not provisioned issue on Android. For this purpose, we’re glad to introduce Dr.Fone - System Repair (Android) , one of its kind of tool that is capable of repairing almost all sort of Android OS issues in just a matter of few clicks. Whether it is SIM not provisioned on Android or SIM not working in Android or your device stuck in a boot loop or black/white screen of death. The most probable reason for these errors is Android OS corruption. And with Dr.Fone – Repair (Android) you can efficiently and effectively repair your Android OS in a hassle freeway.
Dr.Fone - System Repair (Android)
Android repair tool to fix “SIM not provisioned MM#2” error
- Fix any type of Android system issue with ease.
- Even novice users can use it without any hassle.
- Compatible with all major HTC U23 smartphone models.
- Highest success rate in the market for fixing Android issues.
- Supports all Android OS versions.
3981454 people have downloaded it
Step by step Tutorial to fix “SIM not provisioned MM#2” error
Step 1. Connect your HTC U23
Download and launch the Dr.Fone toolkit on your computer and then opt for the “System Repair” option from the main interface. Meanwhile, get your HTC U23 connected with the computer using a genuine cable.
Step 2. Opt for Android Repair and key in important information
Now, hit on the “Android Repair” from the 3 options on the left, followed by hitting the “Start” button. From the upcoming screen, you’ll be asked to key in important device-related information, like brand, model, country, and carrier details. Hit “Next” afterward.
Step 3. Boot your device in Download mode
You must put your device in Download mode for better repairing of your Android OS. Simply follow the onscreen guide to boot your Android in DFU mode and hit “Next” thereafter. Once done, the software will automatically start downloading the most compatible and recent firmware for your device.

Step 4. Initiate Repairing
As soon as the download completes, the software verifies the firmware and automatically initiates repairing your HTC U23. Within a short period, you’ll notice that your HTC U23 has been successfully repaired.
 safe & secure
2.2 Ensure the SIM card is not dirty or wet
At times, the issue can be as simple as cleaning your SIM card and SIM slot properly. Ensuring that SIM is not wet either and then putting it back into its place. If this works, then the SIM not working in Android was due to the dirt or moisture that was preventing proper contact between SIM card pins and smartphone circuit.
2.3 Insert the SIM card correctly
If your SIM card was working properly until yet, there is a good possibility that the SIM card may have moved a bit from its actual location. Eventually, there is poor contact between the SIM card pins and the circuit. Try inserting your SIM card properly with the following steps.
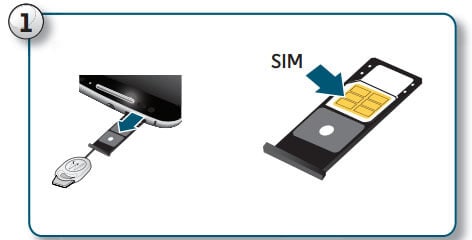
- Power off your HTC U23 and with the help of Q pin, eject the SIM card holder from the SIM slot of your device.
- Now, grab a soft rubber pencil eraser and gently rub it in on the gold pins of SIM card to clean them properly. Then, with the help of a soft cloth wipe away the rubber residue from the SIM card.
- Next, push the SIM back into the SIM card holder properly and push it back into the SIM slot now.
- Turn your device back on and look if your SIM not provisioned on the Android issue is resolved or not.
2.4 Activate the SIM card
Usually, when you buy a new SIM card, it gets automatically activated within 24 hours of being plugged into a new device. But if that’s not happening in your case and you’re wondering how to activate SIM card, make use of the three options below to enable activation:
- Call your carrier service provider
- Send an SMS
- Log on to your carrier’s website and look for the activation page over it.
Note: The aforementioned options are straightforward and are quick ways to enable activation. It depends on your carrier network whether they support them.
2.5 Contact your carrier
Even if your SIM isn’t activated, grab another working device to make a phone call to your carrier or network. Ensure, to explain the entire situation and the error message to them. Be patient while they investigate the issue. It may eat up a heck load of time or may get resolved in a few minutes that completely depend upon the complexity of the issue.

2.6 Try the other SIM card slot
A yet another reason why SIM not working in Android can be because of the SIM card slot might have gone corrupted. Thanks to the dual SIM technology, you do not have to rush immediately to get it to check or repair. You can simply rule out this possibility by ejecting the SIM card from its original SIM slot and then replacing it into the other SIM card slot. If this solution did work out for you then it is obvious that the problem was with the SIM card slot that got corrupted. And hence, it was triggering SIM not responding issue.
2.7 Try the SIM card in other phones
Or just in case, you’ve still no joy and the SIM not provisioned on Android message is bothering you. Try making use of another Android device. Eject the SIM card from the HTC U23 device which is creating problems and try plugging it into other HTC U23] and other smartphones. Perhaps, this will let you know whether the issue is with your device only or with the SIM card itself.
2.8 Try a new SIM card
Still, wondering how to fix SIM not provisioned? Perhaps, nothing worked for you, right? Well, on that note, you must head to your carrier store and request a new SIM card. Also, inform them about the “SIM not provisioned MM2” error, they will be able to execute proper diagnostics over your old SIM card and hopefully get it resolved. Or else, they’ll equip you with a brand new SIM card and swap the new SIM card into your device and get it activated in the meantime. Eventually, restoring the normal functioning of your device.
Conclusion
In wrapping up, SIM not provisioned errors on Android can be troubling, but they’re certainly fixable. There are several methods, from a simple device restart to reaching out to your network provider. But if these don’t work, we suggest trying Dr.Fone - System Repair (Android) . This tool is known for its ability to handle an array of Android issues and could be just what your device needs. Navigate your tech challenges with ease using Dr.Fone.
safe & secure
Also read:
- [Updated] 2024 Approved The Invisible Scrutiny Unlocking IG Selfie Verification Secrets
- [Updated] In 2024, Enabling Successful Video Sharing in Messenger for iOS and Android Users
- [Updated] Mastering YouTube Streams with Simple OBS Guide
- [Updated] The Secret to Skyrocketing Revenue Crafting Engaging Video Trailers for 2024
- Bypass Activation Lock From Apple iPhone XS - 4 Easy Ways
- Guide to Troubleshoot and Solve Disappearing Cursor Glitches in Windows 11
- How to Fix It Realme 11 5G Wont Turn On | Dr.fone
- How to Fix the Soft Bricked Vivo Y78+? | Dr.fone
- How to restore wiped messages on Samsung Galaxy S23 Tactical Edition
- My Videos Arent Playing on Motorola Moto G34 5G – What Can I Do? | Dr.fone
- New In 2024, The Perfect Match Top 7 DAWs Tailored to Guitarists Recording and Playback Needs
- Play Store Stuck on Downloading Of Honor X8b? 7 Ways to Resolve | Dr.fone
- Poco C65 Screen Unresponsive? Heres How to Fix It | Dr.fone
- Reasons for Itel S23+ Stuck on Boot Screen and Ways To Fix Them | Dr.fone
- Spotify Keeps Crashing A Complete List of Fixes You Can Use on Poco C51 | Dr.fone
- Strategies for Apps That Wont Download From Play Store On Google Pixel 8 | Dr.fone
- TP-Link's Cost-Efficient Champion: Unpacking The Archer C9 Review
- Title: HTC U23 Camera Not Working Unexpected Error? Fix It Now | Dr.fone
- Author: Abel
- Created at : 2024-12-15 19:13:05
- Updated at : 2024-12-16 19:23:09
- Link: https://fix-guide.techidaily.com/htc-u23-camera-not-working-unexpected-error-fix-it-now-drfone-by-drfone-fix-android-problems-fix-android-problems/
- License: This work is licensed under CC BY-NC-SA 4.0.