
Lava Yuva 3 Pro Bootloop Problem, How to Fix it Without Data Loss | Dr.fone
Lava Yuva 3 Pro Bootloop Problem, How to Fix it Without Data Loss
Have you, like many other users, faced the bootloop Android problem and wondered what exactly is Android boot loop. Well, Android boot loop is nothing but an error that makes your phone switch on itself every time you manually turn it off. To be precise, when your Lava Yuva 3 Pro does not remain switched off or powered off and starts to boot up automatically after a few seconds, it might be stuck in the boot loop Android.
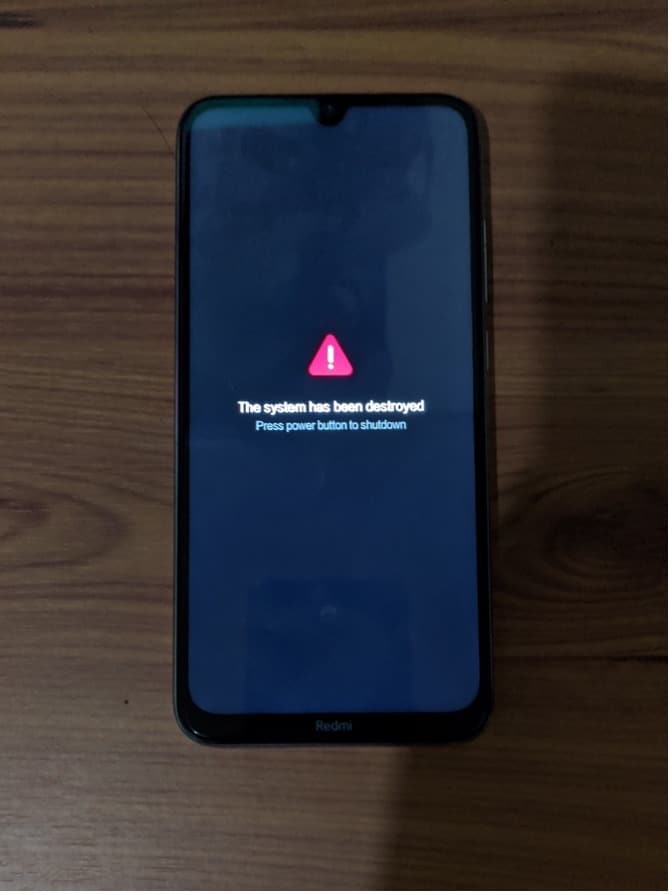
An Android boot loop is a very common problem and is one of the first symptoms of a soft-bricked device. Also, when your device is experiencing Android boot loop issue, it does not start normally to reach the Home or Locked Screen and remains frozen at the Lava Yuva 3 Pro device’s logo, Recovery Mode or a lit-up screen. Many people fear losing their data and other files due to this error and thus, it is a very confusing situation to be in.
We understand the inconvenience caused, therefore, here are ways to tell you how to fix the bootloop problem in Android devices without losing any important data.
However, before moving on, let us learn a little about the causes for the Android boot loop error.
Part 1: What might cause the bootloop issue on Android?
Android boot loop error might seem weird and unexplainable but it occurs because of some specific reasons.
Firstly, please understand that it is a misnomer that boot loop error occurs only in a rooted device. Boot loop Android error can also occur in a stock device with the original software, ROM, and firmware.
In a rooted device, changes made, such as flashing a new ROM or customized firmware which are not compatible with the Lava Yuva 3 Pro device’s hardware or existing software, can be blamed for the boot loop problem.
Moving on, when your device’s software is unable to communicate with the system files during the start-up process, Android boot loop problem may arise. Such a glitch is caused if you have recently updated the Android version.
Also, corrupt App update files may also cause the bootloop Android issue. Apps and programs downloaded from unknown sources bring in a particular type of virus that prevents you from using your device smoothly.
All-in-all, Android boot loop error is a direct outcome of when you try to tamper with your device’s internal settings.
Hence, if you are looking for ways to guide you about how to fix boot loop issue, you will have to revamp the Lava Yuva 3 Pro device internally by either resetting it or adopting a recovery method.
Read on to know more about how to fix the bootloop error without any data loss when your device suffers from the bootloop Android problem.
Part 2: One click to Fix Android Bootloop without factory reset
If you are trying to figure out how to fix boot loop, the first option you have is the one-click fix to Android Bootloop which involves using the Dr.Fone - System Repair software.
This is designed to repair any data corruption on your device and restores your firmware to its usual working condition.
Dr.Fone - System Repair (Android)
One click to fix boot loop of Android
- #1 Android repair solution from your PC, can fix a wide range of Android system issues, such as boot loop, black screen, etc.
- The software requires no technical expertise, and anybody can use it
- A one-click solution when learning how to fix Android boot loop
- Not require root Android phones.
- Works with most Lava Yuva 3 Pro devices, including the latest Lava Yuva 3 Pro phones like S22
- Simple and easy-to-use user interface
4,689,059 people have downloaded it
To help you get started, here’s a step-by-step guide on how to use Dr.Fone - System Repair.
Note: This method can erase data on your device, including your personal files, so make sure you’ve backed up your device before proceeding.
Step #1 Download the Dr.Fone - System Repair software from the website and install it onto your computer.
Open the software and select the System Repair option from the main menu to fix the Android bootloop error.

Step #2 Connect your Lava Yuva 3 Pro to your computer using the official cable and select the “Android” option from the three menu items. Click “Start” to confirm.

You’ll then need to input the Lava Yuva 3 Pro device information, such as your carrier info, device name, model, and country/region in order to ensure you’re downloading and repairing the correct firmware to your phone.

Step #3 Now you’ll need to put your phone into Download Mode to remove the Android bootloop.
For this, you can simply follow the onscreen instructions for both phones with and without home buttons.

Click “Next”, and the software will begin downloading the firmware repair files.

Step #4 Now you can sit back and watch the magic happen!
Make sure your computer stays connected to the internet, and your device stays connected to your computer throughout the entire process. Once the firmware has been downloaded, it will be automatically installed onto your mobile device, removing the boot loop Android error.

You’ll be notified when the process is done and when you can remove your device and start using free from the boot loop Android error!
 safe & secure
Part 3: Soft reset to fix Android bootloop issue
When your device is stuck in Android boot loop, it does not necessarily mean that it is bricked. Boot loop might be occurring due to a simpler problem which can be fixed by turning off your device. This sounds like a home remedy for a serious problem but it works and resolves the problem most of the time.
Follow the steps given below to soft reset your device:
Turn the Lava Yuva 3 Pro device off and take out its battery.

If you cannot take the battery out, let the phone be off for about 3 to 5 minutes, and then turn it back on.
Simply performing a soft reset on your device can help you if you are looking for solutions for how to fix the bootloop issue. This a very useful method as it does not result in any kind of loss in data and protects all your media files, documents, settings, etc.
In case the Lava Yuva 3 Pro device does not turn on normally and is still stuck in the bootloop Android problem, be prepared to use the troubleshooting techniques given and explained below.
Part 4: Boot into Safe Mode to fix Android boot loop

Booting your Lava Yuva 3 Pro into Safe Mode is a useful troubleshooting step to fix boot loop issues caused by third-party apps. When in Safe Mode, the Lava Yuva 3 Pro device will start up with only essential system apps, and any downloaded apps that might be causing conflicts won’t run. Here’s how you can boot your Lava Yuva 3 Pro into Safe Mode to address the boot loop problem:
Step 1: Power Off Your Device
Hold down the power button until it turns off completely.
Step 2: Access Safe Mode
To enter Safe Mode, follow these steps based on your device model:
- For most Android devices: Press and hold the power button to turn on your device. As soon as the manufacturer’s logo appears, press and hold the Volume Down button until the Lava Yuva 3 Pro device finishes booting. You should see “Safe Mode” displayed in the bottom left or right corner of the screen.
- Some devices might require slightly different key combinations. Refer to your device’s user manual or perform an online search for the specific method to enter Safe Mode for your model.
Step 3: Observe the Lava Yuva 3 Pro device
Once your device has booted into Safe Mode, use it for a while to see if the boot loop issue persists. If the boot loop doesn’t occur in Safe Mode, it indicates that the problem is likely caused by a third-party app.
Step 4: Identify and Uninstall Problematic Apps
Now that you’re in Safe Mode, it’s time to identify the troublesome app. Start by uninstalling recently installed apps one by one until the boot loop problem is resolved. After each uninstallation, restart your device normally to check if the boot loop still occurs. Continue this process until you find the problematic app.
Step 5: Restart Normally
Once you’ve identified and uninstalled the problematic app, restart your device normally to exit Safe Mode. Your Android device should now start up without getting stuck in a boot loop.
By following these steps and using Safe Mode to isolate problematic apps, you can effectively troubleshoot and resolve boot loop issues on your Lava Yuva 3 Pro.
Part 4: Factory reset to fix Android bootloop issue
Factory reset, also known as Hard Reset, is a one-stop solution for all your software resulting in issues. Android boot loop being such problem, can be easily overcome by performing a factory reset.
Please note that all your device’s data and settings will be deleted by adopting this method. However, if you have a Google account signed in on your Lava Yuva 3 Pro, you will be able to retrieve most of your data once the Lava Yuva 3 Pro device turns on.
To factory reset your Android boot loop device, you must first boot into the Recovery Mode screen.
To do this:
Press the volume down button and power button together until you see a screen with multiple options before you.

When you are at the Recovery Mode screen, scroll down using the volume down key, and from the options given, select “Factory Reset” using the power key.

Wait for your device to perform the task and then:
Reboot the phone in Recovery Mode by selecting the first option.

This solution is known to fix the boot loop error 9 out of 10 times, but if you still can’t start your Lava Yuva 3 Pro normally, consider using a CWM Recovery to resolve the Android boot loop issue.
Part 5: Use CWM Recovery to fix bootloop on rooted Android
CWM stands for ClockworkMod and it is a very popular custom recovery system. To use this system to solve the boot loop Android error, your Lava Yuva 3 Pro must be rooted with CWM Recovery System which basically means CWM must be downloaded and installed on your device.
Furthermore, to use CWM Recovery to fix boot loop on rooted Android devices, follow the steps given below:
Press the home, power, and volume up buttons to launch the CWM Recovery screen.
Note: you might have to use a different combination of keys to enter into Recovery Mode, depending on your device’s model.

Scroll down using” the volume key to select “Advanced”.

Now select “Wipe” and choose to wipe “Dalvik Cache”.

In this step, select “Mounts and Storage” to click on “Wipe” or “Cache”.
Once this is done, make sure to reboot your Lava Yuva 3 Pro.
This process with successfully fix the Android boot loop error and not cause any loss of data stored on your device stuck in boot loop.
So the bottom line is that boot loop Android issue may seem like an irreparable error but it can be resolved by carefully following the techniques explained above. These methods not only tell you how to fix the bootloop problem but also prevent it from occurring in the future.
An Android boot loop is a common phenomenon with all Android devices because we tend to tamper with our device’s internal settings. Once the ROM, firmware, kernel, etc are damaged or rendered incompatible with the Lava Yuva 3 Pro device’s software, you cannot expect it to function smoothly, hence, the boot loop error occurs. Since you are not the only one suffering from the Android boot loop problem, be rest assured that the ways, given above, to combat it are recommended by users facing similar troubles. So, don’t hesitate and go ahead to try them on.
safe & secure
Quick Fixes for Why Is My Lava Yuva 3 Pro Black and White
Why is My Lava Yuva 3 Pro in black and white? This sudden shift in display colors can be perplexing and impact user experience. This issue affects various devices, including Lava Yuva 3 Pro and other Android models. The abrupt shift to monochrome can impact your daily use. It can make apps and content appear dull.
If you’re asking why is my Android phone in black and white, then you’re in luck. Dive into the article below to unravel the causes behind your phone’s black-and-white display. Discover insights on addressing this unexpected issue, enhancing your overall mobile experience.

Part 1. Phone Screen in Black and White? Easy Fixes for Android Devices
Discovering your Lava Yuva 3 Pro going monochrome can be annoying. The section below answers the question: why did my Lava Yuva 3 Pro phone go black and white? It involves a combination of software adjustments and careful troubleshooting. Follow the practical solutions below to restore vibrant colors to your device.

Accessibility Settings
Accidental activation of accessibility settings may turn your display monochromatic. The “Grayscale“ or “Color Inversion“ option in the Accessibility or Vision section of your phone’s settings might be enabled. It can cause a black-and-white display. Here’s the solution:
- Step 1: Open your phone’s settings. Navigate to the Accessibility or Vision section.

- Step 2: Disable the Grayscale or Color Inversion option.
App Conflicts
Certain third-party apps can cause conflicts, leading to a black-and-white display . Newly installed apps might be the culprit, affecting your device’s color settings. Some apps also have grayscale modes that can impact the overall display. Here’s how to fix it:
- Step 1: Identify and uninstall recently installed apps.
- Step 2: Check individual app settings for grayscale modes.
System Glitches
System glitches or software bugs can trigger display issues. It can result in a black-and-white screen. Outdated software versions may contain bugs affecting color output as well. Regularly checking for software updates can prevent or resolve such glitches. Here’s how.
- Step 1: Go to your phone’s settings. Check for software updates in the Software update or System update section.

- Step 2: Update your device if there is a software update available. Ensure your device is running the latest software version.
Battery Saving Modes
Battery-saving modes can also alter display settings to conserve energy. It can sometimes result in a black-and-white screen. These modes limit power consumption by reducing color output. Reviewing and adjusting these settings can restore the normal color display. Follow the steps below.
- Step 1: Open your Lava Yuva 3 Pro’s Settings. Navigate to the Battery or Battery & Performance section.

- Step 2: Check and adjust battery-saving settings, including toggling power-saving modes on or off.
Hardware Issues
In rare cases, hardware issues may cause a black-and-white display. Physical damage, loose connectors, or problems with the display hardware can impact color reproduction. Identifying and addressing these hardware issues may be crucial for resolving the problem. Here’s what you should do.
- Step 1: Check for physical damage, loose connectors, or display hardware issues.

- Step 2: Seek professional assistance or contact the Lava Yuva 3 Pro device manufacturer if hardware problems are suspected.
Consider a reliable third-party tool if your phone persists in black and white despite troubleshooting attempts. Tools such as Dr.Fone System Repair Android offer advanced solutions for complex system issues. They ensure your phone regains its vibrant display without a hitch.
Part 2. Using a Dedicated Tool: Dr.Fone for Fixing Black and White Display Problems
Dr.Fone is a reliable solution for addressing black-and-white display issues on Android devices. For a stress-free repair experience, follow these simple steps using Dr.Fone - System Repair (Android).
![]()
Dr.Fone - System Repair (Android)
Repair Android System Errors without Any Trouble.
- Fix your Android to normal, no skills required.
- Fix various Android system issues, stuck in boot loop , black screen , or won’t turn on , looping on start, etc.
- The high success rate in resolving Android system issues.
- Compatible with a wide range of Android devices and OS versions
- User-friendly interface with easy-to-follow steps.
3981454 people have downloaded it
- Step 1: Download and install Dr.Fone. Launch the program and click on System Repair on the main window. Connect your Lava Yuva 3 Pro to the computer using the correct cable. Choose Android among the options.
safe & secure
3,601,336 people have downloaded it
- Step 2: Provide accurate device information, including brand, name, model, country/region, and carrier details. Confirm the warning and click Next.
- Step 3: Follow the on-screen instructions and wait for the program to download the firmware. Once downloaded and verified, Dr.Fone automatically initiates the repair process on your Lava Yuva 3 Pro.
- Step 4: After a while, your Lava Yuva 3 Pro will have all system issues fixed. Click Done to complete the process or choose Try again if the problem persists, allowing you to repeat the steps.

Note
It’s highly recommended to back up your Android data before using Dr.Fone for repair.
How Dr.Fone Can Help You Beyond Display Issues
Beyond resolving black-and-white display problems, Dr.Fone serves as a comprehensive tool for all Android issues. The platform can enhance your device functionality.
Key Features
Here are key features that make Dr.Fone an invaluable resource:
- Fix All Kinds of Android Problems
Dr.Fone is designed to address a wide range of Android issues. These include black screens, malfunctioning Play Store, app crashes, boot loops , and bricked Android devices . Its versatility makes it a go-to solution for diverse system challenges.
- Wide Device Compatibility
With support for over 1000 Android models, Dr.Fone ensures compatibility with a vast array of devices. The platform is versatile and a widely applicable tool for Android users.
- High Success Rate
Dr.Fone boasts a high success rate in resolving Android issues. It provides users with confidence in its effectiveness and reliability.
Additional Functionalities
Below are additional functionalities of Dr.Fone that support your device to keep it in top shape.
- **Phone Manager.**Fone acts as a comprehensive phone manager. It allows you to transfer contacts, SMS, photos, videos, and more between your Lava Yuva 3 Pro and computer. The feature simplifies data management and ensures seamless organization.
- Phone Backup. The tool enables selective backup of Android data on a computer. It provides you with the flexibility to safeguard essential information. The selective backup feature ensures efficient use of storage and allows for easy restoration when needed.
- **Screen Unlock Without Losing Data.**Fone offers a secure way to unlock the screen of Android devices without losing data. You can regain access to your devices without compromising valuable data, whether due to forgotten passwords, pattern locks, or PINs.
Part 3. Tips for Maintaining Your Phone Display Brilliance
Maintaining a vibrant phone display enhances user experience and ensures optimal visual clarity. Follow these tips to keep your phone’s display at its best:

Adjust Brightness Mindfully
Optimize brightness settings based on ambient lighting. Avoid excessively high brightness levels, which can strain your eyes and impact battery life.
- Update Regularly
Keep your phone’s software up-to-date to benefit from performance enhancements, bug fixes, and display optimizations provided by system updates.
- Be Mindful of Background Apps
Close unused background apps to free up system resources and prevent unnecessary strain on your phone’s display and overall performance.
- Use Static Wallpapers
Dynamic wallpapers and live backgrounds consume more power. Opt for static wallpapers to reduce battery drain and maintain consistent display performance.
- Avoid Extreme Temperatures
Exposure to extreme hot and cold temperatures can affect your phone’s display and overall performance. Store your device in a moderate environment.
- Implement Screen Timeout
Set a screen timeout to turn off the display when not in use automatically. This conserves battery life and prevents unnecessary wear on the screen.
- Clean Your Screen Regularly
Fingerprints, dust, and smudges can affect display clarity. Clean your screen regularly with a microfiber cloth to ensure a crisp and vibrant view.
- Secure Your Phone
Implement security measures to prevent unauthorized access. This protects your data and ensures the display remains secure and untouched.
- Enable Night Mode
Many phones offer a night mode that reduces blue light emission. It promotes better sleep and reduces eye strain, especially during nighttime use.
- Implement App-Specific Settings
Some apps have specific display settings. Explore and adjust these settings within individual apps to enhance your visual experience and reduce strain.
Conclusion
The guide highlights the “Why is My Lava Yuva 3 Pro black and white“ query. It offers practical solutions for Android and Lava Yuva 3 Pro users. By addressing common issues such as accessibility settings, app conflicts, and system glitches, you can restore their vibrant displays. Maintaining your phone display involves mindful practices, from adjusting brightness to regular updates.
The guide provided solutions for display issues and showcased the versatility of Dr.Fone System Repair Android. It’s a holistic solution for users seeking a seamless and reliable Android experience, addressing diverse concerns with precision and efficiency.
Guide: How To Unbrick a Bricked Lava Yuva 3 Pro Phone
Lava Yuva 3 Pro phones are super popular thanks to their excellent features and affordable prices. But being so popular means people try to customize them with custom software. If you’re not careful, you might have a “bricked” Lava Yuva 3 Pro phone. It won’t work at all. It will be more like a brick than a smartphone.
Don’t worry, though. This guide is here to help. It will show you how to unbrick your phone step by step. You’ll learn to bring your phone back to life and make it work again. So, get started on fixing your bricked Lava Yuva 3 Pro phone by reading this article.
Part 1. Common Reasons Why Lava Yuva 3 Pro Phones Get Bricked
A bricked phone might sound like a techy term, but it’s pretty simple – when your Lava Yuva 3 Pro phone turns into a lifeless block that won’t do anything. In this section, you’ll learn all about why this happens, so you can avoid these issues and keep your phone alive as long as possible.
- Trying to flash incompatible ROMs. Sometimes, people want their Lava Yuva 3 Pro phones to run different software like a custom version of Android called a ROM. But if you use the correct ROM for your specific phone, it can mess things up nicely. Also, inexperience with ROM flashing can hard brickyour Lava Yuva 3 Pro Be sure to follow guides and ask for community help online.
- Rooting mishaps/failures.“Rooting” means giving your phone superpowers, but if you mess up, it can go wrong. Your phone might not boot up, leaving you with a brick. Like the previous bullet, follow guides carefully, especially if inexperienced.
- Failed Firmware Updates. When your phone asks you to update its software, following the instructions carefully is essential. If you interrupt the process or something goes wrong, your phone could be bricked.
Now, you must know about soft and hard-bricking to learn how to diagnose your phone. Soft bricking is like a phone’s bad day – it might not start up. However, with the right help, you can fix it. Hard bricking is worse. It’s when your phone is a paperweight – it won’t turn on, respond, or do anything useful.
Part 2. Method 1: Use the Lava Yuva 3 Pro Flash Tool
Say you’ve accidentally bricked your Lava Yuva 3 Pro phone due to rooting or ROM flashing. You might feel scared, but imagine having a magic wand that can fix your bricked phone. That’s what the Lava Yuva 3 Pro Flash Tool is –a dedicated Lava Yuva 3 Pro unbricking tool. It lets you install or flash different software onto your phone, giving it a fresh start. Most of the time, a simple firmware flash will unbrick your Lava Yuva 3 Pro.
The Lava Yuva 3 Pro Flash Tool is a superhero for various situations. Here are some scenarios where it can save the day:
- **Device Recovery.**If your phone is bricked or acting strange, the Flash Tool can help bring it back to life.
- Firmware Updates. You can use it to install official updates released by Lava Yuva 3 Pro, ensuring your phone runs smoothly.
- **Device Customization.**Want a different look for your phone? The Flash Tool can help you install custom ROMs or themes.
- **Bug Fixes.**Got pesky bugs or glitches? The Flash Tool can replace corrupted software to make your phone behave.
- Performance Enhancement. If your phone feels sluggish, the Flash Tool can boost its speed by flashing a new OS.
How To Use the Lava Yuva 3 Pro Flash Tool To Unbrick a Lava Yuva 3 Pro Phone
Now that you know what the Lava Yuva 3 Pro Flash Tool is all about, it’s time to learn how to use it. If you’ve bricked your Lava Yuva 3 Pro phone, follow the steps below:
- Step 1. Download the Lava Yuva 3 Pro Flash Tool and the stock firmware of your device on your computer.
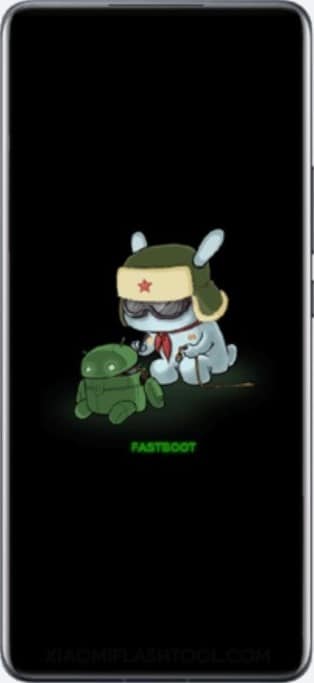
- Step 2. Turn off your phone. Then, press and hold the Volume Down + Power Key simultaneously for 6-8 seconds. This will force your phone to enter the Fastboot mode.

- Step 3. Connect your phone to your computer using a cable when you see this screen flash.
- Step 4. Using the Lava Yuva 3 Pro Flash Tool, click Select. Then, locate the firmware files you downloaded earlier.
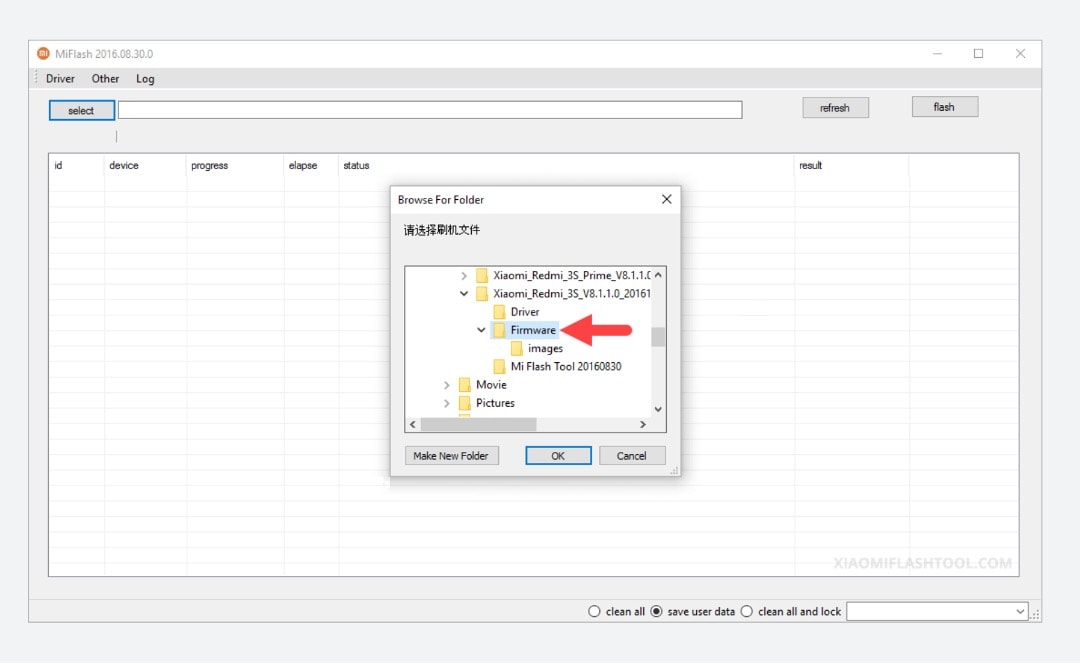
- Step 5. Click the refresh button until the flash tool recognizes your device. Then, click flash to replace the firmware. A text saying “success” should appear under the result column.
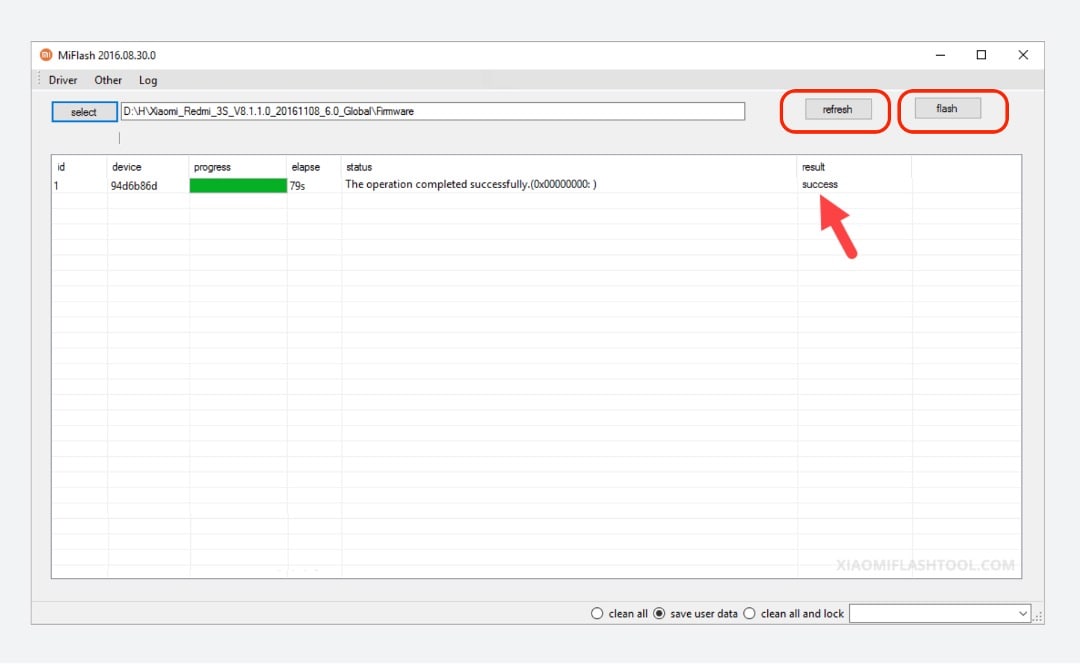
Congratulations! Your phone should be up and working after following these steps.
Part 3. Method 2: Wondershare Dr.Fone
If you gave the Lava Yuva 3 Pro Flash Tool a shot and your phone is still not cooperating, don’t lose hope. Sometimes, the magic touch needs a slight variation. That’s where Dr.Fone comes into play. This dedicated software can work wonders when fixing various phone problems. It can even help in cases of bricked Lava Yuva 3 Pro phones involving software or firmware issues.
![]()
Dr.Fone - System Repair (Android)
Repair Android System Errors without Any Trouble.
- Fix your Android to normal, no skills required.
- Fix various Android system issues, stuck in boot loop , black screen , or won’t turn on , looping on start, etc.
- The high success rate in resolving Android system issues.
- Compatible with a wide range of Android devices and OS versions
- User-friendly interface with easy-to-follow steps.
3981454 people have downloaded it
One of Dr.Fone’s most astonishing powers is its “System Repair” feature. This is where the real magic happens. If your Lava Yuva 3 Pro phone is bricked, it can help repair the underlying software glitches that caused the issue. Moreover, Dr.Fone brings a toolbox of features to the table, making it more than just a one-trick pony. Here are its key features:
- **Data Recovery:**If you’ve lost precious data, Dr.Fone can help recover it, even from a bricked phone.
- **Data Transfer:**You can quickly move data between devices, even if one is unresponsive.
- **System Backup & Restore:**Fone can help you create a backup of your phone’s system and restore it when needed.
- **Unlocking Tools:**If you’re locked out of your phone, Dr.Fone can help you regain access.
How To Use Dr.Fone System Recovery Feature To Unbrick a Lava Yuva 3 Pro Phone
Now that you know about Dr.Fone, it’s time to understand how to use it. Hopefully, it can save your bricked Lava Yuva 3 Pro phone from its problems. Follow the steps below:
- Step 1. DownloadDr.Fone from its official website , and launch it on your computer. After entering the Toolbox menu from the left panel, click System Repair. Make sure that your Lava Yuva 3 Pro phone is connected.
- Step 2. Select Android on the next screen.

- Step 3. Initiate the Android System Repair by clicking Start.
- Step 4. Confirm your device details. You can edit any details that might be wrong.
- Step 5. Put your phone into Download mode. Follow the guidelines for phones with or without home buttons. Your phone will begin downloading the dedicated firmware.
- Step 6. After downloading the firmware, verify and proceed with the installation by clicking Fix Now. Confirm firmware installation by typing “000000” into the text box in the appearing window. Click Confirm afterward.

- Step 7. After the process is finished, your phone should now be okay. Click Done.
Part 4. Best Practices/Tips Before Unbricking Your Phone
Before diving into the unbricking process, you must arm yourself with some tips and precautions to ensure your recovery journey is as smooth as possible. Here’s what you need to know:
- Backing Up Data: An Ounce of Prevention. Remember the golden rule: always back up your data before attempting any phone recovery. Unbricking might save your phone, but being safe is better than sorry.
- **Authentic Tools and Software: Stay on the Safe Side.**Using genuine and trustworthy tools is crucial when unbricking your Lava Yuva 3 Pro This applies especially to Dr.Fone, which you should only download from the official website. Additionally, when recovering your phone’s software, use authentic Lava Yuva 3 Pro ROMs (the operating system’s files).
- **Learning from Online Guides and Communities: Seek Guidance.**Navigating the unbricking process might seem daunting, but you’re not alone. There are many online guides, tutorials, and communities where people share their experiences and solutions.
Conclusion
So, there you have it – your guide to fixing a bricked Lava Yuva 3 Pro phone. Remember, bricking happens when your phone stops working. You won’t be afraid when that happens, as you learned about the Lava Yuva 3 Pro Flash Tool and Dr.Fone. They are your phone-saving superheroes that can unbrick even a hard-bricked Lava Yuva 3 Pro phone.
As a parting reminder, always keep a tool ready for emergencies. For this, choose Dr.Fone. It’s a super tool for all your phone problems. Give it a shot and be confident with your phone wherever you go and whatever you do with it.
safe & secure
3,052,835 people have downloaded it
Also read:
- [New] In 2024, Srgb Standardization The Next Step Beyond Traditional Rgb
- [New] Toolwiz Analysis Revolutionizing Image Editing on the Go
- 2024 Approved Mastering Instagram Promotions Five Key Strategies for Influencers
- 2024 Approved Step-by-Step to Emoji Stickers A Complete Tutorial for Telegram and Beyond
- Best Drone Buys - The Top 5 Pro Picks
- Exploring OpenAI: Your Ultimate Resource for Essential Facts & Features
- How To Fix Unresponsive Phone Touchscreen Of Xiaomi Redmi Note 12T Pro | Dr.fone
- How to Resolve Realme C67 4G Screen Not Working | Dr.fone
- How To Revive Your Bricked Xiaomi Redmi K70E in Minutes | Dr.fone
- In 2024, The Ultimate Guide How to Bypass Swipe Screen to Unlock on Samsung Galaxy M14 4G Device
- Quick Fixes for Why Is My Xiaomi 13T Black and White | Dr.fone
- Reliable User Guide to Fix Google Pixel Fold Running Slow and Freezing | Dr.fone
- Restore Missing App Icon on Honor Magic 6 Pro Step-by-Step Solutions | Dr.fone
- Title: Lava Yuva 3 Pro Bootloop Problem, How to Fix it Without Data Loss | Dr.fone
- Author: Abel
- Created at : 2024-12-07 16:29:59
- Updated at : 2024-12-10 16:45:52
- Link: https://fix-guide.techidaily.com/lava-yuva-3-pro-bootloop-problem-how-to-fix-it-without-data-loss-drfone-by-drfone-fix-android-problems-fix-android-problems/
- License: This work is licensed under CC BY-NC-SA 4.0.