
Lava Yuva 3 Stuck on Screen – Finding Solutions For Stuck on Boot | Dr.fone
Lava Yuva 3 Stuck on Screen – Finding Solutions For Stuck on Boot
The market has embraced Lava Yuva 3 for being the pioneers in the industry. Although the company lacked in providing explicit smartphones, they were still able to catch up with the race. Lava Yuva 3 C31, known to provide durability of the next level, is taking up the latest shelves of Lava Yuva 3 smartphones. Although the company promises reliability, there are several problems involving such smartphones.
One prominent solution stated by Lava Yuva 3 users involves the screen stuck in the boot. If your Lava Yuva 3 is stuck on the “Lava Yuva 3” screen for no particular reason, you will have to read this article. As this article tackles all reasons involving the problem, it comes up with the necessary solutions. These solutions will help Lava Yuva 3 users find solutions for their stuck screens on the boot.
Part 1: What Causes Lava Yuva 3 Screen Stuck on Boot?
Has your Lava Yuva 3 recently been stuck on the boot loop screen? If it is happening or has happened to you, there are some reasons that you need to be aware of. Having an overview of the causes of Lava Yuva 3 being stuck on the Android One screen can help you redirect yourself toward to right solution. Go through the list of all causes and find more about the issue involving screens stuck on boot in Lava Yuva 3 smartphones:
- The Device is Damped in Liquid
It is entirely possible that your Lava Yuva 3 smartphone is immersed in water. With a smartphone dipped in liquid, the Lava Yuva 3 device can turn useless. If you have tried starting it again, it won’t run and might get stuck on the boot.
- Soft-Bricked Device
There are multiple conditions where your Lava Yuva 3 smartphone can get soft-bricked. It majorly happens when a particular function in the Lava Yuva 3 device stops working. To counter the problem, it is essential that you can get your device stuck on the boot screen.
- Outdated Device
If the equipment wears out after a certain time, there is a need to have it changed. With such obsolete models of Lava Yuva 3, you will surely face issues like a screen stuck on the boot. Smartphone equipment cannot be revamped, and you will have to go for newer options.
- Software Update Required
A software update on your Lava Yuva 3 smartphone might be causing issues with the screen stuck on the boot. The best way to get rid of this problem is to update your system software to the latest version.
Part 2: 5 Solutions To Solve Lava Yuva 3 Screen Stuck on Boot
Do you seek to resolve the problem of the Lava Yuva 3 Plus stuck on the Android One screen? There are specific techniques that can be tried as a remedy. These solutions are tried and recommended by experts. Go through the details provided below to solve the issues with your stuck Lava Yuva 3 screen.
Solution 1: Force Restart Lava Yuva 3
The first and most proclaimed technique to refresh Lava Yuva 3 devices under such a problem is to force restart them. If the Lava Yuva 3 device is stuck, you will have to perform this process by pressing the “Power” and “Volume Up” keys for 15 seconds. Continue holding the buttons until the Lava Yuva 3 device vibrates or restarts by showing the screen again.

Solution 2: Leave the Phone For a While To Drain Its Battery
A conventional way to solve the issue of a stuck screen in Lava Yuva 3 is to leave the phone in its position. As you let its battery drain out, the phone will turn off, and you can activate the Lava Yuva 3 device again by charging it.
Once you restart it this way, all the procedures will initiate again, and the Lava Yuva 3 device will be as good as new. Draining the battery has given you the leverage to regain control over the Lava Yuva 3 device again.
Solution 3: Check For Updates on Lava Yuva 3 Smartphones
Another quick remedy to try on your Lava Yuva 3 smartphones involves updating their software. If there is any prevailing software update to install on the smartphone, you will have to check and update it by following the steps guided below:
Step 1: Open the “Settings” of your Lava Yuva 3 smartphone and continue to the “System” section in the list of options. You will have to access the “Advanced” options in the “System” menu.

Step 2: As you lead to the advanced options, look for “System update” in the provided options. Look for the “Check for update” button. This will check if your Lava Yuva 3 needs any software updates or not.

Solution 4: Using Wondershare Dr.Fone
One of the finest options available to perform is using a third-party platform that promises smooth operability. Wondershare Dr.Fone is a platform designed to provide such smartphones another life to survive. Its unique functionality repairs all the issues with a smartphone and makes it as good as a new one.
If your Lava Yuva 3 Plus is stuck on the Android One screen, this platform is the ultimate solution for you. With the support of the latest devices and software versions, Dr.Fone – System Repair (Android) offers the best results. To know how to repair your Lava Yuva 3 smartphone with the help of this tool, look through the steps featured next:
Step 1: Open Dr.Fone and Select System Repair
As you launch Dr.Fone after downloading it on your computer, continue to the “System Repair” option. You will have to start by connecting the Android device to the computer through a USB cable. Select “Android Repair” from the options available and continue to the following options.

Step 2: Define Device Information and Confirm
You will be directed to the Lava Yuva 3 device information screen, where you must define the identification parameters of the Lava Yuva 3 device. Select the brand, name, model, country, and carrier details for proper system recovery. On clicking “Next,” you will receive a warning where you will have to type the number “000000” to proceed with the method.

Step 3: Put Your Lava Yuva 3 in Download Mode
Following this, you will have to put your Lava Yuva 3 in Download Mode. For that, you need to follow the steps according to the condition of the Lava Yuva 3 device:
- For Devices with Home Button:
Power off your Android and continue to press and hold the “Volume Down,” “Home,” and “Power” buttons for a few seconds. After holding them for almost 10 seconds, release and press the “Volume Up” button to enter the mode.
- For Devices without Home Button:
Turn off the Android device and hold the “Volume Down,” “Bixby,” and “Power” buttons simultaneously for a few seconds. On releasing the buttons, press the “Volume Up” button to enter Download Mode.

Step 4: Start Downloading and Verify Firmware
To proceed, tap the “Next” button to download the firmware. As you verify the firmware, the repairing process starts on your Lava Yuva 3 device.

Solution 5: Contact the Customer Service Center of Lava Yuva 3
If the issue of the Lava Yuva 3 stuck on the “Lava Yuva 3” screen continues, you will have to contact the Lava Yuva 3 device’s customer support. With no proper method left for the Lava Yuva 3 device, the only effective technique is to visit the authorized store for Lava Yuva 3 smartphones and claim the issue with the Lava Yuva 3 device. In this way, you might receive or get a fully repaired device with no additional charges if the Lava Yuva 3 smartphone is under warranty.
Part 3: How to Avoid Lava Yuva 3 Screen Stuck on Boot?
What if you come to know that you can avoid the Lava Yuva 3 screen stuck-on boot problem? There are a set of tips and tricks that you can follow to explain how to prevent such an issue in the first place. Follow these tips to learn more about saving your Lava Yuva 3 from such miserable conditions:
1. Protect from Malware
The first thing to protect your Lava Yuva 3 smartphone from getting stuck on the boot is to keep it safe from unauthorized and malicious data. The best thing to keep a device secure is to follow all security protocols and avoid bypassing them. If you try downloading something not authorized by the Play Store itself, for instance, an APK, it can make your device vulnerable to malware.
2. Keep Your Device Updated
If you feel frustrated by issues like Lava Yuva 3 being stuck on the Android One screen, the best thing to avoid such a problem is to keep your device updated at all costs. Whenever there is an update on your Lava Yuva 3 smartphone, make sure to install it on time and properly. Do not leave updates uninstalled for no reason, as they can hinder the Lava Yuva 3 device’s speed and performance.
3. Do Not Fool Around with System Files
Changing or modifying system files can be fatal for smartphones. Thus, to keep your Lava Yuva 3 safe, you need to keep your hands away from such important files. Modifying a single file can make your device useless or put you in situations like a Lava Yuva 3 smartphone stuck on the boot. For that, the best tip is to keep yourself out of engagement.
4. Use Wondershare Dr.Fone To Manage All Data With Ease
As you have observed, the power of Dr.Fone can be a perfect phone manager for you at all times. While providing system repair services, it can also help you manage your device’s data and other statuses. Thus, consider keeping Dr.Fone close to your device and its operations. In this way, you will be able to have complete control over all types of data present in the Lava Yuva 3 smartphone.
 safe & secure
4,675,795 people have downloaded it
Conclusion
With that, this brings the article on Lava Yuva 3 smartphones to a conclusion. If you are still facing issues with your Lava Yuva 3 stuck on the “Lava Yuva 3” screen, this article is the perfect solution for your problem.
With all the provided methods, we do hope that you will be able to restore the status of your Lava Yuva 3 smartphone and make it functional. For the finest results, you have also discovered Dr.Fone – System Repair (Android) as the best solution for repairing such devices.
9 Quick Fixes to Unfortunately TouchWiz has stopped Of Lava Yuva 3
“Unfortunately TouchWiz home has stopped” is the talk of the town due to annoying TouchWiz UI, a front-end user interface developed by Lava Yuva 3. Not to mention, the Lava Yuva 3 has borne a whole lot of heat from its agitated users over the years and the reason is pretty much obvious due to the pre-installed bloatware apps and the theme launch “TouchWiz home”. That not just brutally annoys users and eats up a heck of internal storage space but lags up too often due to low speed and stability. As a result users end up with “Unfortunately TouchWiz home has stopped” and “Unfortunately, TouchWiz has stopped”. Apparently, there are several flaws in the design and functioning of this launcher and hence, Touchwiz keeps stopping or becomes unresponsive.
Part 1: Common scenarios when TouchWiz keeps stopping
Here in this section, we will introduce some scenarios that can be blamed for why TouchWiz is not working. Check out the following points:
- More often than not, the TouchWiz keeps stopping after an Android update. When we update our Lava Yuva 3 device, the old data and cache usually conflicts with TouchWIz thereby cropping up this mess.
- When you disable some built-in apps, you might get in trouble with TouchWiz. Doing this sometimes can hamper the TouchWiz operation and raise the “**unfortunately TouchWiz home has stopped**” error message.
- Many times installing some third-party apps and widgets can cause this problem. The apps like launchers can be conflicting with TouchWiz home launcher and therefore cease it to work. Also, a glitched widget is responsible for the same i.e. forces stop the TouchWiz.
Part 2: 9 Fixes to “Unfortunately TouchWiz has stopped”
Fix “TouchWiz keeps stopping” by repairing Android system
When your TouchWiz keeps stopping and you aren’t able to proceed further, the best way to handle the situation is to repair the Android system. And the best that can help you to serve the purpose is Dr.Fone - System Repair (Android). It has the ability to fix any sort of Android system issue without any complications. To fix this issue, the tool only takes few minutes of yours and performs smoothly. Moreover, you don’t have to worry if you aren’t tech pro. This tool requires no special technical know-how. Here are the advantages you get with this tool.
Dr.Fone - System Repair (Android)
One click tool to fix “Unfortunately TouchWiz has stopped”
- A very easy tool that fixes problems in just one click
- Provides full support all day all night as well as offers 7 day money back challenge
- Enjoys higher success rate and considered as first tool carrying such amazing functionalities
- Able to fix wide variety of Android issues including app crashing, black/white screen of death
- Fully secured and no harm regarding any virus infection
3,211,972 people have downloaded it
Step 1: Download the Program
The one-click repairing process begins with downloading Dr.Fone from its official website. When it is downloaded, follow the installation steps. Upon successful installation, launch the tool on your PC.
Step 2: Connect your Lava Yuva 3 Device
After you open the software, hit on the “System Repair” button from the main interface. With the help of a genuine USB cable, get your Lava Yuva 3 phone and connect it with the computer.
Step 3: Choose the Tab
Now, from the next screen, you are supposed to choose “Android Repair” tab. It is given on the left panel.

Step 4: Enter Right Information
Please keep your mobile details handy as you will need them in the next window. You will need to enter the correct brand, model, and country name etc. for better detection of your device.
Step 5: Confirm Actions
This process may result in removing your data hence we strongly recommend you to keep a backup of your data.
Tip: You can use Dr.Fone – Phone Backup (Android) to backup your Lava Yuva 3 device in case you’re wondering how.
Step 6: Take your Device in Download mode
You will get some instructions on your screen to keep your device in Download mode. Follow them according to the Lava Yuva 3 device you own and hit “Next”. When you do this, the program will detect your device and let you download the latest firmware.

Step 7: Repair Device
Now, when the firmware is downloaded, the program will itself begin to repair your device. Wait and keep the Lava Yuva 3 device connected until you get the notification for process completion.

Clear the cache data the TouchWiz
Maximum Android devices are designed to deleted cache data upon getting updated to the newest Android system. However, Lava Yuva 3 stands as an exception in such case. And therefore, many times TouchWiz starts stopping right after upgrading. Thus, due to the collection of cache data, TouchWiz can display error. This calls for removing the cache from TouchWiz and run things smoothly. Here is how to do this:
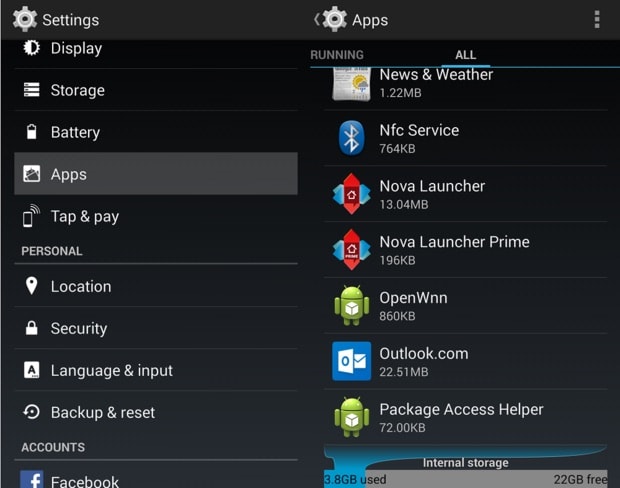
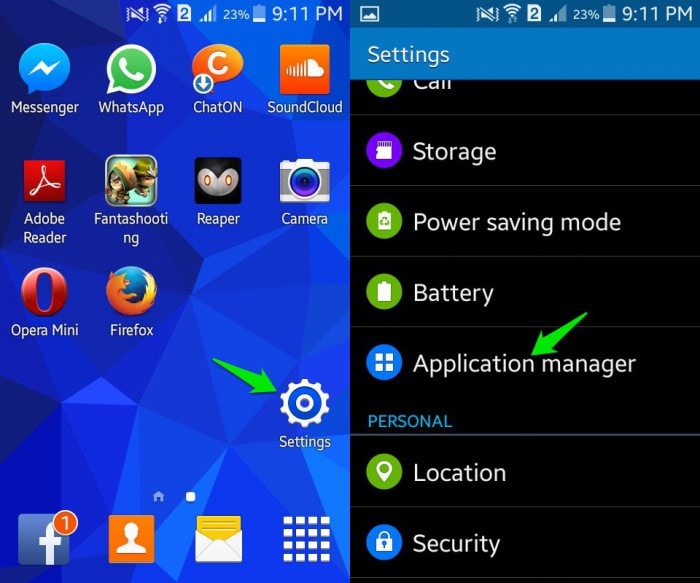
- Tap on “Apps” from the Home screen firstly.
- Launch “Settings” afterwards
- Look for “Applications” and tap on it followed by “Application Manager”.
- When Application Manager gets opened, swipe towards right to get into the “All” screen.
- Now, choose “TouchWiz” and tap “Clear Cache”.
- Now, tap “Clear Data” followed by “OK”.
- Now restart your device.

Please note that this will delete all your Home screens post this method.
Disable Motion & gesture settings
The functions regarding Motions and Gestures can be responsible for why TouchWiz home has stopped in your device. Usually the Lava Yuva 3 devices running on Android version less than Marshmallow are prone to encountering this issue. Or the Lava Yuva 3 devices having modest specs often fall prey to the issue. When you disable these settings, you might get out of the problem.
Change the Animation Scale
When you use TouchWiz, it may consume higher memory usage for high amount of graphic maintenance. As a result, the “**unfortunately TouchWiz home has stopped**” error might crop up. Taking this into consideration, you should try reconfiguring the animation scale and get rid of the error. Here’s how:
Clear Cache Partition
In case the above steps didn’t figure out the problem, here is the next tip. This method can be counted as one of the most effective one. Because it is able to fix minor issues in Android devices, we recommend you for “**TouchWiz home has stopped**” issue too. Let us know how you can do it:
- Turn off your Lava Yuva 3 device.
- Start pressing and holding “Volume Up” and “Power” buttons simultaneously.
- Keep doing this until you see the Android screen. This will take your device into recovery mode.
- You will observe some options on the screen. Take help of Volume buttons, scroll down to choose “Wipe Cache Partition”. Press Power button to confirm and the Lava Yuva 3 device will be rebooted.

Check now if the error is eliminated. If unfortunately not, please try the following solution.
Enable the easy mode
For some users, enabling Easy Mode has been of great assistance. This feature aims to make the user experience more efficient by simply eliminating complex features. The Easy Mode removes those features that confuse the users by messing up the screen. Hence, we suggest you to switch to this mode in order to remove “**TouchWiz not working**” problem. The steps are:
- Open “Settings” and go to “Personalization”.
- Hit on “Easy Mode” now.

Hope the TouchWiz won’t keep stopping error does not pop up anymore!
Boot your phone to safe mode
Here is the next solution to be followed when TouchWiz keeps stopping. As we already said, third-party apps can cause this issue, booting your device in the Safe mode will disable those apps temporarily. Hence you need to boot your Lava Yuva 3 device to Safe mode and check if the reason is any third-party app.
- Switch off your device to initiate.
- Press “Power” button and keep doing this until device’s logo appears on the screen.
- When you see logo appearing, instantly release the button and start holding “Volume Down” button.
- Keep holding until rebooting finishes.
- You will now witness “Safe mode” on the bottom screen. You can now release the button.

Reset Factory settings
If the above method went futile and you’re still at the same place, then factory reset is the next logical step to be taken. We suggest this method because it will take your device to its factory state. As a result, TouchWiz will probably get normal and work perfectly.
Along with this, we would also suggest you go take backup of your data so that you won’t lose any of the personal information from your device after performing factory reset. For your convenience, we have stated the backup steps too in the following guide. Have a look:
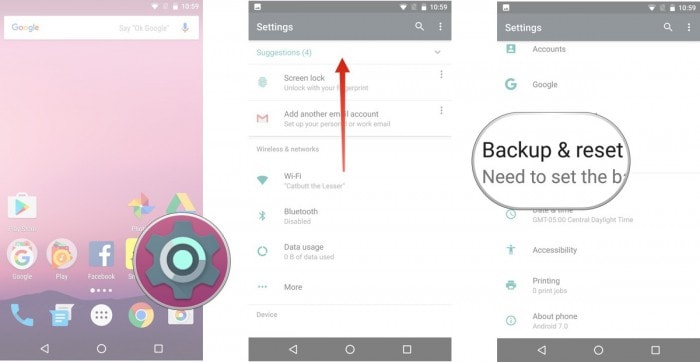
- Run “Settings’ in your device and go to “Backup & Reset”.
- Notice if “Back up my data” is enabled or not. If not, turn it on and create backup.
- Now, scroll for “Factory Data reset” option and confirm it by clicking “Reset Phone”.

- Wait a few minutes and your device will reboot.
Install a new launcher to replace TouchWiz
We believe that you will find the above methods helpful. However, if still in case your TouchWiz is not working, we advice you that you should install a new theme launcher in your device. It will be a wise option to ditch TouchWiz in such scenario rather than tolerating the problem. Hope this advice will help you.
4 Solutions to Fix Unfortunately Your App Has Stopped Error on Lava Yuva 3
We often find people complaining, “Unfortunately Youtube has stopped”, “Unfortunately the internet has stopped” or “Unfortunately Netalpha has stopped”. An error that causes Apps to randomly stop working is experienced by users daily. This is a strange error as it occurs while you are using an App, and it suddenly stops working or crashes. You are brought back from the App screen to the Home Screen of your device with an error message saying: “Unfortunately, it has stopped working.”

Apps not working or stopped while working, such as unfortunately Netalpha has stopped or unfortunately the internet has stopped, is a very confusing error because one moment your App is running smoothly and the next moment it shuts down automatically with an error message. Unfortunately, Youtube has stopped working, Netalpha has stopped. Unfortunately, the internet has stopped, and many more such examples of Apps stopping while working normally are witnessed by users all over the world, and they are constantly on a lookout for solutions to fix such an error.
Read on to find out why exactly your App stops working suddenly and 3 of the best and most effective ways to tackle the problem.
Part 1: Why your App stops working suddenly?
Unfortunately, Youtube has stopped; unfortunately, Netalpha has stopped working, etc. are error messages that pop-up now and then while using Apps on Android mobile devices. It is important to understand that such errors are not App/Apps specific and may occur to any App/Apps. There is no one specific App or genre of Apps that face this problem.
The reason behind unfortunately internet has stopped or any other App which experiences such a glitch in data crash. A data crash is not a serious problem and only means a situation wherein an App, OS, or software stops working normally and exits abruptly. This may happen due to various reasons such as unstable internet connection, both cellular and WiFi. Another reason for Apps to stop working could be corrupted Cache files, which have not been cleared in a long time.
Many users also feel that incomplete or improper installation may cause the App to crash and stop working suddenly.
There may be many more reasons for them; unfortunately, App has stopped error to show up, but no one reason can be blamed for it.
Therefore it is important for us to carefully examine the problem and choose from the solutions given below to fix Unfortunately, Youtube has stopped; unfortunately, Netalpha has stopped; unfortunately, the internet has stopped and many other similar unfortunately App has stopped working errors.
Part 2: A One-Click Fix to ‘Unfortunately App has Stopped’
Fortunately, while this is an annoying problem that stops you from doing what you’re doing, the best way to eliminate this error is simply to repair the data glitch, thus preventing it from happening.
The easiest solution is to use a software application known as Dr.Fone - System Repair , a specialist piece of programming designed to help you fix your devices as quickly as possible.
If this sounds like the option you need to alleviate your, unfortunately, YouTube has stopped errors; this is how to use it.
How to Use Dr.Fone -Repair to Fix Unfortunately App has Stopped Error
Note: Please note that using this solution may rewrite and repair all data on your phone, meaning there is the potential to lose data during the process. Make sure you back up your device before continuing.
Step #1 - Acquire the Software
Head over to the Dr.Fone - System Repair website and download the software to your Mac or Windows computer.
Step #2 - Connect Your Android Device
Launch Dr.Fone and click the System Repair option from the main menu. Now connect your Lava Yuva 3 using the official cable.
From the next menu, select the ‘Android Repair’ option and press ‘Start’.
Step #3 - Input Information & Repair
Tap in your phone information. This is to make sure your device is repaired correctly while minimizing the risk of bricking your device.

Follow the on-screen instructions on how to then boot your Lava Yuva 3 in Download mode.
Once booted, the software will verify your firmware and start repairing your device. Make sure your phone stays connected throughout the process, and you’ll be ready to go and your ‘unfortunately the internet [or another app] has stopped’ error should be erased!
This could take some time, depending on your internet connection and speeds, so be mindful that everything stays connected.
Part 3: Fix your App has unfortunately stopped by clearing App Cache
Herein we bring to you 3 of the most effective remedies to combat the; unfortunately, App has stopped error, which has helped many users facing similar problems.
First among these is to clear the App’s cache. Clearing App Cache to fix Unfortunately Youtube has stopped, and such errors are very popular as it cleans your App/Apps by wiping off data that has been stored due to constant App usage, and it makes the App/Apps as good as new. It is advised to all users to clear the App cache regularly for Apps to function better.
Follow the steps given below to learn how to clear App cache:
• Visit “Settings” to find an option named “Apps”.

• Tap on “Apps” and look for the App which has suddenly stopped.
• Click the App name, say, for example, “Youtube” by scrolling down in “All” Apps.
• From the options that appear, tap on “Storage” and then on “Clear cache” as shown below.

Clearing App cache is always a good idea as it prevents any errors which may be caused due to the cache being corrupt or too full. This method is likely to help you, but if the problem persists, read on to find out about 2 more solutions.
Part 4: Fix your App has unfortunately stopped by the fresh installation
Sometimes, unfortunately, Youtube has stopped; unfortunately, the internet has stopped, and such errors are caused due to improper or inappropriate App installation. It is mandatory to completely download the App from the Google Play Store and use it after it is successfully installed on your device.
Firstly, to uninstall all an existing App from your device, follow the instructions given hereunder:
• Visit “Settings” and search for “Application Manager” or “Apps”.
• Select the App you wish to uninstall, say, for example, “Messenger”.
• From the options that appear before you, click on “Uninstall” to delete the App from your device.

You may also uninstall an app directly from the Home Screen (only possible in certain devices) or the Play Store.
To re-install the App, visit Google Play Store, search for the App name and click on “Install”. You will also find the deleted App in “My Apps and games” on your Play store.
This method has helped many and will be useful to you too. So don’t hesitate to try it. It may sound tedious and time-consuming, but it hardly takes 5 minutes of your time.
Part 5: Fix your App has unfortunately stopped by factory reset
Factory Reset must be used only when nothing else works. Please remember to take a back-up of all your data and contents on the cloud or an external memory device, such as a pen drive before adopting this method because the one you perform a factory reset on your device, all media, contents, data and other files are wiped out, including device settings. Do remember to back up the data on an Android device before performing a factory reset.
Follow the step-by-step explanation given below to factory reset your device to fix Unfortunately Youtube has stopped; unfortunately, the internet has stopped working and similar errors:
• Visit “Settings” by clicking the settings icon, as shown below.
• Now select “Backup and Reset” and move on.
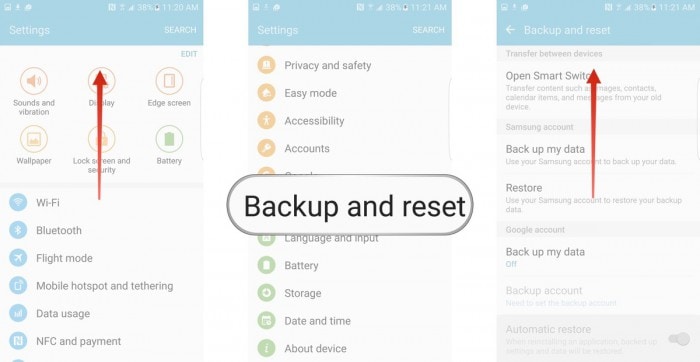
• In this step, select “Factory data reset” and then “Reset Device”.
• Finally, tap on “ERASE EVERYTHING” as shown below to Factory Reset your device.
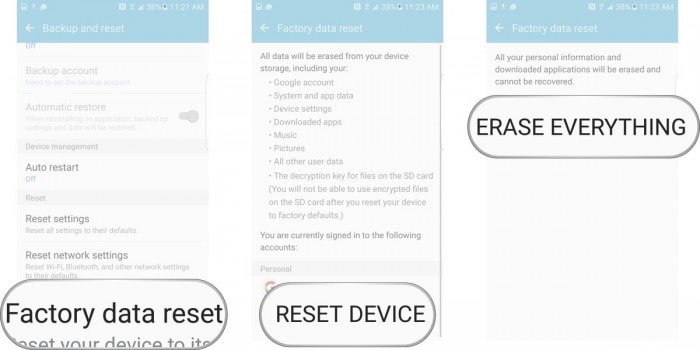
Note: Once the factory reset process is complete, your device will automatically restart and you will have to set it up once again.
Errors such as unfortunately, Youtube has stopped, unfortunately, Netalpha has stopped, unfortunately, the internet has stopped working and so on are very common these days. They disrupt the normal functioning of an App/Apps and prevent you from using the App/Apps smoothly. Unfortunately, App has stopped error is not a serious problem and does not mean there is a problem with the App, your Android OS version, or your handset. It is a random error which occurs due to various reasons in a given situation. If you experience such an error while sign in your favorite App/Apps, DO NOT panic as unfortunately, App has stopped error can be fixed easily. All you need to do is be patient with the App’s software and not try to launch it again and again once it crashes, and an error message pops-up. Just follow the methods listed and explained in detail in the previous segments to solve the problem of unfortunately App has stopped.
Also read:
- [New] 2024 Approved Achieve Higher Interactions Mastering the Art of Square Videos
- [New] 30-Second Color Fixes for Aspiring Photo Pros
- [New] Enhancing Visuals in Remote Collaborations with Google Meet
- [Updated] Enhancing Your NBA Viewing with Smart Techniques for 2024
- How to Fix Unfortunately, Contacts Has Stopped Error on OnePlus Ace 2 | Dr.fone
- In 2024, Tap Into Endless Creativity – Our Compilation of over 50 FREE Advertising Masterpieces!
- Infinix Note 30i Screen Unresponsive? Heres How to Fix It | Dr.fone
- Latest Canon DR-C225 Driver Download Instructions for Windows Operating Systems
- Play Store Not Working On Realme 10T 5G? 8 Solutions Inside | Dr.fone
- Reasons for Lava Yuva 3 Pro Stuck on Startup Screen and Ways To Fix Them | Dr.fone
- Self-Animated Wonders Cutting Edge Techniques for You for 2024
- Symphonic Sounds Windows Edition for 2024
- Title: Lava Yuva 3 Stuck on Screen – Finding Solutions For Stuck on Boot | Dr.fone
- Author: Abel
- Created at : 2024-12-08 16:04:23
- Updated at : 2024-12-10 16:33:29
- Link: https://fix-guide.techidaily.com/lava-yuva-3-stuck-on-screen-finding-solutions-for-stuck-on-boot-drfone-by-drfone-fix-android-problems-fix-android-problems/
- License: This work is licensed under CC BY-NC-SA 4.0.