
Nokia G310 Bootloop Problem, How to Fix it Without Data Loss | Dr.fone
Nokia G310 Bootloop Problem, How to Fix it Without Data Loss
Have you, like many other users, faced the bootloop Android problem and wondered what exactly is Android boot loop. Well, Android boot loop is nothing but an error that makes your phone switch on itself every time you manually turn it off. To be precise, when your Nokia G310 does not remain switched off or powered off and starts to boot up automatically after a few seconds, it might be stuck in the boot loop Android.
An Android boot loop is a very common problem and is one of the first symptoms of a soft-bricked device. Also, when your device is experiencing Android boot loop issue, it does not start normally to reach the Home or Locked Screen and remains frozen at the Nokia G310 device’s logo, Recovery Mode or a lit-up screen. Many people fear losing their data and other files due to this error and thus, it is a very confusing situation to be in.
We understand the inconvenience caused, therefore, here are ways to tell you how to fix the bootloop problem in Android devices without losing any important data.
However, before moving on, let us learn a little about the causes for the Android boot loop error.
Part 1: What might cause the bootloop issue on Android?
Android boot loop error might seem weird and unexplainable but it occurs because of some specific reasons.
Firstly, please understand that it is a misnomer that boot loop error occurs only in a rooted device. Boot loop Android error can also occur in a stock device with the original software, ROM, and firmware.
In a rooted device, changes made, such as flashing a new ROM or customized firmware which are not compatible with the Nokia G310 device’s hardware or existing software, can be blamed for the boot loop problem.
Moving on, when your device’s software is unable to communicate with the system files during the start-up process, Android boot loop problem may arise. Such a glitch is caused if you have recently updated the Android version.
Also, corrupt App update files may also cause the bootloop Android issue. Apps and programs downloaded from unknown sources bring in a particular type of virus that prevents you from using your device smoothly.
All-in-all, Android boot loop error is a direct outcome of when you try to tamper with your device’s internal settings.
Hence, if you are looking for ways to guide you about how to fix boot loop issue, you will have to revamp the Nokia G310 device internally by either resetting it or adopting a recovery method.
Read on to know more about how to fix the bootloop error without any data loss when your device suffers from the bootloop Android problem.
Part 2: One click to Fix Android Bootloop without factory reset
If you are trying to figure out how to fix boot loop, the first option you have is the one-click fix to Android Bootloop which involves using the Dr.Fone - System Repair software.
This is designed to repair any data corruption on your device and restores your firmware to its usual working condition.
Dr.Fone - System Repair (Android)
One click to fix boot loop of Android
- #1 Android repair solution from your PC, can fix a wide range of Android system issues, such as boot loop, black screen, etc.
- The software requires no technical expertise, and anybody can use it
- A one-click solution when learning how to fix Android boot loop
- Not require root Android phones.
- Works with most Nokia G310 devices, including the latest Nokia G310 phones like S22
- Simple and easy-to-use user interface
4,689,059 people have downloaded it
To help you get started, here’s a step-by-step guide on how to use Dr.Fone - System Repair.
Note: This method can erase data on your device, including your personal files, so make sure you’ve backed up your device before proceeding.
Step #1 Download the Dr.Fone - System Repair software from the website and install it onto your computer.
Open the software and select the System Repair option from the main menu to fix the Android bootloop error.

Step #2 Connect your Nokia G310 to your computer using the official cable and select the “Android” option from the three menu items. Click “Start” to confirm.

You’ll then need to input the Nokia G310 device information, such as your carrier info, device name, model, and country/region in order to ensure you’re downloading and repairing the correct firmware to your phone.

Step #3 Now you’ll need to put your phone into Download Mode to remove the Android bootloop.
For this, you can simply follow the onscreen instructions for both phones with and without home buttons.

Click “Next”, and the software will begin downloading the firmware repair files.

Step #4 Now you can sit back and watch the magic happen!
Make sure your computer stays connected to the internet, and your device stays connected to your computer throughout the entire process. Once the firmware has been downloaded, it will be automatically installed onto your mobile device, removing the boot loop Android error.

You’ll be notified when the process is done and when you can remove your device and start using free from the boot loop Android error!
 safe & secure
Part 3: Soft reset to fix Android bootloop issue
When your device is stuck in Android boot loop, it does not necessarily mean that it is bricked. Boot loop might be occurring due to a simpler problem which can be fixed by turning off your device. This sounds like a home remedy for a serious problem but it works and resolves the problem most of the time.
Follow the steps given below to soft reset your device:
Turn the Nokia G310 device off and take out its battery.

If you cannot take the battery out, let the phone be off for about 3 to 5 minutes, and then turn it back on.
Simply performing a soft reset on your device can help you if you are looking for solutions for how to fix the bootloop issue. This a very useful method as it does not result in any kind of loss in data and protects all your media files, documents, settings, etc.
In case the Nokia G310 device does not turn on normally and is still stuck in the bootloop Android problem, be prepared to use the troubleshooting techniques given and explained below.
Part 4: Boot into Safe Mode to fix Android boot loop

Booting your Nokia G310 into Safe Mode is a useful troubleshooting step to fix boot loop issues caused by third-party apps. When in Safe Mode, the Nokia G310 device will start up with only essential system apps, and any downloaded apps that might be causing conflicts won’t run. Here’s how you can boot your Nokia G310 into Safe Mode to address the boot loop problem:
Step 1: Power Off Your Device
Hold down the power button until it turns off completely.
Step 2: Access Safe Mode
To enter Safe Mode, follow these steps based on your device model:
- For most Android devices: Press and hold the power button to turn on your device. As soon as the manufacturer’s logo appears, press and hold the Volume Down button until the Nokia G310 device finishes booting. You should see “Safe Mode” displayed in the bottom left or right corner of the screen.
- Some devices might require slightly different key combinations. Refer to your device’s user manual or perform an online search for the specific method to enter Safe Mode for your model.
Step 3: Observe the Nokia G310 device
Once your device has booted into Safe Mode, use it for a while to see if the boot loop issue persists. If the boot loop doesn’t occur in Safe Mode, it indicates that the problem is likely caused by a third-party app.
Step 4: Identify and Uninstall Problematic Apps
Now that you’re in Safe Mode, it’s time to identify the troublesome app. Start by uninstalling recently installed apps one by one until the boot loop problem is resolved. After each uninstallation, restart your device normally to check if the boot loop still occurs. Continue this process until you find the problematic app.
Step 5: Restart Normally
Once you’ve identified and uninstalled the problematic app, restart your device normally to exit Safe Mode. Your Android device should now start up without getting stuck in a boot loop.
By following these steps and using Safe Mode to isolate problematic apps, you can effectively troubleshoot and resolve boot loop issues on your Nokia G310.
Part 4: Factory reset to fix Android bootloop issue
Factory reset, also known as Hard Reset, is a one-stop solution for all your software resulting in issues. Android boot loop being such problem, can be easily overcome by performing a factory reset.
Please note that all your device’s data and settings will be deleted by adopting this method. However, if you have a Google account signed in on your Nokia G310, you will be able to retrieve most of your data once the Nokia G310 device turns on.
To factory reset your Android boot loop device, you must first boot into the Recovery Mode screen.
To do this:
Press the volume down button and power button together until you see a screen with multiple options before you.

When you are at the Recovery Mode screen, scroll down using the volume down key, and from the options given, select “Factory Reset” using the power key.

Wait for your device to perform the task and then:
Reboot the phone in Recovery Mode by selecting the first option.

This solution is known to fix the boot loop error 9 out of 10 times, but if you still can’t start your Nokia G310 normally, consider using a CWM Recovery to resolve the Android boot loop issue.
Part 5: Use CWM Recovery to fix bootloop on rooted Android
CWM stands for ClockworkMod and it is a very popular custom recovery system. To use this system to solve the boot loop Android error, your Nokia G310 must be rooted with CWM Recovery System which basically means CWM must be downloaded and installed on your device.
Furthermore, to use CWM Recovery to fix boot loop on rooted Android devices, follow the steps given below:
Press the home, power, and volume up buttons to launch the CWM Recovery screen.
Note: you might have to use a different combination of keys to enter into Recovery Mode, depending on your device’s model.

Scroll down using” the volume key to select “Advanced”.

Now select “Wipe” and choose to wipe “Dalvik Cache”.

In this step, select “Mounts and Storage” to click on “Wipe” or “Cache”.
Once this is done, make sure to reboot your Nokia G310.
This process with successfully fix the Android boot loop error and not cause any loss of data stored on your device stuck in boot loop.
So the bottom line is that boot loop Android issue may seem like an irreparable error but it can be resolved by carefully following the techniques explained above. These methods not only tell you how to fix the bootloop problem but also prevent it from occurring in the future.
An Android boot loop is a common phenomenon with all Android devices because we tend to tamper with our device’s internal settings. Once the ROM, firmware, kernel, etc are damaged or rendered incompatible with the Nokia G310 device’s software, you cannot expect it to function smoothly, hence, the boot loop error occurs. Since you are not the only one suffering from the Android boot loop problem, be rest assured that the ways, given above, to combat it are recommended by users facing similar troubles. So, don’t hesitate and go ahead to try them on.
safe & secure
Stuck at Android System Recovery Of Nokia G310 ? Fix It Easily
In this article, you will learn what is Android system recovery, and how to fix Android stuck at system recovery step by step. To get out of Android system recovery more easily, you need this Android repair tool.
You know your Nokia G310 is stuck in recovery mode when you cannot turn on the Nokia G310 device. If you try to turn it on, it shows a message that says, “Android System Recover.” This situation can be quite debilitating for most Android users. Most of the time, you don’t know whether you have lost all of your important Android data. It is even more worrying because of the fact that you cannot turn on your device at all, especially when you don’t know how to fix it.
Part 1. What is Android System Recovery?
Despite all the worry that surrounds an unwanted Android system recovery screen, it is actually a feature that can be quite helpful to your Nokia G310 when it’s needed. It can be useful when you want to hard reset the Android device without having to access the settings. This can be very useful if your device is not working very well or if your touch screen is experiencing problems. It can also be very helpful when you are having a problem accessing the settings on your device.
For these reasons, it is actually a good thing, although when it does happen unexpectedly, you may want to know how to fix it.
Part 2. How to get to Android System recovery
Now that you know how useful the Android System can be, you may want to know how to utilize this feature to get out of some of the problems we mentioned above. Here’s how you can safely get to the Android recovery system on your Nokia G310.
Step 1: Hold down the power key and then select “Power Off” from the options on the screen. If, however, your screen is unresponsive, keep holding the power key for several seconds until the Nokia G310 device is completely turned off.

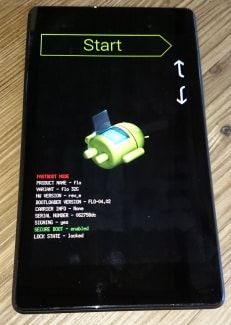
Step 2: Next, you need to hold down the Power and the Volume Key. You should able to see the Android image and a bunch of information about your device. There should also be a “Start” at the top right corner of the screen.
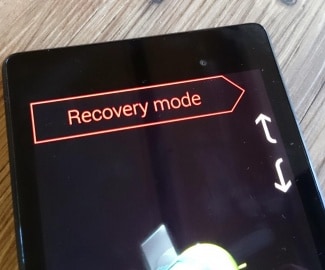
Step 3: Press the Volume up and Volume down keys and use the Power key to select menu options. Press the Volume down key twice to see “Recovery Mode” in red at the top of the screen. Press the Power key to select it.
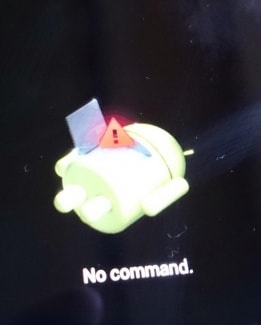
Step 4: The white Google logo will appear immediately followed by the Android logo again as well as the words “No Command” at the bottom of the screen.
Step 5: Finally, press and hold both the Power and the Volume up Key for around 3 seconds and then let go of the Volume up Key but keep holding the Power Key. You should see the Android system recovery options at the top of the screen. Use the Volume keys to highlight and the Power key to select the one you want.

Part 3. Android Stuck at System Recovery? How to fix in one click?
Sometimes during the System Recovery process, the process can glitch, and you’ll lose data on your device, rendering it unusable. However, another solution to fix this is to repair your device using the Dr.Fone - System Repair tool.
Dr.Fone - System Repair (Android)
One-stop solution to fix Android stuck at System recovery
- It’s the #1 software for PC-based Android repair
- It’s easy to use with no technical experience required
- Supports all latest Nokia G310 devices
- Easy, one-click fix Android stuck at system recovery
3981454 people have downloaded it
Here’s a step by step guide on how to use it yourself;
Note: Be aware that this process can erase all your personal files on your device, so ensure you’ve backed up your Nokia G310 before continuing.
Step #1 Head over to the Dr.Fone website and download the software for your Windows computer.
Once installed on your computer, open onto the main menu and connect your Nokia G310 using the official USB cable. Select the System Repair option.
Step #2 Select the ‘Android Repair’ option from the next screen.
Insert your device information, including the brand, carrier details, model and country and region you’re in to ensure you’re downloading the correct firmware.
Step #3 Follow the onscreen instructions on how to put your device in Download Mode.
Your device should already be in this mode but follow the instructions to make sure. There are methods available for devices, both with and without home buttons.
Step #4 The firmware will now start downloading. You’ll be able to track this process in the window.
Ensure your device, and your computer stays connected the entire time, and make sure your internet connection remains stable.
After downloading, the software will automatically start to repair your device by installing the firmware. Again, you can track the progress of this on the screen, and you’ll need to ensure your device remains connected throughout.
You’ll be notified when the operation is complete and when you’re able to disconnect your phone and use it as normal, free from it being stuck on the Android system recovery screen!

Part 4. Android Stuck at System Recovery? How to fix in a common way?
If, however, your device is stuck on system recovery mode, here’s how you can easily get it out of system recovery. The process is slightly different for different Android devices, so you should check your device’s manual before attempting this process.
Step 1: Power off the Nokia G310 device, and just to be sure, take out the battery to ensure that the Nokia G310 device is fully turned off. Then reinsert the battery.
Step 2: Press and hold down the Home button, Power Button, and the Volume up Key simultaneously until the Nokia G310 device vibrates.
Step 3: Once you feel the vibration, release the power button but continue to hold down the Home and Volume up Key. The Android recovery screen will display. Release the Volume up and Home buttons.
Step 4: Press the Volume down key to select the “Wipe Data/ Factory Reset option and then press the Power button to select it.
Step 5: Next, you need to press the Volume down button to highlight “Delete All User Data” and then press the Power button to select it. The device will reset and present the “Reboot System Now” option.
Step 6: Finally, press the Power button to reboot the phone in normal mode.
Part 5. Backup and Restore Android System
Losing data on your Nokia G310 is a common occurrence, and since Android devices don’t really have an automatic full backup solution, it is important to know how to backup and restore your device system. Here’s how to easily do that.
Step 1: Enter the recovery mode on your Nokia G310, as described in Part 2 above. Use the Volume and Power keys to select the “Backup & Restore” option on the screen.
Step 2: Tap on the backup option or use the Volume and Power keys if your screen is unresponsive. This will begin backing up your system to the SD card.
Step 3: After the process is complete, choose “Reboot” to restart the Nokia G310 device.
Step 4: You can then simply check Recovery > backup directory on your SD card. You can rename it to easily find it later during the restore process.
To restore the system from the backup created, follow these simple steps.
Step 1: Once again, enter recovery mode as described in part 2 above and then choose Backup & Restore from the menu list.
Step 2: Press “Restore” to begin the recovery process from the Backup file we created
Step 3: You will be notified when the system restore is complete.
Android system recovery mode can be quite useful, especially when your system is unresponsive. As we have also seen, it is important to know how to get into and out of System Recovery mode if you are going to backup and restore your Android system. It is also quite easy to do both of these things.
App Won’t Open on Your Nokia G310? Here Are All Fixes
It is not a very rare phenomenon where an App won’t open, crash abruptly or face trouble while launching on an Android device. Many Android phone users also add to the fact that whenever they try to launch an App, it keeps loading but does not run smoothly, as it should in normal circumstances.
In such a scenario it is obvious for Android Smartphone users to look for possible solutions for such a random error so that their App/Apps load and work normally.
Many people are also interested in knowing about the causes behind why an App won’t open or why multiple/all Apps won’t open. This article will answer your query about why won’t my App open on an Android phone by listing a few probable causes for the problem.
Here are all the fixes you need if an App won’t open on your Nokia G310. Read on to find out all about why Apps won’t open on your Nokia G310 and solutions to overcome such a problem.
Part 1: Possible reasons for Apps won’t open
If you are an Android phone user and face a problem while trying to open an App on your device, you will ask yourself “Why won’t my App open?”. To answer your question and explain to you why an App won’t open on your phone, here are some probable and simple reasons to make you understand the real problem.
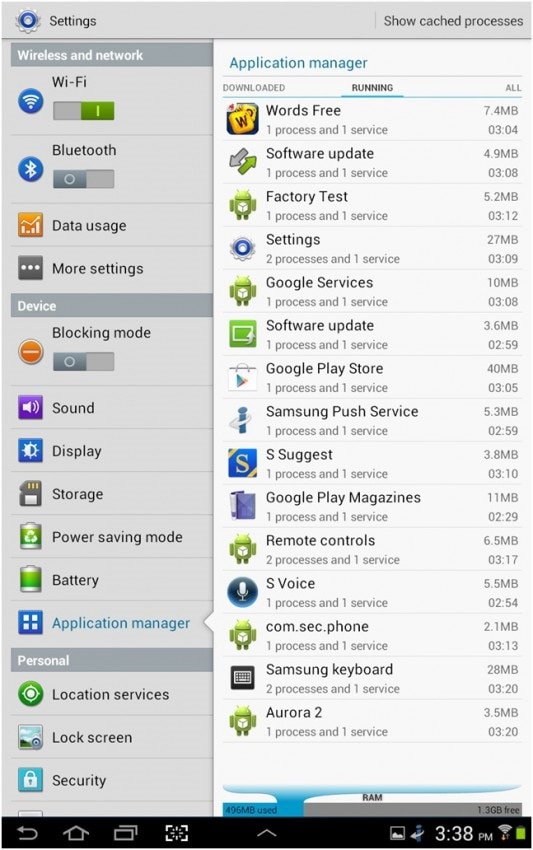
It is appropriate to tag our generation as smartphone addicts because we use smartphones for anything and everything. All our important information, such as photos, videos, audio files, documents, notes, calendars, emails, etc, are stored on our phones. This causes a major storage/space problem in our phones and a shortage of storage space is one of the main reasons why an App won’t open or why all Apps won’t open on your Nokia G310. To see how much of your storage space is occupied by Apps, go to “Settings” and select “Application Manager”.

Another possible reason for Apps to crash or why an App won’t open is a possible data crash. This may occur due to an unstable internet connection or various other background software interruptions.
The causes for the problem to occur are many and no specific reason can be established as the only reason why Apps won’t open on your Nokia G310. There are a lot of speculations about why such a problem occurs and persists, but it is more important to focus on how to fix if a particular App won’t open or if all Apps won’t open on Android.
Part 2: Quickest solution to fix apps won’t open on Android
You have already understood ‘why won’t your app open?’ at the start of this article. But, you are not happy with the traditional solutions to fix the app won’t open issue.
Well, in such a case Dr.Fone - System Repair (Android) can prove to be your savior. It resolves failed Android system update issues, crashing apps, and black screen of death. It can also get an unresponsive or bricked Android device or boot loop stuck device fixed with one click.
Dr.Fone - System Repair (Android)
Why won’t my app open? The quick fix is here!
- This is the first software in the industry that repairs Android systems.
- All the latest Nokia G310 tablets and mobiles are compatible with it.
- With single-click operation, fixing the app won’t open problems is super easy.
- No technical skills are needed to use the tool.
- The high success rate for Nokia G310 Android device issue fixing.
3981454 people have downloaded it
Here comes the detailed guide to fix apps won’t open problem using Dr.Fone - System Repair (Android)
Note: When you are up to fixing apps won’t open issues, make sure to back up your Nokia G310 beforehand. These processes might lead to data erasing and you don’t want to suffer data loss this way.
Phase 1: Preparation and connection of Android device
Step 1: Post-installation and launch of Dr.Fone on your computer, you got to press the ‘System Repair’ tab. Connect the Android device later.
Step 2: Hit the ‘Android Repair’ located on the left panel followed by tapping the ‘Start’ button.
Step 3: Feed your Nokia G310 details under the Nokia G310 device information screen. Please check the warning and press the ‘Next’ button right after that.
Phase 2: Repairing your Nokia G310 under ‘Download’ mode
Step 1: You got to boot the Android device under Download mode, as it’s important. The steps for that are as follows –
- Android devise with a ‘Home’ button – Press together ‘Volume Down’, ‘Home’, and ‘Power’ buttons together for 5 to 10 seconds after turning off the Nokia G310 device. Release them afterward and click the ‘Volume Up’ button to get into the ‘Download’ mode.
- When there is no ‘Home’ button – Turn off the Nokia G310 device and then for 5 to 10 seconds, keep the ‘Volume Down’, ‘Bixby’, and ‘Power’ buttons pressed. Tap the ‘Volume Up’ button after releasing all the buttons to enter the ‘Download’ mode.

Step 2: Hitting the ‘Next’ button starts downloading the Android firmware.
Step 3: Once Dr.Fone - System Repair (Android) verifies the downloaded firmware, it begins fixing the app won’t open the issue asap.
Part 3: 3 Common fixes if a particular App won’t open
In this segment, we will discuss the three best ways to help you fix the problem if only a particular App won’t open/launch/ run and takes an indefinite time to load.
1. Update the App
It is always advisable to keep your Android software as well as your Apps up-to-date and you must constantly check for any updates which may be available in the Google Play Store.
Follow the steps given below to update the app which won’t open on your phone:
• Visit Google Play Store on your Nokia G310.
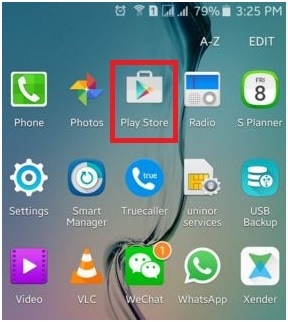
• Now select “My Apps & Games” from the main menu.

• In this step, you may click on “Update All” to update all Apps for which an update is available or manually select the Apps which you wish to Update.

Once the App is updated, close all Apps and tabs running in the background. Now try to launch the app once again. If it opens, your problem is solved. If not, DO NOT worry as there are more ways to help you.
2. Force Stop the App
Closing the App completely which won’t open on your phone is a good idea. To make sure that no operations are running in the background related to the App, you must “Force Stop” it. Doing this is extremely simple and all you need to do is follow the steps given herein under:
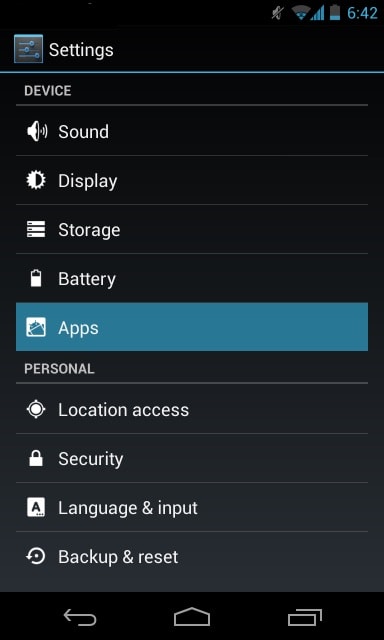
• Visit “Settings” on your phone.
• Click on “Apps” to see a list of all the Apps on your Nokia G310.
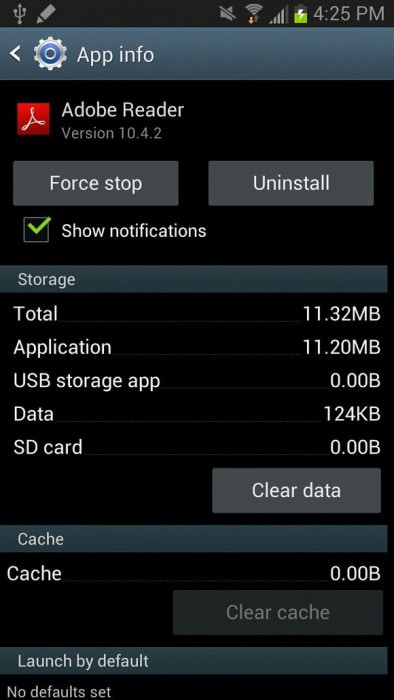
• Select the App which won’t open.
• Now click on “Force Stop” as shown below.
3. Clear App Cache and Data
This method resolves the issue to a great extent by wiping off unnecessary App content from your device.
Carefully follow the step-by-step instructions given below to clear all App cache and data:
• Visit “Settings” and select “Apps”.
• From the list of Apps that appears, select the App that won’t open.
• Now tap on “Clear Cache” and “Clear data” directly or under “Storage”.

Part 4: 3 Common fix if all Apps won’t open on Android
In this segment, we will discuss solutions to the problem if all your Apps won’t open. They are simple and easy to follow and solve the error in no time.
1. Android updates
Firstly, it is very important to keep your Android software updated at all times as an old Android version might not support new Apps or updated Apps.
To update your software:
• Visit “Settings” and keep going downwards.
• Now select “About Phone”.
• From the options available on the screen, tap on “System Updates”

• In this step, if you are prompted for an update, follow the instruction given and do so.
Updating your Android software solves most of your problems. This method might sound weird but works wonders when it comes to App related issues.
2. Restart the phone
Restarting your Nokia G310 to fix an error might sound old school but it gives good results when your Apps won’t open. Restarting your phone is fairly simple. All you need to do is:
• Long press the power button.
• Now click on “Restart”.
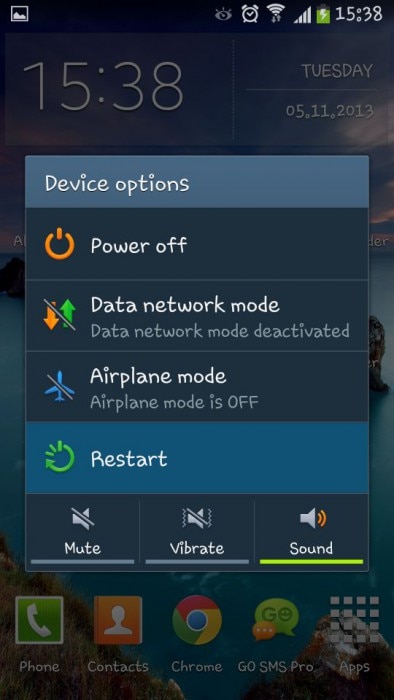
Your phone will automatically restart and once it does, you can try to launch the App. You may also restart your Nokia G310 by pressing the power button for about 15-20 seconds.
3. Reset Factory Settings
This method is a little tedious and must be last on your list. Also, make sure you take a backup of all your data and contents stored on your Nokia G310 and this solution will completely wipe off your phone making as good as a new smartphone.
To Factory Reset your Nokia G310, carefully follow the guidelines given below:
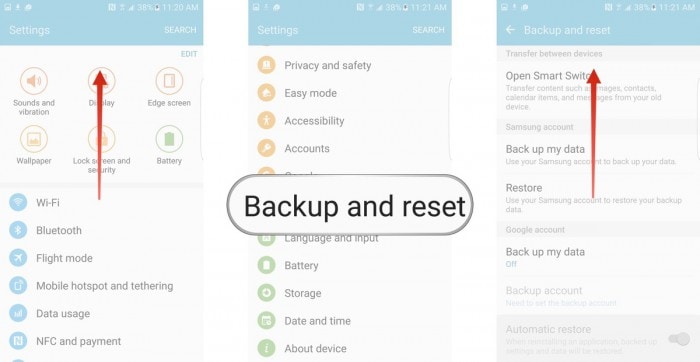
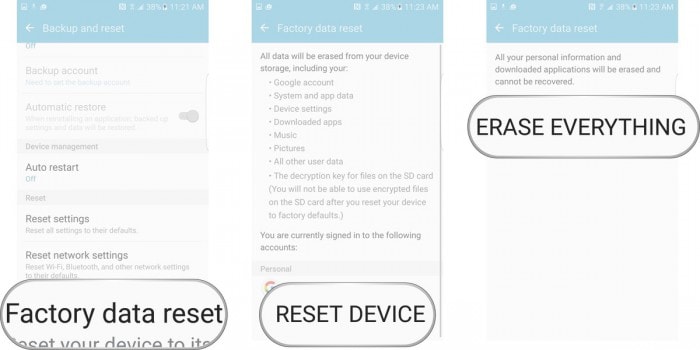
• Visit “Settings” to find the “Backup and reset” option as shown in the screenshot below.
• Now click on “Factory Data Reset”>“Reset Device”>“Erase Everything”
Your phone will now reboot and will be required to set up from scratch.
“Why Won’t my App open” is a question asked by many Android phone users who fear that the problem occurs due to a virus attack or a system failure. However, this is not the case. The reason for the error to the surface is quite minor and can be fixed by you, sitting at home, without resorting to any kind of technical or external assistance. The solutions listed above are easy to understand and not very time-consuming.
So go ahead and try them out now!
Also read:
- [New] In 2024, 10 Missing iPhone X Tips and Tricks For You to Pick Up
- [Updated] Glide 3 Duel Illusionist 4 Emerges for 2024
- CatchEmAll Celebrate National Pokémon Day with Virtual Location On Poco X5 | Dr.fone
- Elevate Your Voice Content with GarageBand Mastery for 2024
- How to Fix the Soft Bricked Honor 90? | Dr.fone
- How To Fix Unresponsive Phone Touchscreen Of Vivo S17 | Dr.fone
- How To Revive Your Bricked Lava Blaze Pro 5G in Minutes | Dr.fone
- How To Revive Your Bricked Vivo Y36i in Minutes | Dr.fone
- In 2024, Assemble Creative GIFs for Online Sharing
- Reasons for Vivo V29 Stuck on Boot Screen and Ways To Fix Them | Dr.fone
- The Reality Behind Earbud Audio Quality: Debunking Lossless Expectations with ZDNet's Analysis
- Unboxing and Test Drive Report: The Toy-Sized Marvel, Galaxy Ford F-1# Remote Control Vehicle
- What Is a SIM Network Unlock PIN? Get Your Samsung Galaxy XCover 7 Phone Network-Ready
- Title: Nokia G310 Bootloop Problem, How to Fix it Without Data Loss | Dr.fone
- Author: Abel
- Created at : 2024-11-29 21:41:03
- Updated at : 2024-12-03 21:04:11
- Link: https://fix-guide.techidaily.com/nokia-g310-bootloop-problem-how-to-fix-it-without-data-loss-drfone-by-drfone-fix-android-problems-fix-android-problems/
- License: This work is licensed under CC BY-NC-SA 4.0.