
Nokia G310 Stuck on Screen – Finding Solutions For Stuck on Boot | Dr.fone
Nokia G310 Stuck on Screen – Finding Solutions For Stuck on Boot
The market has embraced Nokia G310 for being the pioneers in the industry. Although the company lacked in providing explicit smartphones, they were still able to catch up with the race. Nokia G310 C31, known to provide durability of the next level, is taking up the latest shelves of Nokia G310 smartphones. Although the company promises reliability, there are several problems involving such smartphones.
One prominent solution stated by Nokia G310 users involves the screen stuck in the boot. If your Nokia G310 is stuck on the “Nokia G310” screen for no particular reason, you will have to read this article. As this article tackles all reasons involving the problem, it comes up with the necessary solutions. These solutions will help Nokia G310 users find solutions for their stuck screens on the boot.
Part 1: What Causes Nokia G310 Screen Stuck on Boot?
Has your Nokia G310 recently been stuck on the boot loop screen? If it is happening or has happened to you, there are some reasons that you need to be aware of. Having an overview of the causes of Nokia G310 being stuck on the Android One screen can help you redirect yourself toward to right solution. Go through the list of all causes and find more about the issue involving screens stuck on boot in Nokia G310 smartphones:
- The Device is Damped in Liquid
It is entirely possible that your Nokia G310 smartphone is immersed in water. With a smartphone dipped in liquid, the Nokia G310 device can turn useless. If you have tried starting it again, it won’t run and might get stuck on the boot.
- Soft-Bricked Device
There are multiple conditions where your Nokia G310 smartphone can get soft-bricked. It majorly happens when a particular function in the Nokia G310 device stops working. To counter the problem, it is essential that you can get your device stuck on the boot screen.
- Outdated Device
If the equipment wears out after a certain time, there is a need to have it changed. With such obsolete models of Nokia G310, you will surely face issues like a screen stuck on the boot. Smartphone equipment cannot be revamped, and you will have to go for newer options.
- Software Update Required
A software update on your Nokia G310 smartphone might be causing issues with the screen stuck on the boot. The best way to get rid of this problem is to update your system software to the latest version.
Part 2: 5 Solutions To Solve Nokia G310 Screen Stuck on Boot
Do you seek to resolve the problem of the Nokia G310 Plus stuck on the Android One screen? There are specific techniques that can be tried as a remedy. These solutions are tried and recommended by experts. Go through the details provided below to solve the issues with your stuck Nokia G310 screen.
Solution 1: Force Restart Nokia G310
The first and most proclaimed technique to refresh Nokia G310 devices under such a problem is to force restart them. If the Nokia G310 device is stuck, you will have to perform this process by pressing the “Power” and “Volume Up” keys for 15 seconds. Continue holding the buttons until the Nokia G310 device vibrates or restarts by showing the screen again.

Solution 2: Leave the Phone For a While To Drain Its Battery
A conventional way to solve the issue of a stuck screen in Nokia G310 is to leave the phone in its position. As you let its battery drain out, the phone will turn off, and you can activate the Nokia G310 device again by charging it.
Once you restart it this way, all the procedures will initiate again, and the Nokia G310 device will be as good as new. Draining the battery has given you the leverage to regain control over the Nokia G310 device again.
Solution 3: Check For Updates on Nokia G310 Smartphones
Another quick remedy to try on your Nokia G310 smartphones involves updating their software. If there is any prevailing software update to install on the smartphone, you will have to check and update it by following the steps guided below:
Step 1: Open the “Settings” of your Nokia G310 smartphone and continue to the “System” section in the list of options. You will have to access the “Advanced” options in the “System” menu.

Step 2: As you lead to the advanced options, look for “System update” in the provided options. Look for the “Check for update” button. This will check if your Nokia G310 needs any software updates or not.

Solution 4: Using Wondershare Dr.Fone
One of the finest options available to perform is using a third-party platform that promises smooth operability. Wondershare Dr.Fone is a platform designed to provide such smartphones another life to survive. Its unique functionality repairs all the issues with a smartphone and makes it as good as a new one.
If your Nokia G310 Plus is stuck on the Android One screen, this platform is the ultimate solution for you. With the support of the latest devices and software versions, Dr.Fone – System Repair (Android) offers the best results. To know how to repair your Nokia G310 smartphone with the help of this tool, look through the steps featured next:
Step 1: Open Dr.Fone and Select System Repair
As you launch Dr.Fone after downloading it on your computer, continue to the “System Repair” option. You will have to start by connecting the Android device to the computer through a USB cable. Select “Android Repair” from the options available and continue to the following options.

Step 2: Define Device Information and Confirm
You will be directed to the Nokia G310 device information screen, where you must define the identification parameters of the Nokia G310 device. Select the brand, name, model, country, and carrier details for proper system recovery. On clicking “Next,” you will receive a warning where you will have to type the number “000000” to proceed with the method.

Step 3: Put Your Nokia G310 in Download Mode
Following this, you will have to put your Nokia G310 in Download Mode. For that, you need to follow the steps according to the condition of the Nokia G310 device:
- For Devices with Home Button:
Power off your Android and continue to press and hold the “Volume Down,” “Home,” and “Power” buttons for a few seconds. After holding them for almost 10 seconds, release and press the “Volume Up” button to enter the mode.
- For Devices without Home Button:
Turn off the Android device and hold the “Volume Down,” “Bixby,” and “Power” buttons simultaneously for a few seconds. On releasing the buttons, press the “Volume Up” button to enter Download Mode.

Step 4: Start Downloading and Verify Firmware
To proceed, tap the “Next” button to download the firmware. As you verify the firmware, the repairing process starts on your Nokia G310 device.

Solution 5: Contact the Customer Service Center of Nokia G310
If the issue of the Nokia G310 stuck on the “Nokia G310” screen continues, you will have to contact the Nokia G310 device’s customer support. With no proper method left for the Nokia G310 device, the only effective technique is to visit the authorized store for Nokia G310 smartphones and claim the issue with the Nokia G310 device. In this way, you might receive or get a fully repaired device with no additional charges if the Nokia G310 smartphone is under warranty.
Part 3: How to Avoid Nokia G310 Screen Stuck on Boot?
What if you come to know that you can avoid the Nokia G310 screen stuck-on boot problem? There are a set of tips and tricks that you can follow to explain how to prevent such an issue in the first place. Follow these tips to learn more about saving your Nokia G310 from such miserable conditions:
1. Protect from Malware
The first thing to protect your Nokia G310 smartphone from getting stuck on the boot is to keep it safe from unauthorized and malicious data. The best thing to keep a device secure is to follow all security protocols and avoid bypassing them. If you try downloading something not authorized by the Play Store itself, for instance, an APK, it can make your device vulnerable to malware.
2. Keep Your Device Updated
If you feel frustrated by issues like Nokia G310 being stuck on the Android One screen, the best thing to avoid such a problem is to keep your device updated at all costs. Whenever there is an update on your Nokia G310 smartphone, make sure to install it on time and properly. Do not leave updates uninstalled for no reason, as they can hinder the Nokia G310 device’s speed and performance.
3. Do Not Fool Around with System Files
Changing or modifying system files can be fatal for smartphones. Thus, to keep your Nokia G310 safe, you need to keep your hands away from such important files. Modifying a single file can make your device useless or put you in situations like a Nokia G310 smartphone stuck on the boot. For that, the best tip is to keep yourself out of engagement.
4. Use Wondershare Dr.Fone To Manage All Data With Ease
As you have observed, the power of Dr.Fone can be a perfect phone manager for you at all times. While providing system repair services, it can also help you manage your device’s data and other statuses. Thus, consider keeping Dr.Fone close to your device and its operations. In this way, you will be able to have complete control over all types of data present in the Nokia G310 smartphone.
 safe & secure
4,675,795 people have downloaded it
Conclusion
With that, this brings the article on Nokia G310 smartphones to a conclusion. If you are still facing issues with your Nokia G310 stuck on the “Nokia G310” screen, this article is the perfect solution for your problem.
With all the provided methods, we do hope that you will be able to restore the status of your Nokia G310 smartphone and make it functional. For the finest results, you have also discovered Dr.Fone – System Repair (Android) as the best solution for repairing such devices.
Fixes for Apps Keep Crashing on Nokia G310
The rapid evolution of technology has transformed our smartphones into powerful devices. Presently, with just a few taps, they possess the ability to accomplish a diverse array of tasks. It has been possible due to the extensive availability of mobile applications. However, it can be incredibly frustrating when your favorite apps keep crashing repeatedly.
You’re not alone if you’re an Android user who encounters app crashes. This article will explore ten practical ways to fix apps that keep crashing on Android devices. We will also discuss the causes behind app crashes and how to prevent them.
Part 1: What Are the Causes Behind Apps Keep Crashing on Android?
There are many reasons for the app crashing on Android devices. These reasons range from insufficient storage space to bugs and glitches in the apps. Finding out the root cause of an app crashing is important so that you can find the appropriate solution. Discussed below are some of the reasons why your Android apps keep crashing:
Insufficient Memory
When a device is low on memory, it may struggle to run multiple apps simultaneously. Each app requires memory to store its data and execute its processes. If the available memory is limited, it can cause apps to crash. That happens because they don’t have enough resources to operate properly.
Software Compatibility
Android devices come in various models and run different operating system versions. That’s why it is essential to use apps compatible with your device. Since there are a lot of Android variants, it is hard to optimize apps for all devices. An app not optimized for an Android version or device leads to crashes or malfunctions.
Outdated Apps
Apps are regularly updated to introduce new features, fix bugs, and enhance performance. Using an outdated version of an app may cause instability or compatibility problems. Since the app is not optimized for the current version of Android, it can keep crashing.
Network Problems
Some apps rely heavily on network connectivity to function properly. They need a stable and strong internet connection to perform all the functions. These apps can crash if there are network connectivity issues, such as a weak Wi-Fi or network outage. Unstable connections can disrupt data transmission, making the app’s function challenging.
App Bugs
Despite rigorous testing, apps can still have bugs or coding errors that lead to crashes. Bugs in apps can occur due to various reasons. It mostly relates to incorrect implementation of features or unexpected user interactions. App developers work to identify and fix these bugs, often releasing updates.
Part 2: How to Fix the Apps Keep Crashing on Android?
Once you discover why your Android apps keep crashing, fixing them becomes a lot easier. However, there is no need to worry even if you cannot locate the problem source. Below we have listed 10 general and specialized solutions to fix app crashing:
Fix 1: Check the Internet Connection
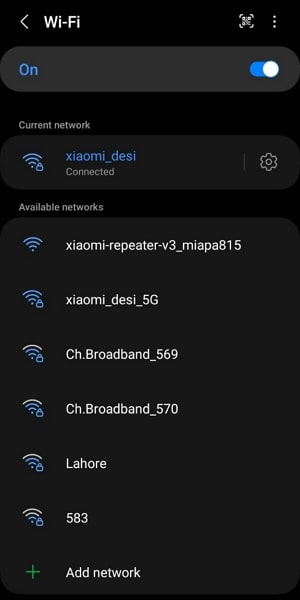
As mentioned before, some apps rely on the internet to function. If you don’t have an active internet connection, they will not work. To avoid the app crashing, you need to ensure that the internet connection on your device is working. If you use Wi-Fi, check the router and turn Wi-Fi off and on again. In the case of mobile data, try enabling Airplane mode and then disabling it.
Fix 2: Force Stop the Apps Keep Crashing
If your apps keep crashing, you should try force-closing the targeted app and re-opening it. Doing this will flush out minor bugs and glitches from the app. These temporary bugs and glitches can occur due to various reasons and hamper the app’s working. Use the following steps to force stop the app that keeps crashing and re-open it:
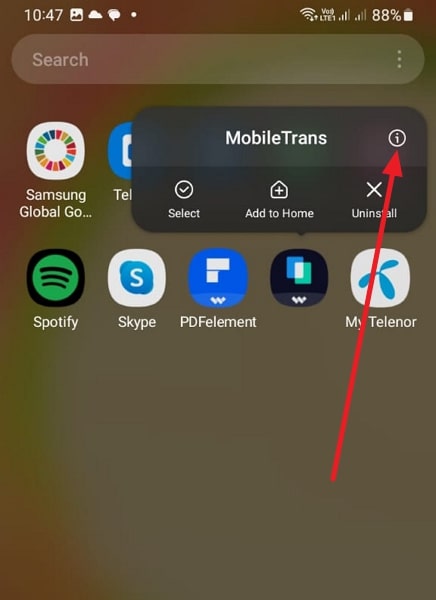
- Step 1: On your Nokia G310, move the app icon and press it to select “App Info.” On the App Info screen, tap the “Force Stop” button to force close the app. The button can be either on the down left or down right corner.
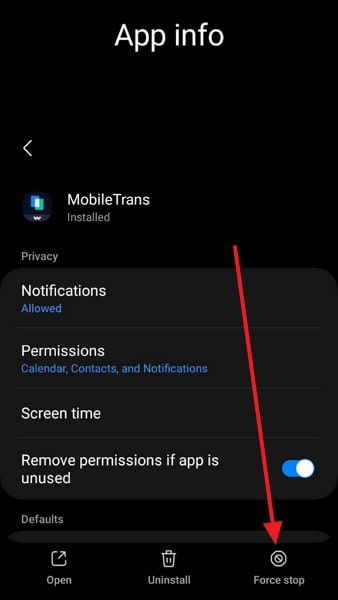
- Step 2: After force closing the app, relaunch it and see if the app crashing issue is resolved.
Fix 3: Restart your Android Device
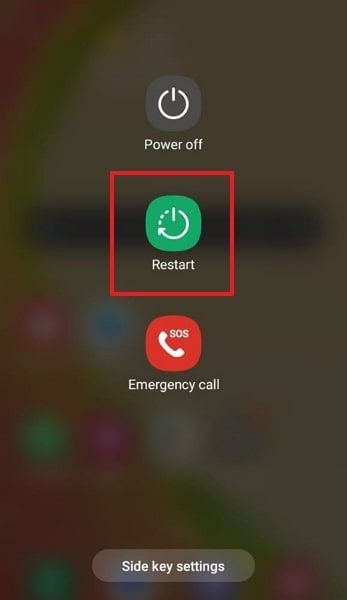
In case restarting the app hasn’t worked, you should try restarting your Nokia G310. Rebooting your device reset all the processes and apps in the Nokia G310 device. It helps remove conflicts between different apps, which can be the cause of your apps keep crashing on Android. To reboot your Nokia G310, adhere to the following guidelines:
- Step: Press and hold the “Power” key until you see the power menu on the screen. Here, tap the “Restart/Reboot” button to restart your Nokia G310.
Fix 4: Update the Android OS
Not updating your Android OS for a long while can cause many performance issues in your device. One of these issues is the incompatibility with the latest apps. That’s why make sure that your Nokia G310 is running the latest available version of the operating system. You can check and update the Android OS of your device using these steps:
- Step 1: Launch the Settings app on your Nokia G310 and scroll down to select “Software Update.” On the next screen, tap “Download and Install” to look for new updates.
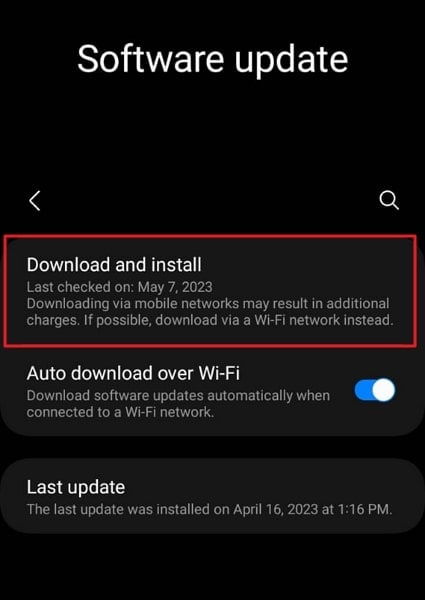
- Step 2: During the update process, ensure you have a stable internet connection. Moreover, your device should be fully charged to avoid any complications.
Fix 5: Clear the App Cache
Have you tried clearing the cache of the app that keeps crashing? The app cache consists of temporary files and data that are stored to enhance app performance. However, if the app cache becomes corrupted, it can cause crashes. In such a situation, clearing the app cache can help resolve the app crashing issue. To clear the app cache on your Nokia G310, follow these steps:
- Step 1: Navigate to your targeted app icon and long-press it. Now, tap “App Info” from the pop-up menu to access app information.
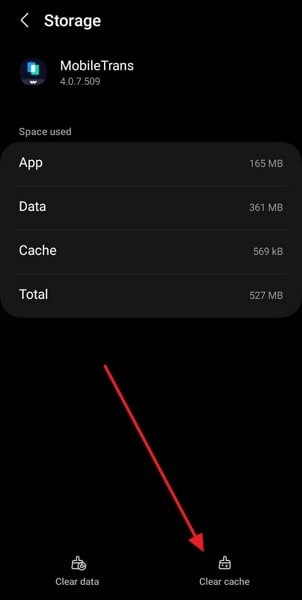
- Step 2: Following this, press “Storage,” and on the following screen, hit “Clear Cache.” It will clean the cache for the targeted app.
Fix 6: Reinstall the Buggy App
Bugs in the app can prove a nightmare and hard to remove from the app. If your apps keep crashing due to bugs, it is best to uninstall and then reinstall the app. It will help you eliminate any corrupted files or settings that might be causing the crashes. Given below are the steps needed to uninstall and reinstall the apps on Android device:
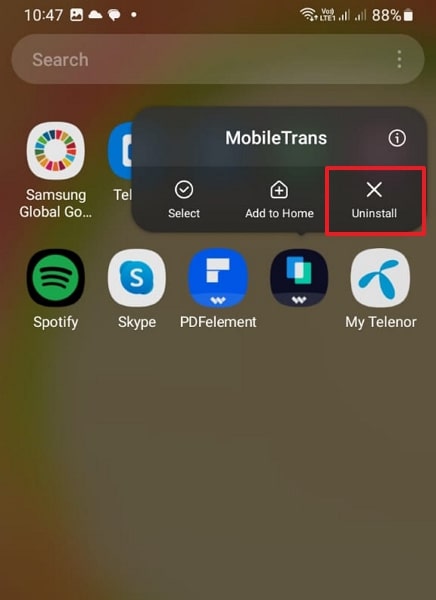
- Step 1: Go to the problematic app on your device and press the app icon for a while. Select “Uninstall” and remove the app by pressing “OK.”
- Step 2: After removing the app, go to Google Play Store and find the targeted app. Here, tap “Install” to reinstall the app on your device.

Fix 7: Check the App Permissions
Sometimes, app crashes can occur due to improper or conflicting permissions. Whenever you install an app on your device, it needs related permission to function. If you have not granted the required permissions, the apps will not function, leading to apps keep crashing on Android. You can check the app permissions using the following procedure:
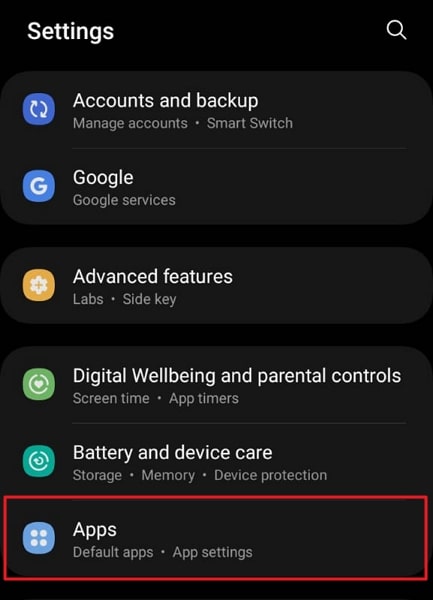
- Step 1: You will need to launch Settings on your Nokia G310 and tap “Apps.” Here find and select the targeted app to open App Info.
- Step 2: On the App Info screen, press “Permissions” to access all permission settings. Here, ensure that your app has the required permissions.

Fix 8: Check and Clear the Phone Storage
Insufficient storage space on your device can also lead to app crashes. Check the available storage space on your Nokia G310 and ensure it has enough free space. If the storage is full, consider deleting unnecessary files or apps to create more space. Explained below is the process to check and free up storage on Android devices:
- Step 1: Open Settings on your Nokia G310 and scroll down to find and select “Battery and Device Care.” Here, tap “Storage” to view the Nokia G310 device storage.
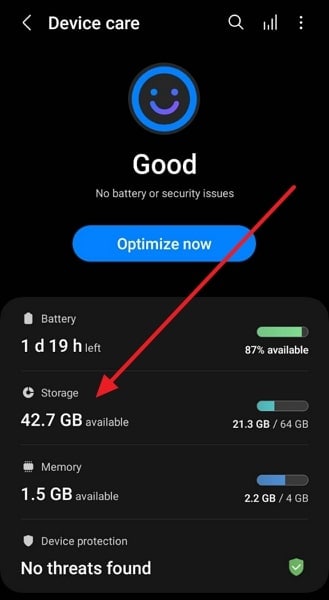
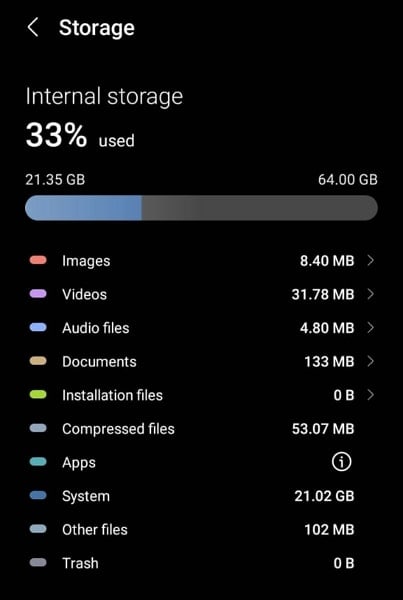
- Step 2: Here, you will see detailed information about everything stored on your device. If the storage space is full, remove the unnecessary data.
Fix 9: Reboot Into Safe Mode
It can be hard to find the app crashing root cause if it happens due to conflicts between different apps. In such scenarios, the best way to find the problematic apps is to use Safe Mode on your device. Safe Mode disables all third-party apps, allowing you to determine if the crashes are caused by a specific app. Follow the process given below to reboot your device into Safe Mode:
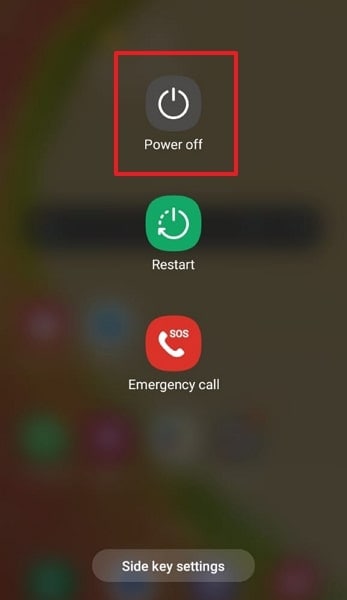
- Step 1: Press and hold the “Volume Down” and “Power” buttons together for 3 seconds to access the power menu. Here, long-press the “Power Off” option.
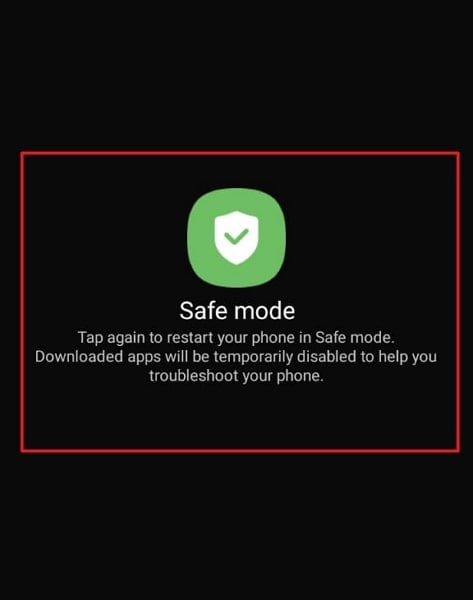
- Step 2: Press the “Power Off” button until “Restart in Safe Mode” appears on the screen. Now reboot the Nokia G310 device into Safe Mode. To exit Safe Mode, you will need to restart the phone.
Fix 10: 100% Working Solution to Fix the Android Apps Keep Crashing – Wondershare Dr.Fone
Trying to fix an app crashing with multiple methods can be a tiring and frustrating experience. That’s why the best option is always to find and use a specialized Android system repair tool. The best Android repair tool currently available is Wondershare Dr.Fone. It is a comprehensive system repairing tool that can fix almost all system issues in Android devices.
Using Wondershare Dr.Fone, you can fix issues like apps crashing, black screen of death, Play Store not working, and many more. Furthermore, you do not need any technical skills to use Wondershare Dr.Fone to repair your Android system issues.
Main Features of Wondershare Dr.Fone
- Wondershare Dr.Fone is a specialized tool for fixing problems with Nokia G310 devices, including the latest Nokia G310 phones.
- It supports the Android system repair feature for over 1000 Android phones across the spectrum.
- With this tool, you can also fix bricked Android devices with ease.
Step to Fix the Android Apps Keep Crashing via Wondershare Dr.Fone
The process of fixing apps that keeps crashing on Android devices is straightforward when using Wondershare Dr.Fone. Here are the simple steps you need to follow to fix the app crashing:
- Step 1: Access System Repair from Toolbox
Open Wondershare Dr.Fone on your system after installation and select “System Repair” from the “Toolbox.” Now connect your Nokia G310 using a USB cable and select “Android” in Wondershare Dr.Fone.
- Step 2: Provide Your Android Device Information
Click “Start” to initiate the repair process and provide your device information. You will need to provide device details like Brand, Name, Model, Country, and Carrier. Now, check the “I agree with the warning, and I am ready to proceed” box and tap “Next.”

- Step 3: Repair the Apps Keeps Crashing on Android
Follow the on-screen instruction to activate Download Mode on your device. Wondershare Dr.Fone will download the related firmware once you have enabled Download Mode. Afterward, click “Fix Now” and confirm your action by inserting the “000000” code. Now, wait for the repair process to finish.

safe & secure
Conclusion
To sum up, if your apps keep crashing on Android, you can resolve it in many ways. Using the fixes given in this article, you can improve apps’ performance and reduce crashes. However, if you’re looking for a reliable and convenient solution, we highly recommend Wondershare Dr.Fone.
With its clean interface and powerful features, Wondershare Dr.Fone stands out as the best choice to fix app crashes. It provides a comprehensive toolkit to diagnose and resolve various software issues.
Proven Ways to Fix There Was A Problem Parsing the Package on Nokia G310
Unable to install your favorite Apps from Google Play Store because there was a problem parsing the package?
The Parse Error or there was a problem parsing the package error is very common with Android devices. Android is a versatile platform and, therefore, a very popular OS. It is an open software and allows users to download and use various types of apps from the Play store. Android is also a cheaper alternative as compared to other Operating Software.
Since many of us are well versed with most of the Android devices, parse error, or there is a problem parsing the package is an error is not something new and uncommon.
The error message usually pops up on the Nokia G310 device screen when we try to download and install an App, for example, “There is a problem parsing the package Pokémon Go ”.
The error message which appears reads as follows:
“Parse error: There is a problem parsing the package”.
Android users who have experienced this would know that the parse error leaves us with only one option, i.e., “OK” as shown in the image below.
There was a problem parsing the package may occur due to several reasons, most of which are listed and explained below. Furthermore, there is a list of solutions to choose from to eliminate the “there is a problem parsing the package” error.
Read on to find out more.
Part 1: Reasons for the parsing error
Parse Error, better known as “there was a problem parsing the package” error is very common and normally surfaces when we try to download and install new Apps onto our Android devices from Google Play Store.
The reason for the error message to pop-up are many but none of them can be blamed singularly for the “there is a problem parsing the package” error. Given below is a list of the most probable reasons for Parse Error to stop an App from installing. Examine them carefully before moving on to the solutions to fix the “there was a problem parsing the package” error.
• Updating the OS may cause some disturbances in the manifest files of different Apps leading to Parse Error.
• Sometimes, the APK File, i.e., Android Application Package, gets infected due to improper or incomplete App installation causing “there is a problem parking the package” error.
• When Apps are downloaded and installed from unknown sources, due permission is needed. In the absence of such permission, the chances of the Parse Error to occur increase.
• Certain Apps are not compatible or supported by the latest and updated Android versions.
• Anti-virus and other cleaning Apps are also a major reason for the “there was a problem parsing the package” error.
The causes listed above are not App specific. The Parse Error may occur due to any one or more of these reasons, but what is more important is to try to get rid of the problem.
Let us move on to learn ways to fix the there was a problem parsing the package error.
Part 2: 8 Solutions to fix the parsing error
“There is problem parking the package” error can be dealt with easily if only we do not panic and deliberately follows the steps explained in this segment. Here are 7 of the most reliable and trustworthy methods to fix the Parse Error.
They are easy, user-friendly, and do not take much of your time. So don not waste any more of your time and try them now.
2.1 One Click to Fix ‘There is a Problem Parsing the Package
If you’re still encountering the Parsing error, there may be a problem with the Nokia G310 device data on your device, which means you’ll need to repair it. Luckily, there’s a simple, one-click solution you can follow called Dr.Fone - System Repair .
Dr.Fone - System Repair (Android)
Android repair tool to fix all android system issues in one click
- Simple, clean, and user-friendly interface
- No technical knowledge required
- Easy one-click repair to fix ‘there is a problem parsing the package’ error
- Should repair most parsing problems with apps, like ‘there is a problem parsing the package Pokemon Go’ error
- Supports most Nokia G310 devices and all the latest models like Galaxy S9/S8/Note 8
3981454 people have downloaded it
If this sounds like the solution you’re looking for, here’s a step by guide on how to use it yourself;
Note: Please note that this repair process can erase all data on your phone, including your personal information. This is why it’s so important to back up your Nokia G310 before proceeding.
Step #1 Head over to the Dr.Fone website and download the software. Install the downloaded software and open it. From the main menu, select the System Repair option.
Input your device and firmware information to confirm you’re installing the right version of the operating system.
Step #2 Follow the onscreen instructions on how to get into Download Mode to start the Repair process.
Once complete, the firmware will start downloading.

Step #3 Once the firmware has downloaded, it will automatically install it to your device.
When this is completed, you’ll be free to disconnect your Nokia G310 and use it how you please without the ‘there is a problem with the parsing package’ error.

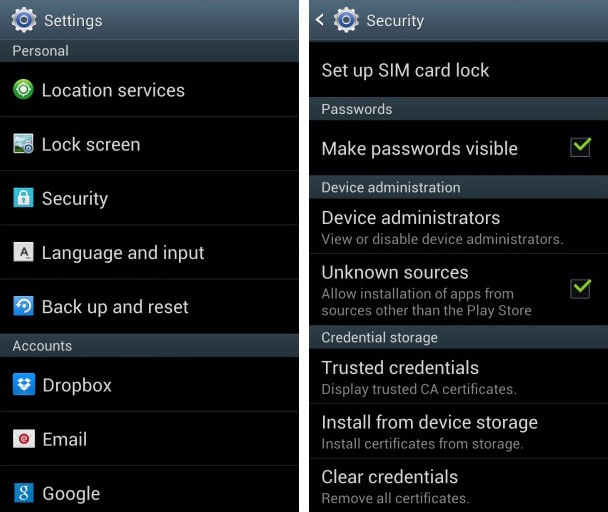
2.2 Allow installation from unknown sources
When we install Apps from other sources and not Google Play Store, there might be a glitch in using such Apps. To overcome this problem, turn on “Allow App installation from other sources”. Follow the steps given below for better understanding:
• Visit “Settings” and select “Applications”.
• Now tick mark on the option saying allow App installation from unknown sources.
2.3 Enable USB debugging
USB debugging is not considered necessary by many users but these methods give you an edge over others while using an Android device as it lets you access things on your phone, etc which you could not earlier.
To enable USB Debugging to fix “There is a problem parsing the package” error, follow these steps:
• Visit “Settings” and select “About Device”.
• Now click on “Build Number” not once but continuously for seven times.

• Once you see a pop-up saying “You are now a developer”, go back to “Settings”.

• In this step, select “Developer Options” and turn on “USB Debugging”.

This should solve the problem. If not, move on to the other techniques.
2.4 Check APK File
An incomplete and irregular App installation may cause the .apk file to get corrupted. Make sure you download the file completely. If need be, delete the existing App or its .apk file and reinstall it from Google Play Store for it to be compatible with your device’s software and to use the App smoothly.
2.5 Check App Manifest File
Manifested App files are nothing but .apk files which are improvised by you. Such changes may cause the Parse Error to occur more frequently. Modifications in the App file can be made by changing its name, App settings, or more advanced customizations. Make sure you roll back all changes and restore the App file to its original state to prevent it from getting corrupted.
2.6 Disable Antivirus and other cleaner Apps
Antivirus software and other cleaning Apps are very helpful in blocking unwanted and harmful Apps from damaging your device. However, sometimes such Apps also prevent you from using other safe Apps.
We do not suggest that you delete the Antivirus App permanently. Temporary uninstallation will be useful here. To do so:
• Visit “Settings” and then select “Apps”.
• Select the antivirus App to click on “Uninstall” and then tap “OK”.
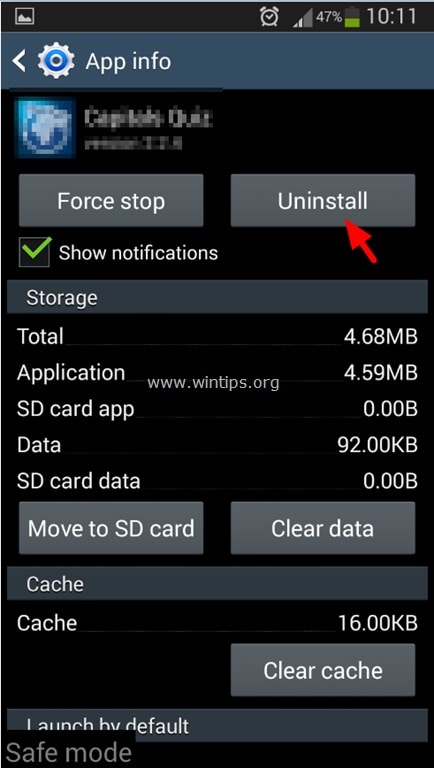
Now download and install the desired App again. Once this is done, do not forget to install the Antivirus App again.
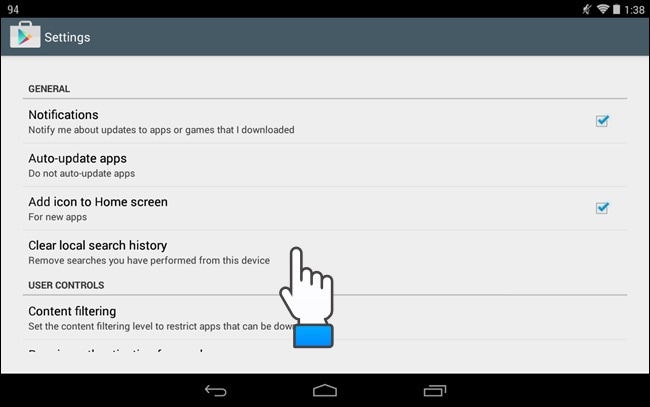
2.7 Clear Cache cookies of Play Store
Clearing Play Store Cache cleans the Android Market platform by deleting all clogged up unwanted data. Follow the steps given below to delete Play Store cache:
• Tap on Google Play Store App.
• Now visit Play Store’s “Settings”.

• Select “General Settings” to “Clear local search history”.
2.8 Factory Reset Android
Factory Resetting your device to fix the Parse Error should be the last thing you try. Make sure you take a back-up of all your data on your Google Account or a Pen Drive because this technique erases all media, contents, data, and other files, including your device settings.
Follow the steps given below to factory reset your device:
• Visit “Settings”.
• Now select “Backup and Reset”.

• In this step, select “Factory data reset” and then “Reset Device” to confirm Factory Reset.
The whole process of factory resetting your Nokia G310 might sound tedious, risky, and cumbersome but it helps to fix the Android SystemUI has stopped error 9 out of 10 times. So, think carefully before using this remedy.
Parse Error: There was a problem parsing the package is an error message that has troubled many Android users. The good part is that the above-stated fixes not only solve the problem but also prevent it from occurring in the future. So, keep them in mind the next time you or anyone you know faces such an issue.
Also read:
- [New] Fixing Full Screen in Obs Journey
- Enhance Video Transmission Success in Messenger Apps for iPhone, Android
- How PGSharp Save You from Ban While Spoofing Pokemon Go On OnePlus 12R? | Dr.fone
- How to Fix Unfortunately, Contacts Has Stopped Error on Nokia G42 5G | Dr.fone
- How to Quickly Fix Bluetooth Not Working on Realme Narzo 60 Pro 5G | Dr.fone
- How To Unbrick a Dead OnePlus Open | Dr.fone
- In 2024, Mastering Privacy in Media Cutting Out Unwanted Visibility
- In 2024, Maximizing Video Clarity in Twitter Feed
- Motorola Moto E13 Not Connecting to Wi-Fi? 12 Quick Ways to Fix | Dr.fone
- Navigating Key Retrieval in Modern Windows Editions
- Overcoming Window's Wide View Resolution Fix
- Restore Missing App Icon on Honor Play 8T Step-by-Step Solutions | Dr.fone
- Strategies for Apps That Wont Download From Play Store On Tecno Spark 20 | Dr.fone
- Top-Ranking FREE AAC MP3 Players: Optimized for PC & MAC Systems
- Will Pokémon Go Ban the Account if You Use PGSharp On Asus ROG Phone 7 Ultimate | Dr.fone
- Title: Nokia G310 Stuck on Screen – Finding Solutions For Stuck on Boot | Dr.fone
- Author: Abel
- Created at : 2024-11-30 16:23:23
- Updated at : 2024-12-03 21:09:57
- Link: https://fix-guide.techidaily.com/nokia-g310-stuck-on-screen-finding-solutions-for-stuck-on-boot-drfone-by-drfone-fix-android-problems-fix-android-problems/
- License: This work is licensed under CC BY-NC-SA 4.0.