
Oppo A79 5G Camera Not Working Unexpected Error? Fix It Now | Dr.fone
Oppo A79 5G Camera Not Working Unexpected Error? Fix It Now
For all its glory and goodness, the Android OS often has its users pulling their hair in frustration at just how buggy the OS can be at times. So, if you’re having one of those days today, we are here to help. Camera app is one of the most used apps on smartphones today. People only launch the app when they want to take a photo, for everything else there’s a dedicated photo gallery app. What happens when you launch the camera app only to realize it threw an error and you missed your photo moment? Don’t throw the phone, not yet. Let us help you out.

Part I: Why Is Android Camera Not Working?
There are a few reasons why the camera app is not working on your Oppo A79 5G.
Low Memory
Camera app does rely heavily on system resources, so in case you have too many apps open and for some reason the OS is not able to manage the resources appropriately for the camera app to function as it should, you will get a camera error.
Low Storage
The camera app needs storage space to save the photos it takes. So, in case your phone is running low on storage space, the camera app would likely malfunction as it would have no way to store the photos it would be taking.
General Bugs And Glitches
OS bugs and general glitches within the OS and the camera app can cause camera not working issue anytime during everyday operation. This is part and parcel of any technology.
Hardware Issues
In the rarest cases, there might have developed an actual hardware issue with the camera system on your Oppo A79 5G. The likely culprit is misuse and abuse, such as a dropped phone or maybe the phone was too hot for extended periods of time, causing hardware issues.
Part II: How To Fix Android Camera Not Working Issue?
So, how to get the Android camera not working problem solved? There are a few ways you can try fixing the camera not working issue on your Oppo A79 5G right where you are, without needing to take the Oppo A79 5G device to the manufacturer’s service center.
II.I: Restart The Handset
One of the first things to do any time an app or your phone or tablet does not work like it should, restarting the Oppo A79 5G device refreshes everything just enough to resolve most commonly occurring issues.

Use the power button on your smartphone to restart your Android handset and see if this resolves the issue.
II.II: Close And Relaunch The Camera App
If the camera app (or any app for that matter) has been in the background for a while and then it is brought to the foreground, there are always chances of it crashing for any reason, or not working as expected. So, closing the app completely and relaunching it is recommended.
Step 1: Launch the app switcher on your specific Android device the way your device manufacturer suggests you to. Usually, it is a swipe up and hold gesture to get into the app switcher.

Step 2: Next, you can choose to close just the camera app or, better yet, close all apps by tapping the Close All button. Flicking any app upwards (quick upward swipe) is how you close an app. If there is no Close All button anywhere, repeat the gesture for all open apps.
II.III: Check App Permissions
These days, thanks to strides in the privacy initiatives, apps need permissions before they can function the way they do. Most of the times, apps such as camera do have the necessary permissions, but sometimes it is possible that the permissions are set incorrectly. To check if the camera app has the requisite permissions, do the following:
Step 1: Go to Settings > Apps > Camera > Permissions.

Step 2: Tap Camera.

Step 3: See if the selected option is Allow Only While Using This App. If not, select it.
II.IV: Clear The Camera App Cache
Clearing the camera app cache is sometimes helpful. To do that:
Step 1: Go to Settings > Apps > Camera and tap Storage Usage.

Step 2: Tap Clear Cache.

II.V: Clear The Photo Gallery App Cache
The camera app is closely tied to the photo gallery app that comes baked in into Android OS. That is because photos that the camera app takes are stored in the photo gallery app. Consequently, if there were any issues in the photo gallery app, that could lead to the camera app not working on Android problem. Here’s how to clear the photo gallery app cache:
Step 1: Go to Settings > Apps > Photos > Storage Usage.

Step 2: Tap Clear Cache.
II.VI: Check For App Updates
This does not happen always, but sometimes, with known bugs and issues, there may be an update released that fixes those bugs and issues that prevent some users from using a given app reliably. Checking for updates is a good step to make sure that your camera app is updated to the latest version possible.
Step 1: Go to Play Store and tap your profile picture on the right.

Step 2: Tap Manage Apps and Device.

Step 3: If there are updates available, Tap Update All to update all apps.
II.VII: Cool The Phone Down
We do not realize the immense power that is packed into the thin smartphone form factor these days. If you have been using the phone to video chat for a while now, you might not realize that the phone has become hot, especially if you are using a desk stand. Same for shooting high-resolution videos; the phone does get quite hot shooting high-resolution videos.
If this is the case, close all apps and let the phone cool down. You might even want to shut the phone off to help cool it faster.
II.VIII: Nudge The Camera System
You may want to tap your camera system (the lenses and surrounding area) gently to see if that gets the camera working. In case it did, this is indicative of a hardware issue, and you should get it checked at the service center at your earliest convenience.
II.IX: Fix Android Camera Not Working Issue In One Click (With Dr.Fone)
Now, if the above fixes have not worked, you might want to repair your Android OS once before you make that appointment with the service centre. And, we have just the app to help you fix your camera not working on Android problem quickly.
Wondershare Dr.Fone is a multi-module app that works on both Windows and macOS and is the only app you will ever need to resolve nearly all of your smartphone and tablet issues that you are likely to encounter. Need to take backups? Dr.Fone Phone Backup has you covered with the ability to take and restore even selective backups, and to any location such as your computer or an external disk as well. Want to transfer WhatsApp chats to a new phone? Use WhatsApp Transfer to do just that! Bought a new phone? Use Phone Transfer to transfer contents from old phone to new, and then use Dr.Fone Data Eraser to securely wipe your old phone before giving it away!
Today, we will use Dr.Fone’s System Repair (Android) module to fix Android camera not working issue quickly.
Download Dr.Fone here.
 safe & secure
Step 1: Launch Dr.Fone app on your PC or Mac.

Step 2: Click System Repair module and then Android.

Step 3: For now, don’t bother with the scenarios given and click Start to go to the next screen.

Step 4: Your Android device will be detected by Dr.Fone. If anything seems incorrect, use the dropdown options to change it, and click Next.

Step 5: Your phone needs to be put into Download mode before it can be repaired. Follow the instructions shown onscreen and click Next.

Step 6: Dr.Fone automatically downloads the most recent firmware for your device and when it is ready, waits for your input. Click Fix Now to start the repair process.

Step 7: You will need to enter a 6-digit code (digit zero, six times – 000000) to confirm and begin the repair process.

When the repair is complete, Dr.Fone shows the final screen as below:

safe & secure
Conclusion
The camera app on your smartphone is one of the most important apps you use. This is not a game; this is an app that makes previous memories possible for you. So, when you get any of those incorrigible errors that are impossible to make sense of, what do you do? This guide gives you 9 fixes to fix Android camera not working error quickly and easily.
Reliable User Guide to Fix Oppo A79 5G Running Slow and Freezing
Android smartphones have opened a lot of doors for their users. They continue to evolve year after year with the hope of giving the world a wonderful digital experience. So far, we can all agree that they’re going the extra mile and doing a really great job. Android phones today are all packed with supreme capabilities that are beneficial to everyone.
However, Android phones are still not close to perfect. They also act up sometimes and cause a stir. Some users have observed that the Android phone is running slow and freezing over time. There can be many potential reasons why Android phone runs slow suddenly. But it doesn’t mean it cannot be restored at all to its original state and function.
In this article, we will review the details of this Android phone issue. We’ll provide solutions you can try if you ever get caught in the same problem. Continue reading to learn more.
Understanding the Specs That Make Android Phones Run Fast
The issue of Android phone running slow and freezing is not limited to old devices only. The same problem has also been observed in newly purchased units. The roots of this unfortunate occurrence vary from one user to another. It depends on different elements, from external factors like users’ handling of the Oppo A79 5G device to internal factors such as its capabilities. To understand it more, below are some Android phone specifications related to the Oppo A79 5G device’s overall performance and speed.
The CPU Core Count
Unlike before, Android phones today are equipped with several cores. Each of them has the ability to execute a process alone. Therefore, the Oppo A79 5G device can handle two or more tasks at once without compromising the quality of its performance. If your Oppo A79 5G contains more CPU core, its performance surely be more powerful and speedy.
The CPU Clock Speed
Simply put, clock speed is basically the speed at which the CPU cores can carry out a cycle in a second. A faster clock speed definitely translates into the Oppo A79 5G device’s higher performance. For instance, an octa-core Android phone with a one GHz per second clock speed is a decent device. But it’s less powerful than a device with the same number of cores but runs at two GHz per second.
Random Access Memory
In a simple language, Random Access Memory (RAM) temporarily stores the data from apps that are currently running. Smartphones can be more flexible with multi-tasking if their RAM has enough space. So if you’re among these users who perform multiple tasks simultaneously, you better choose a device with more RAM.
Internal Storage
The mobile applications installed on your smartphones are directly related to internal storage. The apps save their data every time, so they behave strangely when the Oppo A79 5G device runs out of storage. If you’re using heavy mobile applications, it’s best to opt for smartphones with huge internal storage.
Reasons Why My Oppo A79 5G is Running Slow
It’s not really hard to tell why your Oppo A79 5G is slow because it’s apparently a common issue among users. But don’t worry. Most of the time, the problem is not a major concern. Here are some scenarios that may slow down your Oppo A79 5Gs.
Overloading Background Processes
It’s great to have an Android phone that can flawlessly multi-task. However, not all units can handle that well. As mentioned earlier, it depends on the CPU core count and the core’s clock speed. If your Oppo A79 5G is running slow and freezing, many processes may be happening at the same time. Your device’s cores and clock speed are potentially incapable of executing such demands.
Your Phone is Running Out of Storage
Mobile apps need to save data on your phone. They perform the tasks based on the data stored on the Oppo A79 5G device. So if your Oppo A79 5G is slow, it’s possible that your device is already running out of storage. Each app has its own storage requirement. If your phone goes below that, the app will surely crash and not work.
Animation Speed is Way Too Slow
You can modify the Oppo A79 5G device’s animation type and speed on your Oppo A79 5G via the developer’s option. However, altering its default settings can sometimes make the Android phone run slow. If the speed is set slower, more delays are added to the animation. Hence, it takes a while for Your Oppo A79 5G to launch an app or complete a certain process.
You’re Using an Outdated Android Version
If your Oppo A79 5G is running slow and freezing, the Oppo A79 5G device’s software is probably outdated. The mobile apps installed on your device are lagging or crashing because they’re no longer compatible with the OS. It happens most of the time. Hence, always watch out for OS updates.
Your Phone is Experiencing Some System Issues
Operating systems and device software serve as the main component of all smartphones. Sometimes, it runs into inevitable problems caused by computer bugs and other glitches. When it happens, the Oppo A79 5G device’s overall performance is affected. So that can be the reason why sometimes your Oppo A79 5G is running slow and freezing.
Your Internet Connection is Unstable
Of course, a slow internet connection can make the Android phone runs slow too. Most apps today rely heavily on the internet to execute some tasks like communicating and streaming. So don’t panic when your Oppo A79 5G is running slow and freezing. It’s possible that your internet connection is messing up with you.
What to Do When My Oppo A79 5G Lags?
It’s not as bad as the black screen of death when the Android phone runs slow. However, it can still cause some delays and inconvenience for users. So it’s really important to take action when you notice some anomalies with its speed and performance. Below are some remedies that can help you get rid of this issue.
Solution 1: Reboot Your Phone
Sometimes, minor bugs can give your device a hard time. It can be the reason why your Oppo A79 5G is running slow and freezing. If that’s the case, rebooting your phone might help a lot. Here’s how to do it.
- Step 1: For seven seconds or more, hold the Power and the Volume Down button together.
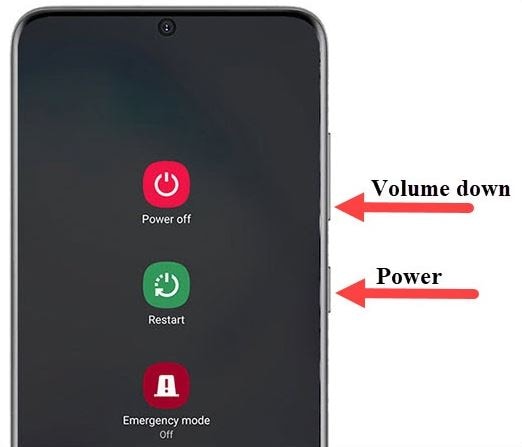
- Step 2: Several options will manifest on the screen. From there, click Restart. Wait until your device completely shuts off and restarts again.
Solution 2: Uninstall the Unused Apps to Free Up Some Storage
If your Oppo A79 5G is running slow and freezing, it’s likely because you’re running out of internal storage. You may uninstall the apps you rarely use to free up some space. Here’s how to do it.
- Step 1: On your home screen, find the app you wish to uninstall. Hold its icon until an option list appears.
- Step 2: Click Uninstall.
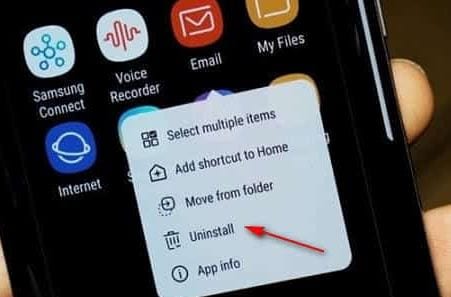
- Step 3: Click Ok if it asks you to confirm the action.
Wait until the app icon disappears from the home screen.
Solution 3: Set the Animation Speed a Little Faster
Altering the animation speed is not that dangerous. However, it can sometimes interfere with the Oppo A79 5G device’s smoothness if set too slow. If your Oppo A79 5G is running slow and freezing after modifying this setting, try to re-adjust it a little faster. Here’s how to do it.
Initiate the following steps first to enable the developers option on your device. Skip this if you have already activated the developers option:
- Step 1: Go to Settings.
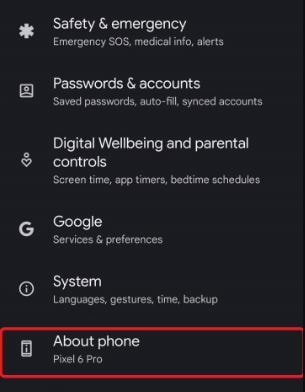
- Step 2: Find the About Phone option. Click on it.
- Step 3: Find the Build Number. And then click on it seven times.
- Step 4: Enter your lock screen passcode if necessary.
Follow these steps to adjust the animation speed:
- Step 1: Tap Settings from your home screen.
- Step 2: From the given options, find and click Systems.
- Step 3: Click Developers options.
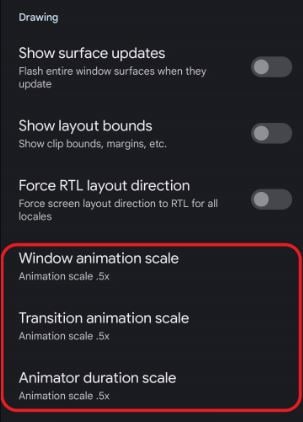
- Step 4: Under the Drawing section, you’ll find the following animation scale settings: Window Animation Scale, Transition Animation Scale, and Animator Duration Scale. Adjust the speed of these three options to 0.5x.
Solution 4: Update Your Phone to the Latest Android Version
It’s always recommended to update your phone to the latest Android version. Aside from repairs to some system errors, it also keeps your phone compatible with mobile apps. An outdated operating system can be the reason why your Oppo A79 5G runs slow, and the apps are freezing. Don’t worry. It’s very easy to perform. Here’s how to do it.
- Step 1: First, ensure your internet connection is strong and stable to avoid unwanted interruptions.
- Step 2: Go to Settings.
- Step 3: Click About Phone.
- Step 4: Click Check Now for Update. If there’s new software available, it will automatically appear on the screen.
- Step 5: Click Install Now. Depending on your device, it will restart itself after the installation process.

Solution 5: Reset Your Oppo A79 5G to Factory Settings
One way to restore the original performance of your Oppo A79 5G is to revert it back to factory settings. It deletes all the phone’s data and adjusts the settings to default. Most of the time, this procedure works magic. It fixes numerous issues, including the Android phone that’s slow and constantly freezing. But ensure your phone has already been backed up before commencing this step. You may use Wondershare Dr.Fone to help you back up and secure your files.
Here’s how to back up your Oppo A79 5G using Wondershare Dr.Fone:
- Step 1: Download Wondershare Dr.Fone from its official website. And then install it on your desktop.
- Step 2: Launch the application on your computer.
- Step 3: After it fully loads, connect your Oppo A79 5G to your computer.
- Step 4: From the main dashboard, find and click Phone Backup. Ensure your device is in USB Debugging mode.
Step 5: Check the files or data you wish to back up. Right after, click Backup.

Here’s how to reset your Oppo A79 5G to factory settings:
- Step 1: Go to Settings.
- Step 2: Click System.
- Step 3: Click Reset Options.
- Step 4: Click Erase All Data (Factory Reset).
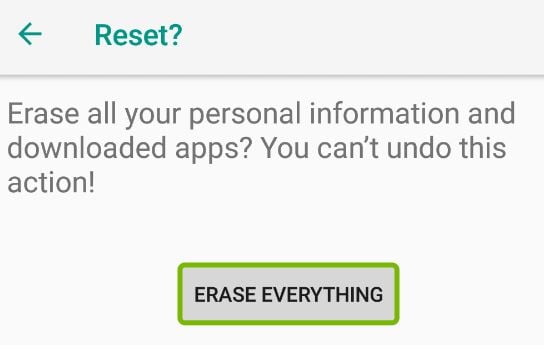
- Step 5: Your Android phone will inform you about the data that will be deleted from this procedure. From there, click Reset Phone.
- Step 6: Your Android device will ask you to confirm the procedure. From there, click Erase Everything.
Solution 6: Fix the System Issue Using Wondershare Dr.Fone
The device’s operating system may sometimes run into unexpected problems. That can make your Oppo A79 5G performs slow. System issue is not a terrifying scenario at all. Thanks to Wondershare Dr.Fone, which provides instant repair to this kind of mobile problem. Here’s how to use it in easy steps.
- Step 1: Launch the Wondershare Dr.Fone application on your desktop. And then connect your Oppo A79 5G to your computer.
- Step 2: Click System Repair from the main dashboard or Toolbox section.
- Step 3: Click Android.
- Step 4: Wondershare Dr.Fone will give you a list of the Android problems that this procedure will fix. From there, click Start.
- Step 5: Wondershare Dr.Fone will ask you to confirm your device details. Review the listed details for Brand, Name, Model, Country, and Carrier. Amend them if necessary. Tick the checkbox beside the Note if you agree to the terms. Lastly, click Next to proceed.
- Step 6: At this point, you need to put your device into Download Mode. Power off your device. And then hold these three buttons altogether: Volume Down, Home (or Bixby if you’re using a newer model), and Power buttons. Finally, press the Volume Up button.

- Step 7: Wondershare Dr.Fone will automatically download the firmware that matches your device’s specifications. Wait until the process has been completed.

- Step 8: Thereafter, the details about the newly downloaded firmware package will be displayed on the screen. From there, click Fix Now.
- Step 9: Before initiating the installation process, Wondershare Dr.Fone will ask you to review and confirm the firmware details. It will also let you know that this procedure will erase the phone’s data. If you agree to the terms, enter 000000 into the input box and click Confirm.
- Step 10: Wait while Wondershare Dr.Fone installs the new firmware to your device.

- Step 11: A notification will immediately appear after installing the new firmware. Click Done if your phone starts normally. Otherwise, click Try Again to repeat the process.
safe & secure
3,660,347 people have downloaded it
Conclusion
Android phone is capable of performing lots of stuff. It can assist you in both your personal and professional tasks. But if it’s sluggish and doesn’t execute optimally, the good things it promises all go down the drain. So if you notice that your Oppo A79 5G is running slow and freezing, act fast to resolve the issue. Wondershare Dr.Fone can be of great help in this kind of situation. It’s an all-in-one mobile solution that can assist you with system repair, phone backup, data recovery, and a lot more.
Oppo A79 5G Bootloop Problem, How to Fix it Without Data Loss
Have you, like many other users, faced the bootloop Android problem and wondered what exactly is Android boot loop. Well, Android boot loop is nothing but an error that makes your phone switch on itself every time you manually turn it off. To be precise, when your Oppo A79 5G does not remain switched off or powered off and starts to boot up automatically after a few seconds, it might be stuck in the boot loop Android.
An Android boot loop is a very common problem and is one of the first symptoms of a soft-bricked device. Also, when your device is experiencing Android boot loop issue, it does not start normally to reach the Home or Locked Screen and remains frozen at the Oppo A79 5G device’s logo, Recovery Mode or a lit-up screen. Many people fear losing their data and other files due to this error and thus, it is a very confusing situation to be in.
We understand the inconvenience caused, therefore, here are ways to tell you how to fix the bootloop problem in Android devices without losing any important data.
However, before moving on, let us learn a little about the causes for the Android boot loop error.
Part 1: What might cause the bootloop issue on Android?
Android boot loop error might seem weird and unexplainable but it occurs because of some specific reasons.
Firstly, please understand that it is a misnomer that boot loop error occurs only in a rooted device. Boot loop Android error can also occur in a stock device with the original software, ROM, and firmware.
In a rooted device, changes made, such as flashing a new ROM or customized firmware which are not compatible with the Oppo A79 5G device’s hardware or existing software, can be blamed for the boot loop problem.
Moving on, when your device’s software is unable to communicate with the system files during the start-up process, Android boot loop problem may arise. Such a glitch is caused if you have recently updated the Android version.
Also, corrupt App update files may also cause the bootloop Android issue. Apps and programs downloaded from unknown sources bring in a particular type of virus that prevents you from using your device smoothly.
All-in-all, Android boot loop error is a direct outcome of when you try to tamper with your device’s internal settings.
Hence, if you are looking for ways to guide you about how to fix boot loop issue, you will have to revamp the Oppo A79 5G device internally by either resetting it or adopting a recovery method.
Read on to know more about how to fix the bootloop error without any data loss when your device suffers from the bootloop Android problem.
Part 2: One click to Fix Android Bootloop without factory reset
If you are trying to figure out how to fix boot loop, the first option you have is the one-click fix to Android Bootloop which involves using the Dr.Fone - System Repair software.
This is designed to repair any data corruption on your device and restores your firmware to its usual working condition.
Dr.Fone - System Repair (Android)
One click to fix boot loop of Android
- #1 Android repair solution from your PC, can fix a wide range of Android system issues, such as boot loop, black screen, etc.
- The software requires no technical expertise, and anybody can use it
- A one-click solution when learning how to fix Android boot loop
- Not require root Android phones.
- Works with most Oppo A79 5G devices, including the latest Oppo A79 5G phones like S22
- Simple and easy-to-use user interface
4,689,059 people have downloaded it
To help you get started, here’s a step-by-step guide on how to use Dr.Fone - System Repair.
Note: This method can erase data on your device, including your personal files, so make sure you’ve backed up your device before proceeding.
Step #1 Download the Dr.Fone - System Repair software from the website and install it onto your computer.
Open the software and select the System Repair option from the main menu to fix the Android bootloop error.
Step #2 Connect your Oppo A79 5G to your computer using the official cable and select the “Android” option from the three menu items. Click “Start” to confirm.
You’ll then need to input the Oppo A79 5G device information, such as your carrier info, device name, model, and country/region in order to ensure you’re downloading and repairing the correct firmware to your phone.
Step #3 Now you’ll need to put your phone into Download Mode to remove the Android bootloop.
For this, you can simply follow the onscreen instructions for both phones with and without home buttons.
Click “Next”, and the software will begin downloading the firmware repair files.
Step #4 Now you can sit back and watch the magic happen!
Make sure your computer stays connected to the internet, and your device stays connected to your computer throughout the entire process. Once the firmware has been downloaded, it will be automatically installed onto your mobile device, removing the boot loop Android error.
You’ll be notified when the process is done and when you can remove your device and start using free from the boot loop Android error!
safe & secure
Part 3: Soft reset to fix Android bootloop issue
When your device is stuck in Android boot loop, it does not necessarily mean that it is bricked. Boot loop might be occurring due to a simpler problem which can be fixed by turning off your device. This sounds like a home remedy for a serious problem but it works and resolves the problem most of the time.
Follow the steps given below to soft reset your device:
Turn the Oppo A79 5G device off and take out its battery.

If you cannot take the battery out, let the phone be off for about 3 to 5 minutes, and then turn it back on.
Simply performing a soft reset on your device can help you if you are looking for solutions for how to fix the bootloop issue. This a very useful method as it does not result in any kind of loss in data and protects all your media files, documents, settings, etc.
In case the Oppo A79 5G device does not turn on normally and is still stuck in the bootloop Android problem, be prepared to use the troubleshooting techniques given and explained below.
Part 4: Boot into Safe Mode to fix Android boot loop

Booting your Oppo A79 5G into Safe Mode is a useful troubleshooting step to fix boot loop issues caused by third-party apps. When in Safe Mode, the Oppo A79 5G device will start up with only essential system apps, and any downloaded apps that might be causing conflicts won’t run. Here’s how you can boot your Oppo A79 5G into Safe Mode to address the boot loop problem:
Step 1: Power Off Your Device
Hold down the power button until it turns off completely.
Step 2: Access Safe Mode
To enter Safe Mode, follow these steps based on your device model:
- For most Android devices: Press and hold the power button to turn on your device. As soon as the manufacturer’s logo appears, press and hold the Volume Down button until the Oppo A79 5G device finishes booting. You should see “Safe Mode” displayed in the bottom left or right corner of the screen.
- Some devices might require slightly different key combinations. Refer to your device’s user manual or perform an online search for the specific method to enter Safe Mode for your model.
Step 3: Observe the Oppo A79 5G device
Once your device has booted into Safe Mode, use it for a while to see if the boot loop issue persists. If the boot loop doesn’t occur in Safe Mode, it indicates that the problem is likely caused by a third-party app.
Step 4: Identify and Uninstall Problematic Apps
Now that you’re in Safe Mode, it’s time to identify the troublesome app. Start by uninstalling recently installed apps one by one until the boot loop problem is resolved. After each uninstallation, restart your device normally to check if the boot loop still occurs. Continue this process until you find the problematic app.
Step 5: Restart Normally
Once you’ve identified and uninstalled the problematic app, restart your device normally to exit Safe Mode. Your Android device should now start up without getting stuck in a boot loop.
By following these steps and using Safe Mode to isolate problematic apps, you can effectively troubleshoot and resolve boot loop issues on your Oppo A79 5G.
Part 4: Factory reset to fix Android bootloop issue
Factory reset, also known as Hard Reset, is a one-stop solution for all your software resulting in issues. Android boot loop being such problem, can be easily overcome by performing a factory reset.
Please note that all your device’s data and settings will be deleted by adopting this method. However, if you have a Google account signed in on your Oppo A79 5G, you will be able to retrieve most of your data once the Oppo A79 5G device turns on.
To factory reset your Android boot loop device, you must first boot into the Recovery Mode screen.
To do this:
Press the volume down button and power button together until you see a screen with multiple options before you.

When you are at the Recovery Mode screen, scroll down using the volume down key, and from the options given, select “Factory Reset” using the power key.

Wait for your device to perform the task and then:
Reboot the phone in Recovery Mode by selecting the first option.

This solution is known to fix the boot loop error 9 out of 10 times, but if you still can’t start your Oppo A79 5G normally, consider using a CWM Recovery to resolve the Android boot loop issue.
Part 5: Use CWM Recovery to fix bootloop on rooted Android
CWM stands for ClockworkMod and it is a very popular custom recovery system. To use this system to solve the boot loop Android error, your Oppo A79 5G must be rooted with CWM Recovery System which basically means CWM must be downloaded and installed on your device.
Furthermore, to use CWM Recovery to fix boot loop on rooted Android devices, follow the steps given below:
Press the home, power, and volume up buttons to launch the CWM Recovery screen.
Note: you might have to use a different combination of keys to enter into Recovery Mode, depending on your device’s model.

Scroll down using” the volume key to select “Advanced”.

Now select “Wipe” and choose to wipe “Dalvik Cache”.

In this step, select “Mounts and Storage” to click on “Wipe” or “Cache”.
Once this is done, make sure to reboot your Oppo A79 5G.
This process with successfully fix the Android boot loop error and not cause any loss of data stored on your device stuck in boot loop.
So the bottom line is that boot loop Android issue may seem like an irreparable error but it can be resolved by carefully following the techniques explained above. These methods not only tell you how to fix the bootloop problem but also prevent it from occurring in the future.
An Android boot loop is a common phenomenon with all Android devices because we tend to tamper with our device’s internal settings. Once the ROM, firmware, kernel, etc are damaged or rendered incompatible with the Oppo A79 5G device’s software, you cannot expect it to function smoothly, hence, the boot loop error occurs. Since you are not the only one suffering from the Android boot loop problem, be rest assured that the ways, given above, to combat it are recommended by users facing similar troubles. So, don’t hesitate and go ahead to try them on.
safe & secure
Also read:
- [Updated] 2024 Approved Protecting Melodies on Instagram
- [Updated] Exploring the World with a VR Headset
- [Updated] Fixing Invisible Areas Within YouTube Videos for 2024
- 2024 Approved Optimizing VR Video Quality During Live Gaming
- Essential Techniques to Avert Windows 11 Photos Crashes
- Fix Cant Take Screenshot Due to Security Policy on Xiaomi 14 Ultra | Dr.fone
- From Basics to Brilliance Fullscreen Proficiency in Premiere
- How To Fix Part of the Touch Screen Not Working on Honor 100 | Dr.fone
- How to Fix Unfortunately, Contacts Has Stopped Error on Nubia Z50S Pro | Dr.fone
- How to Resolve Vivo Y100i Power 5G Screen Not Working | Dr.fone
- How To Revive Your Bricked Vivo Y100A in Minutes | Dr.fone
- OnePlus Ace 3 Screen Unresponsive? Heres How to Fix It | Dr.fone
- Play Store Stuck on Downloading Of Vivo Y78+? 7 Ways to Resolve | Dr.fone
- Proven Ways to Fix There Was A Problem Parsing the Package on Honor Play 7T | Dr.fone
- Solving the DllFetchError: Step-by-Step Guide on Handling Windows Error Code 0xC00000E9
- Title: Oppo A79 5G Camera Not Working Unexpected Error? Fix It Now | Dr.fone
- Author: Abel
- Created at : 2024-12-03 01:37:47
- Updated at : 2024-12-04 01:11:31
- Link: https://fix-guide.techidaily.com/oppo-a79-5g-camera-not-working-unexpected-error-fix-it-now-drfone-by-drfone-fix-android-problems-fix-android-problems/
- License: This work is licensed under CC BY-NC-SA 4.0.