
Oppo Find X6 Pro Camera Not Working Unexpected Error? Fix It Now | Dr.fone
Oppo Find X6 Pro Camera Not Working Unexpected Error? Fix It Now
For all its glory and goodness, the Android OS often has its users pulling their hair in frustration at just how buggy the OS can be at times. So, if you’re having one of those days today, we are here to help. Camera app is one of the most used apps on smartphones today. People only launch the app when they want to take a photo, for everything else there’s a dedicated photo gallery app. What happens when you launch the camera app only to realize it threw an error and you missed your photo moment? Don’t throw the phone, not yet. Let us help you out.

Part I: Why Is Android Camera Not Working?
There are a few reasons why the camera app is not working on your Oppo Find X6 Pro.
Low Memory
Camera app does rely heavily on system resources, so in case you have too many apps open and for some reason the OS is not able to manage the resources appropriately for the camera app to function as it should, you will get a camera error.
Low Storage
The camera app needs storage space to save the photos it takes. So, in case your phone is running low on storage space, the camera app would likely malfunction as it would have no way to store the photos it would be taking.
General Bugs And Glitches
OS bugs and general glitches within the OS and the camera app can cause camera not working issue anytime during everyday operation. This is part and parcel of any technology.
Hardware Issues
In the rarest cases, there might have developed an actual hardware issue with the camera system on your Oppo Find X6 Pro. The likely culprit is misuse and abuse, such as a dropped phone or maybe the phone was too hot for extended periods of time, causing hardware issues.
Part II: How To Fix Android Camera Not Working Issue?
So, how to get the Android camera not working problem solved? There are a few ways you can try fixing the camera not working issue on your Oppo Find X6 Pro right where you are, without needing to take the Oppo Find X6 Pro device to the manufacturer’s service center.
II.I: Restart The Handset
One of the first things to do any time an app or your phone or tablet does not work like it should, restarting the Oppo Find X6 Pro device refreshes everything just enough to resolve most commonly occurring issues.

Use the power button on your smartphone to restart your Android handset and see if this resolves the issue.
II.II: Close And Relaunch The Camera App
If the camera app (or any app for that matter) has been in the background for a while and then it is brought to the foreground, there are always chances of it crashing for any reason, or not working as expected. So, closing the app completely and relaunching it is recommended.
Step 1: Launch the app switcher on your specific Android device the way your device manufacturer suggests you to. Usually, it is a swipe up and hold gesture to get into the app switcher.

Step 2: Next, you can choose to close just the camera app or, better yet, close all apps by tapping the Close All button. Flicking any app upwards (quick upward swipe) is how you close an app. If there is no Close All button anywhere, repeat the gesture for all open apps.
II.III: Check App Permissions
These days, thanks to strides in the privacy initiatives, apps need permissions before they can function the way they do. Most of the times, apps such as camera do have the necessary permissions, but sometimes it is possible that the permissions are set incorrectly. To check if the camera app has the requisite permissions, do the following:
Step 1: Go to Settings > Apps > Camera > Permissions.

Step 2: Tap Camera.

Step 3: See if the selected option is Allow Only While Using This App. If not, select it.
II.IV: Clear The Camera App Cache
Clearing the camera app cache is sometimes helpful. To do that:
Step 1: Go to Settings > Apps > Camera and tap Storage Usage.

Step 2: Tap Clear Cache.

II.V: Clear The Photo Gallery App Cache
The camera app is closely tied to the photo gallery app that comes baked in into Android OS. That is because photos that the camera app takes are stored in the photo gallery app. Consequently, if there were any issues in the photo gallery app, that could lead to the camera app not working on Android problem. Here’s how to clear the photo gallery app cache:
Step 1: Go to Settings > Apps > Photos > Storage Usage.

Step 2: Tap Clear Cache.
II.VI: Check For App Updates
This does not happen always, but sometimes, with known bugs and issues, there may be an update released that fixes those bugs and issues that prevent some users from using a given app reliably. Checking for updates is a good step to make sure that your camera app is updated to the latest version possible.
Step 1: Go to Play Store and tap your profile picture on the right.

Step 2: Tap Manage Apps and Device.

Step 3: If there are updates available, Tap Update All to update all apps.
II.VII: Cool The Phone Down
We do not realize the immense power that is packed into the thin smartphone form factor these days. If you have been using the phone to video chat for a while now, you might not realize that the phone has become hot, especially if you are using a desk stand. Same for shooting high-resolution videos; the phone does get quite hot shooting high-resolution videos.
If this is the case, close all apps and let the phone cool down. You might even want to shut the phone off to help cool it faster.
II.VIII: Nudge The Camera System
You may want to tap your camera system (the lenses and surrounding area) gently to see if that gets the camera working. In case it did, this is indicative of a hardware issue, and you should get it checked at the service center at your earliest convenience.
II.IX: Fix Android Camera Not Working Issue In One Click (With Dr.Fone)
Now, if the above fixes have not worked, you might want to repair your Android OS once before you make that appointment with the service centre. And, we have just the app to help you fix your camera not working on Android problem quickly.
Wondershare Dr.Fone is a multi-module app that works on both Windows and macOS and is the only app you will ever need to resolve nearly all of your smartphone and tablet issues that you are likely to encounter. Need to take backups? Dr.Fone Phone Backup has you covered with the ability to take and restore even selective backups, and to any location such as your computer or an external disk as well. Want to transfer WhatsApp chats to a new phone? Use WhatsApp Transfer to do just that! Bought a new phone? Use Phone Transfer to transfer contents from old phone to new, and then use Dr.Fone Data Eraser to securely wipe your old phone before giving it away!
Today, we will use Dr.Fone’s System Repair (Android) module to fix Android camera not working issue quickly.
Download Dr.Fone here.
 safe & secure
Step 1: Launch Dr.Fone app on your PC or Mac.

Step 2: Click System Repair module and then Android.

Step 3: For now, don’t bother with the scenarios given and click Start to go to the next screen.

Step 4: Your Android device will be detected by Dr.Fone. If anything seems incorrect, use the dropdown options to change it, and click Next.

Step 5: Your phone needs to be put into Download mode before it can be repaired. Follow the instructions shown onscreen and click Next.

Step 6: Dr.Fone automatically downloads the most recent firmware for your device and when it is ready, waits for your input. Click Fix Now to start the repair process.

Step 7: You will need to enter a 6-digit code (digit zero, six times – 000000) to confirm and begin the repair process.

When the repair is complete, Dr.Fone shows the final screen as below:

safe & secure
Conclusion
The camera app on your smartphone is one of the most important apps you use. This is not a game; this is an app that makes previous memories possible for you. So, when you get any of those incorrigible errors that are impossible to make sense of, what do you do? This guide gives you 9 fixes to fix Android camera not working error quickly and easily.
Fixes for Apps Keep Crashing on Oppo Find X6 Pro
The rapid evolution of technology has transformed our smartphones into powerful devices. Presently, with just a few taps, they possess the ability to accomplish a diverse array of tasks. It has been possible due to the extensive availability of mobile applications. However, it can be incredibly frustrating when your favorite apps keep crashing repeatedly.
You’re not alone if you’re an Android user who encounters app crashes. This article will explore ten practical ways to fix apps that keep crashing on Android devices. We will also discuss the causes behind app crashes and how to prevent them.
Part 1: What Are the Causes Behind Apps Keep Crashing on Android?
There are many reasons for the app crashing on Android devices. These reasons range from insufficient storage space to bugs and glitches in the apps. Finding out the root cause of an app crashing is important so that you can find the appropriate solution. Discussed below are some of the reasons why your Android apps keep crashing:
Insufficient Memory
When a device is low on memory, it may struggle to run multiple apps simultaneously. Each app requires memory to store its data and execute its processes. If the available memory is limited, it can cause apps to crash. That happens because they don’t have enough resources to operate properly.
Software Compatibility
Android devices come in various models and run different operating system versions. That’s why it is essential to use apps compatible with your device. Since there are a lot of Android variants, it is hard to optimize apps for all devices. An app not optimized for an Android version or device leads to crashes or malfunctions.
Outdated Apps
Apps are regularly updated to introduce new features, fix bugs, and enhance performance. Using an outdated version of an app may cause instability or compatibility problems. Since the app is not optimized for the current version of Android, it can keep crashing.
Network Problems
Some apps rely heavily on network connectivity to function properly. They need a stable and strong internet connection to perform all the functions. These apps can crash if there are network connectivity issues, such as a weak Wi-Fi or network outage. Unstable connections can disrupt data transmission, making the app’s function challenging.
App Bugs
Despite rigorous testing, apps can still have bugs or coding errors that lead to crashes. Bugs in apps can occur due to various reasons. It mostly relates to incorrect implementation of features or unexpected user interactions. App developers work to identify and fix these bugs, often releasing updates.
Part 2: How to Fix the Apps Keep Crashing on Android?
Once you discover why your Android apps keep crashing, fixing them becomes a lot easier. However, there is no need to worry even if you cannot locate the problem source. Below we have listed 10 general and specialized solutions to fix app crashing:
Fix 1: Check the Internet Connection
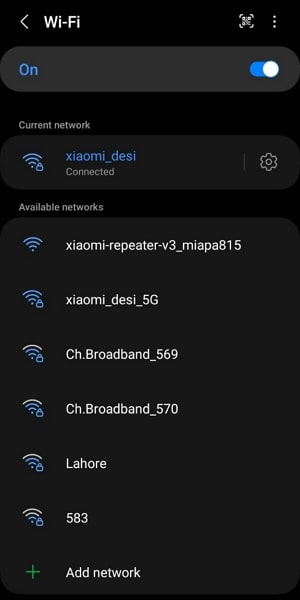
As mentioned before, some apps rely on the internet to function. If you don’t have an active internet connection, they will not work. To avoid the app crashing, you need to ensure that the internet connection on your device is working. If you use Wi-Fi, check the router and turn Wi-Fi off and on again. In the case of mobile data, try enabling Airplane mode and then disabling it.
Fix 2: Force Stop the Apps Keep Crashing
If your apps keep crashing, you should try force-closing the targeted app and re-opening it. Doing this will flush out minor bugs and glitches from the app. These temporary bugs and glitches can occur due to various reasons and hamper the app’s working. Use the following steps to force stop the app that keeps crashing and re-open it:
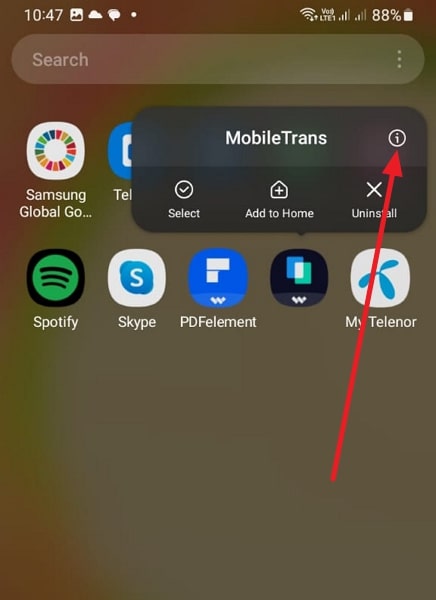
- Step 1: On your Oppo Find X6 Pro, move the app icon and press it to select “App Info.” On the App Info screen, tap the “Force Stop” button to force close the app. The button can be either on the down left or down right corner.
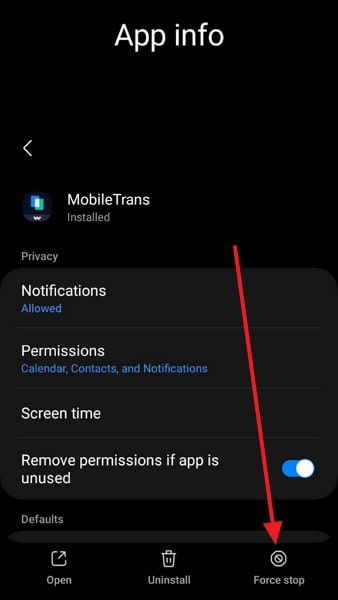
- Step 2: After force closing the app, relaunch it and see if the app crashing issue is resolved.
Fix 3: Restart your Android Device
In case restarting the app hasn’t worked, you should try restarting your Oppo Find X6 Pro. Rebooting your device reset all the processes and apps in the Oppo Find X6 Pro device. It helps remove conflicts between different apps, which can be the cause of your apps keep crashing on Android. To reboot your Oppo Find X6 Pro, adhere to the following guidelines:
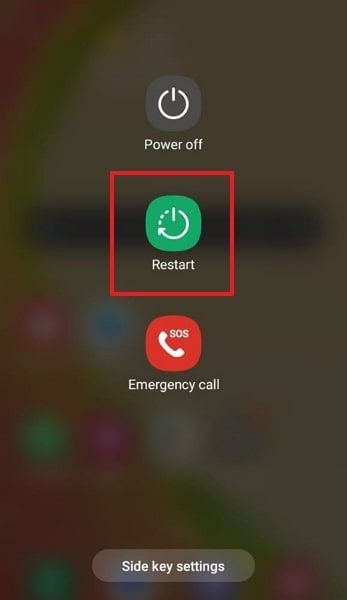
- Step: Press and hold the “Power” key until you see the power menu on the screen. Here, tap the “Restart/Reboot” button to restart your Oppo Find X6 Pro.
Fix 4: Update the Android OS
Not updating your Android OS for a long while can cause many performance issues in your device. One of these issues is the incompatibility with the latest apps. That’s why make sure that your Oppo Find X6 Pro is running the latest available version of the operating system. You can check and update the Android OS of your device using these steps:
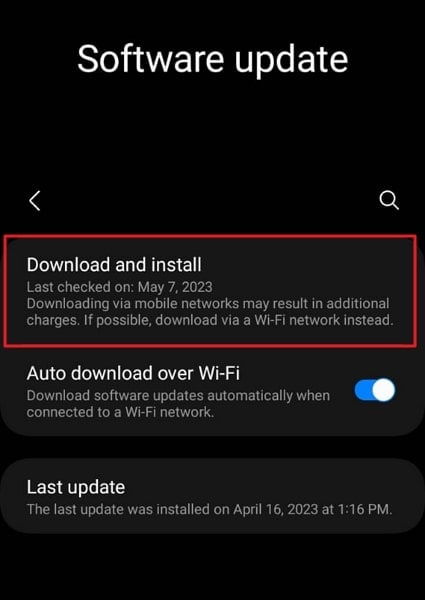
- Step 1: Launch the Settings app on your Oppo Find X6 Pro and scroll down to select “Software Update.” On the next screen, tap “Download and Install” to look for new updates.
- Step 2: During the update process, ensure you have a stable internet connection. Moreover, your device should be fully charged to avoid any complications.
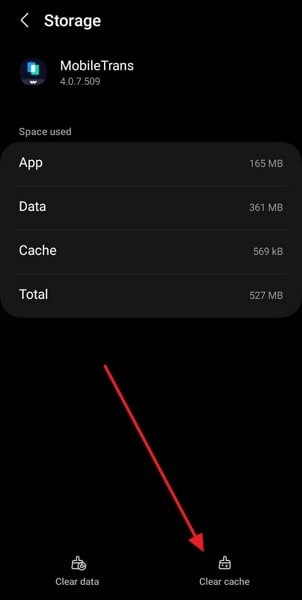
Fix 5: Clear the App Cache
Have you tried clearing the cache of the app that keeps crashing? The app cache consists of temporary files and data that are stored to enhance app performance. However, if the app cache becomes corrupted, it can cause crashes. In such a situation, clearing the app cache can help resolve the app crashing issue. To clear the app cache on your Oppo Find X6 Pro, follow these steps:
- Step 1: Navigate to your targeted app icon and long-press it. Now, tap “App Info” from the pop-up menu to access app information.
- Step 2: Following this, press “Storage,” and on the following screen, hit “Clear Cache.” It will clean the cache for the targeted app.
Fix 6: Reinstall the Buggy App
Bugs in the app can prove a nightmare and hard to remove from the app. If your apps keep crashing due to bugs, it is best to uninstall and then reinstall the app. It will help you eliminate any corrupted files or settings that might be causing the crashes. Given below are the steps needed to uninstall and reinstall the apps on Android device:
- Step 1: Go to the problematic app on your device and press the app icon for a while. Select “Uninstall” and remove the app by pressing “OK.”
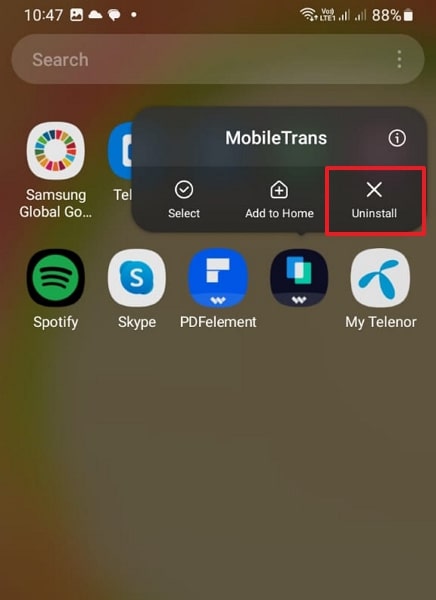
- Step 2: After removing the app, go to Google Play Store and find the targeted app. Here, tap “Install” to reinstall the app on your device.

Fix 7: Check the App Permissions
Sometimes, app crashes can occur due to improper or conflicting permissions. Whenever you install an app on your device, it needs related permission to function. If you have not granted the required permissions, the apps will not function, leading to apps keep crashing on Android. You can check the app permissions using the following procedure:
- Step 1: You will need to launch Settings on your Oppo Find X6 Pro and tap “Apps.” Here find and select the targeted app to open App Info.
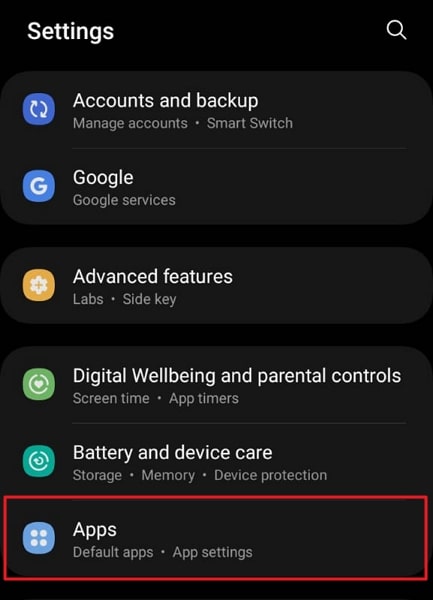
- Step 2: On the App Info screen, press “Permissions” to access all permission settings. Here, ensure that your app has the required permissions.

Fix 8: Check and Clear the Phone Storage
Insufficient storage space on your device can also lead to app crashes. Check the available storage space on your Oppo Find X6 Pro and ensure it has enough free space. If the storage is full, consider deleting unnecessary files or apps to create more space. Explained below is the process to check and free up storage on Android devices:
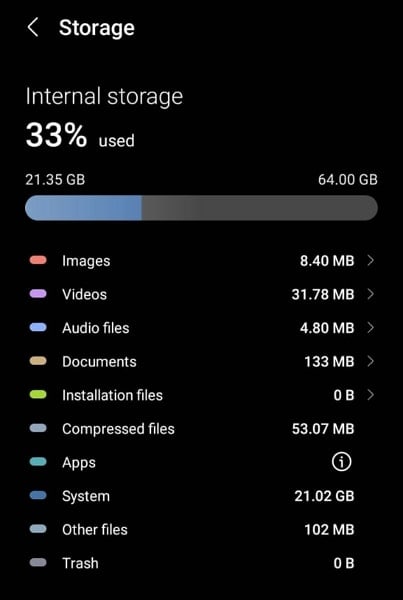
- Step 1: Open Settings on your Oppo Find X6 Pro and scroll down to find and select “Battery and Device Care.” Here, tap “Storage” to view the Oppo Find X6 Pro device storage.
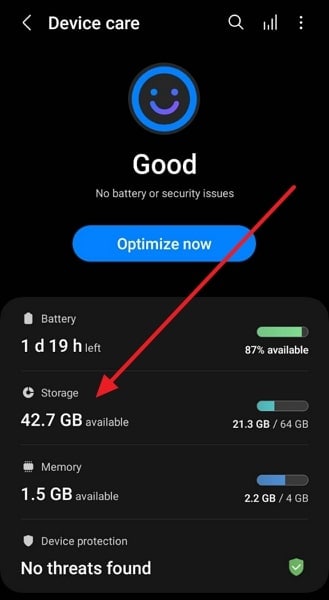
- Step 2: Here, you will see detailed information about everything stored on your device. If the storage space is full, remove the unnecessary data.
Fix 9: Reboot Into Safe Mode
It can be hard to find the app crashing root cause if it happens due to conflicts between different apps. In such scenarios, the best way to find the problematic apps is to use Safe Mode on your device. Safe Mode disables all third-party apps, allowing you to determine if the crashes are caused by a specific app. Follow the process given below to reboot your device into Safe Mode:
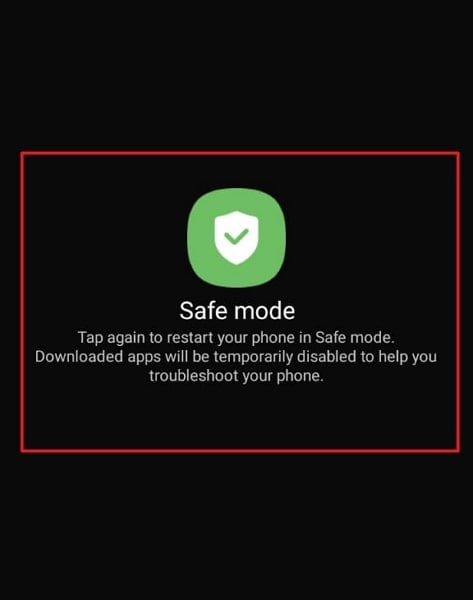
- Step 1: Press and hold the “Volume Down” and “Power” buttons together for 3 seconds to access the power menu. Here, long-press the “Power Off” option.
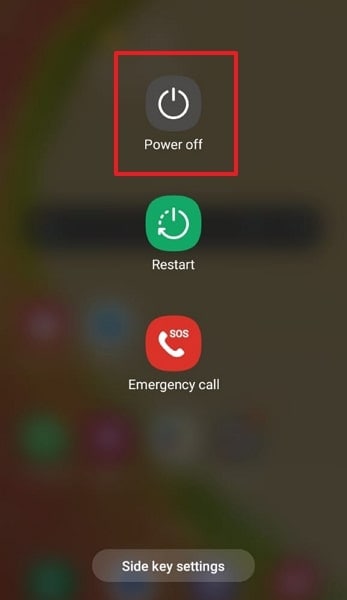
- Step 2: Press the “Power Off” button until “Restart in Safe Mode” appears on the screen. Now reboot the Oppo Find X6 Pro device into Safe Mode. To exit Safe Mode, you will need to restart the phone.
Fix 10: 100% Working Solution to Fix the Android Apps Keep Crashing – Wondershare Dr.Fone
Trying to fix an app crashing with multiple methods can be a tiring and frustrating experience. That’s why the best option is always to find and use a specialized Android system repair tool. The best Android repair tool currently available is Wondershare Dr.Fone. It is a comprehensive system repairing tool that can fix almost all system issues in Android devices.
Using Wondershare Dr.Fone, you can fix issues like apps crashing, black screen of death, Play Store not working, and many more. Furthermore, you do not need any technical skills to use Wondershare Dr.Fone to repair your Android system issues.
Main Features of Wondershare Dr.Fone
- Wondershare Dr.Fone is a specialized tool for fixing problems with Oppo Find X6 Pro devices, including the latest Oppo Find X6 Pro phones.
- It supports the Android system repair feature for over 1000 Android phones across the spectrum.
- With this tool, you can also fix bricked Android devices with ease.
Step to Fix the Android Apps Keep Crashing via Wondershare Dr.Fone
The process of fixing apps that keeps crashing on Android devices is straightforward when using Wondershare Dr.Fone. Here are the simple steps you need to follow to fix the app crashing:
- Step 1: Access System Repair from Toolbox
Open Wondershare Dr.Fone on your system after installation and select “System Repair” from the “Toolbox.” Now connect your Oppo Find X6 Pro using a USB cable and select “Android” in Wondershare Dr.Fone.
- Step 2: Provide Your Android Device Information
Click “Start” to initiate the repair process and provide your device information. You will need to provide device details like Brand, Name, Model, Country, and Carrier. Now, check the “I agree with the warning, and I am ready to proceed” box and tap “Next.”
- Step 3: Repair the Apps Keeps Crashing on Android
Follow the on-screen instruction to activate Download Mode on your device. Wondershare Dr.Fone will download the related firmware once you have enabled Download Mode. Afterward, click “Fix Now” and confirm your action by inserting the “000000” code. Now, wait for the repair process to finish.
safe & secure
Conclusion
To sum up, if your apps keep crashing on Android, you can resolve it in many ways. Using the fixes given in this article, you can improve apps’ performance and reduce crashes. However, if you’re looking for a reliable and convenient solution, we highly recommend Wondershare Dr.Fone.
With its clean interface and powerful features, Wondershare Dr.Fone stands out as the best choice to fix app crashes. It provides a comprehensive toolkit to diagnose and resolve various software issues.
11 Ways to Fix it When My Oppo Find X6 Pro Won’t Charge
What would you do if your phone or other device’s battery is draining? You will plug it into a power source. Right? What if you realize that your phone won’t charge? My phone won’t charge, and the Oppo Find X6 Pro tablet won’t charge is a common problem.
Android devices are very prone to this problem, and hence Android device owners complain frequently that My Oppo Find X6 Pro won’t charge even when it is plugged into a power source properly. The reason behind the phone won’t charge, or Oppo Find X6 Pro tablet won’t charge are not very complicated and, therefore, can be dealt with by you sitting at home.
A charging problem can occur due to a temporary software crash. It is also possible that a corrupted device cache may be causing such a glitch. Another reason for phones not to charge normally or charge slowly is an inappropriate power source or defective charging cable and adapter. All these and many more problems will be cured in the 10 solutions to fix My Oppo Find X6 Pro won’t charge error.
So if you’re still thinking about why won’t My Oppo Find X6 Pro charge, read on to find out solutions to fix My Oppo Find X6 Pro won’t charge problem.
Part 1. One-click solution to fix Android phone won’t charge
While you are upset over ‘why My Oppo Find X6 Pro won’t charge?’, would you mind us helping you around?
Well, we have got Dr.Fone - System Repair (Android) at your fingertips to get rid of this annoying phone won’t charge issues (caused by system corruption). Whether the Oppo Find X6 Pro device froze or became unresponsive, bricked, or got stuck on the Oppo Find X6 Pro logo/blue screen of death or apps started crashing. It can fix every Android system problem.
Dr.Fone - System Repair (Android)
Easy-to-operate program to fix Android phone won’t charge
- As it supports all the latest Oppo Find X6 Pro devices, it can even easily fix the Oppo Find X6 Pro tablet won’t charge issue.
- With a single click, you can fix your entire Android system issues.
- The very first tool is available in the market for Android system repair.
- Without any technical knowledge, one can use this software.
- This tool is intuitive with a high success rate.
3981454 people have downloaded it
Note: When you are stressed over ‘why won’t My Oppo Find X6 Pro charge’, we are ready to eliminate the tension and make things easier for you. But, before you start fixing the phone won’t charge the problem, make sure to back up the Android device . This fixing process might wipe out all the Oppo Find X6 Pro device data.
Phase 1: Preparing and connecting the Android device
Step 1: Install and then run Dr.Fone - System Repair (Android), the ultimate Android repair software on your PC. Hit the ‘System Repair’ tab, followed by connecting your Oppo Find X6 Pro.
Step 2: Tap on the ‘Android Repair’ option and then click ‘Start’ for moving ahead.
Step 3: Mention the detailed information about your Oppo Find X6 Pro under the Oppo Find X6 Pro device information section. Press ‘Next’ then on.
Phase 2: Get to ‘Download’ mode for repairing the Oppo Find X6 Pro device
Step 1: It’s essential that you put the Android device under ‘Download’ mode to resolve the phone won’t charge the issue. Here comes how to do –
- With a ‘Home’ button device, switch off it before holding down the set of keys, including ‘Power’, ‘Volume Down’, and ‘Home’ key for 5-10 seconds. Let them go and hit the ‘Volume Up’ key for entering the ‘Download’ mode.

- If the ‘Home’ button is not there, you got to turn down the Oppo Find X6 Pro device and altogether hold down the ‘Volume Down’, ‘Bixby’, and ‘Power’ keys between 5-10 seconds. Soon after you release the keys, tap the ‘Volume Up’ button for entering the ‘Download’ mode.
Step 2: Click ‘Next’ to start downloading the Android firmware.

Step 3: Now, Dr.Fone - System Repair (Android) would verify the firmware and then start repairing the Android system on its own. It will ultimately fix your ‘why won’t My Oppo Find X6 Pro charge’ trouble.
Part 2. 10 common ways to fix Android won’t charge
1. Check/replace charging cable
Charging cables fray or become defunct after prolonged usage. Therefore, it is advised to always use the Oppo Find X6 Pro device’s original charging cable or purchase a good quality charging cord, which doesn’t damage your device or your adapter.
It is also very commonly observed that the charging end of the cable which gets connected to the charging port of the Oppo Find X6 Pro device gets damaged and prevents the current from flowing to the phone/tablet.

2. Check/clean charging port
The charging port in your device is a small opening where the charging end of the cabbie is inserted for the current to flow to the phone/tablet. Very often, we notice that the charging port gets blocked with tiny particles of dirt. The charging port might also get clogged if dirt and dust get accumulated in it, preventing the sensors from receiving and forwarding the current to the Oppo Find X6 Pro device.

The best way to take this problem is to clean the port with a blunt pin or a soft bristle unused toothbrush. Make sure you clean the port gently and do not damage it or its sensors.

3. Check/replace charging adapter
This method is fairly simple, and all you need to do is check whether or not the charging adapter is working properly as sometimes, the adapter itself is to be blamed for the charge. To make sure that you are not using a defective adapter, connect your charging cable/USB to another adapter. If your device charges normally, it means there is a problem is with your adapter, and you must replace it at the earliest to solve My Oppo Find X6 Pro won’t charge the issue.

4. Try another power source
This technique is more like a quick trick. It means to switch from one power source to another or use a more efficient and suitable power source. Laptops and PCs charge slower than a direct power source, i.e., a wall socket. Sometimes, the charging speed is slower, and the battery is draining. In such a scenario, choose to charge your device by directly plugging it into a socket on the wall to never experience My Oppo Find X6 Pro won’t charge problem.
5. Clear device Cache
Clearing Cache is a great technique as it cleans your device and all its partitions. By clearing the cache, all the unwanted data and files stored in your device get deleted, which may be causing glitches in the Oppo Find X6 Pro device’s software, preventing it from recognizing the current.
Follow the steps given below to clear your device’s cache:
• Visit “Settings” and find “Storage”

• Now tap on “Cached Data”.

• Click “OK” to clear all unwanted cache from your device as shown above.
Try charging your phone after clearing the cache. If your phone doesn’t charge even now, do not worry. There are more ways to help you combat My Oppo Find X6 Pro won’t charge problem.
6. Re-start/reboot your phone/tablet
Restarting your device to fix why won’t My Oppo Find X6 Pro charge error is a very effective remedy. This method of rebooting your device not only fixes software glitches but other but also tackles other factors/operations that might be running in the background preventing your device from charging.
Restarting a device is simple and can be done by following the steps given below:
• Long press the power button of your device.
• From the options that appear, click on “Restart”/ “Reboot” as shown in the image below.

To restart your device, you may also press the power button for about 20-25 seconds for the phone/tablet to automatically reboot.
7. Download and install the Ampere App
The Ampere app can be downloaded from the Google Play Store. It is very helpful to fix the why won’t my charge error as it gives you real-time information about your device’s battery consumption, charging status, and other essential data.
If the App gives information in green color, it means all is wetland your device is charging normally, however, if the information before you is in orange, you need to take steps to fix the charging problem.


8. Install software updates
Installing your Android version updates is a good idea as the software is the interface that receives charge from the charging port sensors and gives a command for the phone/tablet to charge. People often continue to use older OS versions, which cause trouble and prevent the Oppo Find X6 Pro device from charging.
To check for and install updates on your device, you must be connected to WiFi or a cellular network. Next, visit “Settings” and select “About device”. Now click on “Software Update”.

If there is an update available, you will be prompted to download it. Just follow the instructions given before you install a brand new Android OS version on your device.
9. Factory reset your device
Factory Reset is must be done after due deliberation. Remember to take a back-up of all your data and contents on the cloud or an external memory device, such as a pen drive before adopting this method because once you perform a factory reset on your device, all media, contents, data and other files are wiped out, including your device settings.
Follow the steps given below to factory reset your device:
• Visit “Settings” by clicking the settings icon as shown below.
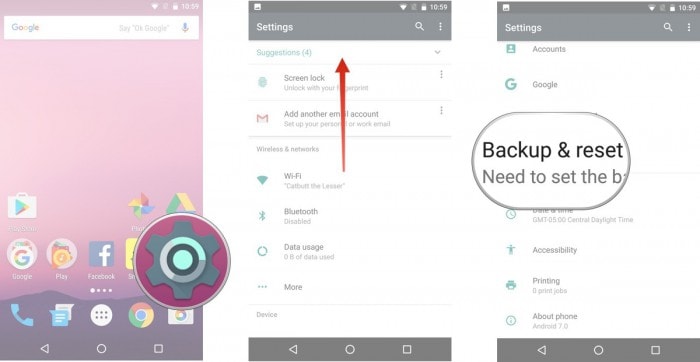
• Now select “Backup and Reset” and move on.
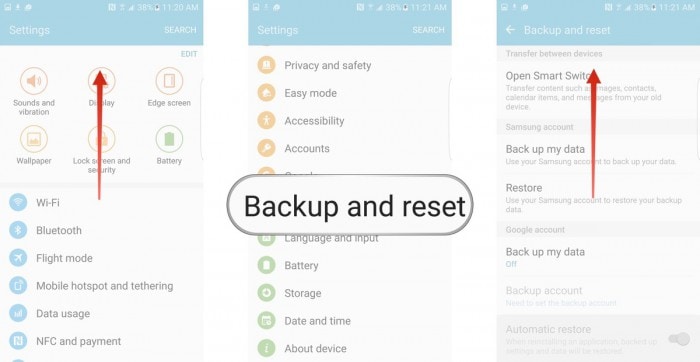
• In this step, select “Factory data reset” and then “Reset Device”.
• Finally, tap on “ERASE EVERYTHING” as shown below to Factory Reset your device.

Note: Once the factory reset process is complete, your device will automatically restart and you will have to set it up once again.
10. Replace your battery
This should be your last resort to fix My Oppo Find X6 Pro won’t charge problem, and you should only attempt to replace your battery if none of the other techniques work. Also, please consult a technician before purchasing and installing a new battery in your device as different phones and tablets have a different type of battery requirements.

Finally, fixing the phone won’t charge the problem is simple, and therefore there is no need for you to worry as you are not the only one experiencing such an issue. Other Android users have tried, tested, and recommended the methods given above to solve why won’t My Oppo Find X6 Pro charge or Oppo Find X6 Pro tablet won’t charge error. So go ahead and try them out now.
Also read:
- [New] Cutting-Edge Introduction Editors for All Your Tech
- [New] In 2024, Exploring Hues From Textbooks to Canvas
- Effective Use of AdSense on YouTube to Boost Channel Income
- Guide Simple À L'Utilisation De PowerShell Pour Faire Une Copie Bit À Bit D'un HDD Sous Windows
- How To Fix Part of the Touch Screen Not Working on OnePlus Nord N30 SE | Dr.fone
- How to Flash Dead Realme Narzo N53 Safely | Dr.fone
- How to Quickly Fix Bluetooth Not Working on Samsung Galaxy XCover 7 | Dr.fone
- In 2024, Leading the Charge in PC Livestreams with TikTok Features
- My Videos Arent Playing on Honor X50i+ – What Can I Do? | Dr.fone
- Play Store Not Working On Poco M6 5G? 8 Solutions Inside | Dr.fone
- Samsung Galaxy A15 4G Screen Unresponsive? Heres How to Fix It | Dr.fone
- The Future of Social Media: Cryptocurrency Promos
- Win's Wired Woes? Here Are 6 Steps for Getting Your Network Up and Running
- Title: Oppo Find X6 Pro Camera Not Working Unexpected Error? Fix It Now | Dr.fone
- Author: Abel
- Created at : 2024-11-27 18:40:23
- Updated at : 2024-12-03 17:12:55
- Link: https://fix-guide.techidaily.com/oppo-find-x6-pro-camera-not-working-unexpected-error-fix-it-now-drfone-by-drfone-fix-android-problems-fix-android-problems/
- License: This work is licensed under CC BY-NC-SA 4.0.