
Play Store Not Working On Samsung Galaxy A54 5G? 8 Solutions Inside | Dr.fone
Play Store Not Working On Samsung Galaxy A54 5G? 8 Solutions Inside
A functional Google Play Store is crucial for Android users to access, update, and install apps. Unfortunately, common issues like your Google Play Store not working can disrupt this experience. If you find your Play Store misbehaving more often than not, don’t fret.
In this guide, discover reliable solutions when your Google Play Store is not responding. The article will teach you how to tackle these problems and ensure a seamless app experience. Don’t let technical glitches hinder your digital journey—follow these troubleshooting steps for a swift resolution. Explore the page below to learn more.

Part I. 7 Common Google Play Store Issues Users Encounter
The Google Play Store serves as the epicenter for Android users. It facilitates seamless access to a vast array of apps. However, encountering issues with the platform can impact the functionality of your device. Below are 7 common issues on why your Google Play Store is not responding.
Inability To Open the Play Store
The inability to open the Play Store leaves you without access to new apps or updates. The issue is often accompanied by error messages, which can leave you scratching your head.
Crashing Issues
Frequent crashes undermine the stability of the Play Store. Users attempting to browse or download apps may find themselves abruptly kicked out of the application. It can disrupt your intended tasks and cause annoyance in the long run.
Not Responding Errors
The dreaded “Not Responding” message can bring usability to a standstill. Users navigating the Play Store may experience delays or complete unresponsiveness. It can lead to a frustrating and unproductive experience.
Download and Installation Failures
When downloads and installations fail, you will be unable to enjoy new apps or updates. This issue can be annoying when trying to access crucial software improvements or security updates.
Authentication and Account Issues
Problems with authentication and account access can lock users out of their Google accounts on the Play Store. It prevents users from purchasing or downloading apps. The issue not only hampers functionality but also raises security concerns.
Update Problems
Difficulties in updating apps can leave users with outdated software. It can potentially compromise security and miss out on new features. The issue diminishes the user experience by depriving you of the latest enhancements.
Connection and Network Errors
Persistent connection and network errors impede the Play Store’s ability to fetch data. It hinders users from browsing and downloading apps. The issue is frustrating in areas with unstable internet connectivity.
Part II. Why Does the Google Play Store Keep Stopping?
If you’re wondering why does Google Play Store keeps stopping on your phone, there can be several factors. Here are some of them below.

- **Network issues.**Unstable or poor internet connections can disrupt the communication between the Samsung Galaxy A54 5G device and the Play Store. It can lead to frequent crashes.
- **Outdated Play Store version.**Running an outdated version of the Play Store may result in compatibility issues. The lack of essential updates can cause the application to stop unexpectedly.
- Cache and data accumulation. Over time, cached data and accumulated data in the Play Store can become corrupted. It can hinder the smooth operation of your phone and contribute to sudden stops.
- Google account problems. Authentication issues, incorrect credentials, or other problems with the linked Google account can disrupt the Play Store’s functionality. This can also lead to repeated crashes.
- **System glitches and bugs.**Inherent glitches and bugs within the Android operating system may affect the Play Store’s performance. They can cause your device to stop unexpectedly.
Part III.7 Quick Solutions To Resolve Play Store Not Working Issues
Encountering issues with the Google Play Store can be frustrating. It disrupts your ability to download, update, or access essential apps. Here are seven quick solutions when your Google Play Store unfortunately has stopped.

Clear Cache and Data
Revitalize your Google Play Store by addressing performance issues. Clearing cache and data can be a crucial step when troubleshooting malfunctions or glitches in the app. Here’s how.
- Step 1: Head to your device’s Settings and navigate to Apps or Application Manager.
- Step 2: Locate and select Google Play Store. Within Storage, choose Clear Cache and Clear Data. Confirm your action and restart the Play Store.

Update Play Store
Enhance your Play Store’s functionality by ensuring it’s up-to-date. This method suits those who haven’t updated their Google Play Store for a long time. Follow the steps below.
- Step 1: Open the Play Store app and tap the three horizontal lines in the top-left corner to access the menu.
- Step 2: Select Settings and scroll down to find the Play Store version. Install any available updates.

Check Internet Connection
Ensure a stable internet connection on your device. Switch between Wi-Fi and mobile data to identify connectivity issues. Restart your router or modem if problems persist.
Reset App Preferences
Restore your device’s app settings to default for improved functionality. Below are the steps.
- Step 1: Go to your device’s Settings and select Apps or Application Manager.
- Step 2: Tap the three dots in the top-right corner and choose Reset app preferences.

Re-add Google Account
Resolve Play Store issues by re-adding your Google account. Follow these steps in Settings to remove and re-add your Google account, ensuring a seamless and error-free experience.
- Step 1: Navigate to Settings and choose Accounts or Users & Accounts.
- Step 2: Select Google and remove the account. Re-add the Google account and verify if the Play Store functions properly.

Uninstall Play Store Updates
This method troubleshoots Play Store problems by uninstalling updates. Here’s how.
- Step 1: Access Settings and go to Apps or Application Manager.
- Step 2: Find Google Play Store and tap on Uninstall Updates. Confirm the action and restart the Play Store.

Perform a System Update
Ensure your device’s overall stability by performing a system update to ensure the stable operation of the Play Store. Follow the steps below.
- Step 1: Access Settings, scroll down, and select System or Software Update.
- Step 2: Next, choose System update or Check for Updates and install any available system updates**.**

If you’re still asking yourself why my Google Play Store is not opening after conventional methods prove ineffective, it may lead you to explore third-party tools. As a final recourse, considering reputable tools like Wondershare Dr.Fone - System Repair introduces a fresh approach to troubleshooting your device.
Part IV. How To Repair Play Store Not Working With an Alternative
Repairing your Google Play Store can be swift and effective with Dr.Fone - System Repair. This tool offers advanced features to diagnose and fix various system issues without the advanced skills required. It provides a quick and efficient resolution for a malfunctioning Google Play Store. Follow these three simple steps to get started:
- Step 1: Begin by downloading and installing Dr.Fone - System Repair (Android) on your computer.
 safe & secure
4,207,329 people have downloaded it
- Step 2: Launch the program and connect your Samsung Galaxy A54 5G to the computer using a USB cable. Choose the Samsung Galaxy A54 5G device type and click Start to initiate the repair process.

- Step 3: Dr.Foneshould automatically detect the brand of your device. Next, choose the Name, Model, Country, and Carrier. Tick the checkmark and click Next to continue. Follow the on-screen instructions and wait for the repair process to complete.

- Step 4: Simply click Done on the prompt window displaying a confirmation message to exit the tool if your Samsung Galaxy A54 5G starts successfully. In the event that the Samsung Galaxy A54 5G device fails to start, select Try Again to initiate the process once more.

Bonus: What Else Can Dr.Fone - System Repair Do?
Beyond its utility in fixing Google Play Store malfunctions, Dr.Fone is known for its user-friendly interface and high success rate. Its ability to address a wide range of Android issues offers a comprehensive solution to various system-related problems. Below are the platform’s key highlights.

Key Features
- Fixes diverse Android issues. Dr.Fone - System Repair excels in resolving a multitude of Android problems. This includes a black screen, a boot loop, and bricked Android devices. Its comprehensive approach ensures you can rely on a single tool to tackle a wide range of system-related issues.
- Support for over 1000 Android models. Dr.Fone supports over 1000 Android models. The broad coverage ensures diverse devices can use the software to troubleshoot and repair their Android systems.
- User-Friendly interface. Dr.Fone is designed with simplicity in mind. It offers an easy-to-use interface that caters to both novice and experienced users.
- High success rate. The software boasts a high success rate in resolving Android issues. Its effectiveness in tackling various problems has garnered trust among users. It’s one of the go-to solutions for those seeking reliable and efficient system repairs.
safe & secure
4,131,376 people have downloaded it
Conclusion
Addressing issues when your Google Play Store does not work is crucial for an uninterrupted Android experience. Follow the outlined steps to regain control and enjoy a seamless app experience. Don’t let frustrations linger; take immediate action for a hassle-free Google Play Store.
Lastly, having Dr.Fone - System Repair at your side offers a reliable solution for a wide range of Android concerns. Don’t worry if your Google Play store is not responding, and Dr.Fone can fix it in minutes.
Top 10 Fixes for Phone Keep Disconnecting from Wi-Fi On Samsung Galaxy A54 5G
The revolutionized world is about the internet, online life, and social media. You can get all the information you need from the internet. You are a click away from booking tickets, buying groceries, calling your loved ones, or even you can handle office meetings with the internet.

Since everything revolves around the internet, it’s annoying if your WI-FI disconnects. You might question yourself why does my Wi-Fi keep disconnecting from the phone? To know the answer, read the article below.
Part 1: Why Does Your Phone Keep Disconnecting from WiFi?
Is your phone frequently getting disconnected from Wi-Fi? Or the internet service is lagging? We have a few options from which you can inspect your problem. Not all internet issues arise from the service provider, as some issues are because of the Samsung Galaxy A54 5G devices that are using the internet. Some of these issues are discussed below for your assistance:
- Router Problems
If the internet provider is doing their job right, the router might not deliver you the right thing. Like other electronic devices, they can also misbehave. This can happen because the router is faulty, or it can happen because the firmware is outdated.
- Out of Wi-Fi Range
Why does My Samsung Galaxy A54 5G keep disconnecting from Wi-Fi? It is because you might be out of range! The router’s placement is very important. The router transmits frequencies that have a limited range. If you are moving out of the range, the internet automatically disconnects.
- Wi-Fi Signals Getting Blocked
The signals from the router can dissipate from any other electronic device nearby. Signals like radio and microwaves can interfere with signal strength.
- Devices Connected with Router
Commonly, a house has around a dozen devices connected to the internet router. People do not think that the router has limited connection slots. It is unable to entertain a specific number of requests for service facilitation. The router has limitations; the service quality will drop if the limitations are exceeded. This drop in quality can also cause internet disconnection from devices.
- Unstable Internet
If your Samsung Galaxy A54 5G gets disconnected frequently, then this disconnection is due to unstable internet, but apart from the above-mentioned problems, there is another reason for internet disconnection.
Sometimes, the internet is stable, but it still disconnects. This is because the internet service provider might not send the best quality internet you have acquired it for. If your internet is stable and the phone still keeps disconnecting, then head onto the next part that will share the top 10 fixes to sort out this issue.
Part 2: 10 Ways to Fix Wi-Fi Keep Disconnecting on Phone
As we have mentioned earlier if your Wi-Fi is stable, but it keeps disconnecting from Samsung Galaxy A54 5G S22 or other Android phones, the coming section of this article is for you. We will provide you with 10 solutions with complete assistance to fix the “Wi-fi keeps disconnecting Android“ issue.
Fix 1: Restart Your Phone
If the Wi-Fi keeps disconnecting from your Samsung Galaxy A54 5G, but the internet is stable, then you should try to fix the issue by restarting your phone. Sometimes, it’s the phone that’s causing a problem, so to resolve it, you can follow the steps given below:
Step 1: Firstly, unlock your phone. Now, press the Power button and hold it for a few seconds.
Step 2: Now, select the ‘Reboot’ option to resolve the issue from the options on the screen.

Fix 2: Check Router Settings
If your Android keeps disconnecting from Wi-Fi, you can also fix the problem by checking the router settings. This is because your phone might be blocked from connecting to the network, and if this is the scenario, your phone will never maintain the connection. You should check the Router’s admin panel or app to remove your phone from the blocklist.
Fix 3: Reconnect to Network
To fix the annoying problem that your Wi-Fi keeps disconnecting, you should try forgetting the network and then reconnecting to it. This could be done easily by following the steps below:
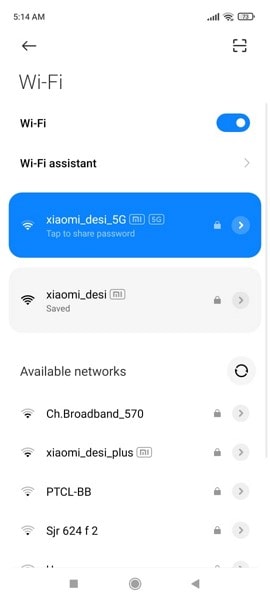
Step 1: First, you need to open the Wi-Fi settings menu. This could be done by pressing and holding the Wi-Fi option from the drop-down menu of your phone until the settings open up.

Step 2: A list of all the Wi-Fi networks will appear on the screen. Select the network that is causing trouble from that list and hit the ‘Forget Network’ option.
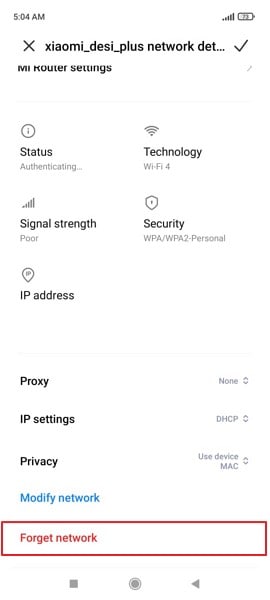
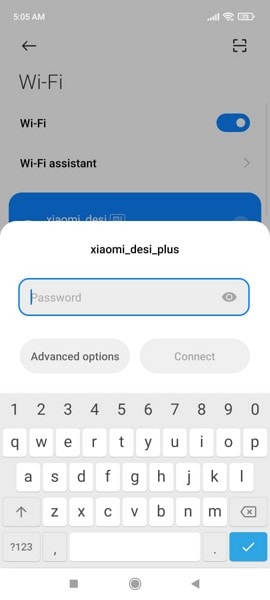
Step 3: After that, you should reconnect to this Wi-Fi network by selecting it from the Wi-Fi list and entering its password.
Fix 4: Restart Your Router
As we discussed, to restart your phone, you can also restart the router to get rid of the problem. For this, hit the restart button on the router to get a fresh start. If the Samsung Galaxy A54 5G device has no button, disconnect the power supply and plug it back in to connect again. Most internet issues are resolved by restarting the router.
Fix 5: Forget Old Networks
The problem that your Wi-Fi keeps disconnecting can also occur because of the list of networks you have connected to. Having yourselves connected to different set of networks could turn out to be quite problematic in the process. In the process of finding and switching to the best network, your device’s Wi-Fi will continually disconnect and reconnect with the nearby networks. To finish this irritating issue, you should remove and forget all the extra networks that you connected previously.
Step 1: You should start by pressing and holding the Wi-Fi option from the drop-down menu on your phone until the Wi-Fi settings screen appears.

Step 2: You will see a list of all the Wi-Fi networks you have connected to previously. One by one, select each network and hit the ‘Forget Network’ button to remove it.
Fix 6. Check Recently Installed Applications
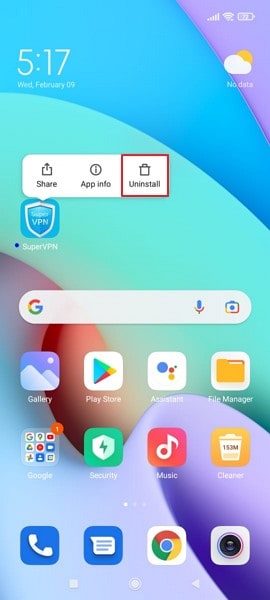
Sometimes, different installed applications can also cause trouble. If your Wi-Fi was fine, but suddenly it started disconnecting, then don’t forget to check the recently installed apps. This is because with not knowing the damage it can cause, you might have installed some VPNs, connections boosters, or firewalls. You can try and disable them but if that doesn’t resolve the problem, then uninstall the app.
Step 1: For uninstalling the problematic application, you have to select it and hold it. You will see a pop-up menu of multiple options; choose the option of ‘Uninstall’ to remove the app from the phone.
Fix 7: Reset Network Settings on your Phone
It’s annoying that your Wi-Fi keeps disconnecting while you are working or studying. Android users can easily get over this problem by resetting the network settings. The steps for this fix are as follows:
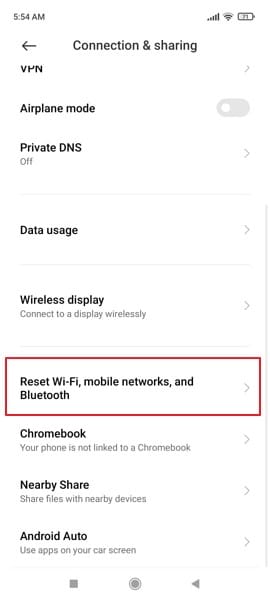
Step 1: For resetting the network, start by opening the ‘Settings’ menu on your phone. Then, scroll down, look for the ‘Connection & Sharing’ option, and select it.
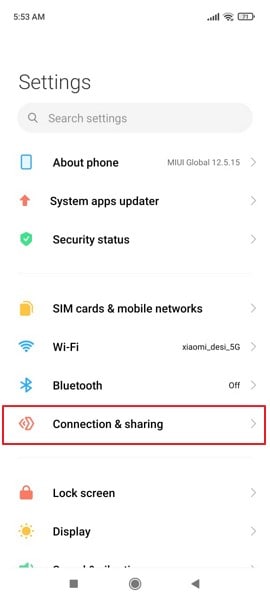
Step 2: As you progress onto a new screen, you will find the option of “Reset Wi-Fi, Mobile Networks, and Bluetooth” in the menu. Select the option to lead to the next window.
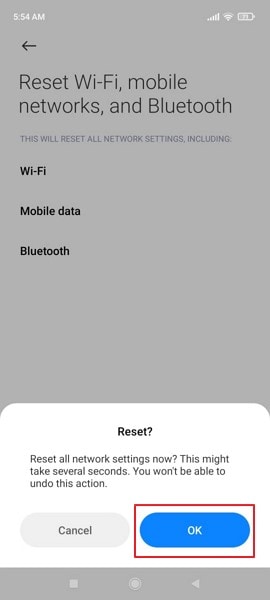
Step 3: Click on the option of “Reset Settings” present on the bottom of the next screen that shows up. Provide confirmation of resetting these settings by inserting your device’s PIN, if any.

Step 4: After providing the appropriate clearances, you will be asked for another confirmation of resetting the Samsung Galaxy A54 5G device’s networks to default. Click “OK” to execute.
Fix 8: Check Routers Range
If your Wi-Fi automatically disconnects and connects again while you are roaming in the house, then it is because of the router’s range; you should check it. For this, you can consider changing and modifying your AP (Access Point) band on your router.
Although the 5GHz frequency band is recognized for providing better network speeds, this band has a shorter range as compared to the 2.4GHz band, which has a better coverage of area. You can easily shift your router’s range through its configuration page. It is considered optimal to utilize the 2.4GHz frequency band for better ranges.

Fix 9: Stay Connected while Asleep
Most Android phones have a battery-saving feature. This feature disables the network connections to save the battery of the phone. If this is why the Wi-Fi keeps disconnecting, follow the steps shared below to fix it:
Step 1: Start by opening the ‘Settings’ menu on your phone. Then scroll down until you find the ‘Battery’ option and open it.

Step 2: Then, from the battery screen, hit the ‘More Battery Settings’ options. Then, you will see the ‘Stay Connected while Asleep’ option; turn it on.

Fix 10: Upgrade Router Firmware
If none of the above-shared fixes work, the last fix to resolve the problem is upgrading your router firmware. For this, you should contact any professional who knows network operations as upgrading router firmware takes time and requires knowledge.
Wi-Fi Stay Connected
The article above has discussed 10 solutions that offer a comprehensive toolkit to tackle the persistent issue of Wi-Fi keeps turning off Android. By toggling Airplane Mode, restarting your device, adjusting settings, and updating firmware, among other steps, you can effectively address and resolve this connectivity problem. With these solutions at your disposal, you can regain a stable and uninterrupted Wi-Fi experience on your Samsung Galaxy A54 5G.
[8 Quick Fixes] Unfortunately, Snapchat has Stopped on Samsung Galaxy A54 5G
Have you ever been deep in conversation with a loved one or friend, taking advantage of all the funny filters and games Snapchat has to offer when you’ve suddenly been presented with the ‘Unfortunately, Snapchat has Stopped’ error code? This is usually followed by the app crashing back to the main menu.
If so, don’t worry; you’re not alone. Snapchat crashing in this way is nothing new, but it can be incredibly annoying when it keeps happening and stops you from enjoying the conversations you care about.
Fortunately, there are plenty of solutions out there to help you out and get the app working again as it should do. Today, we’re going to explore them all to help you get back to what you were doing before and as though there was never a problem.
Part 1. Install Snapchat again from Google Play Store

One of the best ways to resolve the Snapchat crashing problem or Snap Map not working issue is to delete the app and reinstall it again. When you’re using your phone, there is data continually flowing around and data being sent here, there, and everywhere.
During these processes, bugs can occur, and if they can’t sort themselves out, the best thing to do is to reset your app and start from a fresh installation. Here’s how to do it.
Step 1: Hold down the Snapchat app from your main menu and press the ‘x’ button to uninstall the app.
Step 2: Open the Google App Store from your device and search ‘Snapchat’ in the search bar. Find the official app page and download the app onto your device.
Step 3: The app will automatically install itself once downloaded. Open the app, sign in to your account using your log-in details, and you should be able to use the app like normal.
Part 2. Check for new Snapchat Updates

Hand in hand with the problem above, sometimes a bug can restrict Snapchat from working, or perhaps your personal update settings. If you receive a Snapchat from someone with an upgraded version, this can crash your app.
Here’s how to make sure you’re running the latest version of Snapchat is Snapchat isn’t responding.
- Launch the Play Store and navigate to the My Apps and Games page
- Tap the Update button
- The app will now automatically update to the latest version
Part 3. Wipe the cache of Snapchat
If you have a lot of data in your Snapchat cache, this can cause the app to become overloaded in which you’ll need to clear it to start again and refresh the app. This is a common problem that can cause Snapchat has stopped working error.
Here’s how to fix it.
Open the Snapchat app and tap the Profile icon on the top left-hand side of your screen

Tap the Settings gear icon on the top right
Scroll down the Settings menu and tap the Clear Cache option
Here, you can choose to Clear All, but you can select individual areas if you prefer
Tap the Confirm option to clear your cache preference completely


Part 4. Fix the system issues that caused Snapchat stopping
If you’re experiencing the Snapchat crashing on Android often, or you’re experiencing similar errors with other apps, this can be an indication that there’s something wrong with your Android operating system.
The best way to fix this is to repair your device using the software known as Dr.Fone - System Repair (Android). This is a powerful repair system that can completely recover your device from any errors, including the Snapchat keeps crashing error.
Dr.Fone - System Repair (Android)
Dedicated repair tool to fix Snapchat crashing on Android.
- Recover your device from any problem, including black screen or unresponsive screen.
- Supports over 1000+ unique Android devices, models, and brands.
- Trusted by over 50+ million customers around the world.
- Can fully repair faults with your Samsung Galaxy A54 5G’s firmware in a few simple steps.
- One of the most user-friendly applications in the world.
3,889,035 people have downloaded it
To help you make the most of this Android repair software and to fix your Snapchat not responding error, here’s a step-by-step guide on how to use it.
Step 1: Download the Dr.Fone - System Repair (Android) software to your computer. Install the software to your Mac or Windows computer by following the onscreen instructions.
Once completed, open the software, so you’re on the main menu.
Step 2: From the main menu, click the System Repair option, followed by the Android option. Of course, if you have an iOS device you want to repair in the future, the option is there if you want it. Also, connect your Samsung Galaxy A54 5G to your computer using the USB cable.
Step 3: Confirm details.
On the next screen, use the drop-down menus to confirm the model, brand, operating system, and carrier of your device. Click Next to confirm the details are correct.
Step 4: You’ll now need to put your phone into Download Mode, sometimes referred to as Recovery Mode. For this, you can follow the onscreen instructions. Make sure your device stays connected to your computer throughout this process.
The method will slightly differ depending on whether your device has a home button, so make sure you follow the right instructions for your individual device.

Step 5: Once in Download Mode, the software will now download and install a fresh version of your Samsung Galaxy A54 5G’s operating system. This can take some time, so make sure your device stays connected, and your computer stays on and doesn’t shut down.

Step 6: That’s it! Once you see the screen saying your device has been repaired, you’ll be able to close the Dr.Fone - System Repair (Android) software, disconnect your phone, and can start using Snapchat as normal without the Snapchat not responding error coming up!
safe & secure
Part 5. Check for the Android update

Similar to some of the other solutions we’ve listed above, if you’re using an outdated version of the Android operating system, but the latest version of Snapchat is coded to the most recent, this can be a cause for the Snapchat crashing on Android problem to occur.
Fortunately, it’s easy to check to make sure you’re running the latest version of Android and to download and install the update if you need it. Here’s how, which will help to sort out your Snapchat keeps crashing Android problems.
Step 1: Open the Settings menu on your Samsung Galaxy A54 5G and select the About Phone option.
Step 2: Tap the ‘Check for Updates’ option. If an update is available, you’ll then have the option to Install Now or Install Overnight. If no update is available, you’ll see a notification stating your device is up to date and no action is needed.
Part 6. Connect to another Wi-Fi
In some cases, you may be trying to connect to a Wi-Fi network that’s not very stable. This may keep cutting the connection to your device, which in turn is causing Snapchat to crash on Android.
To resolve this, you can simply try connecting to another Wi-Fi network or a data plan to see whether this is the problem. If so, changing network and then using the Snapchat app should stop any error messages from occurring.
Step 1: Open the Settings menu on your Samsung Galaxy A54 5G, followed by the Wi-Fi option.

Step 2: Tap the new Wi-Fi network you’re currently connected to, and then tap the ‘Forget’ option, to stop your phone connecting to it.

Step 3: Now tap the new Wi-Fi network you want to connect to. Insert the Wi-Fi security code and connect. Now try reopening and using the Snapchat to see if you can use it.

Part 7. Stop using the custom ROM

If you’re running a custom Android ROM on your device, with some versions of the ROM and some apps, you’re going to experience errors simply because of the way the apps and the ROMs are coded and designed.
Unfortunately, there’s no easy fix to this, and if you want to continue using the app, you’ll need to reflash your Samsung Galaxy A54 5G back to its original firmware, and then wait until the ROM developers update the ROM to be compatible with social apps like Snapchat.
However, this reflashing process is simple thanks to the Dr.Fone - System Repair (Android) software that we listed above. To follow the detailed step-by-step guide, follow the steps on Part 4 of this article, or follow the quick guide instructions below.
- Download and install the Dr.Fone - System Repair (Android) software to your computer
- Connect your Samsung Galaxy A54 5G to your Windows computer using the USB cable
- Open the software and click the Repair option.
- Select the Android device repair option
- Make sure your carrier and device information are correct
- Put your device into Download Mode by following the onscreen instructions
- Allow the software to repair your Samsung Galaxy A54 5G automatically
Part 8. Reset the factory settings of your Android

One of the last resorts you can take is factory resetting your Samsung Galaxy A54 5G back to its original settings. From the day you first started using your device, you’ve been using the system and downloading files and apps, and over time this increases the chances of creating a bug.
However, by resetting your device to factory settings, you can reset these bugs and get your apps and device working again free from the Unfortunately, Snapchat has stopped error message. Here’s how to factory reset your device.
Make sure you back up your personal files from your device first like your photos and music files because factory resetting your device will clear your device’s memory.
Step 1: Tap the Settings menu on your device and click the Backup and Reset option.
Step 2: Click the Reset Phone option. That’s it! The phone will take several minutes to complete the process, after which your phone will be reset to its original state.
Also read:
- [New] 2024 Approved Boosting YouTube Rankings with Top SEO Practices (1-11)
- [Updated] In 2024, Little Drivers' Lively Gameplay
- 簡單指南:如何透過電腦通過USB光碟來下載歌曲
- All About Factory Reset, What Is It and What It Does to Your Honor 90? | Dr.fone
- Discover the Powerhouse Underneath: How Noctua's NH-L12Sx77 Transforms Small Form Factor PC Cooling with Superior RAM and VRM Heat Sink Design
- Guía Para Localizar Todas Las Imágenes en Tu PC Con Windows 10: Técnicas De SEO
- How To Pause Life360 Location Sharing For Xiaomi Civi 3 Disney 100th Anniversary Edition | Dr.fone
- How to Quickly Fix Bluetooth Not Working on Samsung Galaxy A23 5G | Dr.fone
- In 2024, How To Pause Life360 Location Sharing For Tecno Spark 10 Pro | Dr.fone
- In 2024, Strategies for Bulk TikTok Video Acquisition
- Simple Solutions to Fix Android SystemUI Has Stopped Error For Vivo X100 | Dr.fone
- Spotify Keeps Crashing A Complete List of Fixes You Can Use on Xiaomi Redmi 13C | Dr.fone
- Spotify Keeps Crashing A Complete List of Fixes You Can Use on Xiaomi Redmi 13C 5G | Dr.fone
- Strategizing to Spot and Capture Youtube's Hidden Markets for 2024
- Top-Rated Switch Capture Cards Revealed for 2024
- Title: Play Store Not Working On Samsung Galaxy A54 5G? 8 Solutions Inside | Dr.fone
- Author: Abel
- Created at : 2024-11-21 20:51:03
- Updated at : 2024-11-24 17:35:16
- Link: https://fix-guide.techidaily.com/play-store-not-working-on-samsung-galaxy-a54-5g-8-solutions-inside-drfone-by-drfone-fix-android-problems-fix-android-problems/
- License: This work is licensed under CC BY-NC-SA 4.0.