
Play Store Stuck on Downloading Of Vivo Y100i? 7 Ways to Resolve | Dr.fone
Play Store Stuck on Downloading Of Vivo Y100i? 7 Ways to Resolve
Part 1: Symptoms when “Play Store Stuck on Downloading”
Just as any problem gives some indication of anything wrong is going to befall. Similarly, a user does feel some unexpected turns of events resulting in Play Store to stick at downloading. If one happens to see that the progress bar has suddenly frozen to a certain scope and taking ages to march any further, it is treated as the first signs for Play store not working properly. Another, such scenario is where your apps are not able to download easily. Rather, the Play store reflects a message downloads are yet in the pending queue. If one happens to witness such problems, these can be in fact be giving you the warning signal of the Play store problem

Part 2: Causes of why “Play Store Stuck on Downloading”
With technology, uncertainties are bound to happen. It becomes quite tricky to analyze the real problem and craft a solution. As, there can be several causes that might be disturbing the smooth functionality of Play store. Here are some collated issues that we’ve gathered that are indicative of the cause.
- The time is not rightly setup: Sometimes, the unexpected root cause of play store failing to work is due to the date and time not set up rightly. If the system time is not according to the standard timing, then the application can misbehave.
- Fluctuations in internet connection: If internet speed is running too low or has weaker connection, Play Store download stuck at 99 problem may arise out. Always, use a good speed of internet.
- Get rid of Cache: Extras of cache can pose to be problematic in the working of applications. Users must timely clean their devices so as to brush away any kind of cache memory.
- Outdated version of Play store app: Users generally do not feel the urge for updating the play store app. It is important to use only the updated version so as the functioning of Google Play app is not affected.
Part 3: 7 fixes for Play Store stuck on downloading
3.1 Check SD card and phone storage space
All the applications, data of one’s device is generally loads directly in phone’s storage or the SD card (if plugged). Hence, it is crucial to check whether your phone storage or SD is not fully occupied. As it can indirectly be the reason why the issue of “**Play Store download stuck at 99%**” might occur. Ensure to get rid of any application that you are no longer using. Or, consider deleting any picture, videos or documents that aren’t required by you.
3.2 Check Wi-Fi or cellular data connection
Sometimes, it’s not your phone that is going all faulty, the root cause might be the internet connection. If the internet is running low or does not seem to be stable, then the play store download problem may occur. Users must ensure that the Vivo Y100i device they are working should have a stable network connection so as to combat the problem. Then, they can try downloading the application and check if the problem is prevalent or not.
3.3 One click to fix corrupted Play Store components
The world of internet and its intricacies are beyond a novice’s realm. Chances of malfunctioning of Google Play Store may be due to the components relating to Play Store may have gone corrupted. To resolve such issue, the need of a good software that is courageous enough to tackle all kinds of issues is need. For that, the only perfect solution is Dr.Fone - System Repair (Android), an impeccable software useful in providing speedy recovery of your phone. With it you can ward away the issues like boot problem, black screen of death, phone stuck etc.
Dr.Fone - System Repair (Android)
Android repair tool to fix Play Store stuck on downloading
- Can easily deal with all kinds of problems disrupting the activities of Android phone including app crashes, system crash, black screen of death, Play Store stuck on downloading。
- 1-click technology helpful in repairing rare kinds of issues like phone stuck in boot loop, recovery mode, Vivo Y100i logo or Android devices getting bricked.
- Supports compatibility with several kinds of Android phones, including the all Vivo Y100i models even the Vivo Y100i S9.
- The easy to use interface is crafted with underlying features and functionalities in a right manner.
- Provides 24 hours customer assistance to users for resolving queries or problems.
3,224,929 people have downloaded it
Step by Step Tutorial
Here is the complete guide which will help users in understanding how Dr.Fone - System Repair (Android) can vanish Play store download problem completely.
Step 1: Launch Dr.Fone - System Repair (Android) and connect device
First of all, load the program on PC. In the interim, draw connection of device with phone using a genuine cable. Over the interface, tap on “System Repair” mode.

Step 2: Select Android Repair mode
Over the following screen, select “Android Repair” placed at the left panel to resolve play store stuck issue and press “Start” button too!

Step 3: Fill in the information
It is important to add in all the necessary information for successful execution of program. Make sure to give details of “Brand”, “Name”, “Country”, “Model” and all other fields.

Step 4: Ensure to Download Firmware
Now, follow the on the on-screen prompts to boot Android phone into the download mode. Once done, you’re ready to download the suitable firmware package by hitting the “Next”.
Fret not, the program will automatically detect the most suitable firmware for your device.

Step 5: Repair Android phone
After the package downloads, program will repair all kinds of problems surfacing over your phone automatically. This way, the Play store stuck on downloading will get resolved fully.

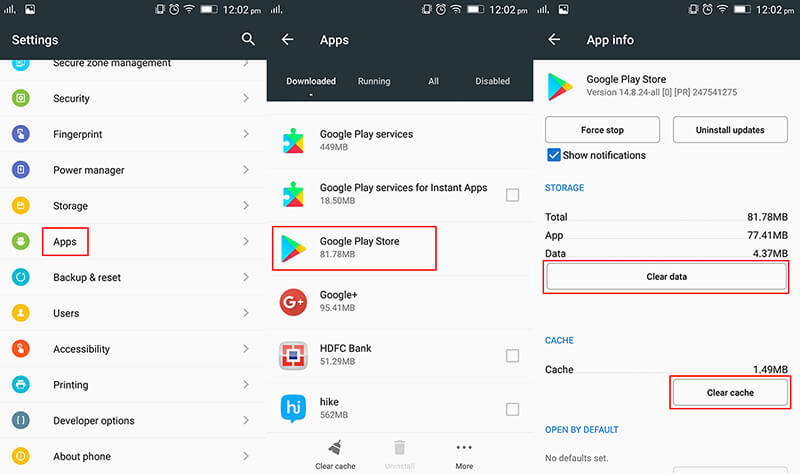
3.4 Clear data and cache of Play Store and download again
Did you know the piling up of cache memory can certainly pull off a great deal for Play Store getting stuck? Cache data may generally stash the data so that you can access it even in future course. But, this do east up a good chunk of space and result in the misbehavior of Play Store app. You can opt to brush away Play store stuck on downloading by using the following steps.
- Get your Vivo Y100i and visit “Settings”.
- Then, surf for “Application manager” option and launch “Google Play store” option.
- From there, click on “Cached Data” and select the “Clear Cache” option.
- Optionally, make use of “Force Stop” feature to halt the functioning of the app.
- At last, reboot/restart your smartphone.
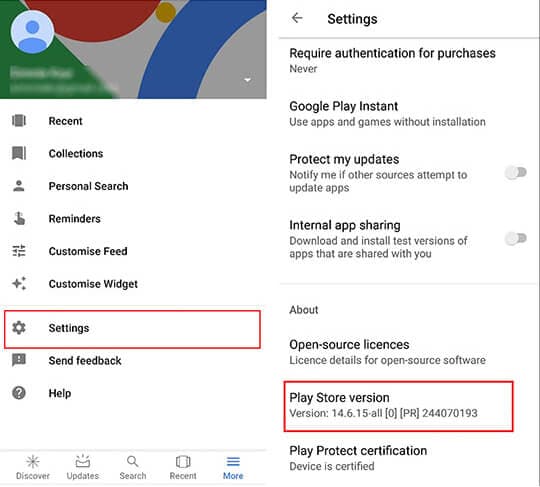
3.5 Update Play Store to the latest version
When was the last time you cared to update your Play store app? Generally, users overlook the need of updating the application. As, they think that it may not be of any greater importance. But, in reality working in an outdated version can directly impact Play Store and cause download problem. Follow the below steps to update Play Store to latest version.
- From phone, just launch Google Play Store app from app drawer.
- Press the 3 horizontal lines icon over the top and locate “Settings” from the left menu.
- In Settings, browse for “Play Store Version” located under “About” section.
- Tap on it, if it shows that Play Store app is not updated then proceed with the on-screen prompts to update it to the latest version.
3.6 Try another Google account
If you’re unable to see a streak of hope and wondering why my Play Store is still showing download pending. Well, some unexpected issue might be there with your Google account. As, there are times where your existing Google account can be the hurdle. Therefore, trying your hand in some other Google account might assist to work things out.
3.7 Avoid downloading large apps
Last but certainly not the least, users must avoid downloading large applications. Especially those games that eats a whopping number of 300+MB of your space. You must always watch out on size of the application is and only then craft the decision to load it on your device. This may help out in keeping the Play store stuck on downloading problem at bay.
Vivo Y100i Not Connecting to Wi-Fi? 12 Quick Ways to Fix
Nowadays, it’s pretty much essential to have your Vivo Y100i or smartphone connected to the internet. Whether you’re watching videos, looking something up, or using any kind of app, you need the internet for these applications to function correctly.
This is why it can so annoying when it gets to a point where the internet connection isn’t working. However, the problem of a web page not loading correctly is just the tip of the iceberg.
There are plenty of problems you could experience, whether it’s the Wi-Fi network keeps disconnecting on its own without any warning, perhaps a security issue where the passcode or IP address isn’t being registered properly, or even if the connection is just being super slow, even if there’s no reason too.
Luckily, despite there being so many problems out there, there are also many solutions. Today, we’re going to share with you the complete definitive guide to help you get your Vivo Y100i connected and free from problems and issues.
Part 1: Restart your Vivo Y100i
Begin by powering off your Vivo Y100i and unplugging your router. Wait for about a minute before plugging in the router and turning on your device. This simple reset can often restore stable connections and fix Android wifi not working.

Part 2: Turn on Airplane mode and turn off
Turn on Airplane Mode for a few seconds, then turn it off. This maneuver refreshes your device’s network connections and might rectify the Android not connecting to wifi issue.

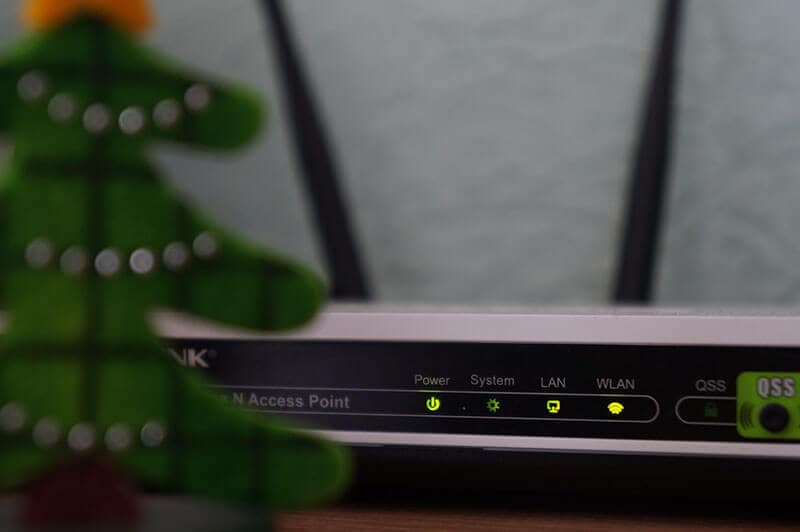
Part 3. Check Wi-Fi Router settings
The third step you’ll want to take is making sure the internet router in your house is working properly and is actually sending internet data to your Vivo Y100i. Of course, if you have other internet-enabled devices connected to the same router and they’re working fine, you know this isn’t the problem.
However, if you’ve got a problem with Wi-Fi not working on your Android and other devices in your home or office, you know you’ve got a router problem. Here’s how to solve it.
- Go to your internet router and check the indicator lights
- While this depends on your device, a green or blue light will mean the connection is good, whereas a red light indicates a problem
- Press the Restart button on your router and wait ten minutes before reconnecting your device and connecting again
- Call up your internet provider to see if there’s an internet connection issue in your area
- Open your web browser and log into your router settings to ensure your Vivo Y100i is connected to the Wi-Fi network and is allowed to send and receive data
Part 4. Boot your Android in safe mode
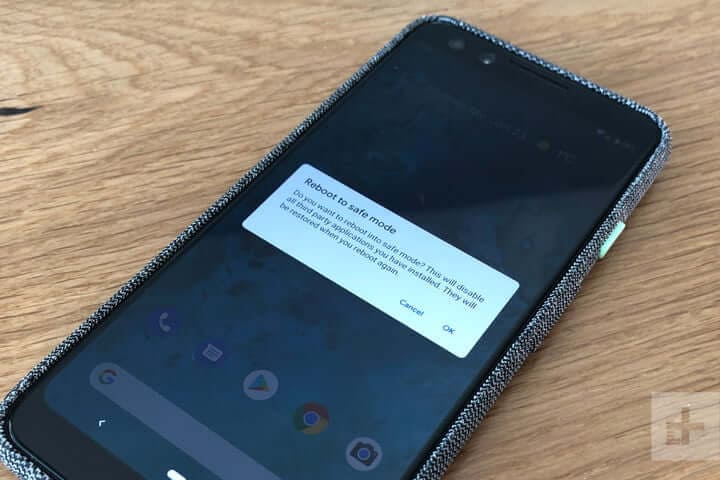
If you’re unable to connect to the internet, but other devices have no issues, you may find the issues is coming from within your Vivo Y100i itself. Fortunately, there are ways you can see whether this is the problem.
The best way to do this is to boot your device in Safe Mode. The process for doing this will depend on the make and model of your Vivo Y100i, but the basic process goes as follows;
- Turn off your Vivo Y100i by holding down the Power button and tapping Power Off. Wait a few minutes to ensure the Vivo Y100i device is completely off
- Press and hold the Power button to turn your phone on, but the press and hold both the volume up and volume down buttons at the same time
- You will see the words ‘Safe Mode’ appear on your screen as the Vivo Y100i device loads
- Now you will be booted in Safe Mode. Try connecting to the internet again to see if it works
If your device connects to the internet while in Safe Mode, you’ll know you have a problem with an app or service that’s running on your device. If this is the case, you’ll need to go through your apps and delete them and then reinstall them one at a time until you find the app or service that is causing your internet problems.
Part 5. Check the Android Wi-Fi adapter
If you’re using a Wi-Fi adapter on your device to connect to the internet, you’ll need to make sure this is working. This could be an adapter on your Vivo Y100i itself, especially if you’re using an older device, or if you’re using an adapter to boost the ranger of your router network.
You need to check both of these to make sure your connection is working properly.
- If using an Android Wi-Fi adapter, make sure all the Vivo Y100i device drivers are up to date, and if you’re using an app, make sure the app is updated, and all the settings allow an internet connection
- If you’re using a router adapter, make sure it’s set up properly, and your Vivo Y100i is connected to the adapter using the correct passwords. Try connecting another device to see if the internet connection is working on there
- Whichever method you’re using, try disconnecting your Vivo Y100i and forgetting the network, and then reconnecting and entering the right password to refresh the connection
Part 6. Check SSID and IP address on Android
To make a Wi-Fi connection work, your Vivo Y100i needs to match two codes that connect and relate to your router to establish the connection and work correctly. These are known as the SSID and the IP address.
Every wireless device will have its own codes and making sure they’re matched to the network you’re connecting to is crucial to ensuring the internet is working on your Vivo Y100i. Here’s how to check on your Vivo Y100i to make sure everything is correct.
- Tap the Settings menu option, followed by Wi-Fi on your Vivo Y100i
- Turn on your Wi-Fi network and connect it to your router
- Find the router name (SSID) and make sure it’s exactly the same as the SSID written on your router
- Once connected, tap the Wi-Fi network and you will see the IP address. Check both your phone and the router codes to make sure this number matches
When these numbers are matching, if your Android is still not connecting to wifi, you’ll know this wasn’t the problem.
Part 7. Fix Android system issues in one click
If none of the solutions above are working, this could indicate a real problem with the firmware and operating system of your Vivo Y100i. Fortunately, a fast solution to get everything working again is to completely repair the software of your phone.
You can do this easily using powerful Android recovery software known as Dr.Fone - System Repair (Android) . This is the leading repair tool on the market and is designed to fix and repair any firmware and software problems you may be having.
Dr.Fone - System Repair (Android)
A one-click tool to fix Wi-Fi not working on Android
- Can repair Android from any problem including the black screen of death
- A trusted software application used by 50+ million people around the world
- The most user-friendly mobile repair application available right now
- Supports over 1,000+ Android models and devices
- A world-class customer support team to help you whenever you need them
3,483,527 people have downloaded it
To help you have the best and the most accurate experience when using the Dr.Fone - System Repair (Android) application, here’s a complete step-by-step guide on how to use it.
Step One Make your way over to the Wondershare website and download the Dr.Fone - System Repair (Android) software. Install it onto your computer by following the on-screen instructions.
Once installed, connect your Vivo Y100i to your computer using a USB cable, and open the software, click “System Repair”.
Step Two Click the “Android” option in the menu and then click “Start” to begin the Repair process.
Step Three On the next screen, go through the options and use the drop-down menus to make sure the information is correct for your individual device. Accept the terms and conditions of the software, and then click the “Next” button.
Step Four Confirm you want the software to carry out the repair process by typing the ‘000000’ code into the pop-up box and pressing Confirm. Make sure you read everything displayed in this box beforehand to know what’s happening.

Step Five Now put your phone into Download Mode by following the on-screen instructions, so your device is ready for the repair process. The method for getting your phone into Download Mode will vary depending on your device, so make sure you’re following the right instructions.

Step Six Once the software has detected your device in Download Mode, it will automatically begin the repair process. You need to make sure your device stays connected throughout this time, and your computer stays on.

The whole process is automatic, so you won’t need to do anything until it’s finished. Once completed, you can disconnect your phone and start connecting it to the internet as normal!
 safe & secure
Part 8. Check the Wi-Fi connectivity on another phone

When experiencing problems with your Wi-Fi network, it’s worth noting the problem might not be with your phone, but rather the Wi-Fi network itself. This is why it’s important to make sure you check the connection on another device.
Of course, if you’re already using another phone on your Wi-Fi network, you know this isn’t the case. However, if you’re not sure, here’s what you need to do;
- Get another Android or iOS phone or tablet
- Open the Settings menu and connect to the Wi-Fi network you’re having problems with
- Enter the password and connect to the network
- Open a web browser on the phone and try loading a web page
- If the page loads, you know the Wi-Fi network isn’t the problem
- If the page doesn’t load, you know you’ve got a problem with your Wi-Fi network
Part 9. Change the password of the Wi-Fi
Each Wi-Fi network router will give the opportunity to choose and change the password you have to let devices connect to your network. It’s important you try changing this because you never know if someone else has accessed your network and could be blocking your device. Here’s how it works;
- Log onto your computer and open your Wi-Fi settings
- Depending on the brand and method of your individual router, navigate to the Wi-Fi password settings menu
- Change the password to something complicated using all available digits and characters
- Save the password and restart the router to disconnect all devices
- Now connect your Vivo Y100i to the router using the new password
Part 10. Reset network settings on Android
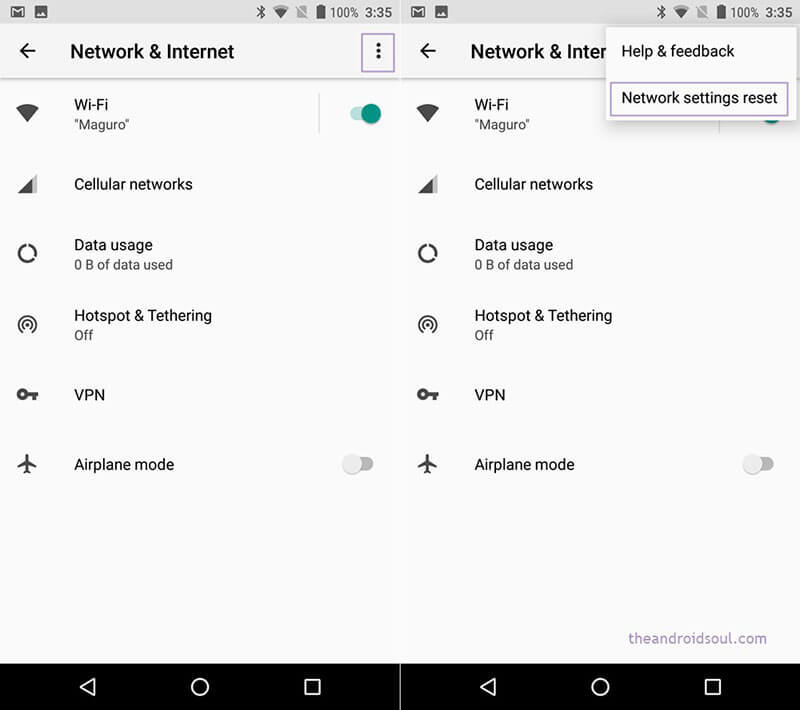
Just like the method above where you’ll be effectively resetting the network settings on your router, if this hasn’t worked, you’ll be able to reset the network settings on your Vivo Y100i, hopefully removing the bugs and allowing you to connect.
Here’s how you can do this easily on your Vivo Y100i;
- From the home screen of your Vivo Y100i, open the Settings menu
- Tap the Backup & Reset option
- Tap the Reset Network Settings option
- Tap the Reset Network option
- If you need to, enter the PIN number or passcode for the Android device, and the Vivo Y100i device will confirm the reset has taken place
- Reconnect your Vivo Y100i to your Wi-Fi network for the changes to take effect
Part 11. Clear partition cache in recovery mode
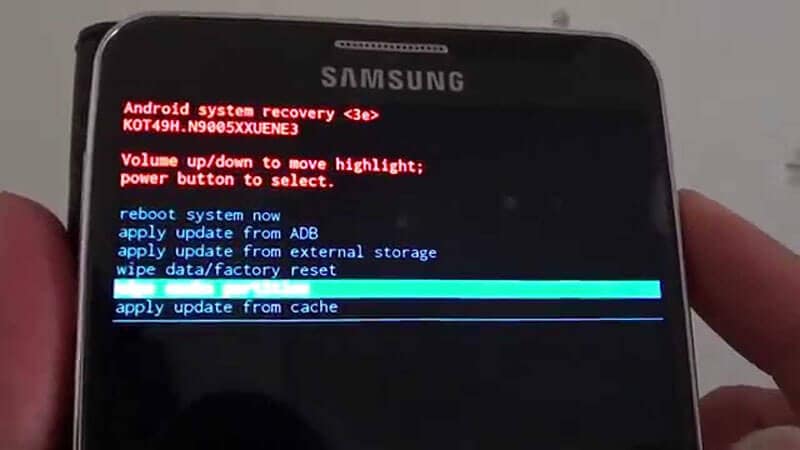
As you continue to use your Vivo Y100i, the partition cache will fill up with data your device needs and doesn’t need. However, by clearing your device’s partition cache, you can make clear up some space which should help your device have enough memory to connect to the internet.
- Turn off your Vivo Y100i
- Turn it on by holding down the power button, volume button, and home button
- When your phone vibrates, let go of the Power button, but continue to hold the volume button
- When a menu is displayed, use the volume buttons to navigate the menu
- Select the Android System Recovery option, followed by Wipe Cache Partition
- Restart your device and connect to the internet
Part 12. Reset factory settings

If worse comes to worst, another option you have is to factory reset your Vivo Y100i. As we’ve spoken about above, while using your phone from the day you started using it, your device will fill up with files and data which can become messy and causes bugs.
However, by factory resetting your device, you can start again from the factory default from which you first received it, ultimately clearing the bugs. Make sure you back up your device before proceeding because it will erase your personal files.
- Open the Settings menu on your Vivo Y100i
- Navigate to System > Advanced > Reset Options
- Tap the Reset phone option, and enter your PIN code if required
- Tap Erase Everything
- Wait for your phone to complete the process
- Restart your device and connect to the internet
safe & secure
7 Solutions to Fix Chrome Crashes or Won’t Open on Vivo Y100i
Google Chrome is one of the most popular web browsers in the world. It is fast, secure, and easy to use. However, like any other app, it is not free from errors. Many users have reported that Chrome crashes or won’t open on their Vivo Y100i. If you are also facing this issue, then you have come to the right place. In this article, we will discuss the reasons behind this problem and provide you with 7 solutions to fix Chrome crashes or won’t open on Vivo Y100i.
Being one of the widely used browsers, Chrome is always our rescue whenever vital information is our need. Imagine, you launched Chrome for some urgent work and all of a sudden, got “Unfortunately Chrome has stopped” error. You re-opened it thinking about proper functioning of it now but to no avail. Does this situation sound familiar? Are you in a same problem as well? Fret not! We will discuss in this article why your Chrome is crashing on Android and the potential solutions to do away with the problem. Please read the article attentively and know what helps you best.
Part 1: Too many tabs opened
One of the main reasons why Chrome keeps crashing could be the multiple opened tabs. If you keep open the tabs, it may slow down the performance of Chrome and the app will use RAM. As a result, it will obviously get stopped midway. Therefore, we suggest you to close the tabs which are opened. And once you do that, exit the app and then launch it again.
Part 2: Too much memory used
When Chrome or any other app keeps running on the background, issues like “Unfortunately Chrome has stopped” are likely to occur. Moreover, the opened apps will eat the memory of your device. Hence, as the next solution, it is suggested that the Chrome should be closed by force quitting and then you need to try to launch it again to work. See if it works or still Chrome is not responding.
1. Simply tap on the Home button twice to get on the recent apps screen. Please note that the button may vary to reach the screen. Please check once and move accordingly.
2. Now simply swipe the app up/left/right (according to the Vivo Y100i device).
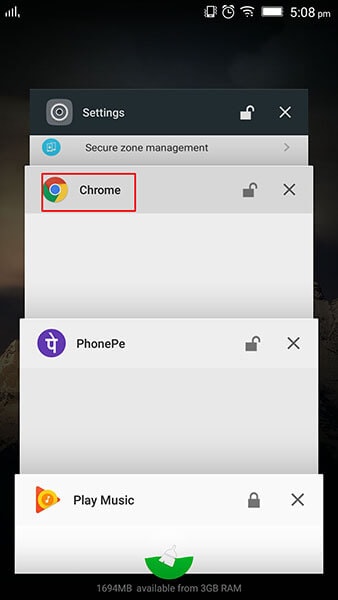
3. The app will be force quit now. You can then start it again to check if thing get back to normal.
Part 3: Chrome cache overflowing
While using any app for long, the temporary files for those gets collected in the form of cache. And when cache is not getting cleared, one may face the freezing, crashing or sluggish apps. And this could also be the cause why your Chrome keeps stopping. Hence, the following steps will show you how to clear cache and make Chrome work as before.
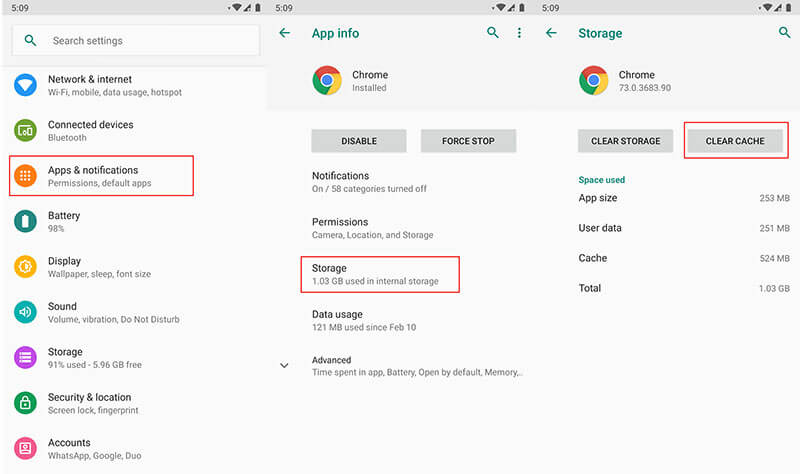
1. Open “Settings” and go to “Apps & Notifications”.
2. Look for “Chrome” and tap on it.
3. Go to “Storage” and click on “Clear Cache”.
Part 4: Exclude the issue of website itself
Most probably Chrome is not able to support the website you are trying to access. We doubt if the particular website you are making use of is the culprit and making Chrome keeps stopping. In such case, we would like to recommend you to make use of another browser and try to access the website from there. See if this works or not. If now, please follow the next solution.
Part 5: Android firmware corruption
Another reason why your Chrome has stopped could be the corrupted software. You can’t expect anything normal when your firmware corruption occurs and so in the case of Chrome. If this is the case, the re-flashing the stock ROM is the most recommended solution. And the best that can help you in this is none other than Dr.Fone - System Repair (Android) . Within one click, it vows to help users in flashing the ROM without any complications. Read the advantages offered by this tool.
Dr.Fone - System Repair (Android)
Android repair tool to fix crashing Chrome
- It works like a pro no matter what problem your device is stuck with.
- More than 1000 types of Android devices are compatible with this tool.
- Easy to use and holds higher success rate.
- No need for any special technical knowledge to use this
- Offers an incredible interface from which anyone can work with.
3,605,074 people have downloaded it
How to Use Dr.Fone - System Repair (Android) when Chrome is crashing on Android
Step 1: Install the Tool to Begin
Start downloading it from there. Install it once downloading is completed and open the tool. The main screen will show you some tabs. You need to hit on “System Repair” among those.
Step 2: Get Android Device Connected
Now, you need to connect your Vivo Y100i with the computer using USB cord. When the Vivo Y100i device is connected successfully, click on the “Android Repair” option from the left panel.
Step 3: Enter Details
On the following screen, you need to select the right phone brand, name model and enter career details. Check once to confirm and hit on “Next”.
Step 4: Download Firmware
Now, follow the steps displaying on the screen to enter the DFU mode. When you do this, click on “Next” and the program will download the firmware.
Step 5: Repair the Issue
Once the firmware is downloaded, you will notice that the repairing process will start by the program. Wait until it gets finished and try to start Chrome again and you’ll surely get rid of the problem.
Part 6: File Downloading issue from Chrome
While you were trying to download from internet, the file didn’t download properly or it might get stuck and eventually crashing Chrome occurs. In such instances, many times, uninstalling and installing helps. Therefore, follow the steps below to uninstall and install Chrome and fix Chrome keeps stopping
- Go to “Settings” and tap on “Apps”.
- Select “Chrome” and tap on “Uninstall Updates”.
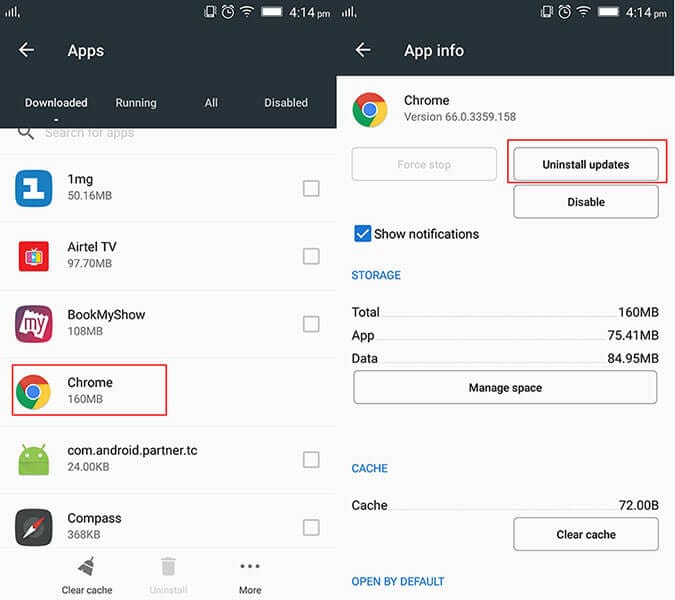
- Now, you need to re-install it from Play Store. From the “My Apps” section, tap on Chrome and update it.
Part 7: Clashes between Chrome and system
Of still you are receiving “Unfortunately Chrome has stopped” pop-up, it might be because of the incompatibility between the Chrome and system. Maybe your device is not updated and therefore is at odds with the Chrome app. So, the last tip that we would like give you is to update your Vivo Y100i. Following are the steps for it. Follow them and stop the Chrome crashing on Android issue.
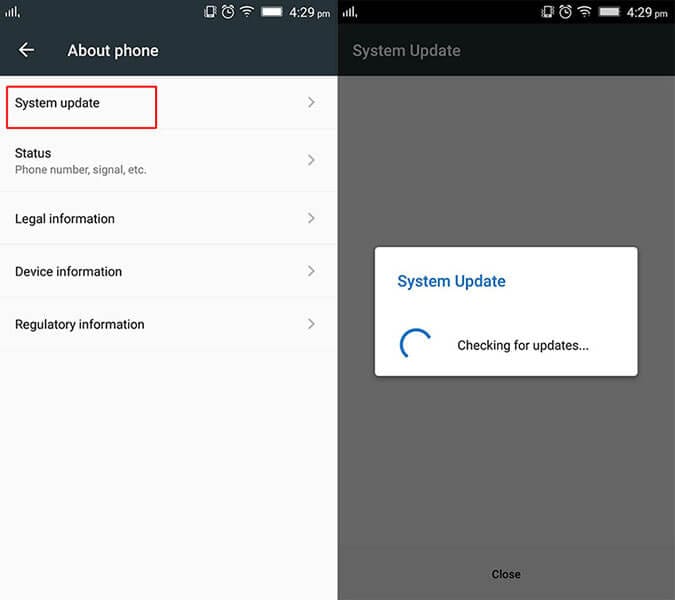
- Go to “Settings” and tap on “System”/”About Phone”/”About Device”.
- Now, choose “Software Update”/”System Update” and your device will detect if there is any update present on your device. Proceed accordingly.
Also read:
- [Updated] 2024 Approved Blending Primary and B-Roll for Smooth Transitions
- A Working Guide For Pachirisu Pokemon Go Map On Nubia Red Magic 9 Pro+ | Dr.fone
- AOMEI Backupperについて学ぶ:主要単語・用語リスト
- Easy Instructions for Connecting a Logitech WiFi Mouse to a New Transmitter Device
- From Raw Files to Stunning Artwork Mastering Polarr's Editing for 2024
- How To Fix Unresponsive Phone Touchscreen Of Realme 12 Pro+ 5G | Dr.fone
- How To Fix Unresponsive Phone Touchscreen Of Vivo S17 Pro | Dr.fone
- How To Unbrick a Dead Samsung Galaxy M34 5G | Dr.fone
- In 2024, Does Life360 Notify When You Log Out On OnePlus Ace 2V? | Dr.fone
- Leading Power Inverters Reviewed: Find Your Perfect Match
- Play Store Stuck on Downloading Of Vivo X Fold 2? 7 Ways to Resolve | Dr.fone
- Proven Ways to Fix There Was A Problem Parsing the Package on Oppo A1x 5G | Dr.fone
- Reasons for Tecno Spark 10 4G Stuck on Boot Screen and Ways To Fix Them | Dr.fone
- Reasons for Vivo Y100 5G Stuck on Startup Screen and Ways To Fix Them | Dr.fone
- The Digital Muse: Using ChatGPT for Dynamic Story Creation
- Title: Play Store Stuck on Downloading Of Vivo Y100i? 7 Ways to Resolve | Dr.fone
- Author: Abel
- Created at : 2024-11-12 12:48:56
- Updated at : 2024-11-14 16:36:54
- Link: https://fix-guide.techidaily.com/play-store-stuck-on-downloading-of-vivo-y100i-7-ways-to-resolve-drfone-by-drfone-fix-android-problems-fix-android-problems/
- License: This work is licensed under CC BY-NC-SA 4.0.