
Realme 11 Pro+ Not Receiving Texts? 10 Hassle-Free Solutions Here | Dr.fone
Realme 11 Pro+ Not Receiving Texts? 10 Hassle-Free Solutions Here
If you are using an Realme 11 Pro+, you might have encountered the issue of not receiving texts. This issue can be quite frustrating, as it prevents you from staying connected with your friends and family. However, there are several ways to fix this issue and get your texts back up and running. In this article, we will show you some of the best solutions to fix the issue of not receiving texts on Realme 11 Pro+.
It is very common that the Android messaging app is not working on many devices especially broken devices . People often encounter this issue in Realme 11 Pro+ phones, even the latest ones.
You might find lots of people online stating I can’t receive text messages on Android. And usually, people don’t find a legit solution for this issue. If you are also experiencing this sort of issue on your Realme 11 Pro+s, then don’t panic. We have a series of methods that can supposedly fix the problem. But at first, we will learn what the main reasons this problem arises are and how do you know that it is consistent not some random error.
Take a look at the sections below, and you will learn all possible things regarding the messaging application on your phone.
Part 0. Symptoms and Causes of Android Not Receiving Texts
The most common symptoms that would clarify that your Android messaging service is not working right are given below:
- You will stop receiving any texts all of a sudden.
- You can’t send or receive a text message.
- Whenever you try to text someone, the message sent failed notification pop up on the screen.
The reasons why your Android is not receiving texts are given below:
- Network issue
- Insufficient memory
- Mis-configuration of device settings
- Switching of devices
- A glitch in the messaging app
- Software issue
- Carrier problem with the registered network.
Apart from all these reasons, some additional causes are also there that can lead to this issue.
Part 1: One-click to Fix Android not Receiving Texts by Android System Repair
If you are not willing to waste your precious time fixing the message problem, then you can switch to the top-rated Android repair tool, i.e., Dr.Fone - System Repair (Android) . With this software, you can easily fix issues like the black screen of death, crashing apps, can’t receive text messages on Android, or failed download. If you have no idea what is causing the message app problem, you can simply think of repairing the whole Android system.
You surely need to try the software as it can perform the following tasks:
Dr.Fone - System Repair (Android)
Android repair tool to fix Android Not Receiving Texts
- Fix the Android system without technical knowledge.
- Complete Android repair tool for all brands and models.
- Simple and Easy Repair procedure
- 100% guarantee that the problem will be fixed.
- Also available for iOS devices.
3981454 people have downloaded it
You can download and install the software on your system and use it to fix any issue. Then follow the steps given below:
Step 1: Launch the application and choose the System Repair option from the main interface. Connect your Realme 11 Pro+ to the computer and choose the Android Repair mode, and hit the Start button to begin.

Step 2: You will have to provide information about your device, including the brand, name, model, country, and carrier. In between, you will be notified that your device repair might erase the existing data of your device.

Step 3: Agree with the conditions and hit the Next button. The software will download the firmware package automatically. It might take a while to finish the download, and when it is finished, the repair process will be initiated automatically.

It won’t take long, and your Realme 11 Pro+ will be repaired. Now you will be able to receive and send text messages without any hassle.
Part 2: Remove and Insert the SIM
The easiest thing that you can try if your Realme 11 Pro+ is not receiving any text messages is because the SIM is not inserted right. If your SIM card is inserted wrong, then it is obvious you can’t receive text messages on Android. Simply take out the SIM card, see how it must be inserted, and do it correctly. Once the SIM is inserted in the right way, you will receive the pending text messages immediately unless there is another issue preventing it.
Part 3: Check Network Connection
Another simple method that you can try if you are not receiving text messages on Realme 11 Pro+ phone is to check your network connection. Usually, you can see the bar on the top of the screen. Maybe the problem exists because you have no signal strength at the moment.
Part 4: Consult your Carrier about the Data Plan
Maybe you are unable to get messages on your Realme 11 Pro+s because your existing data plan has expired. You can directly contact your Carrier about the issues where your Realme 11 Pro+ is not receiving texts. If your plan has expired, then you might have to renew it immediately. If not, then try out other fixes to resolve this issue.
Part 5: Try the SIM card in Another Phone or Slot
Sometimes, people complain that Realme 11 Pro+ is not receiving texts from iPhone, and it might be because of the SIM card issue. So, the best thing you can try is to remove the SIM from your current phone and insert it into another phone.
When you are offline the message is saved on the server and just about when you get online, the text messages are delivered. If it is the SIM issue, then you will not get the message unless you contact your network operator.
Part 6: Clear the Cache of Messaging App
In smartphones, the memory space often gets filled up with cache. And not everyone remembers that they have to clear the cache from time to time. The accumulated cache can also lead to this issue. So, if your Android messaging app is not working, you have to clear the cache memory.
Step 1: Open the Settings and go to Apps. Find the Messages app from the list and tap to open it. There you will see the storage occupied by the app along with the cache.
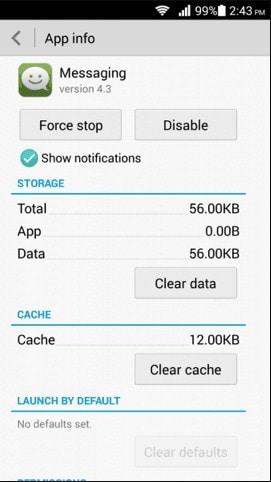
Step 2: Click on the Clear Cache button and wait as the Realme 11 Pro+ device free up the memory of your device.
Once the cache is cleared, you can also clear the data if you want to and you’ll instantly receive the text messages on your phone.
Part 7: Delete Useless Messages to Free Up Space
Sometimes, if you are not receiving text messages on Realme 11 Pro+, it means that you need to clean up the clutter of useless messages from your phone and SIM both. The phone messages can be deleted directly from your phone. But the SIM card messages needed to be deleted separately. The SIM cards don’t have enough memory to hold plenty of messages. Therefore, once the storage is full, you will stop receiving messages entirely.
Step 1: Open the messages app and open settings. Look for an option that says “Manage SIM Card Messages”. Sometimes, you can find this option under Advanced Settings.
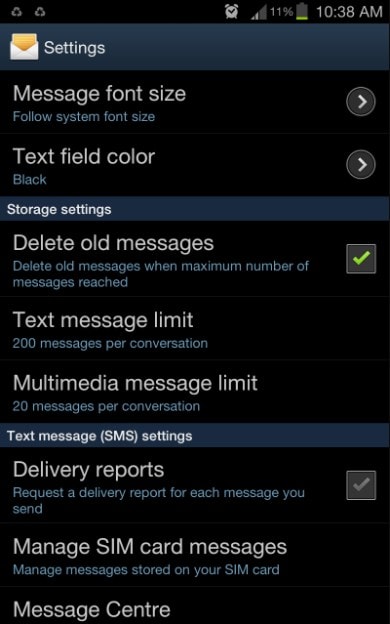
Step 2: There, you will see the existing messages on the SIM. You can either delete all the messages or perform a selective deletion to free up space.
Part 8: Try a Third-party Messaging App
If you can’t receive messages on your default app, then you can try installing a third-party messaging app. Nowadays, most people use social media messaging apps like WhatsApp, Skype, etc. for messaging. So, if somehow, the Android is not receiving texts, then the new apps can help you to send and receive messages with a non-native network.
_Further Reading: 15 Best Free Chat Apps in 2022. Chat Now! _
Part 9: Ensure your Phone is Fully Charged
Another possible fix to this problem might be your phone’s battery percentage. Sometimes, when the Android is in power saving mode, it disables the default apps too. As a result, you can’t even receive text messages on Android. So, when you plug in the charger, the power saving mode will be disabled, and you will get your text messages.
Part 10: Ensure It’s Not An iMessage From iPhone
If the Realme 11 Pro+ phone is not receiving texts from iPhone, then this might be a different issue. Usually, there is an option on the iPhone where they can send texts as iMessage and simple messages. If the iPhone user sends the text as iMessage, then it will not show up on the Android device. To resolve this, you have to follow the steps below:
Taking the iPhone in hand makes sure that you are connected to a network. Open settings and scroll to look for the Message option. Toggle the bar next to the iMessage option to turn it off.
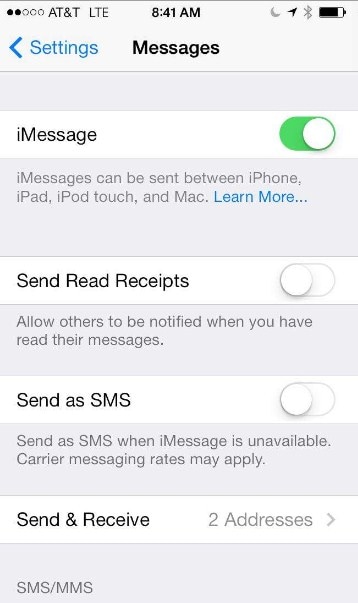
If the FaceTime option is also on, you might have to deactivate that too to send messages and calls as regular ones.
Part 11: Update Your Android
Updating the operating system to the latest Android version can fix some system errors which may cause the “Android not receiving texts” issue because the latest version always brings a better user experience and fix the know bugs.
Conclusion
Now you know several methods that can work if the Android messaging app is not working. If you experience this kind of issue with your Realme 11 Pro+, then you are most likely to resolve them with these fixes. If none of the solutions seem to fix the issue, then you can take the help of Dr. Fone - System Repair (Android) feature. With this tool, you can resolve all kinds of working issues on your device.
What To Do When Realme 11 Pro+ Has Black Screen of Death?
Have you ever got the error of freezing the Android device home screen? Or the notification light keeps blinking without anything shown on display? Then you are facing Android black screen of death.
This scenario is common with many Android mobile users, and they always hunt for solutions to get rid of this Android black screen problem. Here are some more situations that can assure you that you are facing Android black screen of death.
- The light of the phone is blinking but the Realme 11 Pro+ device is not responding.
- The phone is hanging and freezing very frequently.
- The mobile is rebooting and crashing more often and the battery is draining a lot faster.
- Phone restarts on its own.
If you face these situations, you might be facing the Android black screen of death issue. Follow this article, and we’ll discuss how to get rid of this annoying problem at ease.
Part 1: Why Android device gets black screen of death?
Similar to the “Blue Screen of Death “ (BSOD) on computers, the Android Black Screen of Death indicates a severe system crash or malfunction. When this issue occurs, the Realme 11 Pro+ device’s display remains blank, and you are unable to interact with the Realme 11 Pro+ device, access apps, or perform any actions. The cause of the Android black screen of death can vary, but some common factors include:
- Install incompatible apps or apps with bugs and viruses.
- Have bugs or errors in the Android operating system.
- Keep the mobile charged for long after it’s fully charged.
- Use a non-compatible charger.
- Use an old battery.
- Incorrectly install or incomplete system updates.
- Excessive heat due to heavy usage or environmental factors.
If you face the situations mentioned above, this is clearly a case of the Android screen black. But don’t worry about that. You can follow the article below to get rid of this situation on your own.
Part 2: How to rescue data when Android gets black screen of death?
This annoying Android black screen of death is making it impossible to access your internal data. So, the possibility is that you might lose all the data. We have a solution for all of your data recovery problems from a damaged Android device.
The solution for recovery data is the Dr.Fone - Data Recovery (Android) toolkit by Wondershare. This tool is highly appreciated worldwide and very popular for its feature-rich user interface. This tool can perform a lot of functions that can successfully recover the data from a damaged device.
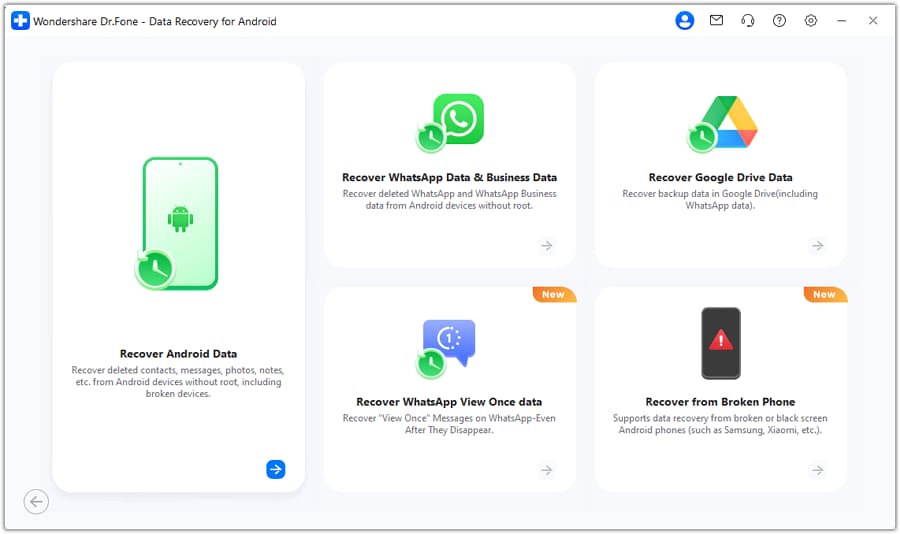
Use this revolutionary toolkit to get the data back from the black tablet screen of death. Connect the Realme 11 Pro+ device with the PC after installing this tool and follow the on-screen instruction, and all of your data will be transferred to your PC. Unfortunately, the tool is supported on selected Realme 11 Pro+ Android devices as of now.
Dr.Fone - Data Recovery (Android)
A Dedicated Tool to Retrieve Data from Broken Android Devices .
- Recover data from broken devices or devices that are damaged in any other way, such as those has black screen.
- Recover photos, videos, contacts, messages, call logs, and more.
- Highest retrieval rate in the industry.
- Compatible with most Realme 11 Pro+ devices.
3981454 people have downloaded it
Part 3: 9 Solutions to fix the black screen of death of Android
- 3.1 One click to fix the black screen of death

- 3.2 Force restart your Realme 11 Pro+
- 3.3 Check and clean your phone
- 3.4 Remove the battery
- 3.5 Recharge the Realme 11 Pro+ device
- 3.6 Wipe cache partition to fix black screen of death
- 3.7 Uninstall incompatible apps
- 3.8 Reboot to safe mode
- 3.9 Factory reset to fix Android black screen of death
3.1 One click to fix the black screen of death
Facing an Android device with a black screen of death, I believe, is one of the gloomiest moments of one’s life, especially for those who know little about the technical part of Android. But here is the truth we have to admit: most cases of the black screen of death arise due to system glitches in Android.
What to do? Shall we find someone who is tech-savvy to seek help? Come on, this is the 21st century, and there are always one-click solutions to deal with technical issues for laymen like you and me.
Dr.Fone - System Repair (Android)
Fix Black Screen of Death for Android In One Click
- Fix all Android system issues like a black screen of death, OTA update failures, etc.
- Update the firmware of Android devices. No technical skills are required.
- Support all the new Realme 11 Pro+ devices like Galaxy S22, S23, etc.
- Click-through operations to bring Android out of the black screen of death.
3,364,231 people have downloaded it
Here are the easy steps to get your Realme 11 Pro+ out of the black screen of death:
Download and install the Dr.Fone tool. After launching it, you can see the following screen pop up.
Select “System Repair” from the home page, and then click on the “Android “.
Click “Start” to commence the Android system repair. In the next screen, select and confirm your Android model details like name, model, country, etc. and go on.
Boot your Android into Download mode by following the on-screen demonstrations.
Then the tool will download the Android firmware and flash the new firmware to your Realme 11 Pro+.
A moment later, your Realme 11 Pro+ will be repaired completely, and the black screen of death will be fixed.
Video guide: How to fix the Android black screen of death step by step
 safe & secure
3.2 Force restart your Realme 11 Pro+
Because it is the quickest and most painless solution, most people do this when their Android phone screen goes black too fast. The majority of phone issues can be resolved by performing a hard reboot. Here are the necessary measures if you haven’t tried this method before.
To reboot your Realme 11 Pro+, you may need to press a specific key combination, depending on the model you have, but most Android devices can be force restarted by doing the following steps:
Step 1: Press and hold the power button for about 10-15 seconds. Keep holding it until the Realme 11 Pro+ device restarts.
Step 1: For Realme 11 Pro+ devices, press and hold down the Power and Volume Down buttons for about 7 seconds.

3.3 Check and clean your phone
This method might not be popular with Android users, but this can do wonders when dealing with an Android black screen of death issue. To do this, follow the steps provided below:
Step 1: Ensure your phone’s buttons and ports are not stuck before anything else.
Step 2: See if dirt prevents you from turning the Realme 11 Pro+ device on. Then, quickly press and release the button a few times.
Step 3: If the phone isn’t charging normally, ensure the charging port isn’t clogged with dust and debris by checking and cleaning it. You can gently blow out any debris in the charging port or use a wooden toothpick to pry it open.
Step 4: After you’re done with the cleaning, it’s best to charge the phone for at least 10 minutes. Just give it a quick charge and then try to restart it.

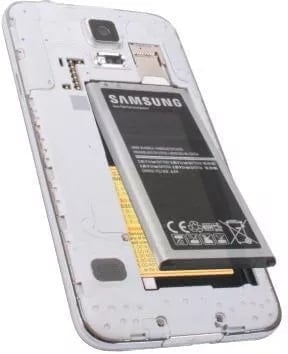
3.4 Remove the battery
If your phone’s battery is removable, you can try taking it out and trying again if restarting and cleaning it doesn’t fix the problem.
Step 1: To get started, take the phone apart by starting at the back.
Step 2: After 20 to 30 seconds, take out the battery and put it back in.
Note: When replacing the battery, ensure the metal contacts correctly connect to the phone.
This easy and straightforward method should help you fix your Android screen black issue, but if it doesn’t, continue reading, as this article got more techniques you can try.
3.5 Recharge the Realme 11 Pro+ device
If your Realme 11 Pro+ screen suddenly goes black, let the battery die completely. Then once the battery is completely dead, you should plug it in to charge and turn it on by pressing the Power button. Try to check if you still encounter the issue after doing so.
3.6 Wipe cache partition to fix black screen of death
If your Realme 11 Pro+ turns on, but the screen remains black, clearing the cache partition should solve the problem. After all, keeping caches on your phone would cause it to run more slowly and cause other problems. Therefore, the issue can be resolved by clearing the cache partition. Check the following steps on how to do this below:
Step 1: Turn off your Realme 11 Pro+.
Step 2: Boot the Realme 11 Pro+ device into Recovery Mode.
Note: The steps necessary to enter recovery mode will vary depending on your specific Android phone model. To ensure you’re doing the correct steps for your device, consult the user manual or look it up online. The following instructions work for Realme 11 Pro+ devices:
- For older Realme 11 Pro+ devices with the home button: Press and hold the Volume Up button, the Power button, and the Home buttons simultaneously.
- For newer Realme 11 Pro+ devices without the home button: Press and hold the Volume Up button and the Power button together.
- If the Realme 11 Pro+ device logo appears, release your grip, and the phone will restart.
Step 3: Find the Wipe cache partition option using the volume controls after entering Recovery Mode.
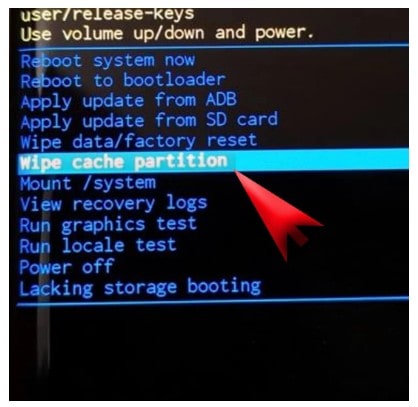
Step 4: Select Wipe cache partition by pressing the Power button.
Step 5: On the next screen, use the Volume Down button to highlight “Yes” and then press the Power button to confirm the cache wipe.
Step 6: The cache partition will be wiped, and you will see the “Cache wipe complete” message on the screen.
Step 7: Use the Volume Down button to navigate to the “Reboot system now” option and press the Power button to reboot your Realme 11 Pro+ device.
After rebooting, you can see that you have successfully got rid of the annoying Android black screen of death. For most of the cases, this method solves the problem. If not, you have to move to the next method.
3.7 Uninstall incompatible apps
Android screen black can be a result of installing a bug or incompatible apps. If you have recently installed an app that crashes frequently, that may be the reason for the issue. Uninstalling the app from the Realme 11 Pro+ device may solve the problem with ease. For doing this, you need to boot your device in Safe mode. Follow the below steps.
Step 1: Power down your device by pressing and holding the Power button until a menu appears.
Step 2: Navigate to Safe Mode by pressing and holding the Power Off button.
Step 3: Tap the “Safe mode” icon to enter Safe mode. You should now see Safe Mode at the Realme 11 Pro+ device’s bottom.
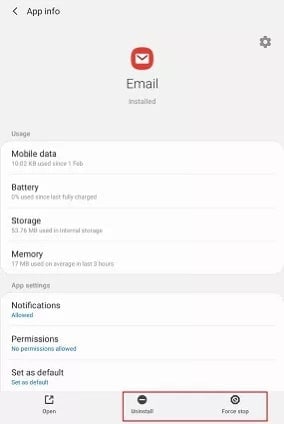
Step 4: After selecting Settings, head to the Apps section.
Step 5: Select the app by clicking on it; the App Info window should appear. To uninstall the app, tap the Uninstall option from the menu below the screen.
Step 6: Now restart the Realme 11 Pro+ device by pressing the power button and let it boot up in normal mode.
If the app is the reason for Android black screen of death, then after uninstalling, you can get rid of this issue. If not, now you have to factory reset your device to solve the problem.
3.8 Reboot to safe mode
Even after multiple attempts to launch them, certain applications act suspiciously and cause the Realme 11 Pro+ device to crash. When an Android phone suddenly goes black, you can often isolate the problem to a specific app by booting into Safe mode.
Step 1: Begin by restarting your phone. To do that, press the Power button until a menu appears.
Step 2: Press the Power Off button to enter Safe mode.
Step 3: Activate Safe mode by clicking the “Safe Mode” icon.
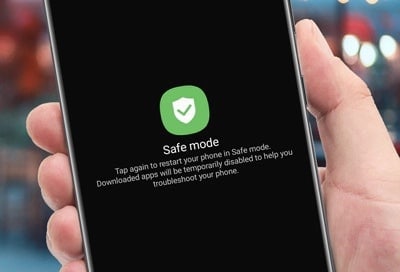
Step 4: To return to Normal mode, turn off your device and then turn it back on.
3.9 Factory reset to fix Android black screen of death
The factory reset is the option that enables the factory state of your device by erasing all data, settings, bugs, and apps. Your device will be fresh like factory condition after this reset. Worth mentioning here, you’ll lose all the internal data and installed apps after this reset. So, to overcome the Android tablet black screen of death, you must perform this action as the last option. Follow the below steps carefully.
Step 1: Turn off the Realme 11 Pro+ device. Then press the Volume Up + Power button + home button (or press Volume Up + Power buttonS) altogether and let the mobile boot into recovery mode.
Step 2: After booting up in recovery mode, you can find the “Factory data reset” option. Navigate to that option with the volume up and down arrow and select it with the power button.
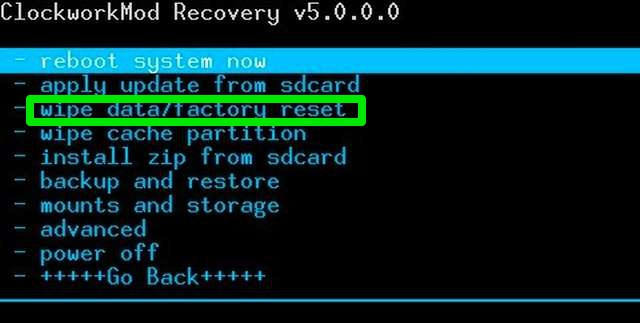
Step 3: In this step, you need to confirm your action by tapping on the “Yes” option. After this, your device will start erasing. This may take a while to complete the whole process.
Now, your device will reboot automatically and you can see the Android black screen of death problem is solved.
Part 4: How to avoid Android black screen of death?
These are the general methods to overcome the situation of Android screen black. But to avoid this situation, here are a few tips to follow –
- Install apps from trusted suppliers only.
- Use security or antivirus software on your device.
- Take a backup at regular intervals.
- Always keep Android OS updated.
- Don’t keep your mobile charged for a long duration after a full charge.
- If your battery gets old, replace it soon.
- Keep your device’s storage well-maintained. Regularly delete unnecessary data.
- Close unused apps running in the background to conserve system resources.
- Prevent phone overheating by avoiding excessive usage, and not exposing it to direct sunlight for extended periods.
By following these steps, you should avoid the most unpleasant situations, such as the Android screen black. We all know that “Prevention is always better than cure”.
The Bottom Line
There could be a lot of reasons why an Android black screen issue occurs, but the important thing is knowing the correct ways how to fix it. And this article has covered nine proven methods to help you fix an Android phone screen black problem.
But among the methods discussed above, Dr.Fone – System Repair just stood out as this program does not only help you with a black screen of death problem, but it covers many other Android system issues too. It’s also a highly intuitive program that requires no skills to operate.
safe & secure
6 Solutions to Fix Error 505 in Google Play Store on Realme 11 Pro+
In case you are receiving the error code 505 while downloading an application from Google play store and have no clue what is it, then this is the right article for you. In this article we are covering the reasons behind the occurrence of Google play error 505. Not only that, we are also providing 6 solutions to fix the error code 505. Usually, this error is seen with Android 5.0 Lollipop version and occurs at the time when you try to install the already downloaded application making it hard to run the app.
Such an error is a kind of permission error. That is, in case you have two similar kinds of applications such as banking apps and both looking for similar kind of permission, causes conflict error named as error 505.
The occurrence chance is more in the old operating systems, 4 KitKat, Android version 4. Let us then proceed to know more about this error 505.
Part 1: Reasons for Google Play error 505

As per the report by some users, error 505 occurs in certain apps such as Weather App, SBI, ITV, Adobe Air 15, We Chat etc.
To have the right idea about the problem, we have listed all the reasons of it occurrence below:
- Google play store is not updated or refreshed (Causes the error during the downloading process)
- Due to installation of an outdated version (In case your Android version is outdated may result in error in the installation process)
- Cache memory(Is the redundant data occurs due to search history)
- Application is not compatible with the Android OS (If the app you are downloading is not the updated may cause error)
- Adobe air app
- Data crash (Many time app or Google play store crashed crashes after downloading it, reason may be some bugs, so many apps are open, less memory etc.)
Now that we know the reasons, let us also learn about the solutions that will guide you to resolve the error code 505.
Part 2: 6 Solutions to fix error code 505
Any error that occurs during downloading or installation process not only hinders with the new app but also takes a large amount of our time to solve the issue. To check that, let us go through the 6 solutions one by one.
Solution 1: One click to make error code 505 disappear
The most common cause for error code 505 pop-up is that Android system files that underpin the Google Play module are corrupted. To make error code 505 disappear in this condition, you should have your Android system repaired.
Dr.Fone - System Repair (Android)
One click to repair Android system and make error code 505 disappear
- Fix all Android system issues like error code 505, error code 495, error code 963, etc.
- One click to fix error code 505. No technical skills required.
- Supports all the new Realme 11 Pro+ devices like Galaxy S8, S9, etc.
- Easy-to-understand instructions provided on each screen.
4,999,459 people have downloaded it
Now, you just need to follow these Android repair steps to fix error code 505:
Note: Android repair needs to flash the system firmware, which may erase existing Android data. To prevent data loss, back up all the important data from Android to PC .
Step1: Download the Dr.Fone - System Repair (Android) program , install and launch it. The following interface will pop up.
Step2: Select the “Android Repair” among the 3 tabs, connect your Android to PC, and click “Start”.

Step3: Choose the correct device details from each field, confirm them and continue.
Step4: Boot your Android in download mode, then start downloading the firmware of your device.

Step5: After the Realme 11 Pro+ device firmware is downloaded, the tool will start repairing your Android.
Step6: When your Android is repaired, the error code 505 will disappear.

Solution 2: Check whether Download Manger is ON or not
Many times download manager is set to disable due to which you are not able to download or install the app. So, it is required to make a check whether the download manager is set on or off. So that your installation process will work properly. The process to enable the download manager is as follows.
>Go to Settings
>Select the Application Manger or App (Option depends upon the Realme 11 Pro+ device)
At the top, an option will appear
>Swipe right till you locate Download manager at top of the screen of the Realme 11 Pro+ device
>Then Select Enable

Enabling download manager to give permission to the Realme 11 Pro+ device to start the download or installation process.
Solution 3: Updating to the latest version of OS of your Realme 11 Pro+
Working with an old operating system is ok, but many times old version also creates some problem and is the main reason behind the occurrence of any bug or error. So, updating the older version act like a rescue to get rid of any such issue or bug. The Process of updation is quite simple; you just need to follow the below steps and your device is ready to get updated to the latest version. Steps are:
- >Go to Settings
- >Select about Phone
- >Click on System Update
- >Check for updates
- >Click on Update
- >Need to click on Install (if any update is available)

Solution 4: Clearing the cache memory from Google services Framework and Google play store
While browsing data online or through Google play store some cache memory get stored for the fast access to the pages. Below mentioned simple steps will help you in clearing out the cache memory from Google services framework and Google play store.
Process to clear the Cache memory for Google Services Framework
- >Go to Settings
- >Select Applications
- >Click on Manage Applications
- >Click to select ‘ALL’
- >Click on Google services framework
- >Select ‘Clear data and clear cache’
That will remove the cache memory of your Google services framework
Steps to Cache memory of Google Play Store
- >Go to Settings
- >Applications
- >Manage Applications
- >Click to select ‘ALL’
- >Select Google Play store
- >Clear data and clear cache
It will clear the cache of Google play store

Clearing the cache memory remove the extra temporary memory, thus free up space for the further installation process.
Solution 5: Reinstalling play store Updates
The reason behind the installation error code 505 might be Google play store updates.
Due to continuous updation of new apps and services Google Play store used to be flooded with so many updates or sometimes does not updated properly. That sometimes caused the problem in dealing with app installation. Resolving the issue is important to make your play store ready for future updation and installation.

- >Go to Settings
- >Visit Application Manager or Apps
- >Select Google Play Store
- >Click on Uninstalling Updates
- >A Message will appear ‘Change play store app to factory version’- Accept it
- >Now Open Google play store>It will refresh the updates within 5 to 10 minutes(So you need to keep your internet connection on while Google play store is updating its store for new updates.)

Solution 6: Third party App
In the case, error 505 occur due to the installation of two or more apps with duplicate permission of data, as many times we use to install two similar kind of app that creates the situation where both seeking out for somewhat similar permissions for the installation. The manual finding is a long and tiring process. Then you can take the assistance of ‘Lucky Patcher App’ to find out which app is creating the conflict. This app will assist you in finding out the duplicity if any and then modifying it. Through this app, once you will find out which particular app is causing the conflict, then you can delete that conflicting app from your phone so that problem of error code 505 gets sort out.
Download link: https://www.luckypatchers.com/download/

Note: If still, you are in the state of trouble to solve the issue of error code 505 then Google Play help center is here to look out all troubles related to app store and its service. You can check out the details by visiting the following link:
https://support.google.com/googleplay/?hl=en-IN#topic=3364260
Or call them at their call center number regarding the issue.

Bonus FAQ about Google Play error
Q1: What is a 505 error code?
The HyperText Transfer Protocol (HTTP) error 505: HTTP Version Not Supported response status code means that the HTTP version used in the request is not supported by the server.
Q2: What is a 506 error?
The 506 error code is a frequent error when operating the Google Play Store. You will sometimes see this error code when you are downloading an app. The app may seem to be downloading just fine when suddenly, near the end of the installation, an error occurs, and a message pops up saying, “App could not be downloaded due to an error 506.”
Q3: How to fix the 506?
Solution 1: Restart your device which can help solve most problems.
Solution 2: Remove the SD card safely.
Solution 3: Correct date and time if it is wrong.
Solution 4: Add your Google Account again.
Solution 5: Clear Google Play Store data and cache.
However, sometimes the five simple couldn’t work anymore. A system repair software can be helpful quickly. We really recommend the Dr.Fone - System Repair (Android) , only a few minutes, the error will be fixed.
Conclusion
Not being able to download or install the app is very frustrating and time-consuming also. Therefore, in this article, we went through the reasons behind the occurrence error code 505 as well as resolving the issue by following five effective methods. I hope that you would be able to sort out the error 505 by following above methods thus would be able to install the application without further delay.
Also read:
- [New] 2024 Approved Expedite YouTube Video Submission Rapid Rendering Secrets
- [New] In 2024, Ideal Platforms for Procuring YouTube Ringtone Files
- [New] In 2024, Navigating YouTube Music Eclecticism
- [New] Privacy Pioneers Explore Instagram Stories Secretly
- Fast Und Effiziente Konvertierung Von MKV Zu HEVC/H.265 - Günstig & Hochauflösend!
- Here are Some Pro Tips for Pokemon Go PvP Battles On Motorola Razr 40 | Dr.fone
- How To Overcome Tracking Problems With Apple's Magic Mouse
- How to Stop Life360 from Tracking You On Honor Magic 6 Lite? | Dr.fone
- How to Stop My Spouse from Spying on My Vivo S18 | Dr.fone
- How To Teleport Your GPS Location On Apple iPhone 15 Plus? | Dr.fone
- How To Teleport Your GPS Location On Apple iPhone SE (2022)? | Dr.fone
- How To Teleport Your GPS Location On Asus ROG Phone 8 Pro? | Dr.fone
- Play Store Stuck on Downloading Of Itel P55? 7 Ways to Resolve | Dr.fone
- Proven Ways to Fix There Was A Problem Parsing the Package on Vivo Y36 | Dr.fone
- The Dead Have Never Died | Free Book
- Title: Realme 11 Pro+ Not Receiving Texts? 10 Hassle-Free Solutions Here | Dr.fone
- Author: Abel
- Created at : 2024-10-28 21:10:11
- Updated at : 2024-10-30 08:53:32
- Link: https://fix-guide.techidaily.com/realme-11-proplus-not-receiving-texts-10-hassle-free-solutions-here-drfone-by-drfone-fix-android-problems-fix-android-problems/
- License: This work is licensed under CC BY-NC-SA 4.0.