
Reasons for Infinix Smart 7 Stuck on Boot Screen and Ways To Fix Them | Dr.fone
Reasons for Infinix Smart 7 Stuck on Boot Screen and Ways To Fix Them
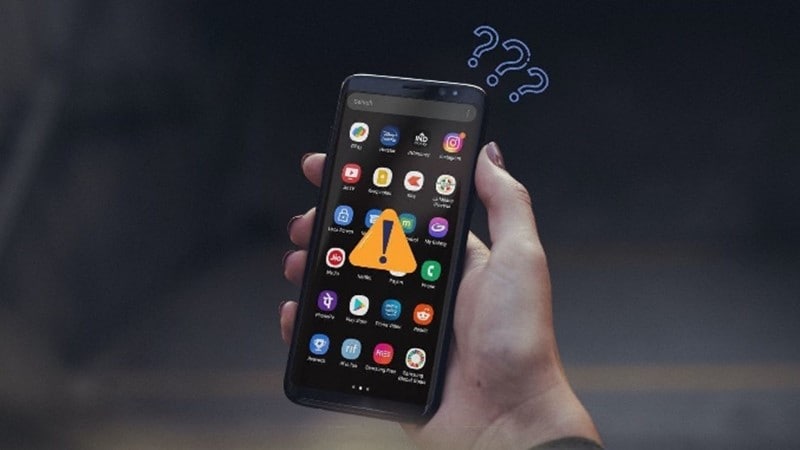
One of the main reasons why people own a phone is for convenience. It will be ironic if that device, supposed to grant convenience, provides problems instead. Some people face this when their Android phone is stuck on the logo page and unable to do anything. As expected, this is common in Android phones and is why people are unhappy with Android phones.
This article will share the possible reasons why your Android phone is stuck on the boot screen. This article will share three possible reasons for this problem and five valuable tips to help fix this issue. If all else fails, we have an application to share and recommend that is guaranteed to solve your problem in no time. Keep on reading to find out more!
Part 1. Why Is Your Infinix Smart 7 Stuck on the Boot Screen?
There are countless reasons why a problem happens, just like why your Android phone is stuck on the logo page. This section sieved out the top 3 reasons why your Android boot screen happens and some tips to overcome it.
1. Changes to the Software
Android is a flexible operating system. It allows users to customize it in any way they desire, which is Android’s beauty. The customizable nature of the operating system allows users to unlock, root, flash, and tinker. However, this flexibility in customization might be a double edge sword. Accidental tampering with the Android system might result in software problems, such as being stuck on the Android boot screen.
Fortunately, this is not a complicated fix. Android accepts different fixes and allows the system to return to how it once was. Even with software issues, the system does not get completely inoperable. The best way to fix changes to the software is to start from the beginning of the process. This might offer the best chance for you to restore your phone to normal.
Although it is fun to customize and change the software, following trusted sources ensures you do not damage your phone. Having an Android phone stuck on the logo page is one of the many examples of the problems that might happen if changes to the software go out of hand.
2. Android Software Updates
Updates are a common cause of Android phones stuck on the logo. It happened when the update did not complete as it should have been. Several reasons for incomplete updates, such as poor internet connection, the connection between computer and phone being lost, a power cut, the phone freezing, and the list go on. When an update is uncompleted, issues such as being stuck at the Android boot screen and many others might occur.
Before an update starts, your mobile device will notify you of the duration of the update. As a tip, set aside an additional 10-15 minutes on top of the update duration to ensure your update is completed successfully. It will be ideal for activating the software update only when there is sufficient power in your phone or keep it charging during the update.
When an update is disrupted or stopped before it completes, the existing Android version will become corrupted while the new software to be updated is incomplete. This means that your Infinix Smart 7 has no system to run on. Always complete your software updates, and you will not have the problem of your Android phone getting stuck on the logo.

3. Malfunctioning Applications
If you noticed that your Android phone is stuck on the logo page only after installing certain apps, there is a high chance that the app is not compatible with the existing apps in your phone or with the Android version. When an app conflicts with the Android system or other apps, this will run into problems with your phone.
This problem typically happens when an app is downloaded from a third-party source, not the official Google Play Store. This app from a third-party source might be malicious or contain a virus. This can cause problems such as being stuck at the Android boot screen.
To overcome this, locate the app that has been giving you issues and remove the app from your phone. Restart your device, and you should be able to have your Infinix Smart 7 functioning properly.
Part 2. 5 Helpful Ways To Fix Android Phones Stuck on Boot Screen
After understanding the common problems on why your Android phone is stuck on the logo page, here are five easy solutions you can try solving at home.
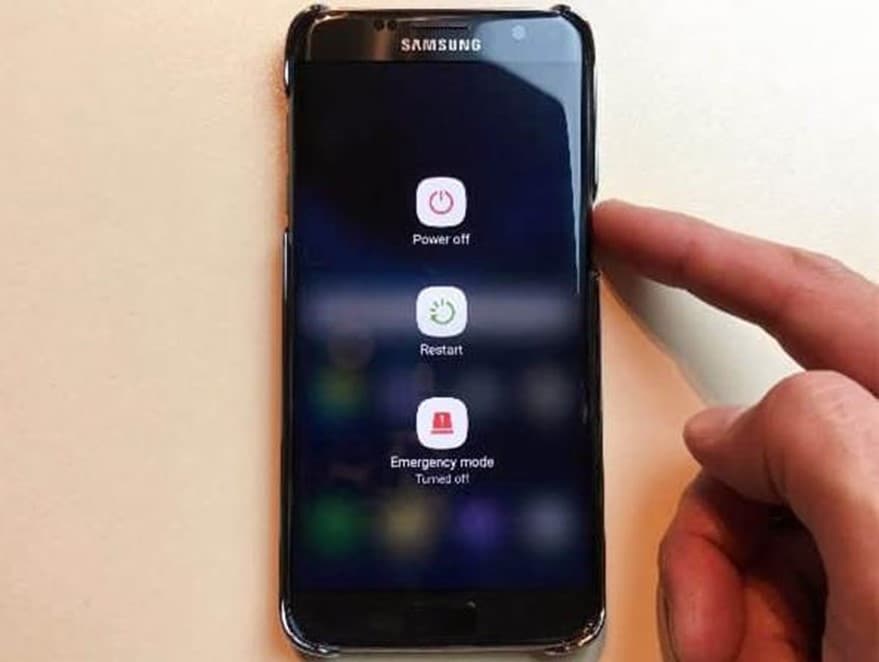
1. Force Reboot
When encountering problems with your Infinix Smart 7, such as being stuck at the Android boot screen, you should first try a forced reboot. This simple yet effective solution could be what you need to solve all your Android problems. It is essential to leave your device turned off for at least a minute or two before turning it back on.
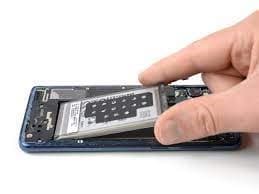
2. Pull Out Battery
Another way to restart your Infinix Smart 7 when it is frozen is to try taking the battery out. Android devices are designed with a removable battery, and sometimes you can resolve the issue easily by removing the battery and replacing it after a couple of seconds. Then, turn on your device again and test to see if your Android phone is stuck on the logo page.
If it works, then the problem is solved. However, some Android devices come with a built-in battery. For these kinds of devices, a stimulated battery pull should be attempted. A simulated battery pull is a set of instructions telling your Infinix Smart 7 to switch off and on again. If your device does not offer the simulated battery pull option, omit this troubleshooting option.
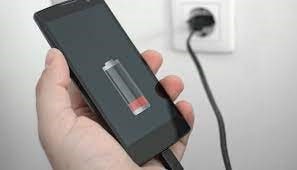
3. Charge Your Device
If your Android phone is stuck on the logo page and not getting past it, no matter how many times you have tried, it may be due to a low battery! As simple as it sounds, plug your device into a power outlet and try restarting your phone. You might be surprised that this simple fix is all it takes to solve your Android problem.
4. Wipe Cache Data
Cache refers to a software or hardware component of an Android device that stores your program and data for reference. This data might result from the daily usage of your device or duplicate data from a different source on the Infinix Smart 7 device. Similar to a computer, if the cache occupies too much space on your device, it might cause your Infinix Smart 7 to become slower and eventually get stuck at the Android boot screen.
Wiping out the cache data from your Infinix Smart 7 could free up more space, allow your device to function faster, and avoid problems such as being stuck at the Android boot screen. Do not worry; wiping the cache data is entirely safe and will not lead to any loss of important data or programs on your phone.
5. Factory Reset
If all the methods above fail, performing a factory rest might be your last option. However, it is important to note that performing a factory reset will erase everything on your phone, including apps, contacts, photos, etc. As a tip, back up all your data from your device before performing a factory reset. That way, you can still retrieve all your precious information after the reset.
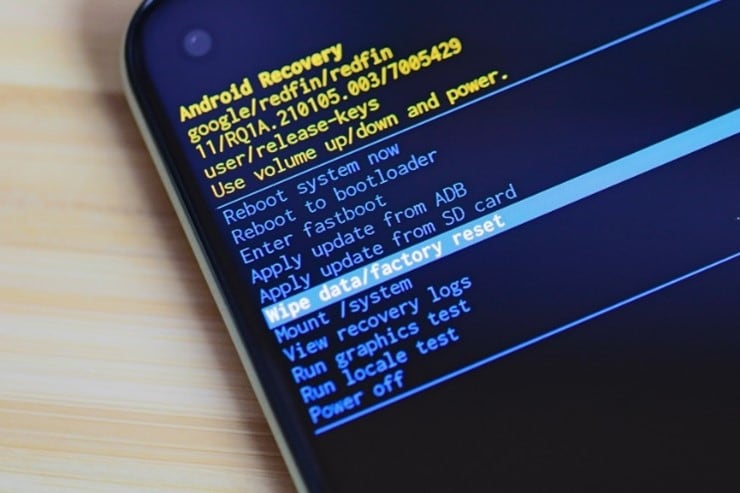
Follow the steps below to perform a factory rest on your Infinix Smart 7:
Step 1: Turn off your phone and press the Power button and Volume Down button at the same time
Step 2: Use the Volume button to scroll the options and highlight Wipe data/factory reset. Press the Power button to begin the factory reset.
Part 3. Bonus Tip: Best App To Solve Android Phone Stuck On Boot Screen
If all the solutions above do not work and you do not want to perform a factory reset on your phone, one option is to use an app called Dr.Fone. It is one of the most effective phone recovery solutions and can help to bring your Infinix Smart 7 back to a state like it was brand new. Being stuck on the Android boot screen will be a problem of the past.

Refer to the tutorial below to solve your Android phone is stuck on the logo page issue.
Step 1: Download and install Dr.Fone – System Repair (Android) on your computer. Open the application and connect your Infinix Smart 7 to the computer.
Step 2: Select the issue you face on the next page. If you use a Infinix Smart 7 phone, select Stuck at Infinix Smart 7 Logo. Alternatively, you can click on Black Screen or Stuck in Boot Loop.

Step 3: Input the Brand, Name, Model, Country, and Carrier of your phone and click on Next.

Step 4: Follow the instructions provided on the page and wait for the system repair to finish. After which, click on Done to complete the process.
 safe & secure
Conclusion
This article summarizes some possible reasons your Android phone is stuck on the logo page. Five useful strategies were shared to easily overcome your Infinix Smart 7 being stuck in the boot. However, if all the above methods do not work, we recommend trying the Dr.Fone-System Repair.
Dr.Fone-System Repair repairs the operating system issues and fixes the problem with your Infinix Smart 7. Once you power on your Infinix Smart 7 again, you can rest assured that it will be like new.
[8 Quick Fixes] Unfortunately, Snapchat has Stopped on Infinix Smart 7
Have you ever been deep in conversation with a loved one or friend, taking advantage of all the funny filters and games Snapchat has to offer when you’ve suddenly been presented with the ‘Unfortunately, Snapchat has Stopped’ error code? This is usually followed by the app crashing back to the main menu.
If so, don’t worry; you’re not alone. Snapchat crashing in this way is nothing new, but it can be incredibly annoying when it keeps happening and stops you from enjoying the conversations you care about.
Fortunately, there are plenty of solutions out there to help you out and get the app working again as it should do. Today, we’re going to explore them all to help you get back to what you were doing before and as though there was never a problem.
Part 1. Install Snapchat again from Google Play Store

One of the best ways to resolve the Snapchat crashing problem or Snap Map not working issue is to delete the app and reinstall it again. When you’re using your phone, there is data continually flowing around and data being sent here, there, and everywhere.
During these processes, bugs can occur, and if they can’t sort themselves out, the best thing to do is to reset your app and start from a fresh installation. Here’s how to do it.
Step 1: Hold down the Snapchat app from your main menu and press the ‘x’ button to uninstall the app.
Step 2: Open the Google App Store from your device and search ‘Snapchat’ in the search bar. Find the official app page and download the app onto your device.
Step 3: The app will automatically install itself once downloaded. Open the app, sign in to your account using your log-in details, and you should be able to use the app like normal.
Part 2. Check for new Snapchat Updates

Hand in hand with the problem above, sometimes a bug can restrict Snapchat from working, or perhaps your personal update settings. If you receive a Snapchat from someone with an upgraded version, this can crash your app.
Here’s how to make sure you’re running the latest version of Snapchat is Snapchat isn’t responding.
- Launch the Play Store and navigate to the My Apps and Games page
- Tap the Update button
- The app will now automatically update to the latest version
Part 3. Wipe the cache of Snapchat
If you have a lot of data in your Snapchat cache, this can cause the app to become overloaded in which you’ll need to clear it to start again and refresh the app. This is a common problem that can cause Snapchat has stopped working error.
Here’s how to fix it.
Open the Snapchat app and tap the Profile icon on the top left-hand side of your screen

Tap the Settings gear icon on the top right
Scroll down the Settings menu and tap the Clear Cache option
Here, you can choose to Clear All, but you can select individual areas if you prefer
Tap the Confirm option to clear your cache preference completely


Part 4. Fix the system issues that caused Snapchat stopping
If you’re experiencing the Snapchat crashing on Android often, or you’re experiencing similar errors with other apps, this can be an indication that there’s something wrong with your Android operating system.
The best way to fix this is to repair your device using the software known as Dr.Fone - System Repair (Android). This is a powerful repair system that can completely recover your device from any errors, including the Snapchat keeps crashing error.
Dr.Fone - System Repair (Android)
Dedicated repair tool to fix Snapchat crashing on Android.
- Recover your device from any problem, including black screen or unresponsive screen.
- Supports over 1000+ unique Android devices, models, and brands.
- Trusted by over 50+ million customers around the world.
- Can fully repair faults with your Infinix Smart 7’s firmware in a few simple steps.
- One of the most user-friendly applications in the world.
3,889,035 people have downloaded it
To help you make the most of this Android repair software and to fix your Snapchat not responding error, here’s a step-by-step guide on how to use it.
Step 1: Download the Dr.Fone - System Repair (Android) software to your computer. Install the software to your Mac or Windows computer by following the onscreen instructions.
Once completed, open the software, so you’re on the main menu.
Step 2: From the main menu, click the System Repair option, followed by the Android option. Of course, if you have an iOS device you want to repair in the future, the option is there if you want it. Also, connect your Infinix Smart 7 to your computer using the USB cable.
Step 3: Confirm details.
On the next screen, use the drop-down menus to confirm the model, brand, operating system, and carrier of your device. Click Next to confirm the details are correct.

Step 4: You’ll now need to put your phone into Download Mode, sometimes referred to as Recovery Mode. For this, you can follow the onscreen instructions. Make sure your device stays connected to your computer throughout this process.
The method will slightly differ depending on whether your device has a home button, so make sure you follow the right instructions for your individual device.

Step 5: Once in Download Mode, the software will now download and install a fresh version of your Infinix Smart 7’s operating system. This can take some time, so make sure your device stays connected, and your computer stays on and doesn’t shut down.

Step 6: That’s it! Once you see the screen saying your device has been repaired, you’ll be able to close the Dr.Fone - System Repair (Android) software, disconnect your phone, and can start using Snapchat as normal without the Snapchat not responding error coming up!

safe & secure
Part 5. Check for the Android update

Similar to some of the other solutions we’ve listed above, if you’re using an outdated version of the Android operating system, but the latest version of Snapchat is coded to the most recent, this can be a cause for the Snapchat crashing on Android problem to occur.
Fortunately, it’s easy to check to make sure you’re running the latest version of Android and to download and install the update if you need it. Here’s how, which will help to sort out your Snapchat keeps crashing Android problems.
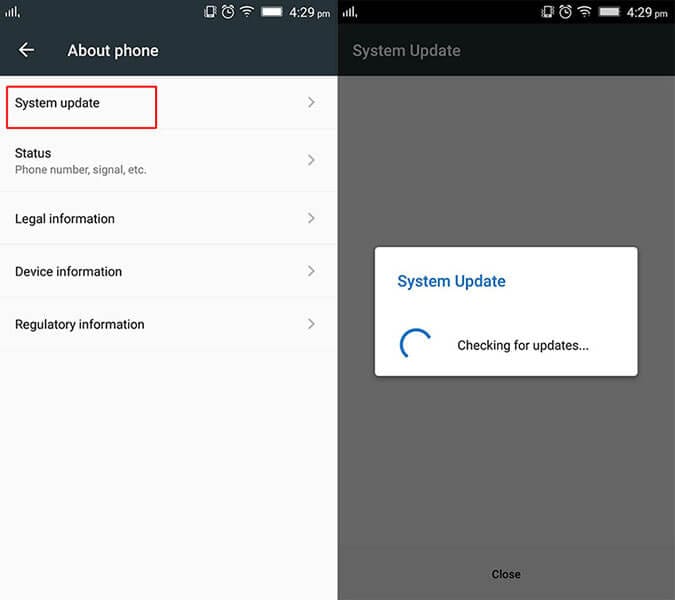
Step 1: Open the Settings menu on your Infinix Smart 7 and select the About Phone option.
Step 2: Tap the ‘Check for Updates’ option. If an update is available, you’ll then have the option to Install Now or Install Overnight. If no update is available, you’ll see a notification stating your device is up to date and no action is needed.
Part 6. Connect to another Wi-Fi
In some cases, you may be trying to connect to a Wi-Fi network that’s not very stable. This may keep cutting the connection to your device, which in turn is causing Snapchat to crash on Android.
To resolve this, you can simply try connecting to another Wi-Fi network or a data plan to see whether this is the problem. If so, changing network and then using the Snapchat app should stop any error messages from occurring.
Step 1: Open the Settings menu on your Infinix Smart 7, followed by the Wi-Fi option.

Step 2: Tap the new Wi-Fi network you’re currently connected to, and then tap the ‘Forget’ option, to stop your phone connecting to it.

Step 3: Now tap the new Wi-Fi network you want to connect to. Insert the Wi-Fi security code and connect. Now try reopening and using the Snapchat to see if you can use it.

Part 7. Stop using the custom ROM

If you’re running a custom Android ROM on your device, with some versions of the ROM and some apps, you’re going to experience errors simply because of the way the apps and the ROMs are coded and designed.
Unfortunately, there’s no easy fix to this, and if you want to continue using the app, you’ll need to reflash your Infinix Smart 7 back to its original firmware, and then wait until the ROM developers update the ROM to be compatible with social apps like Snapchat.
However, this reflashing process is simple thanks to the Dr.Fone - System Repair (Android) software that we listed above. To follow the detailed step-by-step guide, follow the steps on Part 4 of this article, or follow the quick guide instructions below.
- Download and install the Dr.Fone - System Repair (Android) software to your computer
- Connect your Infinix Smart 7 to your Windows computer using the USB cable
- Open the software and click the Repair option.
- Select the Android device repair option
- Make sure your carrier and device information are correct
- Put your device into Download Mode by following the onscreen instructions
- Allow the software to repair your Infinix Smart 7 automatically
Part 8. Reset the factory settings of your Android

One of the last resorts you can take is factory resetting your Infinix Smart 7 back to its original settings. From the day you first started using your device, you’ve been using the system and downloading files and apps, and over time this increases the chances of creating a bug.
However, by resetting your device to factory settings, you can reset these bugs and get your apps and device working again free from the Unfortunately, Snapchat has stopped error message. Here’s how to factory reset your device.
Make sure you back up your personal files from your device first like your photos and music files because factory resetting your device will clear your device’s memory.
Step 1: Tap the Settings menu on your device and click the Backup and Reset option.
Step 2: Click the Reset Phone option. That’s it! The phone will take several minutes to complete the process, after which your phone will be reset to its original state.
7 Solutions to Fix Chrome Crashes or Won’t Open on Infinix Smart 7
Google Chrome is one of the most popular web browsers in the world. It is fast, secure, and easy to use. However, like any other app, it is not free from errors. Many users have reported that Chrome crashes or won’t open on their Infinix Smart 7. If you are also facing this issue, then you have come to the right place. In this article, we will discuss the reasons behind this problem and provide you with 7 solutions to fix Chrome crashes or won’t open on Infinix Smart 7.
Being one of the widely used browsers, Chrome is always our rescue whenever vital information is our need. Imagine, you launched Chrome for some urgent work and all of a sudden, got “Unfortunately Chrome has stopped” error. You re-opened it thinking about proper functioning of it now but to no avail. Does this situation sound familiar? Are you in a same problem as well? Fret not! We will discuss in this article why your Chrome is crashing on Android and the potential solutions to do away with the problem. Please read the article attentively and know what helps you best.
Part 1: Too many tabs opened
One of the main reasons why Chrome keeps crashing could be the multiple opened tabs. If you keep open the tabs, it may slow down the performance of Chrome and the app will use RAM. As a result, it will obviously get stopped midway. Therefore, we suggest you to close the tabs which are opened. And once you do that, exit the app and then launch it again.
Part 2: Too much memory used
When Chrome or any other app keeps running on the background, issues like “Unfortunately Chrome has stopped” are likely to occur. Moreover, the opened apps will eat the memory of your device. Hence, as the next solution, it is suggested that the Chrome should be closed by force quitting and then you need to try to launch it again to work. See if it works or still Chrome is not responding.
1. Simply tap on the Home button twice to get on the recent apps screen. Please note that the button may vary to reach the screen. Please check once and move accordingly.
2. Now simply swipe the app up/left/right (according to the Infinix Smart 7 device).
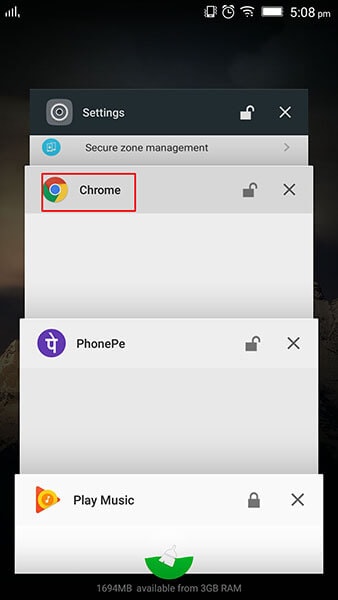
3. The app will be force quit now. You can then start it again to check if thing get back to normal.
Part 3: Chrome cache overflowing
While using any app for long, the temporary files for those gets collected in the form of cache. And when cache is not getting cleared, one may face the freezing, crashing or sluggish apps. And this could also be the cause why your Chrome keeps stopping. Hence, the following steps will show you how to clear cache and make Chrome work as before.
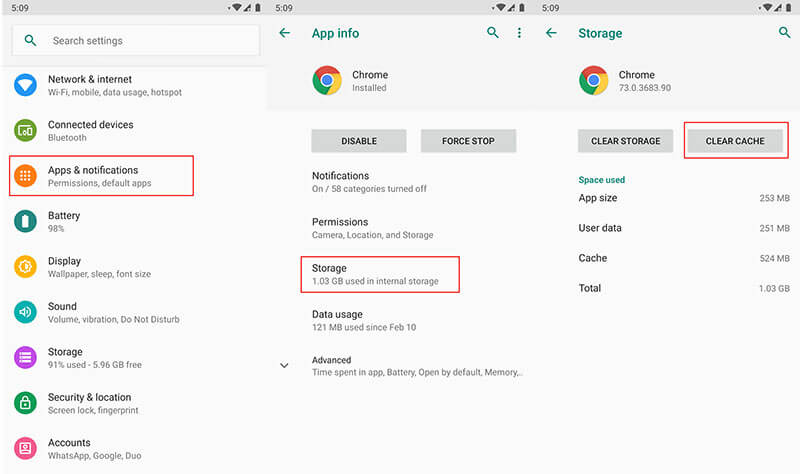
1. Open “Settings” and go to “Apps & Notifications”.
2. Look for “Chrome” and tap on it.
3. Go to “Storage” and click on “Clear Cache”.
Part 4: Exclude the issue of website itself
Most probably Chrome is not able to support the website you are trying to access. We doubt if the particular website you are making use of is the culprit and making Chrome keeps stopping. In such case, we would like to recommend you to make use of another browser and try to access the website from there. See if this works or not. If now, please follow the next solution.
Part 5: Android firmware corruption
Another reason why your Chrome has stopped could be the corrupted software. You can’t expect anything normal when your firmware corruption occurs and so in the case of Chrome. If this is the case, the re-flashing the stock ROM is the most recommended solution. And the best that can help you in this is none other than Dr.Fone - System Repair (Android) . Within one click, it vows to help users in flashing the ROM without any complications. Read the advantages offered by this tool.
Dr.Fone - System Repair (Android)
Android repair tool to fix crashing Chrome
- It works like a pro no matter what problem your device is stuck with.
- More than 1000 types of Android devices are compatible with this tool.
- Easy to use and holds higher success rate.
- No need for any special technical knowledge to use this
- Offers an incredible interface from which anyone can work with.
3,605,074 people have downloaded it
How to Use Dr.Fone - System Repair (Android) when Chrome is crashing on Android
Step 1: Install the Tool to Begin
Start downloading it from there. Install it once downloading is completed and open the tool. The main screen will show you some tabs. You need to hit on “System Repair” among those.
Step 2: Get Android Device Connected
Now, you need to connect your Infinix Smart 7 with the computer using USB cord. When the Infinix Smart 7 device is connected successfully, click on the “Android Repair” option from the left panel.
Step 3: Enter Details
On the following screen, you need to select the right phone brand, name model and enter career details. Check once to confirm and hit on “Next”.
Step 4: Download Firmware
Now, follow the steps displaying on the screen to enter the DFU mode. When you do this, click on “Next” and the program will download the firmware.
Step 5: Repair the Issue
Once the firmware is downloaded, you will notice that the repairing process will start by the program. Wait until it gets finished and try to start Chrome again and you’ll surely get rid of the problem.

Part 6: File Downloading issue from Chrome
While you were trying to download from internet, the file didn’t download properly or it might get stuck and eventually crashing Chrome occurs. In such instances, many times, uninstalling and installing helps. Therefore, follow the steps below to uninstall and install Chrome and fix Chrome keeps stopping
- Go to “Settings” and tap on “Apps”.
- Select “Chrome” and tap on “Uninstall Updates”.
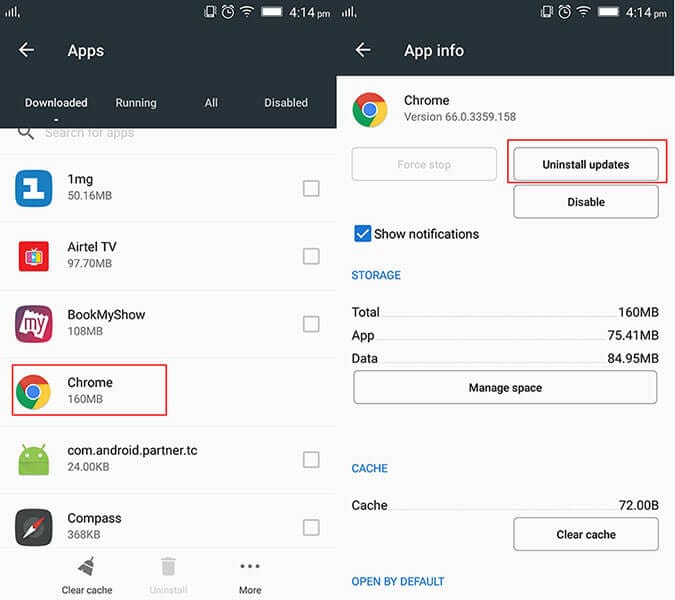
- Now, you need to re-install it from Play Store. From the “My Apps” section, tap on Chrome and update it.
Part 7: Clashes between Chrome and system
Of still you are receiving “Unfortunately Chrome has stopped” pop-up, it might be because of the incompatibility between the Chrome and system. Maybe your device is not updated and therefore is at odds with the Chrome app. So, the last tip that we would like give you is to update your Infinix Smart 7. Following are the steps for it. Follow them and stop the Chrome crashing on Android issue.
- Go to “Settings” and tap on “System”/”About Phone”/”About Device”.
- Now, choose “Software Update”/”System Update” and your device will detect if there is any update present on your device. Proceed accordingly.
Also read:
- [New] In 2024, Creating Captivating Visuals with DIY Filming Methods
- [New] In 2024, From Zero to Hero on Instagram Top 5 Tips with Examples From Elites
- 2024 Approved Mastering Pinterest Videos to MP3s Essential Strategies
- 4 Most-Known Ways to Find Someone on Tinder For Tecno Phantom V Flip by Name | Dr.fone
- Beam-Wise Video Setups Expert Strategies to Shine
- Does find my friends work on Infinix Smart 8 Pro | Dr.fone
- Edit and Send Fake Location on Telegram For your Tecno Pop 8 in 3 Ways | Dr.fone
- How to Quickly Fix Bluetooth Not Working on Oppo Find N3 | Dr.fone
- How to Quickly Fix Bluetooth Not Working on Sony Xperia 5 V | Dr.fone
- How to Resolve OnePlus Nord CE 3 5G Screen Not Working | Dr.fone
- In 2024, How to Migrate Android Data From Honor X7b to New Android Phone? | Dr.fone
- Infinix Zero 30 5G Screen Unresponsive? Heres How to Fix It | Dr.fone
- Samsung Galaxy S23 FE Screen Unresponsive? Heres How to Fix It | Dr.fone
- Simplify Spreadsheets: Boost Your Excel Skills Using ChatGPT
- Unleashing Potential Views Best Keyword Resources Ranked for 2024
- Updated In 2024, The Article Introduces some of the Best Free Online Video Loopers for Windows, Mac and Linux
- Win11 Peace: Halt Unseen Operations
- Title: Reasons for Infinix Smart 7 Stuck on Boot Screen and Ways To Fix Them | Dr.fone
- Author: Abel
- Created at : 2024-10-21 16:31:06
- Updated at : 2024-10-24 17:19:31
- Link: https://fix-guide.techidaily.com/reasons-for-infinix-smart-7-stuck-on-boot-screen-and-ways-to-fix-them-drfone-by-drfone-fix-android-problems-fix-android-problems/
- License: This work is licensed under CC BY-NC-SA 4.0.