
Reasons for Nokia G42 5G Stuck on Startup Screen and Ways To Fix Them | Dr.fone
Reasons for Nokia G42 5G Stuck on Startup Screen and Ways To Fix Them
There are many reasons why phones get stuck on the boot screen. It could be something as simple as physical damage or more complicated related to software problems. Having your phone stuck on the logo screen, or boot screen is annoying, and it is no surprise that people will find ways to fix this issue when encountered.
This article will share the possible reasons why your phone is stuck on the boot screen. This article will share three possible reasons for this problem and three valuable tips to help fix this issue. If all else fails, there is an application that is recommended and is sure to solve your issue in no time. Keep on reading to find out more!
It is not uncommon for phones to be stuck on the startup screen, but finding out why this happens is tricky. This section identified some of the top reasons your cellphone could have gotten stuck on the startup screen.
Physical Damage to the Phone
If you accidentally dropped your phone or knocked it on a hard surface, you could have damaged the internal hardware of your phone. This could affect your phone’s ability to reboot and result in your phone being stuck on the boot screen.
If you are 100% certain that your phone has gone through physical damage, you should seek professional help to have your phone repaired or checked. It is advised not to fix this problem yourself as your phone’s internal parts are complicated and delicate. Look for an official phone repair store and get your phone fixed for issues like your phone getting stuck on the logo.
Liquid Damage
It is not common for your phone to expose to water. Rain or water splashes are unavoidable; sometimes, your phone gets wet. Little exposure to water on the surfaces of your phone is fine. However, if you fall into a pool with your phone or drop it in a puddle of water, your phone will likely suffer from liquid damage.
Even the tiniest water droplet that seeped into your phone could damage the internal hardware of your device, often leaving you with your phone stuck on the boot screen. The first thing to do when you accidentally submerge your phone in the water is to check if the water has damaged your phone.
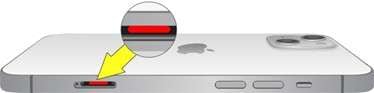
For iPhone users, look for the water damage indicator. If you see that it has turned from white to red, it has suffered from water damage. You have two options if your phone has suffered liquid damage. One is dismantling your phone and letting it dry for at least 48 hours. Two is bringing your phone to a repair shop to fix it.
Software Issues
Software issues are probably the most common reason your phone is stuck on the logo screen. Eight times out of ten, software issues are either caused by a failed software update, using an older version of the operating system, or having a jailbroken phone. When the software does not successfully update, the phone will have no operating system, as the old system was erased before the new software was installed.
The older operating system is also not desired as your phone typically will send periodic updates to make sure your phone is up-to-date and free from bugs. Running applications on an older operating system might lead to issues like the phone being stuck on the boot screen or the logo. Hence, updating your phone to the latest software version would be better.
Part 2. 3 Helpful Ways To Fix Phones Stuck on Boot Screen
After understanding the common problems on why your phone is stuck on the startup screen page, here are three easy solutions to try solving yourself at home.
Hard reboot your phone
To quickly fix any of your phone issues, especially when stuck on the startup screen, perform a hard reboot. The term hard reboot means turning your device off and on again. You might think this is a simple option, but this is a tried and tested method that might work on a minor glitch that results in your smartphone getting stuck on the startup screen page.
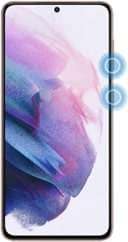
Here is an example of performing a hard reboot for an Android phone such as Nokia G42 5G. Preess and hold the Power and Volume Down buttons simultaneously for more than 7 seconds to perform the hard reboot.
Put your phone in recovery mode
If a hard reboot does not work, a natural next step is to try going into recovery mode. The recovery mode is specially designed to solve any software-related issues. It is important to note that entering recovery mode will delete all your corrupted files and replace them with a functional operating system. Hence, back up all your files to ensure you retain all your information.
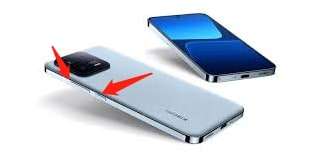
Here is a step-by-step process for putting your Nokia G42 5G or Redmi smartphone in recovery mode.
Step 1: Tap and press the Power button to switch off your Nokia G42 5G/Redmi phone
Step 2:Hold the Volume Up and the Power buttons at the same time, then release the keys when the Main menu of Recovery mode appears on the screen.
Step 3: You can use the volumes buttons to navigate up and down and press the Power key to confirm the selection.
Factory Reset
If you do not want to attempt recovery mode, you can try resolving the issue of your phone being stuck on the startup screen through Factory Reset. Factory Reset, also called Hard Reset, erases all information and data on your device. As a result, it will return to the settings and recover the data it used to have when leaving the factory.
Here is an example of putting your Samsang smartphone into the Factory Reset DFU mode.
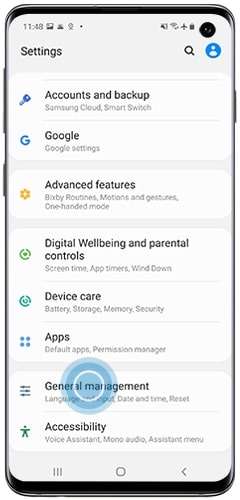
Step 1: Open the Settings application on your phone and tap General Management.
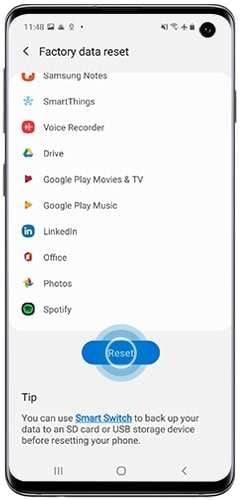
Step 2: Go to Reset > Factory data reset.
Step 3: Swipe to and tap Reset.
Note: Before carrying out a factory reset, you need to input the password of your Nokia G42 5G Account.
Bonus Tip: Best App To Solve Phone Stuck on Boot Screen
If all the solutions above do not work and you do not want to perform a factory reset on your phone, one option is to use an application called Wondershare Dr.Fone. It is one of the most effective phone recovery solutions and can help to bring your phone back to a state like it was brand new. Being stuck on the startup screen page will be a problem of the past.

The following steps will show you how to use Dr.Fone to perform system repair on your phone.
Step 1: To the Dr.Fone application using the link above and click on System Repair.
Step 2: Depending on the Nokia G42 5G device you are using, choose either Android or iPhone.
Step 3: In the next window, select the issue you are facing and click Start.
Step 4: Choose the corresponding Brand, Name, Model, Country, and Carrier from each drop-down menu and click Next.
Tip: Make sure the information you input is accurate, as it will affect the system repair if the information is inaccurate.

Step 5: Connect your device to your computer and follow the instructions on the screen to enter Download mode. Click on Next to proceed to the next step.
Step 6: Wait for the process to complete, and a new firmware will be updated on your device. Power on your phone and check if the issue still exists.

Frequently Asked Questions
The following are interesting and frequently asked questions about how to solve boot loops.
- What is a boot loop?
A boot loop describes a process when Your Nokia G42 5G stays stuck in a circle of rebooting. When your phone is stuck on the startup screen, one of the strategies you will try is to restart your device. However, when your phone gets stuck in a boot loop, it is your device’s way of trying to turn it off and on again to fix the issue.
Since there is an issue with the booting process, it will keep running into the same error repeatedly, calling the boot loop. When trapped in a boot loop, your device will keep turning off and on. Most boot loop issues are software-related, such as a wrong system update.
- How do you fix a boot loop?
When stuck in a boot loop, there are different troubleshooting methods for other devices. For Android phones, force your phone into its Recovery mode; from there, you can restore a previous backup. This backup could be from when the boot loop did not exist, so recovery to that backup could quickly solve the problem.
For iPhones, it is the same concept as the Android, restore your phone to the previous backup. You can use iTunes to restore a previously stored backup on your computer.
- How to prevent a boot loop?
A boot loop typically starts when there is a change to your system before a reboot cycle. Most issues are software-related, such as having to do a system upgrade gone wrong or a problem that doesn’t mesh. One way to prevent this is to perform a software or system upgrade constantly. Make your phone juiced to prevent it from turning off mid-way when updating.
 safe & secure
3,405,439 people have downloaded it
Conclusion
This article summarizes some of the possible reasons why your phone is stuck on the boot screen. It demonstrated three useful strategies to overcome your phone stuck in the boot with ease. However, if all the above methods do not work, why not try Dr.Fone-System Repair?
Dr.Fone-System Repair repairs the operating system issues and fixes the issue with your phone. Once you power on your phone again, you can rest assured that it will be like new.
Ways to Unbrick Your Android Device: Various Ways for Recovery
When your Nokia G42 5G becomes unresponsive or frozen after mistakenly flashing a ROM or rooting, you are informed that the phone has been bricked. The most terrifying aspect will not just be gadget loss, but also data erasure. However, what exactly is a bricked phone, and, more importantly, how do you fix a bricked Android phone?
This article will explain what a bricked android phone is, why an Android phone becomes bricked, how to unbrick an Android phone without losing data and a third-party application you can use.
Part 1. Causes of Bricked Phones
In everyday settings, our mobile devices have become our greatest friends, therefore breaking your phone is the last thing you want to do. There are different reasons why devices brick, and we must be familiar with them in order to comprehend the various techniques to repair bricked devices.
Here are some common reasons why your Nokia G42 5G is bricked:
- **Flashing Stock/Custom ROM:**It is possible that you installed an incompatible ROM in the Android phone, that the phone shuts off during the process, or that you have performed other errors that cause your phone to restart indefinitely or to become stuck at the starting screen.
- **Rooting an Android device:**You are unable to effectively root the Nokia G42 5G device.
- **Android firmware is being updated:**If the phone is interrupted when updating the Android firmware, it will be bricked.
- **Installing harmful applications:**You installed harmful programs on your Nokia G42 5G, or the phone was infected with a virus.
Part 2. How to Fix a Bricked Phone
The first step is to establish how badly your device is bricked. In most cases, you will be working with soft bricks that are pretty simple to repair. If your phone is stuck in a boot loop or enters recovery mode every time you turn it on, you may have a soft brick.
To repair bricked Android phones and tablets, you must first thoroughly examine the Nokia G42 5G device’s state. Before you begin troubleshooting, determine the sort of bricking that your phone is experiencing. However, there is no specific software to unbrick your Nokia G42 5G; you may need to learn the complexities of this issue or hire a professional to do it for you.
 safe & secure
Here are some simple methods for repairing bricked Android devices:
Method 1. Reboot the Phone in Safe Mode
Trying to reboot your android device in safe mode is the first and easiest thing you should try if your phone is bricked. Here’s how to do it:
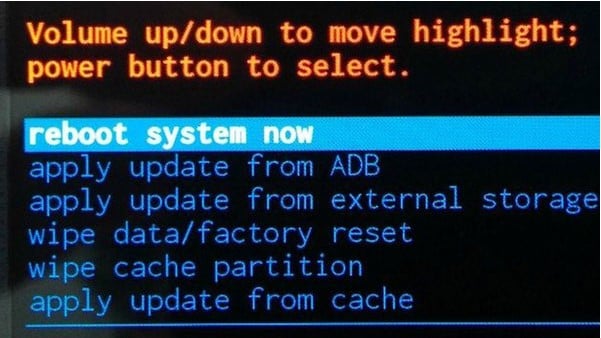
- Step 1: Turn off your smartphone and press the Volume Up + Power button to enter recovery mode. Then, using the volume controls, navigate the menu and select Reboot system now.
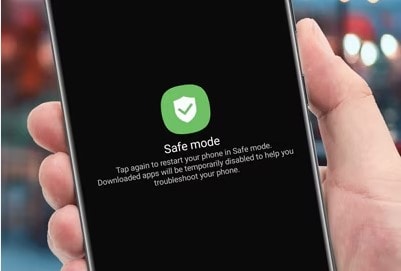
- Step 2: Select the highlighted option by pressing the Power button. After that, wait for your device to reset normally.
- Note: The steps for booting into recovery mode may change based on the manufacturer of your device. For further information, go to the user manual for your phone or tablet.
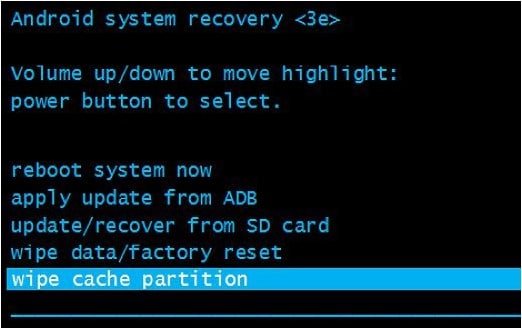
Method 2. Wipe the Cache Partition
This is the first indication that a user’s phone has gone bricked. The phone turned on automatically, however it became stuck or frozen on the logo screen. The issue might be caused by the undeleting of data and cache, which prevents the phone from displaying the home screen.
This issue, however, may be resolved by wiping the data and cache partitions in recovery mode. You must do the following to do this:
- Step 1: Turn off your smartphone and enter recovery mode by pressing the Power and Volume Down buttons simultaneously. Different devices have various approaches for entering recovery mode, so you may perform better.
- Step 2: After entering recovery mode, you should see the screen below. Remember to pick Advanced and then “Wipe Dalvik Cache” if your device is under Clockwork Mod recovery. Return to the main screen and select “Wipe Cache Partition” once more.
- Step 3: Finally, on your smartphone, choose the Reboot system immediately.
Method 3. Perform a Factory Reset
A factory reset can undo the alterations made to your device that resulted in the brick phone, but you will lose everything you have downloaded and installed in the process. Here’s how to restore a bricked Android phone to factory settings:
- Step 1: Boot your device into recovery mode (turn off your device, then press power button + volume up button).
- Step 2: Select “Wipe Data/“Factory Reset” then confirm the action. When the process is done, you’ll be returned to the recovery mode menu.
- Step 3: Select “Reboot System Now” to restart your device.
Method 4. Flash a Custom ROM
If you boot your phone directly into recovery mode, there’s a problem with the ROM you loaded. Then simply flash the following custom ROM on your phone:
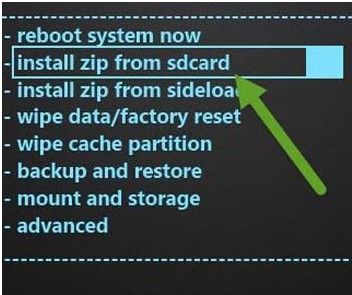
- Step 1: Save the required ROM (in ZIP format) to an SD card. The SD card should then be inserted into your Nokia G42 5G.
- Step 2: Click the “Install zip from sdcard” button. Then, select the ZIP file that contains the ROM. Finally, click the “reboot system now” button.
Method 5. Using Wondershare Dr.Fone
Wondershare Dr.Fone - Data Recovery is the first data recovery solution for any damaged Android smartphone in the globe. It offers one of the greatest recovery rates and can recover a variety of information like images, videos, contacts, messages, and call logs. The program is most effective with Nokia G42 5G smartphones.
While it is not an Android unbrick tool, it is a useful tool for retrieving data when your Nokia G42 5G becomes bricked. It is quite easy to use:
- Step 1: Launch Wondershare Dr.Fone and select “Data Recovery” > “Recover Android Data” from the menu. Then, select “****Recover from Broken Phone”.

- Step 2: Choose the file types you wish to recover. Click “Next” and then select the type of damage your phone is experiencing. Select “Touch screen not responsive, or cannot access the phone” or “Black/broken screen”.

- Step 3: Use the recovery wizard to enter your Android smartphone into Download Mode. Connect your Android handset to the computer after following the instructions to begin automatically analyzing your device.

- Step 4: The program will provide a list of all recoverable files, organized by file type. To preview the file, highlight it. Choose the files you wish to recover and then click “Recover” to save all the data you want to restore.

 safe & secure
Part 3. How to Prevent Bricking Your Phone
How to prevent a device from “bricking” itself and how to repair it if it does The delay is set by the MCU, but it should be long enough to allow the debug adapter to connect to the Nokia G42 5G device and halt it before the Nokia G42 5G device disables itself.
Here are some things to remember to prevent your device from bricking:
- Avoiding unofficial firmware updates: Installing unapproved OS firmware on your phone will most certainly violate any manufacturer’s warranty you have on it. Read the installation instructions for your unique phone model thoroughly and then carefully follow them, taking time and patience.
- **Being cautious when rooting or jail breaking:**Rooting and Jail breaking disables parts of the operating system’s built-in security mechanisms, which are part of what makes the operating system safe, and your data protected from exposure or damage.
- **Install an antivirus application on your device:**Mobile devices increase the danger of data leaks and breaches. As a result, antiviral software is beneficial on mobile phones. Mobile Device Management is an excellent choice for virus protection on your mobile device.
- Backup your phone data regularly: Backing up your phone safeguards your data in the event that you lose it, it is stolen, or it no longer works. When it comes time to replace your phone, having a backup makes it simple to restore your data to the new device. Furthermore, backing up your phone allows you to organize your data so that it is easier to access.
- Avoid installing apps from untrusted sources: Apps installed from unauthorized sources make your device and personal data more exposed to dangers such as Ransomware. So you should be wary of where you download applications.
Conclusion
It is certainly upsetting when your gadget bricks, but you may attempt the solutions listed above to resolve the issue. Meanwhile, if you want to solve the problem quickly and easily, you can try Wondershare Dr.Fone. It can not only help you repair your Android smartphone, but it can also help you extract data from a bricked device, recover data, and many more Android device solutions!
safe & secure
App Won’t Open on Your Nokia G42 5G? Here Are All Fixes
It is not a very rare phenomenon where an App won’t open, crash abruptly or face trouble while launching on an Android device. Many Android phone users also add to the fact that whenever they try to launch an App, it keeps loading but does not run smoothly, as it should in normal circumstances.
In such a scenario it is obvious for Android Smartphone users to look for possible solutions for such a random error so that their App/Apps load and work normally.
Many people are also interested in knowing about the causes behind why an App won’t open or why multiple/all Apps won’t open. This article will answer your query about why won’t my App open on an Android phone by listing a few probable causes for the problem.
Here are all the fixes you need if an App won’t open on your Nokia G42 5G. Read on to find out all about why Apps won’t open on your Nokia G42 5G and solutions to overcome such a problem.
Part 1: Possible reasons for Apps won’t open
If you are an Android phone user and face a problem while trying to open an App on your device, you will ask yourself “Why won’t my App open?”. To answer your question and explain to you why an App won’t open on your phone, here are some probable and simple reasons to make you understand the real problem.
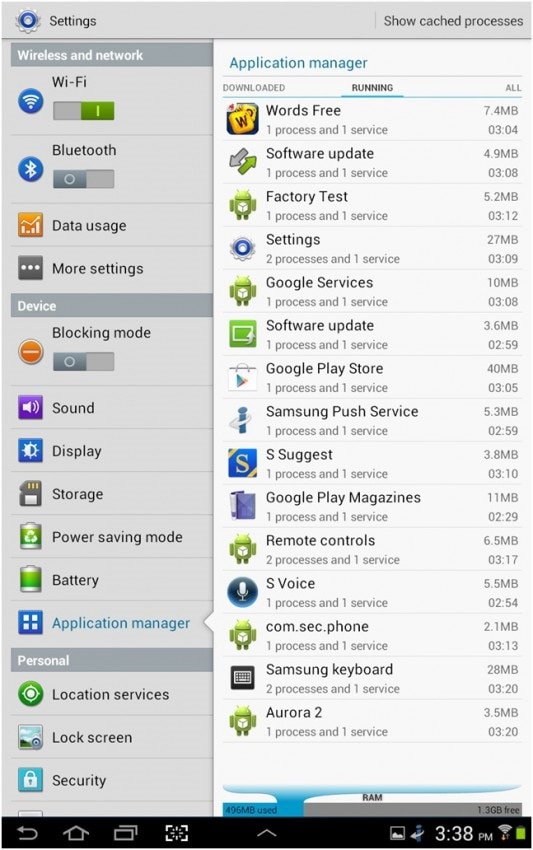
It is appropriate to tag our generation as smartphone addicts because we use smartphones for anything and everything. All our important information, such as photos, videos, audio files, documents, notes, calendars, emails, etc, are stored on our phones. This causes a major storage/space problem in our phones and a shortage of storage space is one of the main reasons why an App won’t open or why all Apps won’t open on your Nokia G42 5G. To see how much of your storage space is occupied by Apps, go to “Settings” and select “Application Manager”.

Another possible reason for Apps to crash or why an App won’t open is a possible data crash. This may occur due to an unstable internet connection or various other background software interruptions.
The causes for the problem to occur are many and no specific reason can be established as the only reason why Apps won’t open on your Nokia G42 5G. There are a lot of speculations about why such a problem occurs and persists, but it is more important to focus on how to fix if a particular App won’t open or if all Apps won’t open on Android.
Part 2: Quickest solution to fix apps won’t open on Android
You have already understood ‘why won’t your app open?’ at the start of this article. But, you are not happy with the traditional solutions to fix the app won’t open issue.
Well, in such a case Dr.Fone - System Repair (Android) can prove to be your savior. It resolves failed Android system update issues, crashing apps, and black screen of death. It can also get an unresponsive or bricked Android device or boot loop stuck device fixed with one click.
Dr.Fone - System Repair (Android)
Why won’t my app open? The quick fix is here!
- This is the first software in the industry that repairs Android systems.
- All the latest Nokia G42 5G tablets and mobiles are compatible with it.
- With single-click operation, fixing the app won’t open problems is super easy.
- No technical skills are needed to use the tool.
- The high success rate for Nokia G42 5G Android device issue fixing.
3981454 people have downloaded it
Here comes the detailed guide to fix apps won’t open problem using Dr.Fone - System Repair (Android)
Note: When you are up to fixing apps won’t open issues, make sure to back up your Nokia G42 5G beforehand. These processes might lead to data erasing and you don’t want to suffer data loss this way.
Phase 1: Preparation and connection of Android device
Step 1: Post-installation and launch of Dr.Fone on your computer, you got to press the ‘System Repair’ tab. Connect the Android device later.
Step 2: Hit the ‘Android Repair’ located on the left panel followed by tapping the ‘Start’ button.

Step 3: Feed your Nokia G42 5G details under the Nokia G42 5G device information screen. Please check the warning and press the ‘Next’ button right after that.

Phase 2: Repairing your Nokia G42 5G under ‘Download’ mode
Step 1: You got to boot the Android device under Download mode, as it’s important. The steps for that are as follows –
- Android devise with a ‘Home’ button – Press together ‘Volume Down’, ‘Home’, and ‘Power’ buttons together for 5 to 10 seconds after turning off the Nokia G42 5G device. Release them afterward and click the ‘Volume Up’ button to get into the ‘Download’ mode.

- When there is no ‘Home’ button – Turn off the Nokia G42 5G device and then for 5 to 10 seconds, keep the ‘Volume Down’, ‘Bixby’, and ‘Power’ buttons pressed. Tap the ‘Volume Up’ button after releasing all the buttons to enter the ‘Download’ mode.

Step 2: Hitting the ‘Next’ button starts downloading the Android firmware.

Step 3: Once Dr.Fone - System Repair (Android) verifies the downloaded firmware, it begins fixing the app won’t open the issue asap.

Part 3: 3 Common fixes if a particular App won’t open
In this segment, we will discuss the three best ways to help you fix the problem if only a particular App won’t open/launch/ run and takes an indefinite time to load.
1. Update the App
It is always advisable to keep your Android software as well as your Apps up-to-date and you must constantly check for any updates which may be available in the Google Play Store.
Follow the steps given below to update the app which won’t open on your phone:
• Visit Google Play Store on your Nokia G42 5G.
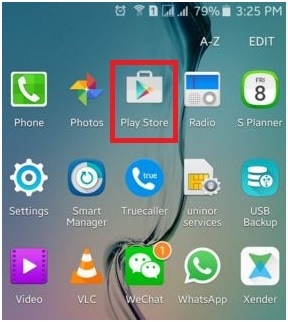
• Now select “My Apps & Games” from the main menu.
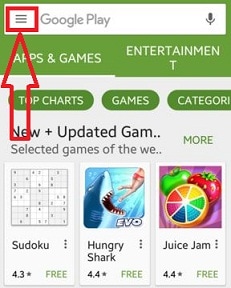
• In this step, you may click on “Update All” to update all Apps for which an update is available or manually select the Apps which you wish to Update.

Once the App is updated, close all Apps and tabs running in the background. Now try to launch the app once again. If it opens, your problem is solved. If not, DO NOT worry as there are more ways to help you.
2. Force Stop the App
Closing the App completely which won’t open on your phone is a good idea. To make sure that no operations are running in the background related to the App, you must “Force Stop” it. Doing this is extremely simple and all you need to do is follow the steps given herein under:
• Visit “Settings” on your phone.
• Click on “Apps” to see a list of all the Apps on your Nokia G42 5G.
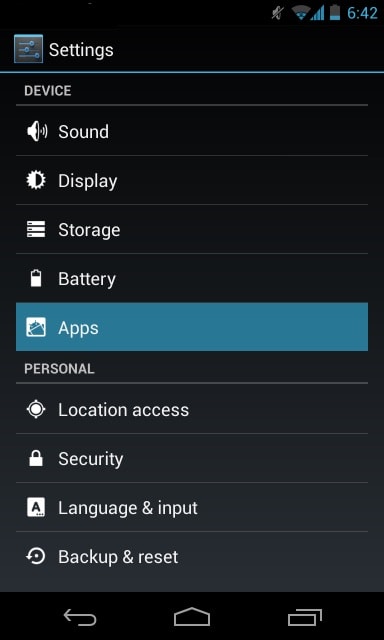
• Select the App which won’t open.
• Now click on “Force Stop” as shown below.
3. Clear App Cache and Data
This method resolves the issue to a great extent by wiping off unnecessary App content from your device.
Carefully follow the step-by-step instructions given below to clear all App cache and data:
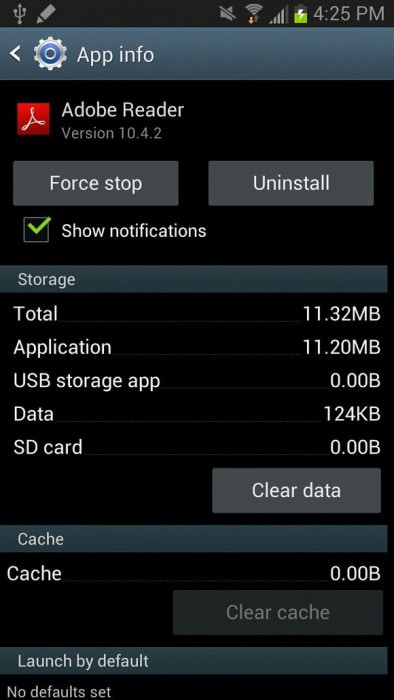
• Visit “Settings” and select “Apps”.
• From the list of Apps that appears, select the App that won’t open.
• Now tap on “Clear Cache” and “Clear data” directly or under “Storage”.

Part 4: 3 Common fix if all Apps won’t open on Android
In this segment, we will discuss solutions to the problem if all your Apps won’t open. They are simple and easy to follow and solve the error in no time.
1. Android updates
Firstly, it is very important to keep your Android software updated at all times as an old Android version might not support new Apps or updated Apps.
To update your software:
• Visit “Settings” and keep going downwards.
• Now select “About Phone”.
• From the options available on the screen, tap on “System Updates”

• In this step, if you are prompted for an update, follow the instruction given and do so.
Updating your Android software solves most of your problems. This method might sound weird but works wonders when it comes to App related issues.
2. Restart the phone
Restarting your Nokia G42 5G to fix an error might sound old school but it gives good results when your Apps won’t open. Restarting your phone is fairly simple. All you need to do is:
• Long press the power button.
• Now click on “Restart”.
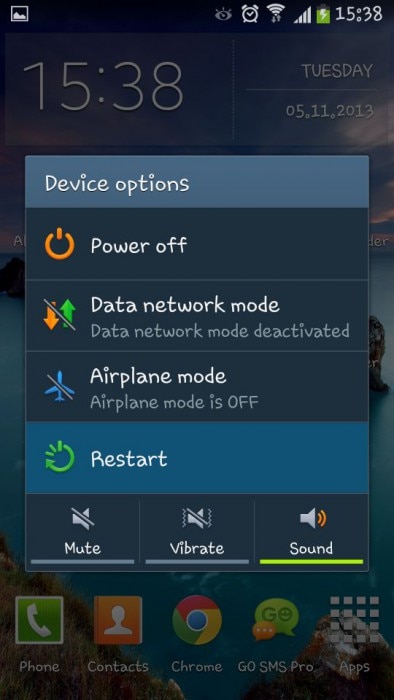
Your phone will automatically restart and once it does, you can try to launch the App. You may also restart your Nokia G42 5G by pressing the power button for about 15-20 seconds.
3. Reset Factory Settings
This method is a little tedious and must be last on your list. Also, make sure you take a backup of all your data and contents stored on your Nokia G42 5G and this solution will completely wipe off your phone making as good as a new smartphone.
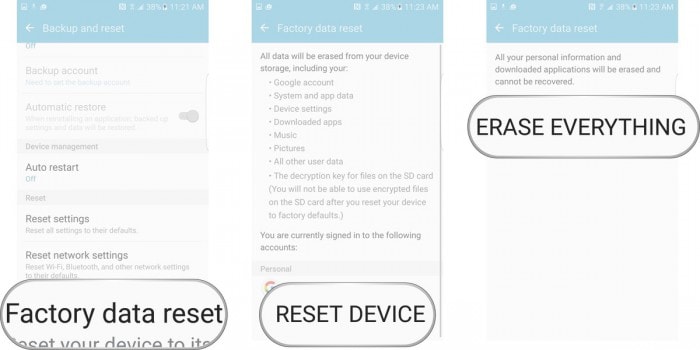
To Factory Reset your Nokia G42 5G, carefully follow the guidelines given below:
• Visit “Settings” to find the “Backup and reset” option as shown in the screenshot below.
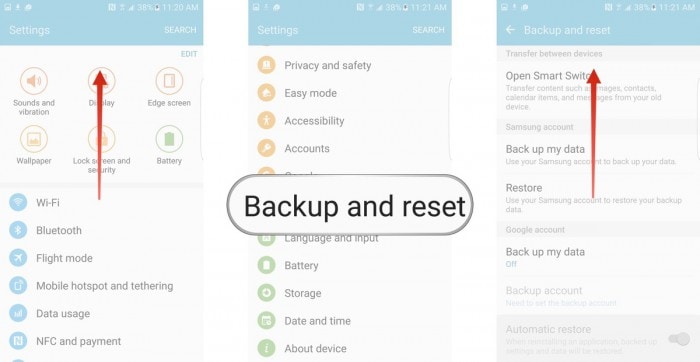
• Now click on “Factory Data Reset”>“Reset Device”>“Erase Everything”
Your phone will now reboot and will be required to set up from scratch.
“Why Won’t my App open” is a question asked by many Android phone users who fear that the problem occurs due to a virus attack or a system failure. However, this is not the case. The reason for the error to the surface is quite minor and can be fixed by you, sitting at home, without resorting to any kind of technical or external assistance. The solutions listed above are easy to understand and not very time-consuming.
So go ahead and try them out now!
Also read:
- [Updated] 2024 Approved Serenity Through Stories A Review of Parent-Driven Narrative Vids
- [Updated] Evolving Scripts in Cinema Today
- [Updated] Strategies for Sustaining Viewer Interest in Online Events
- [Updated] Top-Notch Meme Editing Suite
- [Updated] Unleash Creativity in Videos with Quick Trims on Windows 11
- 2024 Approved Snapping the Screen - Top 8 Compact and Complimentary Android Recorder Software
- 一歩で完了!Dailymotion動画をMP3ファイルに簡単に変換する手順
- How to Fix the Soft Bricked Honor X50i+? | Dr.fone
- How to Flash Dead OnePlus Ace 2 Safely | Dr.fone
- How to Resolve Oppo Reno 8T Screen Not Working | Dr.fone
- How To Restore a Bricked Poco F5 5G Back to Operation | Dr.fone
- How to Successfully Uninstall Epic Games Hub in W11
- IPhone 上照片下地球,步入USB 闪存设备:分享 5 种不同技巧
- Play Store Stuck on Downloading Of Lava Agni 2 5G? 7 Ways to Resolve | Dr.fone
- Play Store Stuck on Downloading Of Xiaomi Redmi 13C? 7 Ways to Resolve | Dr.fone
- Reasons for Xiaomi Redmi Note 12 Pro+ 5G Stuck on Boot Screen and Ways To Fix Them | Dr.fone
- Reasons for Xiaomi Redmi Note 12T Pro Stuck on Boot Screen and Ways To Fix Them | Dr.fone
- Title: Reasons for Nokia G42 5G Stuck on Startup Screen and Ways To Fix Them | Dr.fone
- Author: Abel
- Created at : 2024-10-23 16:57:36
- Updated at : 2024-10-24 16:11:05
- Link: https://fix-guide.techidaily.com/reasons-for-nokia-g42-5g-stuck-on-startup-screen-and-ways-to-fix-them-drfone-by-drfone-fix-android-problems-fix-android-problems/
- License: This work is licensed under CC BY-NC-SA 4.0.