
Reasons for Oppo Reno 11 5G Stuck on Startup Screen and Ways To Fix Them | Dr.fone
Reasons for Oppo Reno 11 5G Stuck on Startup Screen and Ways To Fix Them
There are many reasons why phones get stuck on the boot screen. It could be something as simple as physical damage or more complicated related to software problems. Having your phone stuck on the logo screen, or boot screen is annoying, and it is no surprise that people will find ways to fix this issue when encountered.

This article will share the possible reasons why your phone is stuck on the boot screen. This article will share three possible reasons for this problem and three valuable tips to help fix this issue. If all else fails, there is an application that is recommended and is sure to solve your issue in no time. Keep on reading to find out more!
It is not uncommon for phones to be stuck on the startup screen, but finding out why this happens is tricky. This section identified some of the top reasons your cellphone could have gotten stuck on the startup screen.
Physical Damage to the Phone
If you accidentally dropped your phone or knocked it on a hard surface, you could have damaged the internal hardware of your phone. This could affect your phone’s ability to reboot and result in your phone being stuck on the boot screen.
If you are 100% certain that your phone has gone through physical damage, you should seek professional help to have your phone repaired or checked. It is advised not to fix this problem yourself as your phone’s internal parts are complicated and delicate. Look for an official phone repair store and get your phone fixed for issues like your phone getting stuck on the logo.
Liquid Damage
It is not common for your phone to expose to water. Rain or water splashes are unavoidable; sometimes, your phone gets wet. Little exposure to water on the surfaces of your phone is fine. However, if you fall into a pool with your phone or drop it in a puddle of water, your phone will likely suffer from liquid damage.
Even the tiniest water droplet that seeped into your phone could damage the internal hardware of your device, often leaving you with your phone stuck on the boot screen. The first thing to do when you accidentally submerge your phone in the water is to check if the water has damaged your phone.
For iPhone users, look for the water damage indicator. If you see that it has turned from white to red, it has suffered from water damage. You have two options if your phone has suffered liquid damage. One is dismantling your phone and letting it dry for at least 48 hours. Two is bringing your phone to a repair shop to fix it.

Software Issues
Software issues are probably the most common reason your phone is stuck on the logo screen. Eight times out of ten, software issues are either caused by a failed software update, using an older version of the operating system, or having a jailbroken phone. When the software does not successfully update, the phone will have no operating system, as the old system was erased before the new software was installed.
The older operating system is also not desired as your phone typically will send periodic updates to make sure your phone is up-to-date and free from bugs. Running applications on an older operating system might lead to issues like the phone being stuck on the boot screen or the logo. Hence, updating your phone to the latest software version would be better.
Part 2. 3 Helpful Ways To Fix Phones Stuck on Boot Screen
After understanding the common problems on why your phone is stuck on the startup screen page, here are three easy solutions to try solving yourself at home.
Hard reboot your phone
To quickly fix any of your phone issues, especially when stuck on the startup screen, perform a hard reboot. The term hard reboot means turning your device off and on again. You might think this is a simple option, but this is a tried and tested method that might work on a minor glitch that results in your smartphone getting stuck on the startup screen page.
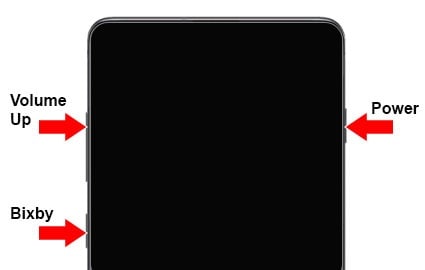
Here is an example of performing a hard reboot for an Android phone such as Oppo Reno 11 5G. Preess and hold the Power and Volume Down buttons simultaneously for more than 7 seconds to perform the hard reboot.


Put your phone in recovery mode
If a hard reboot does not work, a natural next step is to try going into recovery mode. The recovery mode is specially designed to solve any software-related issues. It is important to note that entering recovery mode will delete all your corrupted files and replace them with a functional operating system. Hence, back up all your files to ensure you retain all your information.
Here is a step-by-step process for putting your Oppo Reno 11 5G or Redmi smartphone in recovery mode.
Step 1: Tap and press the Power button to switch off your Oppo Reno 11 5G/Redmi phone
Step 2:Hold the Volume Up and the Power buttons at the same time, then release the keys when the Main menu of Recovery mode appears on the screen.

Step 3: You can use the volumes buttons to navigate up and down and press the Power key to confirm the selection.
Factory Reset
If you do not want to attempt recovery mode, you can try resolving the issue of your phone being stuck on the startup screen through Factory Reset. Factory Reset, also called Hard Reset, erases all information and data on your device. As a result, it will return to the settings and recover the data it used to have when leaving the factory.
Here is an example of putting your Samsang smartphone into the Factory Reset DFU mode.
Step 1: Open the Settings application on your phone and tap General Management.
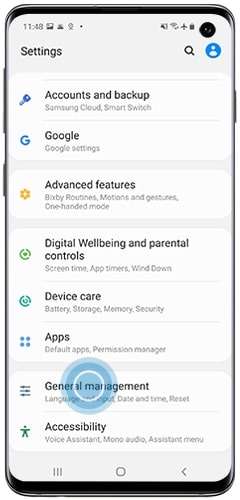
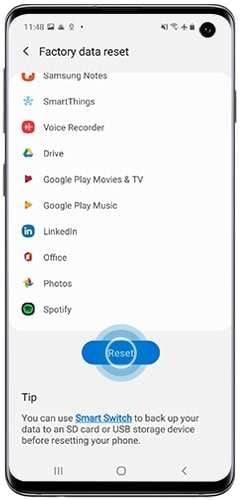
Step 2: Go to Reset > Factory data reset.
Step 3: Swipe to and tap Reset.
Note: Before carrying out a factory reset, you need to input the password of your Oppo Reno 11 5G Account.
Bonus Tip: Best App To Solve Phone Stuck on Boot Screen
If all the solutions above do not work and you do not want to perform a factory reset on your phone, one option is to use an application called Wondershare Dr.Fone. It is one of the most effective phone recovery solutions and can help to bring your phone back to a state like it was brand new. Being stuck on the startup screen page will be a problem of the past.

The following steps will show you how to use Dr.Fone to perform system repair on your phone.
Step 1: To the Dr.Fone application using the link above and click on System Repair.
Step 2: Depending on the Oppo Reno 11 5G device you are using, choose either Android or iPhone.
Step 3: In the next window, select the issue you are facing and click Start.
Step 4: Choose the corresponding Brand, Name, Model, Country, and Carrier from each drop-down menu and click Next.
Tip: Make sure the information you input is accurate, as it will affect the system repair if the information is inaccurate.

Step 5: Connect your device to your computer and follow the instructions on the screen to enter Download mode. Click on Next to proceed to the next step.
Step 6: Wait for the process to complete, and a new firmware will be updated on your device. Power on your phone and check if the issue still exists.
Frequently Asked Questions
The following are interesting and frequently asked questions about how to solve boot loops.
- What is a boot loop?
A boot loop describes a process when Your Oppo Reno 11 5G stays stuck in a circle of rebooting. When your phone is stuck on the startup screen, one of the strategies you will try is to restart your device. However, when your phone gets stuck in a boot loop, it is your device’s way of trying to turn it off and on again to fix the issue.
Since there is an issue with the booting process, it will keep running into the same error repeatedly, calling the boot loop. When trapped in a boot loop, your device will keep turning off and on. Most boot loop issues are software-related, such as a wrong system update.
- How do you fix a boot loop?
When stuck in a boot loop, there are different troubleshooting methods for other devices. For Android phones, force your phone into its Recovery mode; from there, you can restore a previous backup. This backup could be from when the boot loop did not exist, so recovery to that backup could quickly solve the problem.
For iPhones, it is the same concept as the Android, restore your phone to the previous backup. You can use iTunes to restore a previously stored backup on your computer.
- How to prevent a boot loop?
A boot loop typically starts when there is a change to your system before a reboot cycle. Most issues are software-related, such as having to do a system upgrade gone wrong or a problem that doesn’t mesh. One way to prevent this is to perform a software or system upgrade constantly. Make your phone juiced to prevent it from turning off mid-way when updating.
 safe & secure
3,405,439 people have downloaded it
Conclusion
This article summarizes some of the possible reasons why your phone is stuck on the boot screen. It demonstrated three useful strategies to overcome your phone stuck in the boot with ease. However, if all the above methods do not work, why not try Dr.Fone-System Repair?
Dr.Fone-System Repair repairs the operating system issues and fixes the issue with your phone. Once you power on your phone again, you can rest assured that it will be like new.
9 Solutions to Fix Process System Isn’t Responding Error on Oppo Reno 11 5G
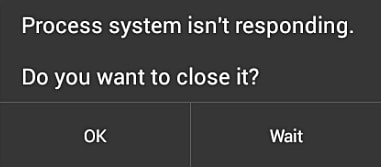
The “Process system isn’t responding” is a common error that occurs in almost every kind of Android device. Even though most Android smartphone manufacturers have taken a huge leap in the last few years, the operating system still suffers from a few pitfalls. The process system isn’t responding Android is one of those errors that have been reported plenty of times. I definitely understand encountering the ‘Process System Isn’t Responding’ error on your Oppo Reno 11 5G can be frustrating.
However, there are several straightforward methods to resolve this issue. This article will provide a step-by-step guide on how to fix the problem and restore your device to normal functionality.
Before solving any Android system issues, try this Android backup software to take a full backup, in case any data loss happens.
Part 1: Reasons for process system isn’t responding error
There could be plenty of reasons for getting the process system is not responding in Android.
- Software Glitch: Android systems may experience temporary glitches due to factors like memory management issues, conflicts between apps or services, or system updates.
- Insufficient System Resources: Low system storage is another reason for getting the error. If you have too many apps on your phone, then it might take a toll on its memory and generate the “process system isn’t responding” prompt.
- Third-Party Apps: Users have also complained that they receive the “Android process system is not responding” error after installing a new app. If you have installed an app from a source other than Google Play Store, then the chances are that you can get this error. Though, even after installing an app from Play Store, there is a bleak probability of facing this issue as well.
- Outdated Software: Using outdated apps, particularly system apps or critical components, may lead to compatibility issues with the latest Android version.
- System Updates: Most of the time, it happens whenever a device is restarted after updating its Android version. Your device could have undergone a bad update or might have had an unsupported driver. This can result in the occurrence of process system not responding issue.
- Corrupt Cache Files: Corrupted cache files can lead to conflicts and result in error.
- Overclocking or Modifications: Rooting or modifying the Android device, or applying overclocking settings, can lead to instability and the process system not responding error.
- Hardware Issues: Rarely, hardware problems like failing components can interfere with the proper functioning of the system.
No matter what the cause is, there are plenty of ways to overcome this issue. We have listed a handful of them in this post.
Part 2: How to Fix Android Process Not Responding? 8 Fixes
When this error occurs, it can disrupt the normal operation of the Oppo Reno 11 5G device, causing apps to freeze or crash. Fortunately, there are several effective methods to address this problem.
Fix 1: Restart your device
This is one of the easiest ways to resolve the process system not responding error. If you are getting this error on your phone, then try to manually restart your device. The way to restart your phone might differ from one device to another. Mostly, it can be done by long-pressing the power button. This will provide different power options. Tap on the “Reboot” one to restart your phone.
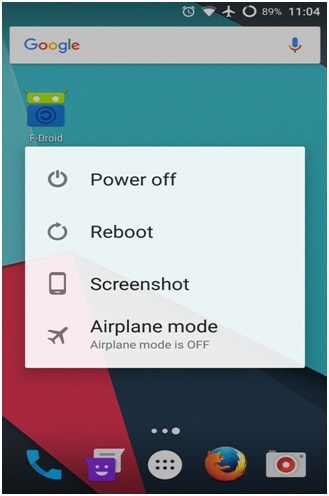
If it won’t work, then long press the Power and Volume up buttons at the same time until the screen goes off. Afterward, use the power button again to turn it on.
Fix 2: Reset App Preferences
Sometimes the apps interfere with the Oppo Reno 11 5G device’s settings because they were given permission to access specific functions. It is recommended to allow the asked permission precisely because some suspicious apps can also steal your sensitive data. Here are the straightforward instructions you need to follow to reset the app preferences:
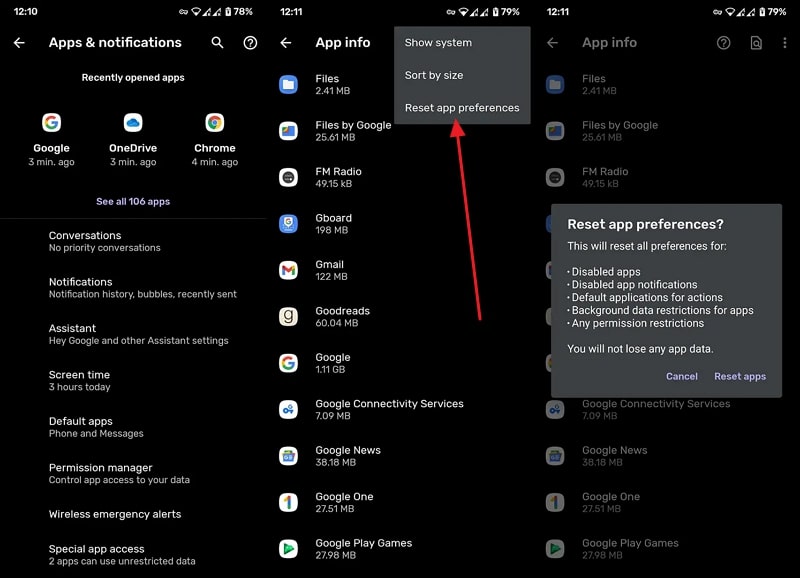
Proceed to the “Apps and Notifications” settings from the Settings app. Next, tap the “See All Apps” option and access the “Three Dots” menu. Here select the “Reset App Preferences” option and confirm the process from the confirmation pop-up.
Fix 3: Free Up Space to Make Sure Android Have Enough Internal Memory
In case the Android internal memory is completely filled, it will slow down the processing speed of the Oppo Reno 11 5G device. Internal memory is vital for the Oppo Reno 11 5G device to run all the background apps or the process required by the OS to run the Oppo Reno 11 5G device efficiently. You can follow these steps to free up some space on your Oppo Reno 11 5G:
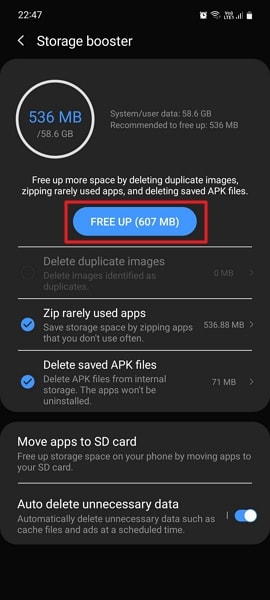
Step 1: Open the Settings app on your Oppo Reno 11 5G and access the “Battery and Device Care” option by scrolling down. Next, tap on the “Three Dots” from the top right corner and choose the “Storage Booster” feature.

Step 2: Following this, you can select the data you want to remove from the internal memory. Your device will show the space it will free up for you, and you can press the “Free Up” button to free up the storage.
Fix 4: Enter Safe Mode to Uninstall Suspicious Apps
This issue can also occur if you have installed an app from the Google Play Store with a very low rating or an APK. Unlike Apple App Store, anyone can easily upload their mobile apps on Play Store, so it is important to check the app’s credibility before installing it. Following are the simplified instructions to enter the safe mode and delete all suspicious applications:
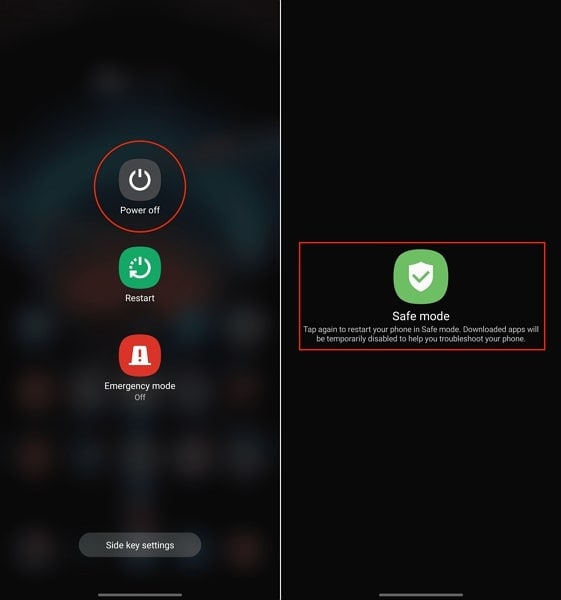
Press and hold the “Power” button of your Android and press and hold the “Power Off” option to access the “Safe Mode” feature. Afterward, confirm to enter the safe mode and remove all the suspicious apps from the Oppo Reno 11 5G device. You can do this by holding on to the app and selecting the “Uninstall” option from the pop-up options.
Fix 5: Update All Apps on your Device
Updating the apps is crucial for any Android device to work with high efficiency and performance. Apps are developed to make the users’ daily tasks easy to execute. However, there might be some negligence in the development, which can leave some bugs in the app. These bugs are fixed with time by releasing the new version of the app. To update your Android app, proceed with the following step-by-step instructions:
Step 1: Locate the Play Store from the Android home screen and access it. Then, tap the “Profile” icon from the top right corner and proceed to the “Manage apps and devices” option. Afterward, you can check how many app updates are available from the “Updates available” option. To update the apps, you will have to go inside this option.
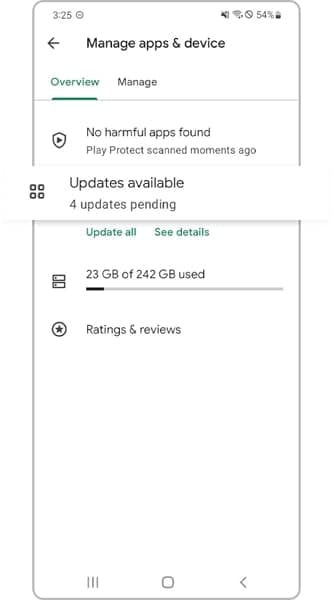
Step 2: You can tap on the “Update All” button if you want to update all the apps one by one. Otherwise, you can press the “Update” option adjacent to each app name to update the frequently used ones.

Fix 6: Check the SD card
If you are still getting the process system isn’t responding to Android error, then chances are that there could be an issue with your SD card. Firstly, check if your SD card is working fine or not. If it is corrupted, then get another memory card for your phone. Also, it should have a prominent amount of free storage. You might be facing this issue if the SD card has limited free space.
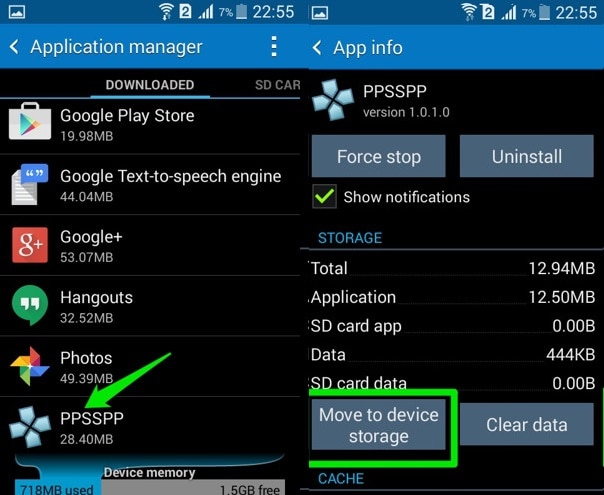
Also, if you are storing apps on the SD card, then your phone might encounter the process isn’t responding issue whenever you run a respective app. Therefore, you should move apps from your SD card to the phone’s internal memory. To do this, go to your phone’s Settings > Application Manager and select any app. If the app is stored on the SD card, then you will get an option of “Move to devise storage”. Just tap on it and manually move every app to your device storage.
Fix 7: One click to fix the process system isn’t responding error
If all the above tricks don’t get your device out of the process system not responding state, then there may be some system issues on your Android. In this case, an Android repair can successfully fix issues like process system isn’t responding.
Note: Android repair may wipe out existing Android data. Back up your Android data before going on.
Dr.Fone - System Repair (Android)
Android repair tool to fix all Android system issues in one click
- Fix all Android system issues like the black screen of death, system UI not working, etc.
- One-click for Android repair. No technical skills are required.
- Supports all the new Oppo Reno 11 5G devices like Galaxy S8, S9, S22, etc.
- Step-by-step instructions are provided. Friendly UI.
3981454 people have downloaded it
Follow the easy steps below to fix process system isn’t responding error:
- 1. Download and install the Dr.Fone tool. Then select “System Repair” from the main window.
- 2. Connect your Oppo Reno 11 5G to the PC. After the Oppo Reno 11 5G device is detected, select the “Android” tab.

- 3. Select and confirm the correct device details of your Android. Then boot your Oppo Reno 11 5G in download mode and proceed.

- 4. Download the firmware and click “Fix Now”.
- 5. After a while, your Android will be repaired with the “process system isn’t responding” error fixed.

safe & secure
Fix 8: Factory reset Android
It is always considered the most used way to factory reset your phone in order to resolve the process system not responding error. Though, this should be your last resort, as it will wipe off your device’s data entirely. Even if you are performing a factory reset, make sure that you back up your data by using a reliable tool like Wondershare Dr.Fone .
Wondershare Dr.Fone
Flexibly Back up and Restore Android Data
- Back up Android data to the computer with one click.
- Preview and restore selectively the backup to any Android device.
- Supports 8000+ Android devices.
- There is no data lost during backup, export, or restoration.
3,981,454 people have downloaded it
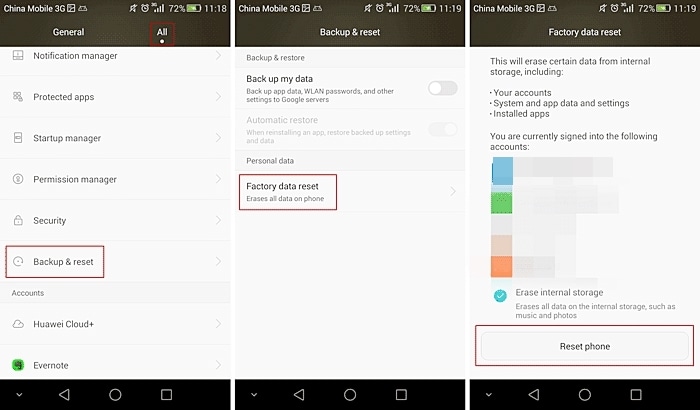
If your phone is functioning, then you can easily factory reset it by visiting Settings > General > Backup & Restore and selecting the option of “Factory Data Reset”. Your device will display a warning regarding all the data files that would be lost or un-synced. Just tap on the “Reset” button to factory reset your device.
If your device is not functioning or locked, then you can perform the factory reset operation by putting your phone into Recovery mode. Most of the time, it can be done by pressing the Power and Volume up button simultaneously for at least 10 seconds. Though, the key combinations might change from one device to another.
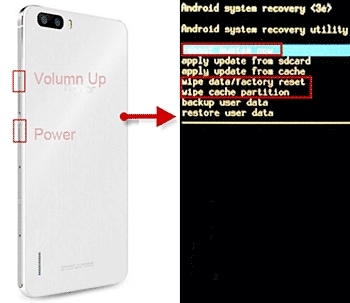
After entering the Recovery mode, go to the “wipe data/factory reset” option using the Volume up and down button. Use the Power button to make a selection. If you get an additional message, then select the “yes – delete all data” option. When it is done, you can simply reboot your device.
Fix 9: Unroot the Oppo Reno 11 5G device
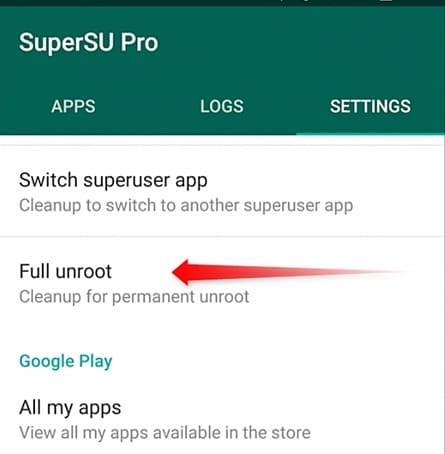
It has been further discovered that the process system isn’t responding error is more common in rooted devices. Therefore, if you also have a rooted Android device, then you can choose to unroot it in order to fix this issue. There are different ways to unroot an Android device. One of the easiest ways to do it is by using the SuperSU app.
You can always download either SuperSU or SuperSU Pro app from its website here . Simply install it on our device and launch it whenever you wish to unroot it. Visit its “Settings” tab and select the option of “Full unroot”.
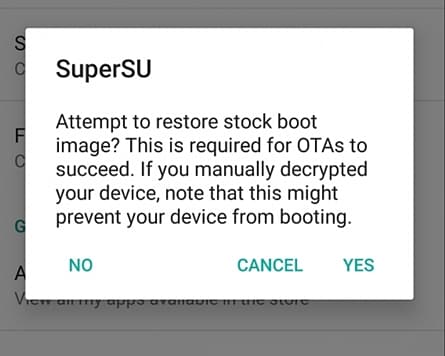
This will generate a warning message regarding all the repercussions of the unrooting process. Just tap on “Continue” to initiate the process.

If you are using an older version of Android, then you might get another pop-up to restore boot images. Simply make the desired selection and start the process. After a while, your device would be restarted the usual way, and it would be unrooted. Most probably, this will resolve the process system isn’t responding error as well.
Now that you know different ways to fix the process system not responding error, you can easily overcome this issue and make the most out of your device. Simply start with the easy fixes, and if they don’t work, then take extreme measures like unrooting your device or restoring it to factory setting. Also, make sure to back up your data before taking any extreme measures.
Effective Methods on How To Take Viruses Off Your Phone
Cell phones have become a part of a person’s daily life. It offers convenience and connectivity at your fingertips. Yet, these handy devices are prone to viruses when used carelessly. Viruses can infiltrate your phone through unverified downloads, unsecured networks, or malicious links. This can compromise your data and device performance.
In this article, you’ll explore practical methods on h ow to take a virus off your phone. From simple preventive measures to specific solutions, this guide aims to equip you with practical strategies, ensuring a safer and smoother mobile experience by safeguarding your phone against the perils of viruses.

Part 1: Why You Get Mobile Viruses in the First Place
Mobile viruses are tiny bugs that sneak into your phone and mess things up. They’re sneaky software programs designed to cause trouble, like stealing your info or making your phone act strange. Pesky viruses are usually acquired by accessing unverified links and downloading sketchy files. This is why it’s essential to be careful about what you access on the internet. It’s also a great habit to beware of the computers you’re connecting your phone to.
You might notice weird things happening on your phone when infected with a virus. It may suddenly slow down, show pop-ups you didn’t click, or run out of battery super-fast . These could be signs that your phone has a virus. Take note of these.

Here are some common ways viruses get into your phone:
- **Accessing sketchy links.**Clicking on strange or suspicious links in messages or emails is the number one virus source.
- **Downloading apps from unauthorized developers.**Getting apps from places other than the official app stores like Google Play or Apple Store can also be a gateway for trojan viruses. This is mainly because apps install files directly to your system when downloaded.
- Connecting to compromised computers. Watching out for viruses or malware when plugging your phone into a computer would be best.
- **Transferring malware files to your phone:**Moving files with viruses from a computer or another device to your phone.
Remember, these bugs can cause a lot of trouble, but staying careful while using your phone can help you avoid them!
Part 2: Different Methods To Take Viruses Off Your Phone
If your phone’s caught a virus, it’s time to remove those bugs. You might wonder about how you get a virus off your phone. Well, this section has you covered with 4 different methods you can use.
Method 1: Wondershare Dr. Fone’s System Repair
If you need a quick, professional, and safe solution, Wondershare Dr.Fone is here to save the day. Its System Repair feature is like a superhero—it swoops in and fixes the problem in a snap. This magic tool does the heavy lifting to remove viruses from your phone.
Here’s how you can use Dr. Fone’s System Repair feature:
- Step 1: Launch Dr.Fone. Choose System Repair in the Toolbox section. Ensure that your phone is connected.
safe & secure
3,391,426 people have downloaded it
- Step 2: Choose either Android or iPhone. In this example, iPhone shall be selected. For Android devices, simply follow and mirror the prompts that will follow.

- Step 3: Select iOS Repair to proceed.

- Step 4: Choose either Standard Mode or Standard Repair. Standard Repair will not remove data from your device. However, for a sure fix, choose Standard Mode.

- Step 5: Put your device to Recovery Mode . Dr. Fone will provide on-screen instructions.

- Step 6: Click Download next to the iOS firmware you want to install.

- Step 7: After the firmware is downloaded, click Repair Now.

- Step 8: Once the process is completed, choose Done. Your phone should be virus-free by now.

Method 2: Using Safe Mode
Safe Mode is like a secret agent—it helps but with a downside. It turns off third-party apps, making your phone useful only for basic calls or texts. Use this method if any solutions in this section do not work. It’s especially handy if you use your phone before sending it to a technician. This way, you’ll learn how you can get a virus off your phone before actually letting a technician do it.
Generally, here’s how you can enter Safe Mode on Android Phones. Do check with your phone manufacturer’s official manual/guides on how to enter them:
- Step 1: Press and hold the power button. Wait for the power options to appear.
- Step 2: Tap and hold the Power Off button.
- Step 3: Tap on the prompt when you see the Reboot to safe mode option.

For iPhones, here’s how you can do it:
- Step 1: Power off your iPhone.
- Step 2: Hold the power button.
- Step 3: Hold the volume down button until you see the Apple logo.
- Step 4: Your phone should now be in safe mode.

Method 3: Downloading Anti-Virus Software
Anti-virus software works like a shield, protecting your phone from sneaky viruses and malware. Here are three recommended anti-virus apps that you should try out. They’re available on both the Google Play Store and App Store. So, regardless of what device you’re using, you’re sure to be safe with these:
- Avast Anti-virus – Mobile Security
- Norton 360: Online Security
- Bitdefender Mobile Security & Anti-virus
Method 4: Performing a Factory Reset
A Factory Reset is like a phone makeover—it wipes everything and starts fresh. But be cautious, as it erases all data!
Generally, the Factory Reset option should be in Settings > General & Backup and reset or under Settings > About phone for Android devices.

IOS devices should be under Settings > General > Transfer or Reset iPhone.

Remember, each method has its strengths and weaknesses. Dr.Fone is quick and effective, Safe Mode is limited but useful, anti-virus apps can protect, and a Factory Reset gives a clean slate. Try these methods to zap those viruses away!
Part 3: Handy Prevention Tips To Avoid Future Infections
To keep your phone safe from viruses, follow these easy tips that act as a shield against potential threats.
- **Regular software updates:**Keep your phone updated with the latest software. Updates often include security patches that protect your phone from new threats.
- **Cautious downloads:**Be careful when downloading apps or files. Stick to trusted sources like Google Play Store or Apple Store. Avoid clicking on suspicious links from unknown sources.
- **Secure networks:**Use secure Wi-Fi networks and limit public Wi-Fi use for sensitive activities. Public networks can expose your device to potential risks.
- **Anti-virus software:**Install a reliable anti-virus app and keep it updated. These apps constantly scan for and detect viruses, safeguarding your device against threats.
These simple yet crucial tips will fortify your phone’s defenses, reducing the likelihood of virus infections and ensuring a safer digital experience.
Conclusion
Viruses can make your phones act weird, but you have the tools to fight back. Keep your phone healthy by updating software, being cautious with downloads and links, using secure networks, and having an anti-virus app.
And, if you’re thinking, “**How do I get a virus off My Oppo Reno 11 5G?**” then Wondershare Dr.Fone is a reliable hero. It’s quick and effective in clearing out those bugs. By staying aware and taking preventive steps, you can keep your phone safe and ensure a trouble-free experience. And if viruses strike, Dr. Fone’s got your back for an instant fix!
Also read:
- [New] 2024 Approved Integrating Instant Video Playback Within the Social Media Webspace
- [New] Surfer’s Choice Ultimate Cam Tech Review 2023 for 2024
- [Updated] 2024 Approved Updated Features in Sony Blu-Ray Player S6700
- Comprehensive Troubleshooting Tips for d3dx9_40.dll File Not Found Error
- Conversione Immagine TGA a PNG Fatto Da Te: Metodo Gratuito Su Movavi
- Hassle-Free Ways to Remove FRP Lock from Itel P55+ Phones with/without a PC
- How to Fix the Soft Bricked Itel P40+? | Dr.fone
- How To Fix Unresponsive Phone Touchscreen Of Xiaomi 13 Ultra | Dr.fone
- How to Rescue Lost Videos from Tecno Camon 30 Pro 5G
- How to Resolve Samsung Galaxy A14 5G Screen Not Working | Dr.fone
- In 2024, Does Google Pixel 8 Have Find My Friends? | Dr.fone
- In 2024, How to Fix Locked Apple ID on Apple iPhone 13
- Realme 12+ 5G Not Connecting to Wi-Fi? 12 Quick Ways to Fix | Dr.fone
- Reasons for Lava Yuva 2 Pro Stuck on Startup Screen and Ways To Fix Them | Dr.fone
- Unseen Workers: Tasker’s Edge Anomalies
- Title: Reasons for Oppo Reno 11 5G Stuck on Startup Screen and Ways To Fix Them | Dr.fone
- Author: Abel
- Created at : 2024-10-20 16:34:38
- Updated at : 2024-10-24 16:33:37
- Link: https://fix-guide.techidaily.com/reasons-for-oppo-reno-11-5g-stuck-on-startup-screen-and-ways-to-fix-them-drfone-by-drfone-fix-android-problems-fix-android-problems/
- License: This work is licensed under CC BY-NC-SA 4.0.