
Restore Missing App Icon on Lava Yuva 3 Step-by-Step Solutions | Dr.fone
Restore Missing App Icon on Lava Yuva 3: Step-by-Step Solutions
The growing conversation around the missing app icons on Android issue has caught our attention. While it seems confusing, it’s a problem that some Android users have encountered.
After all, the presence of app icons on our Android device’s home screen is important for convenient access to our frequently used applications. When your Lava Yuva 3’s icons suddenly disappear, it can leave you feeling lost about how to use and access your apps.
No worries, though. We’ve got you covered with a simple guide in this article. Just follow the steps, and you’ll get those missing app icons back on your Lava Yuva 3.
Part 1: Make Sure if the Missing App Is Installed
Before proceeding with troubleshooting the missing app icon on your Android device, it’s essential to confirm whether the app is still installed or if it has been accidentally deleted. To do it, you can have a quick check on Google Play:
- Step 1: Go to the Play Store.
- Step 2: Tap your Google profile at the top right and find Manage apps and devices.
- Step 3: Open Manage and select the “Installed” tab.
![]()
Now, see whether you can find the app icon that disappeared on your Android. If you can’t find it, it means the app has been accidentally deleted, and you can install it back on your device. However, if it’s confirmed to be installed on your Android but remains missing from your home screen, you can continue the following practice.
Part 2: How To Find the Missing App Icon on Android
“All my apps disappeared from my home Android screen. What should I do?”
If you’ve confirmed that the missing app is installed, but its icon is nowhere to be found on your home screen, don’t fret—there are several solutions you can take to locate and restore the missing app icon on Android.
1. Check hidden apps
How could the Android phone icon be missing? Well, app icons can disappear from your home screen for different reasons. One of the common reasons is you might have accidentally hidden it in your phone. To find and check whether the app is hidden, the steps can be different depending on the phone model you are using.
However, as a general guide, you can follow these steps:
- Step 1. Go to your phone’s Settings.
- Step 2. Use the search bar to look for “Hidden app.”
- Step 3. Once you find the “Hidden app” settings, watch the list to see if the missing app is there. If it is, you can toggle off the switch to unhide it.
![]()
2. Move the app to the home screen from the App Drawer
If your app icon disappeared on your Android, you can also easily restore it by adding the app to the home screen from the app drawer. Follow the step-by-step guide below:
- Step 1. Open the App Drawer on your Android. To do this, swipe from the bottom to the top, starting from your home screen. The App Drawer is where all your installed apps are neatly listed.
- Step 2. Once you open the App drawer, locate the app icon that has disappeared from your home screen. For example, you lost the phone icon on Android. Then, look for the phone icon from the App Drawer.
- Step 3. Long-press the Icon of the missing app and move it to the desired location on your home screen. You can drag it to an empty space or a specific folder.
- Step 4. Release to drop the app icon onto the home screen.
![]()
3. Re-enable disabled app
App icons can also disappear on the Android home screen if you unintentionally or intentionally disable them. Certain phone models even offer a functionality known as ‘Freezer,’ allowing users to temporarily halt the apps. While in a frozen state, the app remains inactive and doesn’t appear on the home screen until you unfrozen it.
To re-enable the disabled app, you can follow the steps here:
- Step 1. Open the Apps & Notifications on the Settings.
- Step 2. Select the app which icon is missing on your home screen. For example, tap the phone app if the phone icon disappears on your Android.
- Step 3: In the App Info, tap Enable.
4. Reset Android to factory settings
If the previous methods don’t work, you might need to do a factory reset on your Lava Yuva 3. But before doing that, it’s important to back up your data first because a factory reset will clear all your data and cache when you press the reset button.
How to reset Android to factory setting:
- Step 1: Go to your Android Settings.
- Step 2: Select Backup and Reset > Factory data reset. Then, choose to erase all data.
Please be mindful that performing a factory reset on Android will reset your Android completely to its initial state.
![]()
Part 3: How to Fix System Error on Android Easily with Reliable Software
Missing app icons on Android can sometimes be a result of errors in your Android system launcher, causing inconvenience and potential disruptions to your device’s operation. To address this issue effectively, you can turn to Dr.Fone’s advanced system repair tool. This tool is designed to handle various system issues, providing an easy and reliable solution.
How to fix the Android system using Dr.Fone’s system repair tool:
- Step 1. Open the Repair Tool
Start by launching Wondershare Dr.Fone on your computer. Go to the Toolbox section and connect your Lava Yuva 3. Choose System Repair and pick Android as your device type.

 safe & secure
4,136,839 people have downloaded it
- Step 2. Begin Repair
Click Start on the new screen to kick off the repair. Since you’re dealing with the Android system, select System Damage.

- Step 3. Fill in the Lava Yuva 3 device Details
The platform will detect your Lava Yuva 3’s brand. Confirm the Name, Model, Country, and Carrier. If your device is unlocked, choose OPEN in the Carrier section. Agree to the warning, click Next, and proceed with the repair.

- Step 4. Activate Download de
Follow the instructions to put your Lava Yuva 3 into Download Mode. Once you are in Download Mode, the firmware will be downloaded automatically.

- Step 5. Confirm Installation
Remember, the repair may erase data. It’s advisable to back up your data first before starting the repair. Enter “000000” to confirm the repair process, shown by a progress bar. Once finished, click Done and see if your phone has returned to normal.

More Articles About Android System:
9 Solutions for Android Process System isn’t Responding Error
How to Fix Android App Not Installed Error Quickly?
Authentication Error Occurred? Here Are 10 Proven Fixes
Conclusion
When the app disappears from the home screen of your Android, it can hinder your ability to access and use the app efficiently. There are several reasons why an app might disappear from your Android home screen, and addressing the issue depends on the specific circumstances.
Whether it’s due to accidental deletion or a system glitch, we have discussed various methods to recover the missing app and ensure smooth functionality in this article. In cases of system-related issues on your Lava Yuva 3, it’s advisable to rely on trustworthy software such as Dr. Fone’s system repair tool for a comprehensive resolution.
[8 Quick Fixes] Unfortunately, Snapchat has Stopped on Lava Yuva 3
Have you ever been deep in conversation with a loved one or friend, taking advantage of all the funny filters and games Snapchat has to offer when you’ve suddenly been presented with the ‘Unfortunately, Snapchat has Stopped’ error code? This is usually followed by the app crashing back to the main menu.
If so, don’t worry; you’re not alone. Snapchat crashing in this way is nothing new, but it can be incredibly annoying when it keeps happening and stops you from enjoying the conversations you care about.
Fortunately, there are plenty of solutions out there to help you out and get the app working again as it should do. Today, we’re going to explore them all to help you get back to what you were doing before and as though there was never a problem.
Part 1. Install Snapchat again from Google Play Store

One of the best ways to resolve the Snapchat crashing problem or Snap Map not working issue is to delete the app and reinstall it again. When you’re using your phone, there is data continually flowing around and data being sent here, there, and everywhere.
During these processes, bugs can occur, and if they can’t sort themselves out, the best thing to do is to reset your app and start from a fresh installation. Here’s how to do it.
Step 1: Hold down the Snapchat app from your main menu and press the ‘x’ button to uninstall the app.
Step 2: Open the Google App Store from your device and search ‘Snapchat’ in the search bar. Find the official app page and download the app onto your device.
Step 3: The app will automatically install itself once downloaded. Open the app, sign in to your account using your log-in details, and you should be able to use the app like normal.
Part 2. Check for new Snapchat Updates

Hand in hand with the problem above, sometimes a bug can restrict Snapchat from working, or perhaps your personal update settings. If you receive a Snapchat from someone with an upgraded version, this can crash your app.
Here’s how to make sure you’re running the latest version of Snapchat is Snapchat isn’t responding.
- Launch the Play Store and navigate to the My Apps and Games page
- Tap the Update button
- The app will now automatically update to the latest version
Part 3. Wipe the cache of Snapchat
If you have a lot of data in your Snapchat cache, this can cause the app to become overloaded in which you’ll need to clear it to start again and refresh the app. This is a common problem that can cause Snapchat has stopped working error.
Here’s how to fix it.
Open the Snapchat app and tap the Profile icon on the top left-hand side of your screen

Tap the Settings gear icon on the top right
Scroll down the Settings menu and tap the Clear Cache option
Here, you can choose to Clear All, but you can select individual areas if you prefer
Tap the Confirm option to clear your cache preference completely


Part 4. Fix the system issues that caused Snapchat stopping
If you’re experiencing the Snapchat crashing on Android often, or you’re experiencing similar errors with other apps, this can be an indication that there’s something wrong with your Android operating system.
The best way to fix this is to repair your device using the software known as Dr.Fone - System Repair (Android). This is a powerful repair system that can completely recover your device from any errors, including the Snapchat keeps crashing error.
Dr.Fone - System Repair (Android)
Dedicated repair tool to fix Snapchat crashing on Android.
- Recover your device from any problem, including black screen or unresponsive screen.
- Supports over 1000+ unique Android devices, models, and brands.
- Trusted by over 50+ million customers around the world.
- Can fully repair faults with your Lava Yuva 3’s firmware in a few simple steps.
- One of the most user-friendly applications in the world.
3,889,035 people have downloaded it
To help you make the most of this Android repair software and to fix your Snapchat not responding error, here’s a step-by-step guide on how to use it.
Step 1: Download the Dr.Fone - System Repair (Android) software to your computer. Install the software to your Mac or Windows computer by following the onscreen instructions.
Once completed, open the software, so you’re on the main menu.
Step 2: From the main menu, click the System Repair option, followed by the Android option. Of course, if you have an iOS device you want to repair in the future, the option is there if you want it. Also, connect your Lava Yuva 3 to your computer using the USB cable.
Step 3: Confirm details.
On the next screen, use the drop-down menus to confirm the model, brand, operating system, and carrier of your device. Click Next to confirm the details are correct.
Step 4: You’ll now need to put your phone into Download Mode, sometimes referred to as Recovery Mode. For this, you can follow the onscreen instructions. Make sure your device stays connected to your computer throughout this process.
The method will slightly differ depending on whether your device has a home button, so make sure you follow the right instructions for your individual device.

Step 5: Once in Download Mode, the software will now download and install a fresh version of your Lava Yuva 3’s operating system. This can take some time, so make sure your device stays connected, and your computer stays on and doesn’t shut down.
Step 6: That’s it! Once you see the screen saying your device has been repaired, you’ll be able to close the Dr.Fone - System Repair (Android) software, disconnect your phone, and can start using Snapchat as normal without the Snapchat not responding error coming up!

safe & secure
Part 5. Check for the Android update

Similar to some of the other solutions we’ve listed above, if you’re using an outdated version of the Android operating system, but the latest version of Snapchat is coded to the most recent, this can be a cause for the Snapchat crashing on Android problem to occur.
Fortunately, it’s easy to check to make sure you’re running the latest version of Android and to download and install the update if you need it. Here’s how, which will help to sort out your Snapchat keeps crashing Android problems.
Step 1: Open the Settings menu on your Lava Yuva 3 and select the About Phone option.
Step 2: Tap the ‘Check for Updates’ option. If an update is available, you’ll then have the option to Install Now or Install Overnight. If no update is available, you’ll see a notification stating your device is up to date and no action is needed.
Part 6. Connect to another Wi-Fi
In some cases, you may be trying to connect to a Wi-Fi network that’s not very stable. This may keep cutting the connection to your device, which in turn is causing Snapchat to crash on Android.
To resolve this, you can simply try connecting to another Wi-Fi network or a data plan to see whether this is the problem. If so, changing network and then using the Snapchat app should stop any error messages from occurring.
Step 1: Open the Settings menu on your Lava Yuva 3, followed by the Wi-Fi option.

Step 2: Tap the new Wi-Fi network you’re currently connected to, and then tap the ‘Forget’ option, to stop your phone connecting to it.

Step 3: Now tap the new Wi-Fi network you want to connect to. Insert the Wi-Fi security code and connect. Now try reopening and using the Snapchat to see if you can use it.

Part 7. Stop using the custom ROM

If you’re running a custom Android ROM on your device, with some versions of the ROM and some apps, you’re going to experience errors simply because of the way the apps and the ROMs are coded and designed.
Unfortunately, there’s no easy fix to this, and if you want to continue using the app, you’ll need to reflash your Lava Yuva 3 back to its original firmware, and then wait until the ROM developers update the ROM to be compatible with social apps like Snapchat.
However, this reflashing process is simple thanks to the Dr.Fone - System Repair (Android) software that we listed above. To follow the detailed step-by-step guide, follow the steps on Part 4 of this article, or follow the quick guide instructions below.
- Download and install the Dr.Fone - System Repair (Android) software to your computer
- Connect your Lava Yuva 3 to your Windows computer using the USB cable
- Open the software and click the Repair option.
- Select the Android device repair option
- Make sure your carrier and device information are correct
- Put your device into Download Mode by following the onscreen instructions
- Allow the software to repair your Lava Yuva 3 automatically
Part 8. Reset the factory settings of your Android

One of the last resorts you can take is factory resetting your Lava Yuva 3 back to its original settings. From the day you first started using your device, you’ve been using the system and downloading files and apps, and over time this increases the chances of creating a bug.
However, by resetting your device to factory settings, you can reset these bugs and get your apps and device working again free from the Unfortunately, Snapchat has stopped error message. Here’s how to factory reset your device.
Make sure you back up your personal files from your device first like your photos and music files because factory resetting your device will clear your device’s memory.
Step 1: Tap the Settings menu on your device and click the Backup and Reset option.
Step 2: Click the Reset Phone option. That’s it! The phone will take several minutes to complete the process, after which your phone will be reset to its original state.
Fix Lava Yuva 3 Android System Webview Crash 2024 Issue
In recent months, the term “Android WebView crash 2023“ has become a common search term among Android users seeking solutions to these app crashes . The issue has been particularly prevalent on Lava Yuva 3 devices, but it has also affected users of other Android models.
Android WebView for Android apps allows you to see and interact with web pages without leaving your app. But lately, it’s been causing more headaches than it’s worth.
So, what’s going on with Lava Yuva 3 Android System WebView, and what can you do to fix its issues? Let’s take a look. This article will shed light on Lava Yuva 3 Android System WebView crashing apps, helping you understand what triggers them, how to identify them, and what you can do to prevent them from happening again.
Part 1: What Should We Know About Lava Yuva 3 Android System WebView Crashes?
This year, the term “Android WebView crash 2023“ has become a familiar and dreaded phrase. This issue has plagued Android users, causing app crashes, freezing , and frustration. But what exactly is Android WebView, and what triggers these apps to crash?
Android WebView is an integral component of Android apps, acting as the invisible engine that renders web content within these apps. It allows users to seamlessly browse websites, watch videos, and interact with web pages without switching to a separate browser. However, when WebView crashes, it disrupts this integrated experience, causing apps to malfunction.
Several signs can indicate an impending or ongoing Android WebView crash. These include:
- App Freezing
One of the earliest signs of an Lava Yuva 3 Android System WebView crash is the app freezing. The app may become unresponsive, refusing to respond to your taps or gestures.
- Unexpected App Closures
Another common sign is unexpected app closing. The app may shut down without warning, abruptly ending your activity. Lava Yuva 3 Android System WebView crashing apps can be disruptive if you are in the middle of a conversation, shopping online, or filling out an important form.
- Error Messages
Error messages can also provide valuable clues about the impending crash. These messages may appear as pop-ups or be displayed within the app itself.

- Slow Loading Times
Slow loading times can also be a sign of an impending crash. If webpages within the app take unusually long to load or images and other content appear pixelated or distorted, it could be a sign that Lava Yuva 3 Android System WebView is struggling to handle the workload.
But why does WebView crash Android smartphones? The answer involves several factors:
- Updates and Compatibility Issues
Updates are often intended to improve software stability and compatibility, but in some cases, they can introduce new bugs or compatibility issues that lead to crashes. It is particularly evident when app developers and WebView developers release updates that don’t fully align, causing conflicts.
- Insufficient Memory
Lava Yuva 3 Android System WebView requires a certain amount of memory to operate properly. If your device is running low on memory, it can cause Lava Yuva 3 Android System WebView to crash. It is more likely to happen on older devices with less RAM.

- Outdated Lava Yuva 3 Android System WebView
The WebView app is responsible for rendering web content within Android apps. Using an outdated version of WebView can introduce known bugs and security vulnerabilities that can cause crashes.
- Conflicts With Other Apps
WebView might crash if it conflicts with other resources or processes running on the Lava Yuva 3 device. It can happen if the Lava Yuva 3 device runs low on memory or other resource-intensive apps compete for system resources.
In the next section, you’ll explore potential solutions to keep your apps running smoothly.
Part 2: Android WebView Crashes? Here Are Quick and Proven Solutions
Now you’ve identified the signs and causes of Lava Yuva 3 Android System WebView crashing apps on your phone. While these issues can be frustrating, there are several quick and proven solutions to fix them.
Uninstall WebView Updates
If you’re experiencing apps crashing after a recent update, consider uninstalling those updates. This action can potentially revert to a more stable version of Lava Yuva 3 Android System WebView.
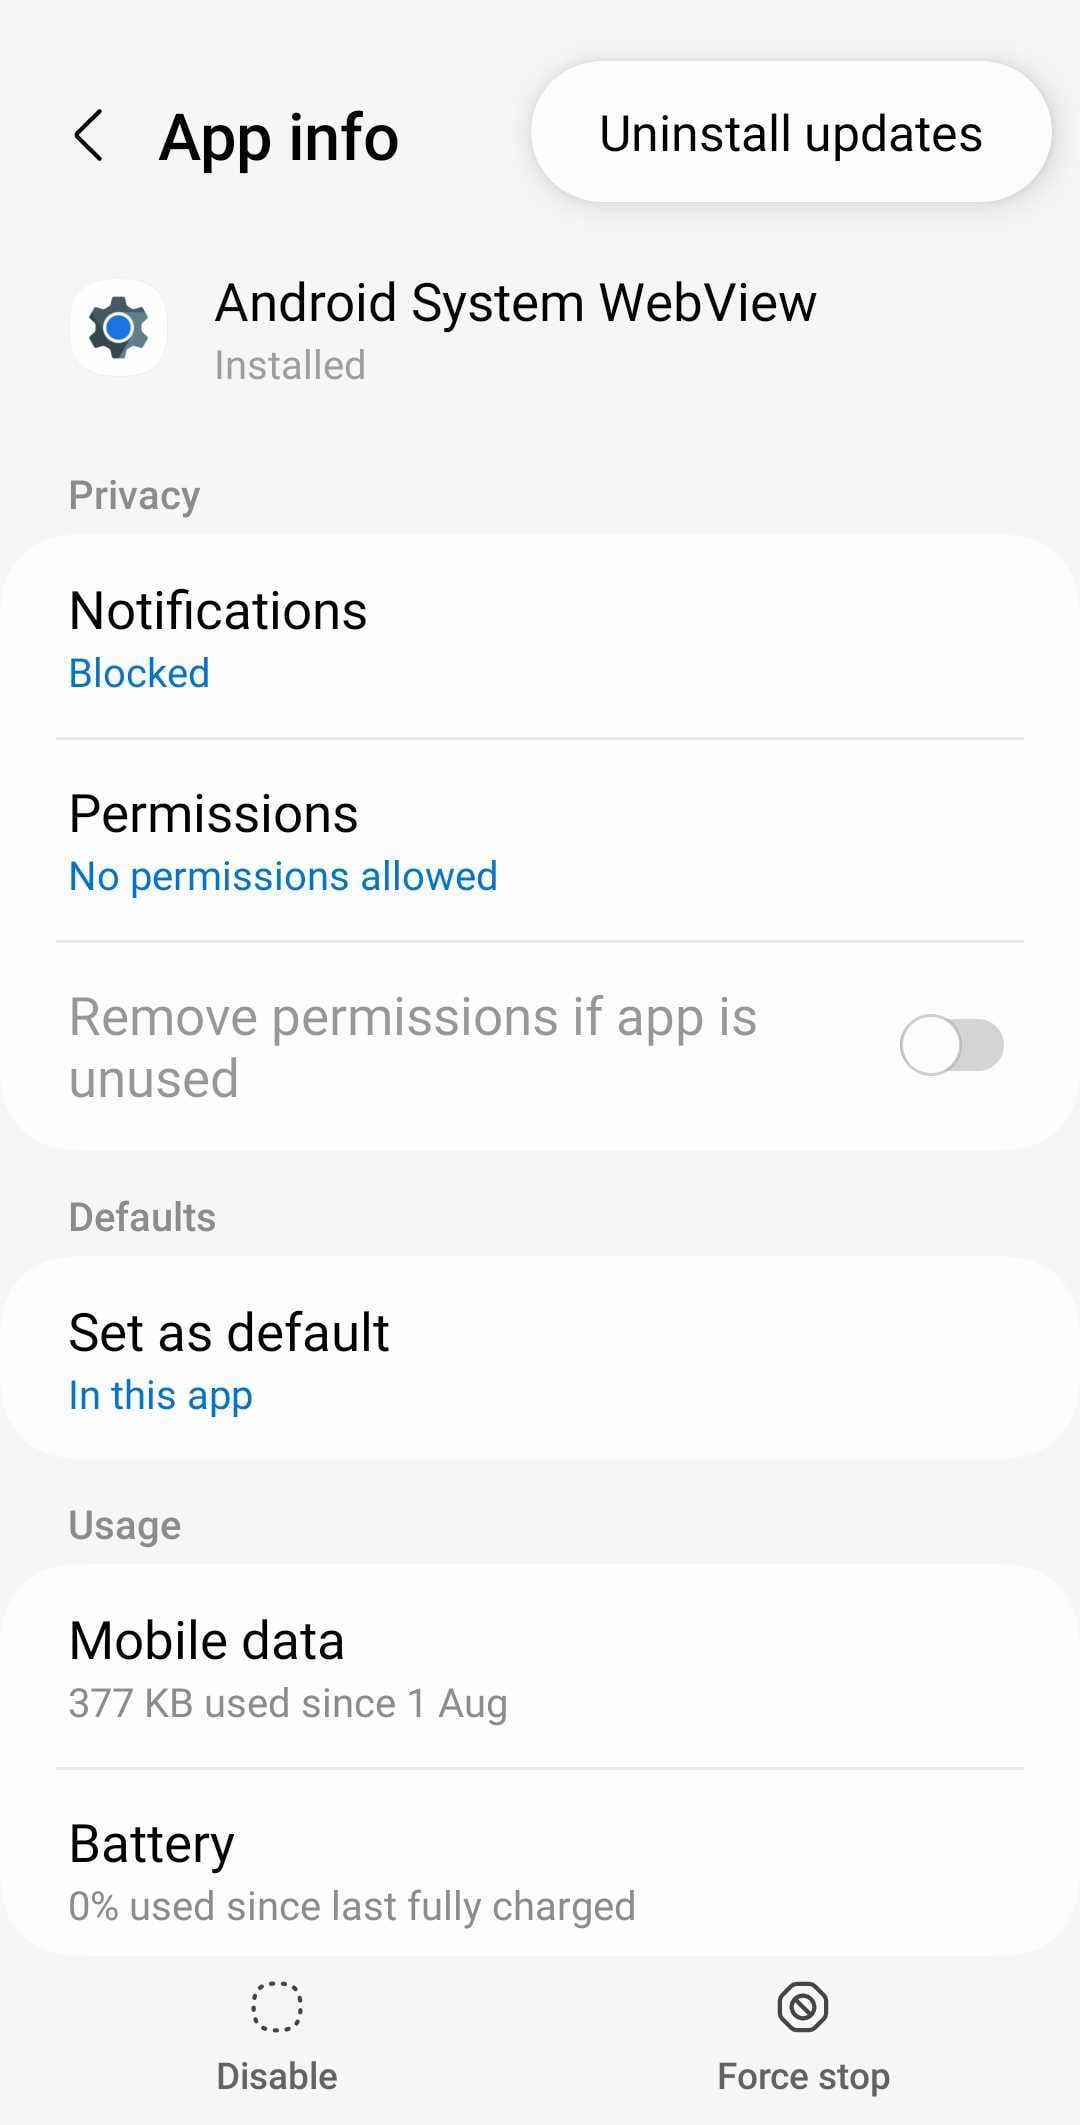
To do this on your Lava Yuva 3, navigate to Settings > Apps, then select Lava Yuva 3 Android System WebView. Tap the menu icon in the top right corner and tap Uninstall updates.
Update Android WebView
Regularly updating Lava Yuva 3 Android System WebView to the latest version is crucial for maintaining compatibility and addressing known bugs. Google releases updates to address these concerns, ensuring optimal performance and stability.
Check for available updates on Lava Yuva 3 devices by navigating to Settings > Apps. Then, select Lava Yuva 3 Android System WebView and tap App details in-store. If an update is available, tap Update to install it and restart your phone.

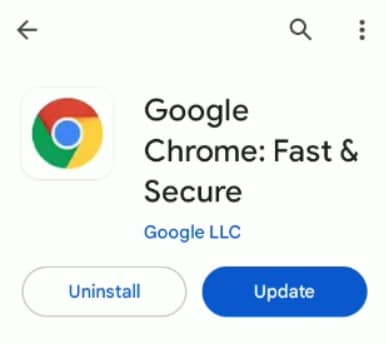
Update Google Chrome
Android WebView is closely tied to Google Chrome, and issues with Chrome can sometimes affect WebView functionality. As such, updating Chrome to the latest version can help address Android System and WebView forcibly closing your phone’s apps.
Open the Google Play Store and search for Google Chrome. If an update is available, tap Update to install it, then restart your device.
Clearing Cache and Data for Android WebView
Clearing the cache frees up phone storage and helps the app run more efficiently. To clear Lava Yuva 3 Android System WebView’s cache and data, go to Settings > Apps and select Lava Yuva 3 Android System WebView. Tap on Storage and tap Clear cache on the lower right corner of your screen.

Restart Device
A simple restart can often resolve temporary glitches or conflicts that might be causing Android WebView crashes. The specific steps to restart your phone will vary depending on your device type.
Check Internet Connection
A stable internet connection is essential for Lava Yuva 3 Android System WebView to render web content properly. If the internet connection is unstable or down, it can lead to crashes. Ensure you have a stable internet connection before using WebView-based apps.
Update Device Software
OS updates may introduce changes to the Lava Yuva 3 Android System WebView that make it more compatible with newer web standards and technologies. It can enhance the performance and stability of apps that rely on WebView for web content.
Check for available software updates by going to Settings > Software Update. If an update is required, tap on Download and install.

While problems like when the Android System WebView crashes Android phones are common, they don’t have to be a persistent problem for Lava Yuva 3 users. It’s also equally important to have effective solutions when app crashes occur. This is where Wondershare Dr.Fone steps in as a reliable and comprehensive solution for restoring app stability and overall phone performance.
Part 3: Restoring Apps and Phone Stability: A Step-by-Step Guide
Dr. Fone’s System Repair tool can help you resolve common Android scenarios, including Google Play Store malfunctions and persistent app crashes.
How To Use Dr.Fone for Lava Yuva 3 Android System WebView Crashing Apps?
Before attempting any repairs, it is crucial to back up your Lava Yuva 3 to prevent data loss. Once you have a secure backup, follow these steps to fix WebView app crashes and restore your Lava Yuva 3 to its optimal performance.
- Step 1: Download the Dr.Fone toolkit. Next, install the software on your desktop and launch it.
safe & secure
3,090,920 people have downloaded it
- Step 2: Connect your Lava Yuva 3 to your computer using a USB cable. Dr.Fone will automatically detect and establish a connection.
- Step 3: Select the System Repair function from the Toolbox homepage and choose Android to confirm your device type.
- Step 4: Click Start to begin the process of fixing Lava Yuva 3 Android System WebView crashes. Next, choose your device details and follow the in-app instructions to put your device in Download mode.
- Step 5: Dr.Fone will analyze your device’s system and download the firmware to solve the root cause of the issue.
- Step 6: Confirm your device information in the dialogue box. Dr.Fone will proceed to repair the detected WebView-related problems.

- Step 7: Once the repair is complete, your device will restart, and Lava Yuva 3 Android System WebView crashing apps should no longer occur.
More Articles About Android System:
5 Ways to Do With & Access Android Phone with Broken Screen
Google Play Services Won’t Update? 12 Fixes are Here!
Easy Ways to Bypass Google Account Verification (FRP) On Android Phones
Conclusion
The “Android WebView crash 2023“ issue was widespread for many Android users. The common issues encountered were app crashes, slow loading times, and error messages. Fortunately, these problems are manageable with the right approach.
By understanding the signs and causes of Lava Yuva 3 Android System WebView crashes, you can take proactive measures to prevent them. Quick fixes such as clearing cache and data or updates can often resolve the issue promptly.
For more comprehensive troubleshooting, Dr. Fone’s mobile solution offers a reliable and user-friendly approach. Its advanced capabilities effectively tackle app crashing issues, providing you peace of mind that your phone is functioning optimally.
safe & secure
4,684,259 people have downloaded it
Also read:
- [New] In 2024, Breakdown of Popular Elements in YouTube Shorts
- [New] Mastering the Art of Audio Blending in Audacity for 2024
- [New] Pro Tips Record Your Mac's Display for 2024
- Boost Your Pinterest Presence Using Any of These Top 5 Posting Automation Solutions
- Edit and Send Fake Location on Telegram For your Honor X50 GT in 3 Ways | Dr.fone
- How To Fix Part of the Touch Screen Not Working on Oppo A79 5G | Dr.fone
- In 2024, 5 Ways To Teach You To Transfer Files from Sony Xperia 5 V to Other Android Devices Easily | Dr.fone
- Infinix Smart 8 Pro Camera Not Working Unexpected Error? Fix It Now | Dr.fone
- Overcoming Issues with Displays That Don't Support HDCP Technology
- Play Store Not Working On Realme C67 4G? 8 Solutions Inside | Dr.fone
- Play Store Stuck on Downloading Of Poco X5 Pro? 7 Ways to Resolve | Dr.fone
- Reasons for Xiaomi Redmi Note 12 Pro 4G Stuck on Startup Screen and Ways To Fix Them | Dr.fone
- Scribe's Summit Selection - Top 8 for 2024
- Solved Warning Camera Failed on Xiaomi Redmi Note 12 Pro+ 5G | Dr.fone
- Spotify Keeps Crashing A Complete List of Fixes You Can Use on Honor Magic5 Ultimate | Dr.fone
- Trasforma I File MP4 in Formato WMV Gratuitamente On-Line Con Convertitore Rapido - Movavi
- Why Your WhatsApp Location is Not Updating and How to Fix On Tecno Spark 20 | Dr.fone
- Title: Restore Missing App Icon on Lava Yuva 3 Step-by-Step Solutions | Dr.fone
- Author: Abel
- Created at : 2024-10-06 20:38:07
- Updated at : 2024-10-12 19:20:02
- Link: https://fix-guide.techidaily.com/restore-missing-app-icon-on-lava-yuva-3-step-by-step-solutions-drfone-by-drfone-fix-android-problems-fix-android-problems/
- License: This work is licensed under CC BY-NC-SA 4.0.