
Samsung Galaxy F04 Not Connecting to Wi-Fi? 12 Quick Ways to Fix | Dr.fone
Samsung Galaxy F04 Not Connecting to Wi-Fi? 12 Quick Ways to Fix
Nowadays, it’s pretty much essential to have your Samsung Galaxy F04 or smartphone connected to the internet. Whether you’re watching videos, looking something up, or using any kind of app, you need the internet for these applications to function correctly.
This is why it can so annoying when it gets to a point where the internet connection isn’t working. However, the problem of a web page not loading correctly is just the tip of the iceberg.
There are plenty of problems you could experience, whether it’s the Wi-Fi network keeps disconnecting on its own without any warning, perhaps a security issue where the passcode or IP address isn’t being registered properly, or even if the connection is just being super slow, even if there’s no reason too.
Luckily, despite there being so many problems out there, there are also many solutions. Today, we’re going to share with you the complete definitive guide to help you get your Samsung Galaxy F04 connected and free from problems and issues.
Part 1: Restart your Samsung Galaxy F04
Begin by powering off your Samsung Galaxy F04 and unplugging your router. Wait for about a minute before plugging in the router and turning on your device. This simple reset can often restore stable connections and fix Android wifi not working.

Part 2: Turn on Airplane mode and turn off
Turn on Airplane Mode for a few seconds, then turn it off. This maneuver refreshes your device’s network connections and might rectify the Android not connecting to wifi issue.


Part 3. Check Wi-Fi Router settings
The third step you’ll want to take is making sure the internet router in your house is working properly and is actually sending internet data to your Samsung Galaxy F04. Of course, if you have other internet-enabled devices connected to the same router and they’re working fine, you know this isn’t the problem.
However, if you’ve got a problem with Wi-Fi not working on your Android and other devices in your home or office, you know you’ve got a router problem. Here’s how to solve it.
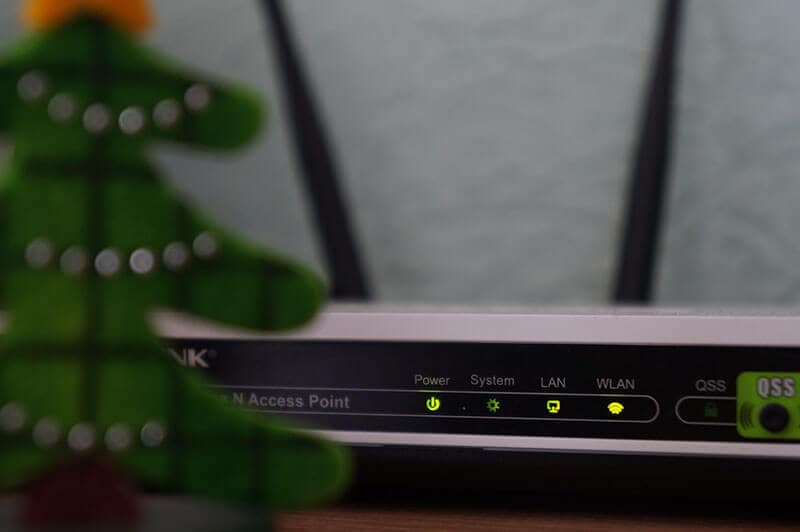
- Go to your internet router and check the indicator lights
- While this depends on your device, a green or blue light will mean the connection is good, whereas a red light indicates a problem
- Press the Restart button on your router and wait ten minutes before reconnecting your device and connecting again
- Call up your internet provider to see if there’s an internet connection issue in your area
- Open your web browser and log into your router settings to ensure your Samsung Galaxy F04 is connected to the Wi-Fi network and is allowed to send and receive data
Part 4. Boot your Android in safe mode
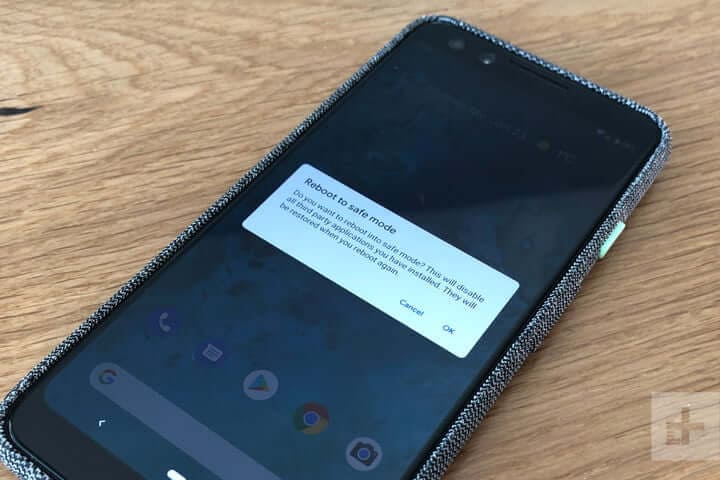
If you’re unable to connect to the internet, but other devices have no issues, you may find the issues is coming from within your Samsung Galaxy F04 itself. Fortunately, there are ways you can see whether this is the problem.
The best way to do this is to boot your device in Safe Mode. The process for doing this will depend on the make and model of your Samsung Galaxy F04, but the basic process goes as follows;
- Turn off your Samsung Galaxy F04 by holding down the Power button and tapping Power Off. Wait a few minutes to ensure the Samsung Galaxy F04 device is completely off
- Press and hold the Power button to turn your phone on, but the press and hold both the volume up and volume down buttons at the same time
- You will see the words ‘Safe Mode’ appear on your screen as the Samsung Galaxy F04 device loads
- Now you will be booted in Safe Mode. Try connecting to the internet again to see if it works
If your device connects to the internet while in Safe Mode, you’ll know you have a problem with an app or service that’s running on your device. If this is the case, you’ll need to go through your apps and delete them and then reinstall them one at a time until you find the app or service that is causing your internet problems.
Part 5. Check the Android Wi-Fi adapter
If you’re using a Wi-Fi adapter on your device to connect to the internet, you’ll need to make sure this is working. This could be an adapter on your Samsung Galaxy F04 itself, especially if you’re using an older device, or if you’re using an adapter to boost the ranger of your router network.
You need to check both of these to make sure your connection is working properly.
- If using an Android Wi-Fi adapter, make sure all the Samsung Galaxy F04 device drivers are up to date, and if you’re using an app, make sure the app is updated, and all the settings allow an internet connection
- If you’re using a router adapter, make sure it’s set up properly, and your Samsung Galaxy F04 is connected to the adapter using the correct passwords. Try connecting another device to see if the internet connection is working on there
- Whichever method you’re using, try disconnecting your Samsung Galaxy F04 and forgetting the network, and then reconnecting and entering the right password to refresh the connection
Part 6. Check SSID and IP address on Android
To make a Wi-Fi connection work, your Samsung Galaxy F04 needs to match two codes that connect and relate to your router to establish the connection and work correctly. These are known as the SSID and the IP address.
Every wireless device will have its own codes and making sure they’re matched to the network you’re connecting to is crucial to ensuring the internet is working on your Samsung Galaxy F04. Here’s how to check on your Samsung Galaxy F04 to make sure everything is correct.
- Tap the Settings menu option, followed by Wi-Fi on your Samsung Galaxy F04
- Turn on your Wi-Fi network and connect it to your router
- Find the router name (SSID) and make sure it’s exactly the same as the SSID written on your router
- Once connected, tap the Wi-Fi network and you will see the IP address. Check both your phone and the router codes to make sure this number matches
When these numbers are matching, if your Android is still not connecting to wifi, you’ll know this wasn’t the problem.
Part 7. Fix Android system issues in one click
If none of the solutions above are working, this could indicate a real problem with the firmware and operating system of your Samsung Galaxy F04. Fortunately, a fast solution to get everything working again is to completely repair the software of your phone.
You can do this easily using powerful Android recovery software known as Dr.Fone - System Repair (Android) . This is the leading repair tool on the market and is designed to fix and repair any firmware and software problems you may be having.
Dr.Fone - System Repair (Android)
A one-click tool to fix Wi-Fi not working on Android
- Can repair Android from any problem including the black screen of death
- A trusted software application used by 50+ million people around the world
- The most user-friendly mobile repair application available right now
- Supports over 1,000+ Android models and devices
- A world-class customer support team to help you whenever you need them
3,483,527 people have downloaded it
To help you have the best and the most accurate experience when using the Dr.Fone - System Repair (Android) application, here’s a complete step-by-step guide on how to use it.
Step One Make your way over to the Wondershare website and download the Dr.Fone - System Repair (Android) software. Install it onto your computer by following the on-screen instructions.
Once installed, connect your Samsung Galaxy F04 to your computer using a USB cable, and open the software, click “System Repair”.

Step Two Click the “Android” option in the menu and then click “Start” to begin the Repair process.

Step Three On the next screen, go through the options and use the drop-down menus to make sure the information is correct for your individual device. Accept the terms and conditions of the software, and then click the “Next” button.

Step Four Confirm you want the software to carry out the repair process by typing the ‘000000’ code into the pop-up box and pressing Confirm. Make sure you read everything displayed in this box beforehand to know what’s happening.

Step Five Now put your phone into Download Mode by following the on-screen instructions, so your device is ready for the repair process. The method for getting your phone into Download Mode will vary depending on your device, so make sure you’re following the right instructions.

Step Six Once the software has detected your device in Download Mode, it will automatically begin the repair process. You need to make sure your device stays connected throughout this time, and your computer stays on.

The whole process is automatic, so you won’t need to do anything until it’s finished. Once completed, you can disconnect your phone and start connecting it to the internet as normal!

 safe & secure
Part 8. Check the Wi-Fi connectivity on another phone

When experiencing problems with your Wi-Fi network, it’s worth noting the problem might not be with your phone, but rather the Wi-Fi network itself. This is why it’s important to make sure you check the connection on another device.
Of course, if you’re already using another phone on your Wi-Fi network, you know this isn’t the case. However, if you’re not sure, here’s what you need to do;
- Get another Android or iOS phone or tablet
- Open the Settings menu and connect to the Wi-Fi network you’re having problems with
- Enter the password and connect to the network
- Open a web browser on the phone and try loading a web page
- If the page loads, you know the Wi-Fi network isn’t the problem
- If the page doesn’t load, you know you’ve got a problem with your Wi-Fi network
Part 9. Change the password of the Wi-Fi
Each Wi-Fi network router will give the opportunity to choose and change the password you have to let devices connect to your network. It’s important you try changing this because you never know if someone else has accessed your network and could be blocking your device. Here’s how it works;
- Log onto your computer and open your Wi-Fi settings
- Depending on the brand and method of your individual router, navigate to the Wi-Fi password settings menu
- Change the password to something complicated using all available digits and characters
- Save the password and restart the router to disconnect all devices
- Now connect your Samsung Galaxy F04 to the router using the new password
Part 10. Reset network settings on Android
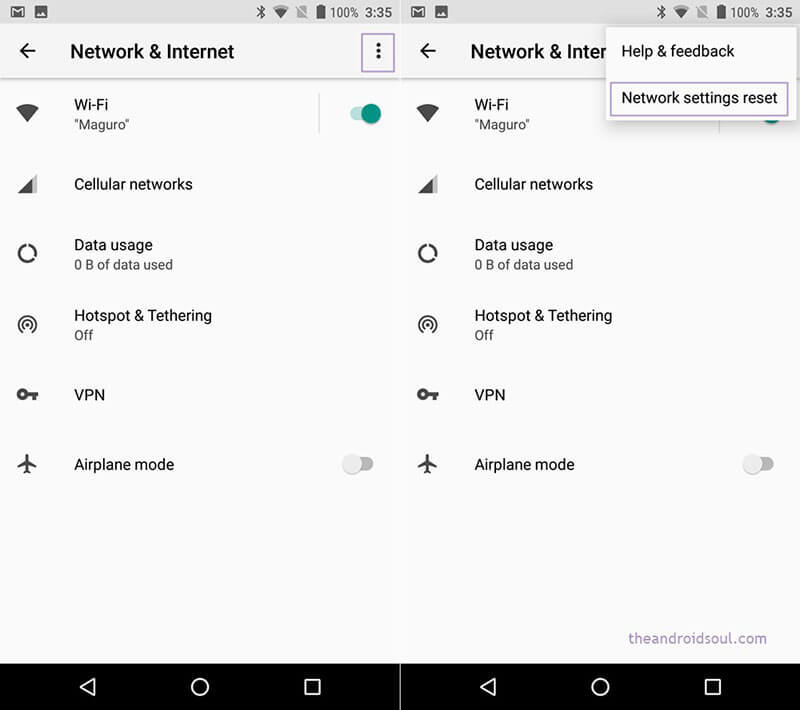
Just like the method above where you’ll be effectively resetting the network settings on your router, if this hasn’t worked, you’ll be able to reset the network settings on your Samsung Galaxy F04, hopefully removing the bugs and allowing you to connect.
Here’s how you can do this easily on your Samsung Galaxy F04;
- From the home screen of your Samsung Galaxy F04, open the Settings menu
- Tap the Backup & Reset option
- Tap the Reset Network Settings option
- Tap the Reset Network option
- If you need to, enter the PIN number or passcode for the Android device, and the Samsung Galaxy F04 device will confirm the reset has taken place
- Reconnect your Samsung Galaxy F04 to your Wi-Fi network for the changes to take effect
Part 11. Clear partition cache in recovery mode
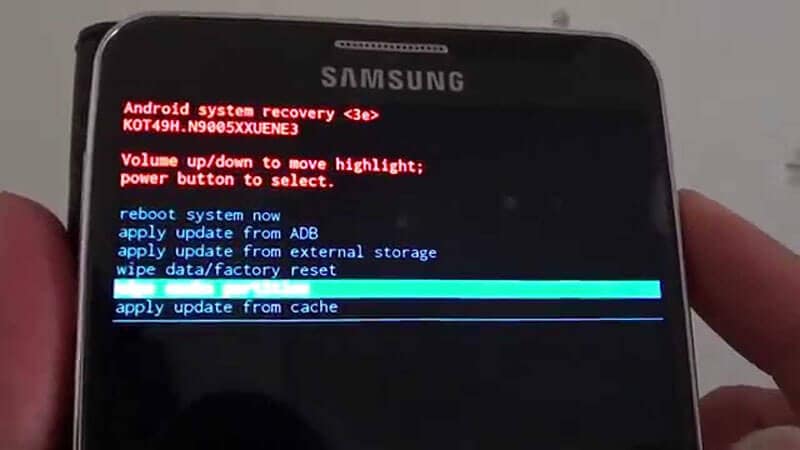
As you continue to use your Samsung Galaxy F04, the partition cache will fill up with data your device needs and doesn’t need. However, by clearing your device’s partition cache, you can make clear up some space which should help your device have enough memory to connect to the internet.
- Turn off your Samsung Galaxy F04
- Turn it on by holding down the power button, volume button, and home button
- When your phone vibrates, let go of the Power button, but continue to hold the volume button
- When a menu is displayed, use the volume buttons to navigate the menu
- Select the Android System Recovery option, followed by Wipe Cache Partition
- Restart your device and connect to the internet
Part 12. Reset factory settings

If worse comes to worst, another option you have is to factory reset your Samsung Galaxy F04. As we’ve spoken about above, while using your phone from the day you started using it, your device will fill up with files and data which can become messy and causes bugs.
However, by factory resetting your device, you can start again from the factory default from which you first received it, ultimately clearing the bugs. Make sure you back up your device before proceeding because it will erase your personal files.
- Open the Settings menu on your Samsung Galaxy F04
- Navigate to System > Advanced > Reset Options
- Tap the Reset phone option, and enter your PIN code if required
- Tap Erase Everything
- Wait for your phone to complete the process
- Restart your device and connect to the internet
safe & secure
7 Solutions to Fix Chrome Crashes or Won’t Open on Samsung Galaxy F04
Google Chrome is one of the most popular web browsers in the world. It is fast, secure, and easy to use. However, like any other app, it is not free from errors. Many users have reported that Chrome crashes or won’t open on their Samsung Galaxy F04. If you are also facing this issue, then you have come to the right place. In this article, we will discuss the reasons behind this problem and provide you with 7 solutions to fix Chrome crashes or won’t open on Samsung Galaxy F04.
Being one of the widely used browsers, Chrome is always our rescue whenever vital information is our need. Imagine, you launched Chrome for some urgent work and all of a sudden, got “Unfortunately Chrome has stopped” error. You re-opened it thinking about proper functioning of it now but to no avail. Does this situation sound familiar? Are you in a same problem as well? Fret not! We will discuss in this article why your Chrome is crashing on Android and the potential solutions to do away with the problem. Please read the article attentively and know what helps you best.
Part 1: Too many tabs opened
One of the main reasons why Chrome keeps crashing could be the multiple opened tabs. If you keep open the tabs, it may slow down the performance of Chrome and the app will use RAM. As a result, it will obviously get stopped midway. Therefore, we suggest you to close the tabs which are opened. And once you do that, exit the app and then launch it again.
Part 2: Too much memory used
When Chrome or any other app keeps running on the background, issues like “Unfortunately Chrome has stopped” are likely to occur. Moreover, the opened apps will eat the memory of your device. Hence, as the next solution, it is suggested that the Chrome should be closed by force quitting and then you need to try to launch it again to work. See if it works or still Chrome is not responding.
1. Simply tap on the Home button twice to get on the recent apps screen. Please note that the button may vary to reach the screen. Please check once and move accordingly.
2. Now simply swipe the app up/left/right (according to the Samsung Galaxy F04 device).
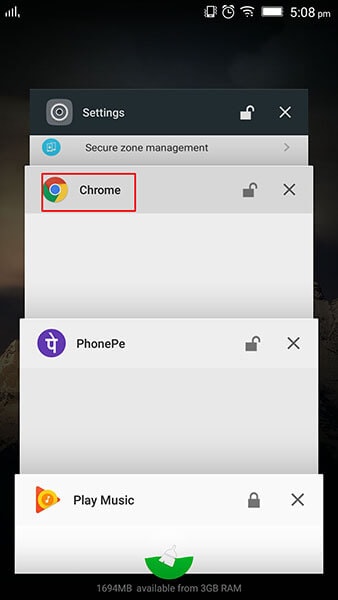
3. The app will be force quit now. You can then start it again to check if thing get back to normal.
Part 3: Chrome cache overflowing
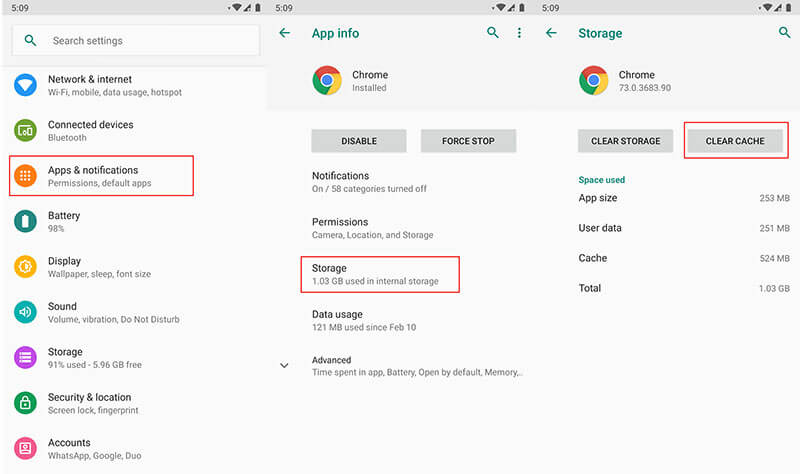
While using any app for long, the temporary files for those gets collected in the form of cache. And when cache is not getting cleared, one may face the freezing, crashing or sluggish apps. And this could also be the cause why your Chrome keeps stopping. Hence, the following steps will show you how to clear cache and make Chrome work as before.
1. Open “Settings” and go to “Apps & Notifications”.
2. Look for “Chrome” and tap on it.
3. Go to “Storage” and click on “Clear Cache”.
Part 4: Exclude the issue of website itself
Most probably Chrome is not able to support the website you are trying to access. We doubt if the particular website you are making use of is the culprit and making Chrome keeps stopping. In such case, we would like to recommend you to make use of another browser and try to access the website from there. See if this works or not. If now, please follow the next solution.
Part 5: Android firmware corruption
Another reason why your Chrome has stopped could be the corrupted software. You can’t expect anything normal when your firmware corruption occurs and so in the case of Chrome. If this is the case, the re-flashing the stock ROM is the most recommended solution. And the best that can help you in this is none other than Dr.Fone - System Repair (Android) . Within one click, it vows to help users in flashing the ROM without any complications. Read the advantages offered by this tool.
Dr.Fone - System Repair (Android)
Android repair tool to fix crashing Chrome
- It works like a pro no matter what problem your device is stuck with.
- More than 1000 types of Android devices are compatible with this tool.
- Easy to use and holds higher success rate.
- No need for any special technical knowledge to use this
- Offers an incredible interface from which anyone can work with.
3,605,074 people have downloaded it
How to Use Dr.Fone - System Repair (Android) when Chrome is crashing on Android
Step 1: Install the Tool to Begin
Start downloading it from there. Install it once downloading is completed and open the tool. The main screen will show you some tabs. You need to hit on “System Repair” among those.
Step 2: Get Android Device Connected
Now, you need to connect your Samsung Galaxy F04 with the computer using USB cord. When the Samsung Galaxy F04 device is connected successfully, click on the “Android Repair” option from the left panel.
Step 3: Enter Details
On the following screen, you need to select the right phone brand, name model and enter career details. Check once to confirm and hit on “Next”.
Step 4: Download Firmware
Now, follow the steps displaying on the screen to enter the DFU mode. When you do this, click on “Next” and the program will download the firmware.

Step 5: Repair the Issue
Once the firmware is downloaded, you will notice that the repairing process will start by the program. Wait until it gets finished and try to start Chrome again and you’ll surely get rid of the problem.
Part 6: File Downloading issue from Chrome
While you were trying to download from internet, the file didn’t download properly or it might get stuck and eventually crashing Chrome occurs. In such instances, many times, uninstalling and installing helps. Therefore, follow the steps below to uninstall and install Chrome and fix Chrome keeps stopping
- Go to “Settings” and tap on “Apps”.
- Select “Chrome” and tap on “Uninstall Updates”.
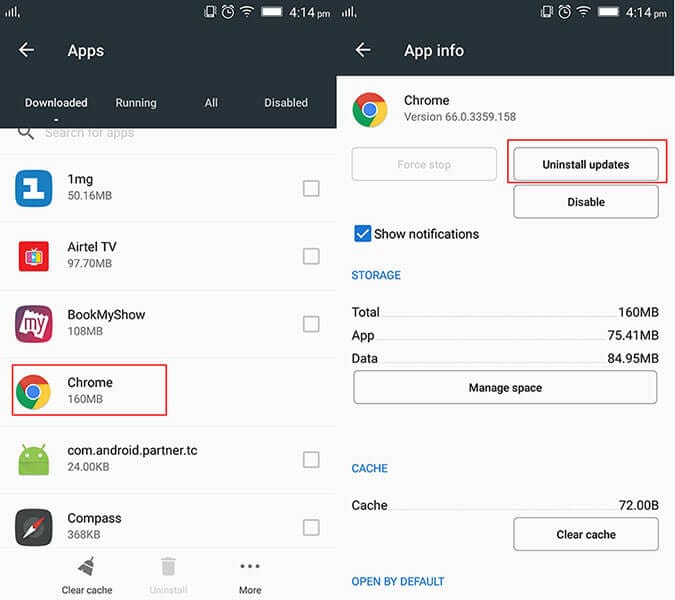
- Now, you need to re-install it from Play Store. From the “My Apps” section, tap on Chrome and update it.
Part 7: Clashes between Chrome and system
Of still you are receiving “Unfortunately Chrome has stopped” pop-up, it might be because of the incompatibility between the Chrome and system. Maybe your device is not updated and therefore is at odds with the Chrome app. So, the last tip that we would like give you is to update your Samsung Galaxy F04. Following are the steps for it. Follow them and stop the Chrome crashing on Android issue.
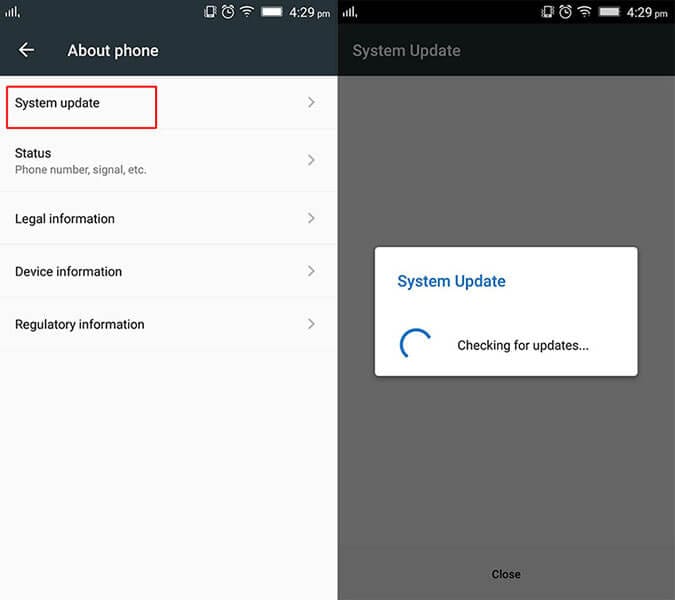
- Go to “Settings” and tap on “System”/”About Phone”/”About Device”.
- Now, choose “Software Update”/”System Update” and your device will detect if there is any update present on your device. Proceed accordingly.
How to Resolve Samsung Galaxy F04 Screen Not Working

Nothing is more frustrating than your phone’s touch screen becoming unresponsive. Given the importance of smartphones in daily work, a phone with a touch screen not working can badly affect your routine. It is an issue found in most smartphone brands, even among Samsung Galaxy F04 phones, known for their efficient performance. If your Samsung Galaxy F04 screen is not working, it can be an exhausting experience.
Luckily for your, multiple ways are available to resolve this issue. This article will list six fixes for resolving the Samsung Galaxy F04 not working issue. It will also discuss the reasons behind this issue in detail and provide a list of tips to avoid it in the future.
Part 1: What Causes Samsung Galaxy F04 Screen Unresponsive?
Answering what causes Samsung Galaxy F04 screen unresponsiveness is difficult. Many reasons, ranging from minor bugs to serious hardware issues, can cause it. To find out the exact or near exact reason, you will have to review your device’s activity before this issue occurs. You can use the following common reasons behind the Samsung Galaxy F04 6T touch screen not working as the basis of your investigation:
1. Touchscreen Calibration
Excessive smartphone use can cause the touchscreen to go out of the required settings. It means until the touch screen is not recalibrated properly, the touch not working issues will continue to pop up.
2. Battery Issue
If your device’s battery is damaged or is at the end of its lifespan, it can cause the touch screen not responding issues. Moreover, the low battery and issue with the charging port can also lead to this problem.
3. Corrupted System Files
The presence of corrupted system files is also a significant cause of such issues. These corrupted files can also lead to serious performance issues on your phone.
4. Conflicting Settings
It is also possible that the conflicting settings in your device are causing this issue. These settings can range from touch sensitivity to screen refresh rate. Unless these conflicts are removed, the touchscreen performance will continue to degrade.
Part 2: The Common Solutions to Solve a Samsung Galaxy F04 Screen Unresponsive
Fixing the Samsung Galaxy F04screen not working is easy as long as it is not a serious hardware issue. While there are multiple ways to solve this problem, we have chosen the 6 most common and easy solutions. Listed below are the 6 common solutions to solve a Samsung Galaxy F04 screen unresponsive:
Solution 1. Restart the Samsung Galaxy F04 Phone
As with any other issue or device, the first fix you should always try first is to restart your device. It is the best solution to fix the Samsung Galaxy F04 not working issue if temporary bugs and glitches are the reason behind it. When you restart your device, it flushes out all temporary bugs and glitches while resetting your device’s processes. Use this guide to restart your Samsung Galaxy F04 device:
Instruction: Press and hold the “Power” button for a couple of seconds until it turns off. Wait a few moments and then use the “Power” button to turn on the Samsung Galaxy F04 device. In some of the Samsung Galaxy F04 devices, you also have to use the “Volume Down” button along with the “Power” button to restart the Samsung Galaxy F04 device.
Solution 2. Check the Charging Port and Battery
The issues with the battery of your Samsung Galaxy F04 5 can also lead to Samsung Galaxy F04 not working. It can be due to your device’s low or near-empty battery. While in some cases, serious issues with the battery can also be behind this problem. Similarly, the reason behind your phone’s touch not working can be charging port issues.
Thus, you should check and clean your device’s charging port and see if it resolves the problem. Moreover, turn off your device, charge it, and then restart it to check if the touch screen not working issue is gone.
Solution 3. Contact the Samsung Galaxy F04 Customer Support
Contacting Samsung Galaxy F04 customer support can also help resolve the Samsung Galaxy F04 screen not working problem. It is especially helpful if you are unable to find the cause and want to seek an expert opinion. The Samsung Galaxy F04 customer support will help you find the issue and recommend a solution.
It is an excellent option if your Samsung Galaxy F04 device’s touch is not working due to hardware issues. They can help guide you to a suitable service center to fix your phone and resolve this issue.

Solution 4. Wipe the Cache of Your Samsung Galaxy F04 Device
A common reason for Samsung Galaxy F04 Nord being stuck on the loading screen is the filled cache partition. If you do not clean out the cache partition of your Samsung Galaxy F04 device, its performance will degrade. As a result, your device will experience issues like the touch screen not working or getting stuck at the loading screen. Here is how you can clear the cache of your Samsung Galaxy F04 device:
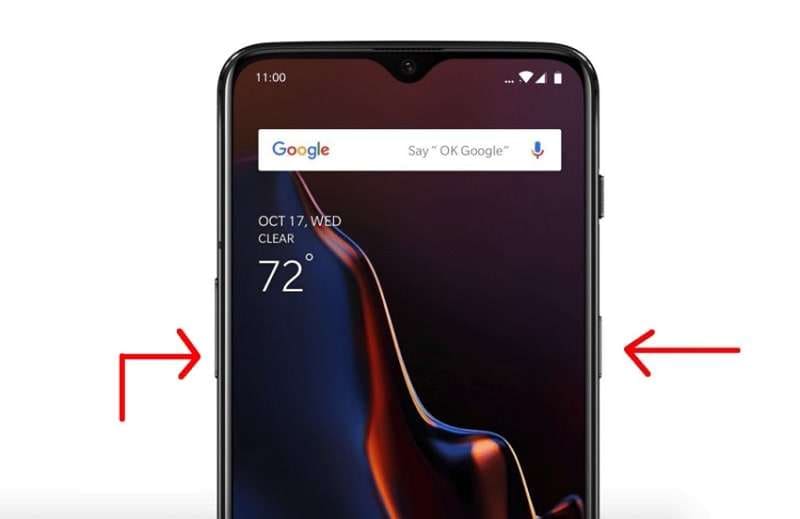
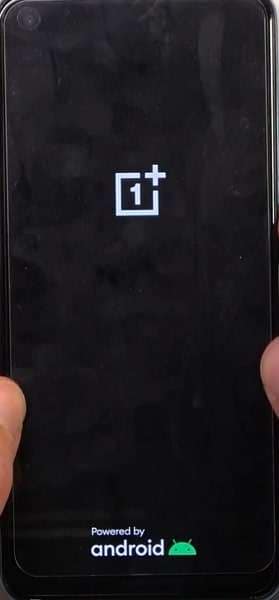
Step 1: Turn off your device by pressing and holding the “Power” button. Once it is turned off, press and hold the “Power” and “Volume Down” buttons until you see the Samsung Galaxy F04 logo.
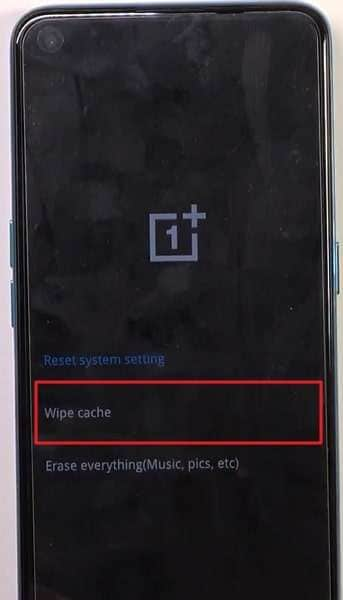
Step 2: Now, enter your phone’s PIN or pattern and choose a language. After selecting the language, choose “Wipe data and cache.”
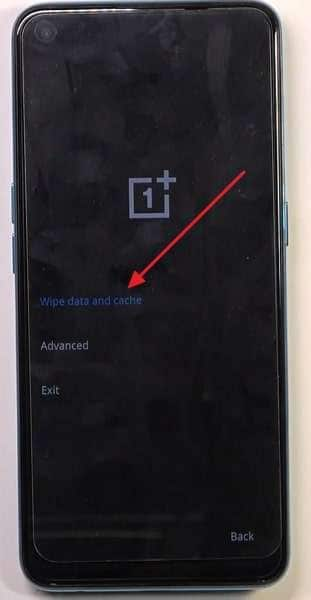
Step 3: Select “Wipe cache” on the next screen and confirm the action through “Yes” in the ensuing window. Once the process is complete, choose “Reboot” to restart your device.
Solution 5. Reset to Factory Settings
Sometimes, clearing the cache partition doesn’t help resolve the touchscreen issue. In that case, You have to factory reset your Samsung Galaxy F04 device. It is the best and last solution if other fixes haven’t worked and you can’t pinpoint the reason. Factory resetting your Samsung Galaxy F04 will delete all phone data. Thus, you should create a proper backup before trying this fix. Follow these steps to factory reset your Samsung Galaxy F04 in no time:
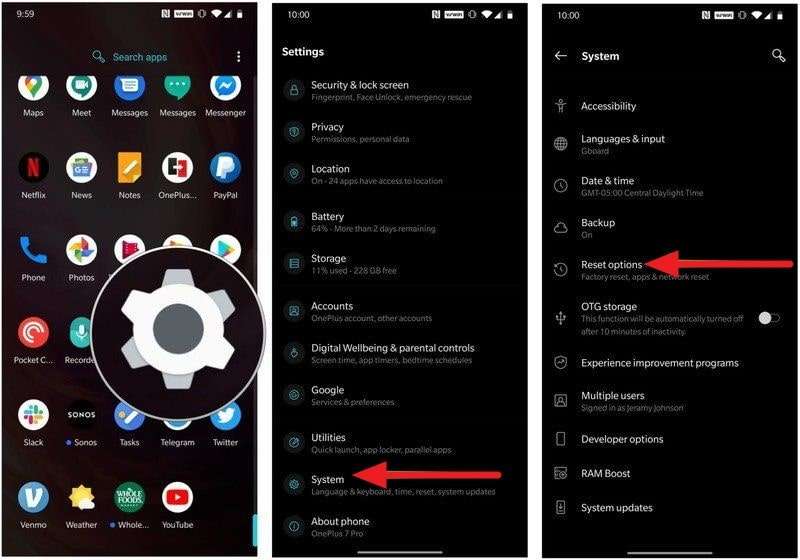
Step 1: Launch Settings on your Samsung Galaxy F04 device and tap “System” to select “Reset Options.”
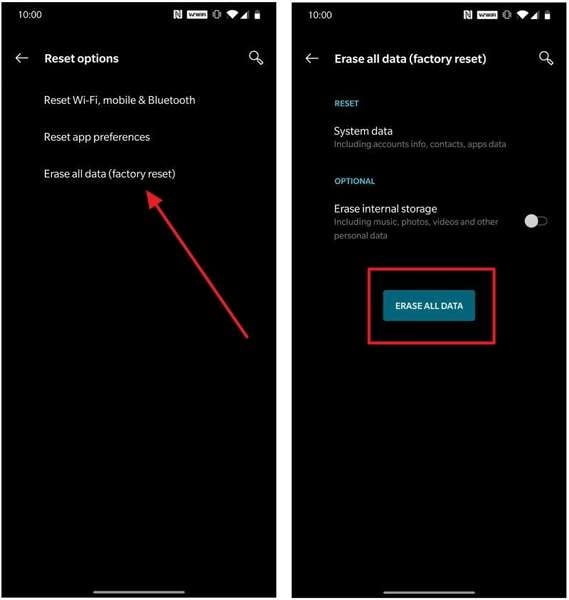
Step 2: In the “Reset Options,” select “Erase all data (factory reset)” and confirm the action by again pressing “Erase All Data.” It will start the factory reset process.
Solution 6. Replace the Old Screen with A New Screen
If none of the above-mentioned fixes have worked so far, you should replace the touch screen. Replacing the touch screen is recommended in case of hardware and severe software issues. However, it can be quite an expensive fix as new touch screens aren’t cheap. The prices for new touchscreens differ depending on the model. These prices start from $20 and go up to hundreds of dollars.
Part 3: How to Avoid Samsung Galaxy F04 Screen being Unresponsive?
Protecting your Samsung Galaxy F04 device against system issues like touch not working is not difficult. While it is true that you can’t 100% avoid such problems, the risks can still be reduced to a great extent. To prevent your Samsung Galaxy F04 screen from being unresponsive, here are some tips you can follow:
- ****Regular Updates:****You should always ensure that your Samsung Galaxy F04 device runs on the latest software version available. It can help prevent bugs or glitches that might cause the screen to become unresponsive.
- ****Device Protection:****It is also essential that you use a good quality phone case and screen protector. These will protect your Samsung Galaxy F04 device from physical damage. Drops, bumps, or scratches can damage the screen and make it unresponsive.
- ****Delete Unnecessary Apps:****If you have too many apps on your Samsung Galaxy F04 devices, it can cause screen unresponsiveness issues. Thus, you should only install the apps you need and delete the apps that are no longer needed.
- ****Use Dr.Fone 13:****Having a professional tool like Fone in your arsenal helps a lot in protecting against system issues. If a system issue is able to pass through, Dr.Fone has the ability to resolve the issue in a matter of seconds. Moreover, it is a complete smartphone tool with data transfer, location changer, and system repair features.
A new version of Dr.Fone is expected to release in the latter half of this month. The new version will include many improvements, advanced features, and increased device support. Furthermore, it will also have a better and more user-friendly interface.

Conclusion
To sum up this article, it can be said that issues like Samsung Galaxy F04 not working are part of life. These issues can occur anytime and are hard to completely protect against. Thus, having a problem solver like Wondershare Dr.Fone is the best choice. It will not only help you safeguard against system issues but also resolve them if they occur.
Also read:
- [New] In 2024, Comic Crafting Mastering 7 Cheeky Content Strategies
- [Updated] 2024 Approved Engage, Learn & Multitask Top Ideas for Making Most of Your Podcasts
- [Updated] 2024 Approved Win11's Best Built-In Recording Software
- Affordable Alternative: Exploring Virtual Reality with This Compact and Powerful VR Device From ZDNet's Top Picks
- Discover the Finest Free Tools for Socio Networking
- Does Poco C65 Have Find My Friends? | Dr.fone
- Framed Fantasies Expert Recommendations on Software & Sites for 2024
- How to Fix It Tecno Pova 6 Pro 5G Wont Turn On | Dr.fone
- In 2024, Exploring the Essence of Vimeo A Leader in Video Platforms
- In 2024, Ways To Find Unlocking Codes For Oppo A1 5G Phones
- Infinix Note 30i Camera Not Working Unexpected Error? Fix It Now | Dr.fone
- Oppo A78 5G Not Receiving Texts? 10 Hassle-Free Solutions Here | Dr.fone
- Proven Ways to Fix There Was A Problem Parsing the Package on Realme C67 5G | Dr.fone
- Quick Fixes for Why Is My Vivo V27 Black and White | Dr.fone
- Quick Fixes for Why Is My Vivo Y100i Power 5G Black and White | Dr.fone
- Restore Missing App Icon on Realme GT Neo 5 SE Step-by-Step Solutions | Dr.fone
- Strategies for Apps That Wont Download From Play Store On HTC U23 | Dr.fone
- Title: Samsung Galaxy F04 Not Connecting to Wi-Fi? 12 Quick Ways to Fix | Dr.fone
- Author: Abel
- Created at : 2024-10-06 16:09:46
- Updated at : 2024-10-12 16:01:41
- Link: https://fix-guide.techidaily.com/samsung-galaxy-f04-not-connecting-to-wi-fi-12-quick-ways-to-fix-drfone-by-drfone-fix-android-problems-fix-android-problems/
- License: This work is licensed under CC BY-NC-SA 4.0.