
Samsung Galaxy M34 Bootloop Problem, How to Fix it Without Data Loss | Dr.fone
Samsung Galaxy M34 Bootloop Problem, How to Fix it Without Data Loss
Have you, like many other users, faced the bootloop Android problem and wondered what exactly is Android boot loop. Well, Android boot loop is nothing but an error that makes your phone switch on itself every time you manually turn it off. To be precise, when your Samsung Galaxy M34 does not remain switched off or powered off and starts to boot up automatically after a few seconds, it might be stuck in the boot loop Android.
An Android boot loop is a very common problem and is one of the first symptoms of a soft-bricked device. Also, when your device is experiencing Android boot loop issue, it does not start normally to reach the Home or Locked Screen and remains frozen at the Samsung Galaxy M34 device’s logo, Recovery Mode or a lit-up screen. Many people fear losing their data and other files due to this error and thus, it is a very confusing situation to be in.
We understand the inconvenience caused, therefore, here are ways to tell you how to fix the bootloop problem in Android devices without losing any important data.
However, before moving on, let us learn a little about the causes for the Android boot loop error.
Part 1: What might cause the bootloop issue on Android?
Android boot loop error might seem weird and unexplainable but it occurs because of some specific reasons.
Firstly, please understand that it is a misnomer that boot loop error occurs only in a rooted device. Boot loop Android error can also occur in a stock device with the original software, ROM, and firmware.
In a rooted device, changes made, such as flashing a new ROM or customized firmware which are not compatible with the Samsung Galaxy M34 device’s hardware or existing software, can be blamed for the boot loop problem.
Moving on, when your device’s software is unable to communicate with the system files during the start-up process, Android boot loop problem may arise. Such a glitch is caused if you have recently updated the Android version.
Also, corrupt App update files may also cause the bootloop Android issue. Apps and programs downloaded from unknown sources bring in a particular type of virus that prevents you from using your device smoothly.
All-in-all, Android boot loop error is a direct outcome of when you try to tamper with your device’s internal settings.
Hence, if you are looking for ways to guide you about how to fix boot loop issue, you will have to revamp the Samsung Galaxy M34 device internally by either resetting it or adopting a recovery method.
Read on to know more about how to fix the bootloop error without any data loss when your device suffers from the bootloop Android problem.
Part 2: One click to Fix Android Bootloop without factory reset
If you are trying to figure out how to fix boot loop, the first option you have is the one-click fix to Android Bootloop which involves using the Dr.Fone - System Repair software.
This is designed to repair any data corruption on your device and restores your firmware to its usual working condition.
Dr.Fone - System Repair (Android)
One click to fix boot loop of Android
- #1 Android repair solution from your PC, can fix a wide range of Android system issues, such as boot loop, black screen, etc.
- The software requires no technical expertise, and anybody can use it
- A one-click solution when learning how to fix Android boot loop
- Not require root Android phones.
- Works with most Samsung Galaxy M34 devices, including the latest Samsung Galaxy M34 phones like S22
- Simple and easy-to-use user interface
4,689,059 people have downloaded it
To help you get started, here’s a step-by-step guide on how to use Dr.Fone - System Repair.
Note: This method can erase data on your device, including your personal files, so make sure you’ve backed up your device before proceeding.
Step #1 Download the Dr.Fone - System Repair software from the website and install it onto your computer.
Open the software and select the System Repair option from the main menu to fix the Android bootloop error.

Step #2 Connect your Samsung Galaxy M34 to your computer using the official cable and select the “Android” option from the three menu items. Click “Start” to confirm.

You’ll then need to input the Samsung Galaxy M34 device information, such as your carrier info, device name, model, and country/region in order to ensure you’re downloading and repairing the correct firmware to your phone.

Step #3 Now you’ll need to put your phone into Download Mode to remove the Android bootloop.
For this, you can simply follow the onscreen instructions for both phones with and without home buttons.

Click “Next”, and the software will begin downloading the firmware repair files.

Step #4 Now you can sit back and watch the magic happen!
Make sure your computer stays connected to the internet, and your device stays connected to your computer throughout the entire process. Once the firmware has been downloaded, it will be automatically installed onto your mobile device, removing the boot loop Android error.

You’ll be notified when the process is done and when you can remove your device and start using free from the boot loop Android error!
 safe & secure

Part 3: Soft reset to fix Android bootloop issue
When your device is stuck in Android boot loop, it does not necessarily mean that it is bricked. Boot loop might be occurring due to a simpler problem which can be fixed by turning off your device. This sounds like a home remedy for a serious problem but it works and resolves the problem most of the time.
Follow the steps given below to soft reset your device:
Turn the Samsung Galaxy M34 device off and take out its battery.

If you cannot take the battery out, let the phone be off for about 3 to 5 minutes, and then turn it back on.
Simply performing a soft reset on your device can help you if you are looking for solutions for how to fix the bootloop issue. This a very useful method as it does not result in any kind of loss in data and protects all your media files, documents, settings, etc.
In case the Samsung Galaxy M34 device does not turn on normally and is still stuck in the bootloop Android problem, be prepared to use the troubleshooting techniques given and explained below.
Part 4: Boot into Safe Mode to fix Android boot loop

Booting your Samsung Galaxy M34 into Safe Mode is a useful troubleshooting step to fix boot loop issues caused by third-party apps. When in Safe Mode, the Samsung Galaxy M34 device will start up with only essential system apps, and any downloaded apps that might be causing conflicts won’t run. Here’s how you can boot your Samsung Galaxy M34 into Safe Mode to address the boot loop problem:
Step 1: Power Off Your Device
Hold down the power button until it turns off completely.
Step 2: Access Safe Mode
To enter Safe Mode, follow these steps based on your device model:
- For most Android devices: Press and hold the power button to turn on your device. As soon as the manufacturer’s logo appears, press and hold the Volume Down button until the Samsung Galaxy M34 device finishes booting. You should see “Safe Mode” displayed in the bottom left or right corner of the screen.
- Some devices might require slightly different key combinations. Refer to your device’s user manual or perform an online search for the specific method to enter Safe Mode for your model.
Step 3: Observe the Samsung Galaxy M34 device
Once your device has booted into Safe Mode, use it for a while to see if the boot loop issue persists. If the boot loop doesn’t occur in Safe Mode, it indicates that the problem is likely caused by a third-party app.
Step 4: Identify and Uninstall Problematic Apps
Now that you’re in Safe Mode, it’s time to identify the troublesome app. Start by uninstalling recently installed apps one by one until the boot loop problem is resolved. After each uninstallation, restart your device normally to check if the boot loop still occurs. Continue this process until you find the problematic app.
Step 5: Restart Normally
Once you’ve identified and uninstalled the problematic app, restart your device normally to exit Safe Mode. Your Android device should now start up without getting stuck in a boot loop.
By following these steps and using Safe Mode to isolate problematic apps, you can effectively troubleshoot and resolve boot loop issues on your Samsung Galaxy M34.
Part 4: Factory reset to fix Android bootloop issue
Factory reset, also known as Hard Reset, is a one-stop solution for all your software resulting in issues. Android boot loop being such problem, can be easily overcome by performing a factory reset.
Please note that all your device’s data and settings will be deleted by adopting this method. However, if you have a Google account signed in on your Samsung Galaxy M34, you will be able to retrieve most of your data once the Samsung Galaxy M34 device turns on.
To factory reset your Android boot loop device, you must first boot into the Recovery Mode screen.
To do this:
Press the volume down button and power button together until you see a screen with multiple options before you.

When you are at the Recovery Mode screen, scroll down using the volume down key, and from the options given, select “Factory Reset” using the power key.

Wait for your device to perform the task and then:
Reboot the phone in Recovery Mode by selecting the first option.

This solution is known to fix the boot loop error 9 out of 10 times, but if you still can’t start your Samsung Galaxy M34 normally, consider using a CWM Recovery to resolve the Android boot loop issue.
Part 5: Use CWM Recovery to fix bootloop on rooted Android
CWM stands for ClockworkMod and it is a very popular custom recovery system. To use this system to solve the boot loop Android error, your Samsung Galaxy M34 must be rooted with CWM Recovery System which basically means CWM must be downloaded and installed on your device.
Furthermore, to use CWM Recovery to fix boot loop on rooted Android devices, follow the steps given below:
Press the home, power, and volume up buttons to launch the CWM Recovery screen.
Note: you might have to use a different combination of keys to enter into Recovery Mode, depending on your device’s model.

Scroll down using” the volume key to select “Advanced”.

Now select “Wipe” and choose to wipe “Dalvik Cache”.

In this step, select “Mounts and Storage” to click on “Wipe” or “Cache”.
Once this is done, make sure to reboot your Samsung Galaxy M34.
This process with successfully fix the Android boot loop error and not cause any loss of data stored on your device stuck in boot loop.
So the bottom line is that boot loop Android issue may seem like an irreparable error but it can be resolved by carefully following the techniques explained above. These methods not only tell you how to fix the bootloop problem but also prevent it from occurring in the future.
An Android boot loop is a common phenomenon with all Android devices because we tend to tamper with our device’s internal settings. Once the ROM, firmware, kernel, etc are damaged or rendered incompatible with the Samsung Galaxy M34 device’s software, you cannot expect it to function smoothly, hence, the boot loop error occurs. Since you are not the only one suffering from the Android boot loop problem, be rest assured that the ways, given above, to combat it are recommended by users facing similar troubles. So, don’t hesitate and go ahead to try them on.
safe & secure
Proven Ways to Fix There Was A Problem Parsing the Package on Samsung Galaxy M34
Unable to install your favorite Apps from Google Play Store because there was a problem parsing the package?
The Parse Error or there was a problem parsing the package error is very common with Android devices. Android is a versatile platform and, therefore, a very popular OS. It is an open software and allows users to download and use various types of apps from the Play store. Android is also a cheaper alternative as compared to other Operating Software.
Since many of us are well versed with most of the Android devices, parse error, or there is a problem parsing the package is an error is not something new and uncommon.
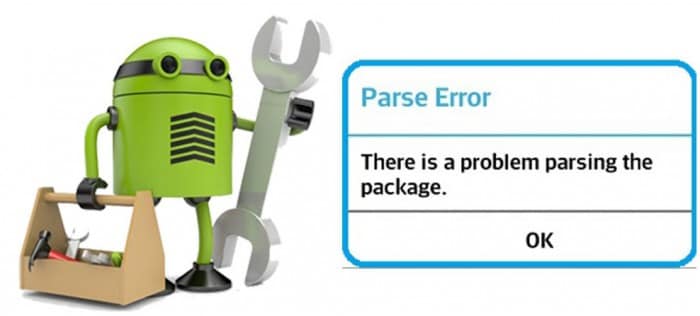
The error message usually pops up on the Samsung Galaxy M34 device screen when we try to download and install an App, for example, “There is a problem parsing the package Pokémon Go ”.
The error message which appears reads as follows:
“Parse error: There is a problem parsing the package”.
Android users who have experienced this would know that the parse error leaves us with only one option, i.e., “OK” as shown in the image below.
There was a problem parsing the package may occur due to several reasons, most of which are listed and explained below. Furthermore, there is a list of solutions to choose from to eliminate the “there is a problem parsing the package” error.
Read on to find out more.
Part 1: Reasons for the parsing error
Parse Error, better known as “there was a problem parsing the package” error is very common and normally surfaces when we try to download and install new Apps onto our Android devices from Google Play Store.
The reason for the error message to pop-up are many but none of them can be blamed singularly for the “there is a problem parsing the package” error. Given below is a list of the most probable reasons for Parse Error to stop an App from installing. Examine them carefully before moving on to the solutions to fix the “there was a problem parsing the package” error.
• Updating the OS may cause some disturbances in the manifest files of different Apps leading to Parse Error.
• Sometimes, the APK File, i.e., Android Application Package, gets infected due to improper or incomplete App installation causing “there is a problem parking the package” error.
• When Apps are downloaded and installed from unknown sources, due permission is needed. In the absence of such permission, the chances of the Parse Error to occur increase.
• Certain Apps are not compatible or supported by the latest and updated Android versions.
• Anti-virus and other cleaning Apps are also a major reason for the “there was a problem parsing the package” error.
The causes listed above are not App specific. The Parse Error may occur due to any one or more of these reasons, but what is more important is to try to get rid of the problem.
Let us move on to learn ways to fix the there was a problem parsing the package error.
Part 2: 8 Solutions to fix the parsing error
“There is problem parking the package” error can be dealt with easily if only we do not panic and deliberately follows the steps explained in this segment. Here are 7 of the most reliable and trustworthy methods to fix the Parse Error.
They are easy, user-friendly, and do not take much of your time. So don not waste any more of your time and try them now.
2.1 One Click to Fix ‘There is a Problem Parsing the Package
If you’re still encountering the Parsing error, there may be a problem with the Samsung Galaxy M34 device data on your device, which means you’ll need to repair it. Luckily, there’s a simple, one-click solution you can follow called Dr.Fone - System Repair .
Dr.Fone - System Repair (Android)
Android repair tool to fix all android system issues in one click
- Simple, clean, and user-friendly interface
- No technical knowledge required
- Easy one-click repair to fix ‘there is a problem parsing the package’ error
- Should repair most parsing problems with apps, like ‘there is a problem parsing the package Pokemon Go’ error
- Supports most Samsung Galaxy M34 devices and all the latest models like Galaxy S9/S8/Note 8
3981454 people have downloaded it
If this sounds like the solution you’re looking for, here’s a step by guide on how to use it yourself;
Note: Please note that this repair process can erase all data on your phone, including your personal information. This is why it’s so important to back up your Samsung Galaxy M34 before proceeding.
Step #1 Head over to the Dr.Fone website and download the software. Install the downloaded software and open it. From the main menu, select the System Repair option.
Input your device and firmware information to confirm you’re installing the right version of the operating system.
Step #2 Follow the onscreen instructions on how to get into Download Mode to start the Repair process.
Once complete, the firmware will start downloading.
Step #3 Once the firmware has downloaded, it will automatically install it to your device.
When this is completed, you’ll be free to disconnect your Samsung Galaxy M34 and use it how you please without the ‘there is a problem with the parsing package’ error.

2.2 Allow installation from unknown sources
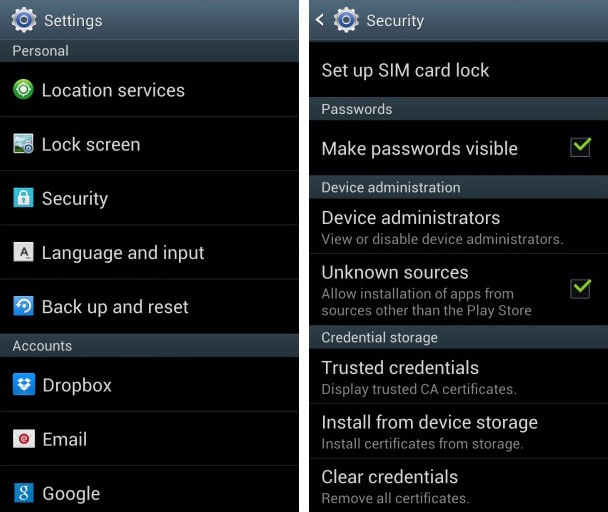
When we install Apps from other sources and not Google Play Store, there might be a glitch in using such Apps. To overcome this problem, turn on “Allow App installation from other sources”. Follow the steps given below for better understanding:
• Visit “Settings” and select “Applications”.
• Now tick mark on the option saying allow App installation from unknown sources.
2.3 Enable USB debugging
USB debugging is not considered necessary by many users but these methods give you an edge over others while using an Android device as it lets you access things on your phone, etc which you could not earlier.
To enable USB Debugging to fix “There is a problem parsing the package” error, follow these steps:
• Visit “Settings” and select “About Device”.
• Now click on “Build Number” not once but continuously for seven times.

• Once you see a pop-up saying “You are now a developer”, go back to “Settings”.

• In this step, select “Developer Options” and turn on “USB Debugging”.

This should solve the problem. If not, move on to the other techniques.
2.4 Check APK File
An incomplete and irregular App installation may cause the .apk file to get corrupted. Make sure you download the file completely. If need be, delete the existing App or its .apk file and reinstall it from Google Play Store for it to be compatible with your device’s software and to use the App smoothly.
2.5 Check App Manifest File
Manifested App files are nothing but .apk files which are improvised by you. Such changes may cause the Parse Error to occur more frequently. Modifications in the App file can be made by changing its name, App settings, or more advanced customizations. Make sure you roll back all changes and restore the App file to its original state to prevent it from getting corrupted.
2.6 Disable Antivirus and other cleaner Apps
Antivirus software and other cleaning Apps are very helpful in blocking unwanted and harmful Apps from damaging your device. However, sometimes such Apps also prevent you from using other safe Apps.
We do not suggest that you delete the Antivirus App permanently. Temporary uninstallation will be useful here. To do so:
• Visit “Settings” and then select “Apps”.
• Select the antivirus App to click on “Uninstall” and then tap “OK”.
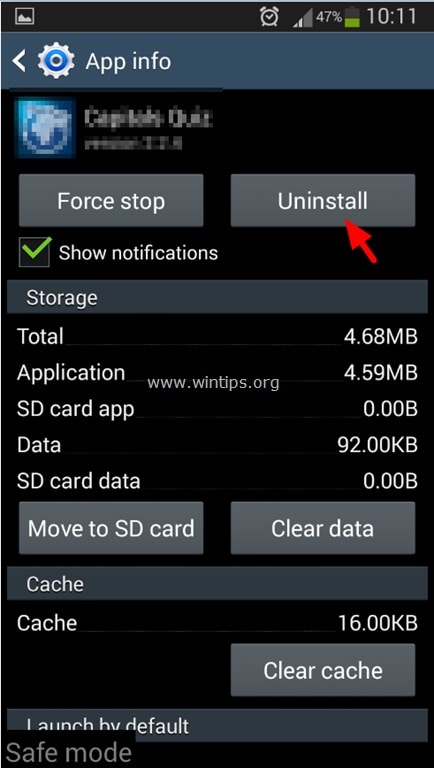
Now download and install the desired App again. Once this is done, do not forget to install the Antivirus App again.
2.7 Clear Cache cookies of Play Store
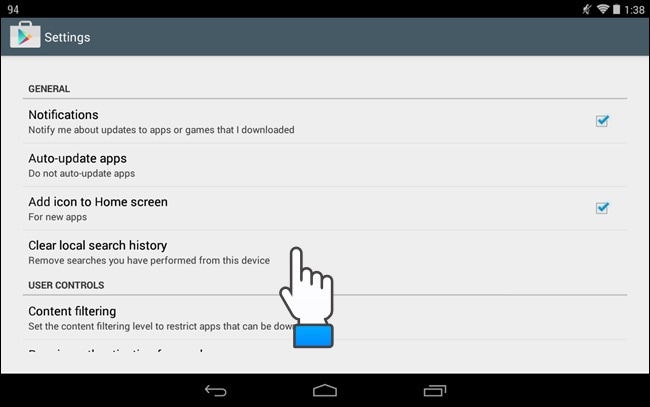
Clearing Play Store Cache cleans the Android Market platform by deleting all clogged up unwanted data. Follow the steps given below to delete Play Store cache:
• Tap on Google Play Store App.
• Now visit Play Store’s “Settings”.

• Select “General Settings” to “Clear local search history”.
2.8 Factory Reset Android
Factory Resetting your device to fix the Parse Error should be the last thing you try. Make sure you take a back-up of all your data on your Google Account or a Pen Drive because this technique erases all media, contents, data, and other files, including your device settings.
Follow the steps given below to factory reset your device:
• Visit “Settings”.
• Now select “Backup and Reset”.

• In this step, select “Factory data reset” and then “Reset Device” to confirm Factory Reset.
The whole process of factory resetting your Samsung Galaxy M34 might sound tedious, risky, and cumbersome but it helps to fix the Android SystemUI has stopped error 9 out of 10 times. So, think carefully before using this remedy.
Parse Error: There was a problem parsing the package is an error message that has troubled many Android users. The good part is that the above-stated fixes not only solve the problem but also prevent it from occurring in the future. So, keep them in mind the next time you or anyone you know faces such an issue.
Effective Methods on How To Take Viruses Off Your Phone
Cell phones have become a part of a person’s daily life. It offers convenience and connectivity at your fingertips. Yet, these handy devices are prone to viruses when used carelessly. Viruses can infiltrate your phone through unverified downloads, unsecured networks, or malicious links. This can compromise your data and device performance.
In this article, you’ll explore practical methods on h ow to take a virus off your phone. From simple preventive measures to specific solutions, this guide aims to equip you with practical strategies, ensuring a safer and smoother mobile experience by safeguarding your phone against the perils of viruses.

Part 1: Why You Get Mobile Viruses in the First Place
Mobile viruses are tiny bugs that sneak into your phone and mess things up. They’re sneaky software programs designed to cause trouble, like stealing your info or making your phone act strange. Pesky viruses are usually acquired by accessing unverified links and downloading sketchy files. This is why it’s essential to be careful about what you access on the internet. It’s also a great habit to beware of the computers you’re connecting your phone to.
You might notice weird things happening on your phone when infected with a virus. It may suddenly slow down, show pop-ups you didn’t click, or run out of battery super-fast . These could be signs that your phone has a virus. Take note of these.

Here are some common ways viruses get into your phone:
- **Accessing sketchy links.**Clicking on strange or suspicious links in messages or emails is the number one virus source.
- **Downloading apps from unauthorized developers.**Getting apps from places other than the official app stores like Google Play or Apple Store can also be a gateway for trojan viruses. This is mainly because apps install files directly to your system when downloaded.
- Connecting to compromised computers. Watching out for viruses or malware when plugging your phone into a computer would be best.
- **Transferring malware files to your phone:**Moving files with viruses from a computer or another device to your phone.
Remember, these bugs can cause a lot of trouble, but staying careful while using your phone can help you avoid them!
Part 2: Different Methods To Take Viruses Off Your Phone
If your phone’s caught a virus, it’s time to remove those bugs. You might wonder about how you get a virus off your phone. Well, this section has you covered with 4 different methods you can use.
Method 1: Wondershare Dr. Fone’s System Repair
If you need a quick, professional, and safe solution, Wondershare Dr.Fone is here to save the day. Its System Repair feature is like a superhero—it swoops in and fixes the problem in a snap. This magic tool does the heavy lifting to remove viruses from your phone.
Here’s how you can use Dr. Fone’s System Repair feature:
- Step 1: Launch Dr.Fone. Choose System Repair in the Toolbox section. Ensure that your phone is connected.
safe & secure
3,391,426 people have downloaded it
- Step 2: Choose either Android or iPhone. In this example, iPhone shall be selected. For Android devices, simply follow and mirror the prompts that will follow.

- Step 3: Select iOS Repair to proceed.

- Step 4: Choose either Standard Mode or Standard Repair. Standard Repair will not remove data from your device. However, for a sure fix, choose Standard Mode.

- Step 5: Put your device to Recovery Mode . Dr. Fone will provide on-screen instructions.

- Step 6: Click Download next to the iOS firmware you want to install.

- Step 7: After the firmware is downloaded, click Repair Now.

- Step 8: Once the process is completed, choose Done. Your phone should be virus-free by now.

Method 2: Using Safe Mode
Safe Mode is like a secret agent—it helps but with a downside. It turns off third-party apps, making your phone useful only for basic calls or texts. Use this method if any solutions in this section do not work. It’s especially handy if you use your phone before sending it to a technician. This way, you’ll learn how you can get a virus off your phone before actually letting a technician do it.
Generally, here’s how you can enter Safe Mode on Android Phones. Do check with your phone manufacturer’s official manual/guides on how to enter them:
- Step 1: Press and hold the power button. Wait for the power options to appear.
- Step 2: Tap and hold the Power Off button.
- Step 3: Tap on the prompt when you see the Reboot to safe mode option.

For iPhones, here’s how you can do it:
- Step 1: Power off your iPhone.
- Step 2: Hold the power button.
- Step 3: Hold the volume down button until you see the Apple logo.
- Step 4: Your phone should now be in safe mode.

Method 3: Downloading Anti-Virus Software
Anti-virus software works like a shield, protecting your phone from sneaky viruses and malware. Here are three recommended anti-virus apps that you should try out. They’re available on both the Google Play Store and App Store. So, regardless of what device you’re using, you’re sure to be safe with these:
- Avast Anti-virus – Mobile Security
- Norton 360: Online Security
- Bitdefender Mobile Security & Anti-virus
Method 4: Performing a Factory Reset
A Factory Reset is like a phone makeover—it wipes everything and starts fresh. But be cautious, as it erases all data!
Generally, the Factory Reset option should be in Settings > General & Backup and reset or under Settings > About phone for Android devices.

IOS devices should be under Settings > General > Transfer or Reset iPhone.

Remember, each method has its strengths and weaknesses. Dr.Fone is quick and effective, Safe Mode is limited but useful, anti-virus apps can protect, and a Factory Reset gives a clean slate. Try these methods to zap those viruses away!
Part 3: Handy Prevention Tips To Avoid Future Infections
To keep your phone safe from viruses, follow these easy tips that act as a shield against potential threats.
- **Regular software updates:**Keep your phone updated with the latest software. Updates often include security patches that protect your phone from new threats.
- **Cautious downloads:**Be careful when downloading apps or files. Stick to trusted sources like Google Play Store or Apple Store. Avoid clicking on suspicious links from unknown sources.
- **Secure networks:**Use secure Wi-Fi networks and limit public Wi-Fi use for sensitive activities. Public networks can expose your device to potential risks.
- **Anti-virus software:**Install a reliable anti-virus app and keep it updated. These apps constantly scan for and detect viruses, safeguarding your device against threats.
These simple yet crucial tips will fortify your phone’s defenses, reducing the likelihood of virus infections and ensuring a safer digital experience.
Conclusion
Viruses can make your phones act weird, but you have the tools to fight back. Keep your phone healthy by updating software, being cautious with downloads and links, using secure networks, and having an anti-virus app.
And, if you’re thinking, “**How do I get a virus off My Samsung Galaxy M34?**” then Wondershare Dr.Fone is a reliable hero. It’s quick and effective in clearing out those bugs. By staying aware and taking preventive steps, you can keep your phone safe and ensure a trouble-free experience. And if viruses strike, Dr. Fone’s got your back for an instant fix!
Also read:
- [New] In 2024, Mastering YouTube Playlist Downloads A Comprehensive Guide
- 2024 Approved Synthesizing a Look at MAGIX Creative Suite
- How to Bypass Google FRP Lock from Asus ROG Phone 8 Pro Devices
- How To Fix Unresponsive Phone Touchscreen Of Samsung Galaxy M14 5G | Dr.fone
- How to Flash Dead Realme 11X 5G Safely | Dr.fone
- How to Resolve Infinix Smart 8 Screen Not Working | Dr.fone
- How to Resolve Nokia G22 Screen Not Working | Dr.fone
- How to Resolve Vivo V27e Screen Not Working | Dr.fone
- How to Transfer Data from Honor Magic 6 Pro to Other Android Devices? | Dr.fone
- In 2024, How to Claim Facebook's Accredited, Elite Verification
- Magicard Rio Expert Driver Install Pack | Updated Version for All Windows Users Including Win 10, 8.1 & 7
- Reliable User Guide to Fix Samsung Galaxy A54 5G Running Slow and Freezing | Dr.fone
- The 4 Essential Steps to Create Engaging Instagram Loops
- The Rise of LG's Tandem OLED Technology in Mainstream Manufacturing, Epitomized by the Flourishing Display of Dell XPS Narratives
- Title: Samsung Galaxy M34 Bootloop Problem, How to Fix it Without Data Loss | Dr.fone
- Author: Abel
- Created at : 2024-10-07 21:32:16
- Updated at : 2024-10-12 16:23:30
- Link: https://fix-guide.techidaily.com/samsung-galaxy-m34-bootloop-problem-how-to-fix-it-without-data-loss-drfone-by-drfone-fix-android-problems-fix-android-problems/
- License: This work is licensed under CC BY-NC-SA 4.0.