
Simple Solutions to Fix Android SystemUI Has Stopped Error For Vivo Y100t | Dr.fone
Simple Solutions to Fix Android SystemUI Has Stopped Error For Vivo Y100t
In this article, you will learn possible causes of Android SystemUI stopping error and 4 methods to fix this issue. Get Dr.Fone - System Repair (Android) to fix Android SystemUI stopping more easily.
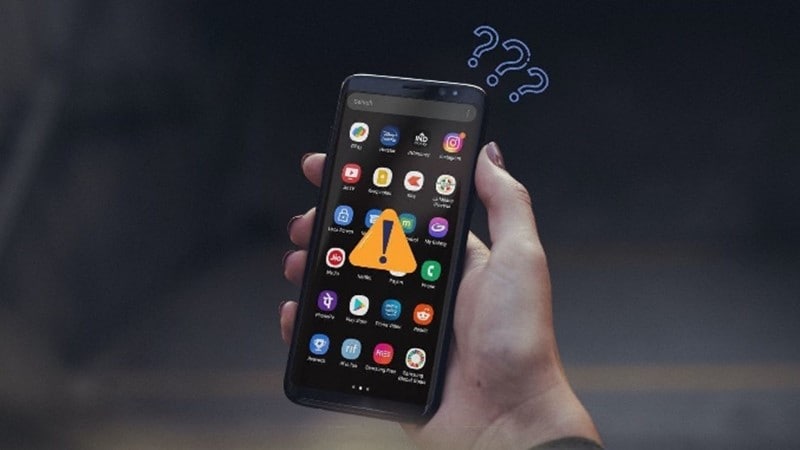
Android SystemUI isn’t responding or Android, unfortunately, the process com.android.systemui has stopped is a not a rare error and is observed in all Android devices these days. The error usually pops up on your device while you are using it with a message on the screen saying Android. Unfortunately, the process com.android.systemui has stopped.
The Android SystemUI isn’t responding error message may also read as “Unfortunately, SystemUI has stopped”.
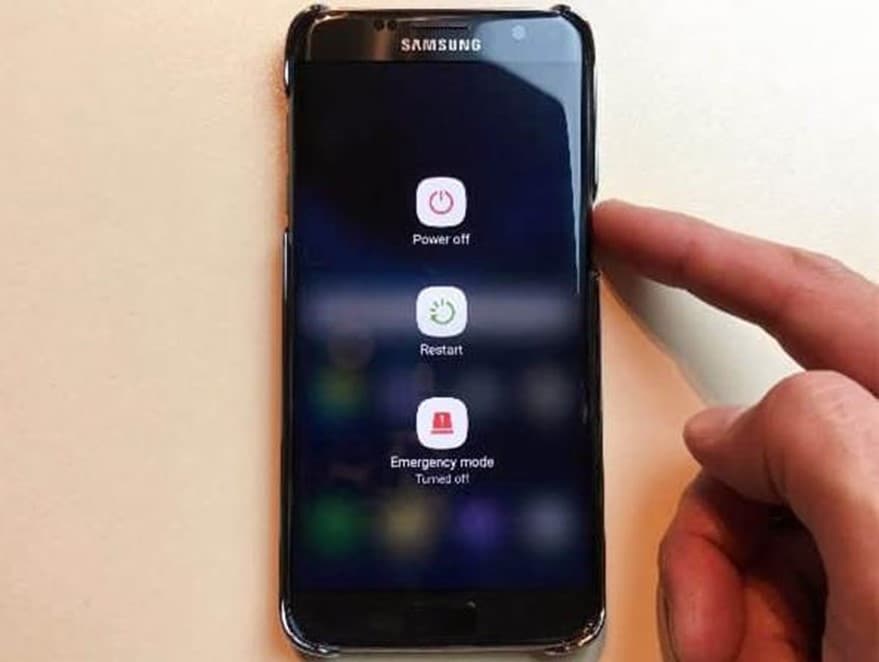
Android SystemUI error can be very confusing as it leaves affected users with only one option, i.e., “OK”, as shown in the images above. If you click on “OK” you will continue to use your device smoothly, but only until the SystemUI isn’t responding error pops-up on your main screen again. You may restart your device, but the Android SystemUI has stopped the problem continues to annoy you until you find a permanent solution for it.
If you are also among the various users who see Android, unfortunately, the process com.android.systemui has stopped error, then do not worry. SystemUI isn’t responding. Error is not a serious issue and can be tackled easily by carefully examining the reasons behind the problem.
Looking for suitable solutions to fix Android SystemUI has stopped error? Then read on to find out all about Android SystemUI isn’t responding error and the most effective ways to fix it.
Part 1: Why Android SystemUI Has stopped happens?

Android device owners would agree that OS updates are very helpful as they fix the bug problem and improve the overall working of your device. However, sometimes these updates may be infected due to which they do not download and install properly. A corrupted OS update may cause Android; unfortunately, the process com.android.systemui has stopped error. All Android updates are directly designed around the Google App, and thus, the problem will persist until the Google App is also updated. Sometimes, even the Google App update may cause such a glitch if it is not successfully downloaded and installed.
Another reason for the Android SystemUI isn’t responding error to occur, maybe because of flashing a new ROM or due to improper firmware update installation. Even when you restore the backed up data from cloud or your Google Account, such Android, unfortunately, the process com.android.systemui has stopped error may show up.
It is not possible to say for sure which one of the above-mentioned reasons is causing your device to show Android SystemUI is not responding error. But what we can do is move on to fixing the Android SystemUI by following any one of the three methods given the following segments.

Part 2: How to fix “com.android.systemui has stopped” in one click
As we’ve learned that Android system UI isn’t responding issue is primarily because of the Android OS updates not installed properly or were corrupted. Hence, there comes the need for a powerful Android system repair tool that can help you rectify such annoying errors.
To serve the purpose, we would like to introduce, Dr.Fone - System Repair (Android) . It is one of its kind of applications and is highly recommended as it has a proven success rate to resolve almost all Android system issues.
It’s now time to understand how to fix Android ‘unfortunately, the process com.android.systemui has stopped’ or in simple words, Android system UI isn’t responding.
Note: Before we proceed to Android repair, please ensure to make a backup of all your data . This is because the Android repair process may wipe out all the data on your device to fix the Android OS issues.
Phase 1: Connect and prepare your Vivo Y100t
Step 1 – Download the Dr.Fone toolkit over your PC. Install it and launch it over. Opt for the “System Repair” tab from the main screen and get your Vivo Y100t connected to the PC.

Step 2 – You need to select “Android Repair” from the left panel and then hit the ‘Start’ button.

Step 3 – Next, you need to select the correct information about your device (i.e., brand, name, model, country/region, and carrier details). Check the warning down below and hit “Next”.

Phase 2: Boot Android in ‘Download’ mode to perform the repair.
Step 1 –You’re now required to boot your Android in Download mode. Here’s what you need to do to put your Android in DFU mode.
If your Android has a Home button:
- Turn off your device. Hold down “Volume Down + Home + Power” buttons altogether for about 10seconds. Let go of the buttons afterward and hit the Volume Up to boot in download mode.

In case your Android has no Home button:
- Turn off your device. Hold down “Volume Down + Bixby + Power” buttons altogether for about 10seconds. Let go of the buttons afterward and hit the Volume Up to boot in download mode.

Step 2 – Once done, hit “Next” to initiate the downloading of the firmware.

Step 3 – As soon as the download completes, the Android repair will automatically be started by the program.

Step 4 – In a just a matter of a few minutes, your Android system UI isn’t responding issue will be resolved.

Part 3: Uninstall Google updates to fix Android SystemUI issue
All Android SystemUI isn’t responding errors are circled the Google App as the Android platform is heavily dependent on it. If you have recently updated your Google App and the Android, unfortunately, the process com.android.systemui has stopped error keeps popping up at regular intervals, make sure you uninstall Google App updates as soon as possible.
Follow the steps given below to fix the Android SystemUI has stopped issue by rolling back the Google App updates:
- Visit “Settings” and select “Apps” or “Application Manager”.
- Now swipe to view “All” Apps.
- From the list of Apps, select “Google App”.
- Finally, tap on “Uninstall Updates” as shown hereunder.
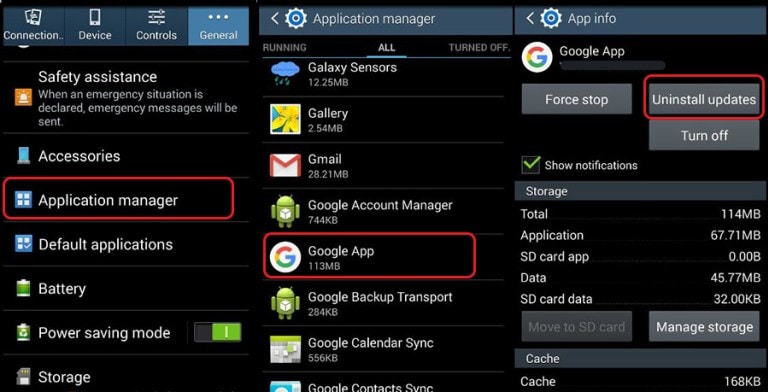
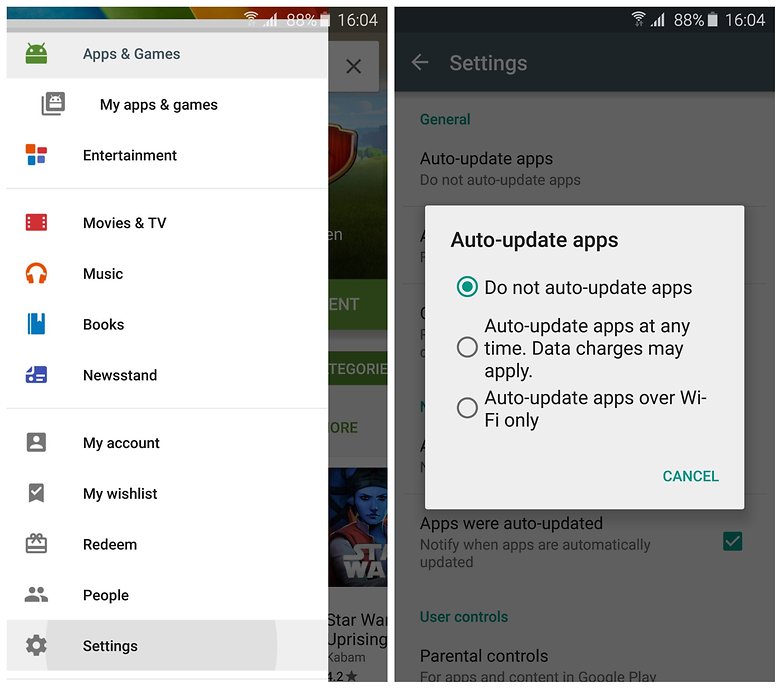
Note: To prevent the Android SystemUI isn’t responding error to occur in the future, do not forget to change your Google Play Store settings to “Do Not Auto-Update Apps”.
Part 4: Wipe Cache partition to fix Android SystemUI error
Android, unfortunately, the process com.android.systemui has stopped error can also be fixed by clearing your cache partitions. These partitions are nothing but storage locations for your modem, kernels, system files, drivers, and built-in Apps data.
It is advisable to clear Cache portions regularly to keep your UI clean and free of glitches.
Android SystemUI isn’t responding error can be overcome by clearing the cache in recovery mode.
Different Android devices have different ways to put it in recovery mode. Refer to your device’s manual to enter the recovery mode screen on your device and then follow the steps given below to fix Android; unfortunately, the process com.android.systemui has stopped error by clearing the cache partition:
- Once you are the recovery mode screen, you will see several options as shown in the screenshot.

- Use the volume down key to scroll down and select ”Wipe cache partition” as shown below.

- After the process is completed, select “Reboot System” which is the first option in the recovery mode screen.
This method will help you de-clutter your device and erase all the clogged up unwanted files. You may lose App related data too, but that is a small price to pay to fix the Android SystemUI isn’t responding error.
If the Android SystemUI has stopped the problem persists, there is only one way out. Read on to find out about it.
Part 5: Fix Android SystemUI error by factory reset
Factory Resetting your device to fix Android; unfortunately, the process com.android.systemui has stopped error is a desperate measure and should be the last thing to do on your list. Take this step only when the above mentored two techniques fail to work.
Also, make sure you take a back-up of all your data and contents stored in your Vivo Y100t on the cloud, Google Account or an external memory device because once you perform a factory reset on your device, all media, contents, data and other files are wiped out, including your device settings.
Follow the steps given below to factory reset your device to solve the Android SystemUI isn’t responding problem:
- Visit “Settings” by clicking the settings icon as shown below.

- Now select “Backup and Reset”.

- In this step, select “Factory data reset” and then “Reset Device”.
- Finally, tap on “ERASE EVERYTHING” as shown below to Factory Reset your device.

After the factory reset process is completed, your device will automatically restart, and you will have to set it up once again.
The whole process of factory resetting your Vivo Y100t might sound tedious, risky, and cumbersome, but it helps to fix the Android SystemUI has stopped error 9 out of 10 times. So, think carefully before using this remedy.
Android SystemUI isn’t responding or Android, unfortunately, the process com.android.systemui has stopped error is commonly seen by users on their devices. It is not a random error and is linked to either the software, Google App, cache partition, or data stored in the Vivo Y100t device. It is fairly simple to deal with this issue as all you need to do is install or roll back your Android OS update, uninstall Google App updates, clear cache partition, or factory reset your device to clear all data, files, and settings stored in it. The methods listed and explained above are the best ways to fight the problem and to prevent it from troubling you in the future. These methods have been adopted by affected users all over the world who recommend them because they are safe and involve minimum risks as compared to other tools to solve the Android SystemUI has stopped error. So go ahead and try them now!
6 Solutions to Fix Error 505 in Google Play Store on Vivo Y100t
In case you are receiving the error code 505 while downloading an application from Google play store and have no clue what is it, then this is the right article for you. In this article we are covering the reasons behind the occurrence of Google play error 505. Not only that, we are also providing 6 solutions to fix the error code 505. Usually, this error is seen with Android 5.0 Lollipop version and occurs at the time when you try to install the already downloaded application making it hard to run the app.
Such an error is a kind of permission error. That is, in case you have two similar kinds of applications such as banking apps and both looking for similar kind of permission, causes conflict error named as error 505.
The occurrence chance is more in the old operating systems, 4 KitKat, Android version 4. Let us then proceed to know more about this error 505.
Part 1: Reasons for Google Play error 505

As per the report by some users, error 505 occurs in certain apps such as Weather App, SBI, ITV, Adobe Air 15, We Chat etc.
To have the right idea about the problem, we have listed all the reasons of it occurrence below:
- Google play store is not updated or refreshed (Causes the error during the downloading process)
- Due to installation of an outdated version (In case your Android version is outdated may result in error in the installation process)
- Cache memory(Is the redundant data occurs due to search history)
- Application is not compatible with the Android OS (If the app you are downloading is not the updated may cause error)
- Adobe air app
- Data crash (Many time app or Google play store crashed crashes after downloading it, reason may be some bugs, so many apps are open, less memory etc.)
Now that we know the reasons, let us also learn about the solutions that will guide you to resolve the error code 505.
Part 2: 6 Solutions to fix error code 505
Any error that occurs during downloading or installation process not only hinders with the new app but also takes a large amount of our time to solve the issue. To check that, let us go through the 6 solutions one by one.
Solution 1: One click to make error code 505 disappear
The most common cause for error code 505 pop-up is that Android system files that underpin the Google Play module are corrupted. To make error code 505 disappear in this condition, you should have your Android system repaired.
Dr.Fone - System Repair (Android)
One click to repair Android system and make error code 505 disappear
- Fix all Android system issues like error code 505, error code 495, error code 963, etc.
- One click to fix error code 505. No technical skills required.
- Supports all the new Vivo Y100t devices like Galaxy S8, S9, etc.
- Easy-to-understand instructions provided on each screen.
4,999,459 people have downloaded it
Now, you just need to follow these Android repair steps to fix error code 505:
Note: Android repair needs to flash the system firmware, which may erase existing Android data. To prevent data loss, back up all the important data from Android to PC .
Step1: Download the Dr.Fone - System Repair (Android) program , install and launch it. The following interface will pop up.
Step2: Select the “Android Repair” among the 3 tabs, connect your Android to PC, and click “Start”.
Step3: Choose the correct device details from each field, confirm them and continue.
Step4: Boot your Android in download mode, then start downloading the firmware of your device.
Step5: After the Vivo Y100t device firmware is downloaded, the tool will start repairing your Android.
Step6: When your Android is repaired, the error code 505 will disappear.
Solution 2: Check whether Download Manger is ON or not
Many times download manager is set to disable due to which you are not able to download or install the app. So, it is required to make a check whether the download manager is set on or off. So that your installation process will work properly. The process to enable the download manager is as follows.
>Go to Settings
>Select the Application Manger or App (Option depends upon the Vivo Y100t device)
At the top, an option will appear
>Swipe right till you locate Download manager at top of the screen of the Vivo Y100t device
>Then Select Enable

Enabling download manager to give permission to the Vivo Y100t device to start the download or installation process.
Solution 3: Updating to the latest version of OS of your Vivo Y100t
Working with an old operating system is ok, but many times old version also creates some problem and is the main reason behind the occurrence of any bug or error. So, updating the older version act like a rescue to get rid of any such issue or bug. The Process of updation is quite simple; you just need to follow the below steps and your device is ready to get updated to the latest version. Steps are:
- >Go to Settings
- >Select about Phone
- >Click on System Update
- >Check for updates
- >Click on Update
- >Need to click on Install (if any update is available)

Solution 4: Clearing the cache memory from Google services Framework and Google play store
While browsing data online or through Google play store some cache memory get stored for the fast access to the pages. Below mentioned simple steps will help you in clearing out the cache memory from Google services framework and Google play store.
Process to clear the Cache memory for Google Services Framework
- >Go to Settings
- >Select Applications
- >Click on Manage Applications
- >Click to select ‘ALL’
- >Click on Google services framework
- >Select ‘Clear data and clear cache’
That will remove the cache memory of your Google services framework
Steps to Cache memory of Google Play Store
- >Go to Settings
- >Applications
- >Manage Applications
- >Click to select ‘ALL’
- >Select Google Play store
- >Clear data and clear cache
It will clear the cache of Google play store

Clearing the cache memory remove the extra temporary memory, thus free up space for the further installation process.
Solution 5: Reinstalling play store Updates
The reason behind the installation error code 505 might be Google play store updates.
Due to continuous updation of new apps and services Google Play store used to be flooded with so many updates or sometimes does not updated properly. That sometimes caused the problem in dealing with app installation. Resolving the issue is important to make your play store ready for future updation and installation.

- >Go to Settings
- >Visit Application Manager or Apps
- >Select Google Play Store
- >Click on Uninstalling Updates
- >A Message will appear ‘Change play store app to factory version’- Accept it
- >Now Open Google play store>It will refresh the updates within 5 to 10 minutes(So you need to keep your internet connection on while Google play store is updating its store for new updates.)

Solution 6: Third party App
In the case, error 505 occur due to the installation of two or more apps with duplicate permission of data, as many times we use to install two similar kind of app that creates the situation where both seeking out for somewhat similar permissions for the installation. The manual finding is a long and tiring process. Then you can take the assistance of ‘Lucky Patcher App’ to find out which app is creating the conflict. This app will assist you in finding out the duplicity if any and then modifying it. Through this app, once you will find out which particular app is causing the conflict, then you can delete that conflicting app from your phone so that problem of error code 505 gets sort out.
Download link: https://www.luckypatchers.com/download/

Note: If still, you are in the state of trouble to solve the issue of error code 505 then Google Play help center is here to look out all troubles related to app store and its service. You can check out the details by visiting the following link:
https://support.google.com/googleplay/?hl=en-IN#topic=3364260
Or call them at their call center number regarding the issue.

Bonus FAQ about Google Play error
Q1: What is a 505 error code?
The HyperText Transfer Protocol (HTTP) error 505: HTTP Version Not Supported response status code means that the HTTP version used in the request is not supported by the server.
Q2: What is a 506 error?
The 506 error code is a frequent error when operating the Google Play Store. You will sometimes see this error code when you are downloading an app. The app may seem to be downloading just fine when suddenly, near the end of the installation, an error occurs, and a message pops up saying, “App could not be downloaded due to an error 506.”
Q3: How to fix the 506?
Solution 1: Restart your device which can help solve most problems.
Solution 2: Remove the SD card safely.
Solution 3: Correct date and time if it is wrong.
Solution 4: Add your Google Account again.
Solution 5: Clear Google Play Store data and cache.
However, sometimes the five simple couldn’t work anymore. A system repair software can be helpful quickly. We really recommend the Dr.Fone - System Repair (Android) , only a few minutes, the error will be fixed.
Conclusion
Not being able to download or install the app is very frustrating and time-consuming also. Therefore, in this article, we went through the reasons behind the occurrence error code 505 as well as resolving the issue by following five effective methods. I hope that you would be able to sort out the error 505 by following above methods thus would be able to install the application without further delay.
Reasons for Vivo Y100t Stuck on Boot Screen and Ways To Fix Them
One of the main reasons why people own a phone is for convenience. It will be ironic if that device, supposed to grant convenience, provides problems instead. Some people face this when their Android phone is stuck on the logo page and unable to do anything. As expected, this is common in Android phones and is why people are unhappy with Android phones.
This article will share the possible reasons why your Android phone is stuck on the boot screen. This article will share three possible reasons for this problem and five valuable tips to help fix this issue. If all else fails, we have an application to share and recommend that is guaranteed to solve your problem in no time. Keep on reading to find out more!
Part 1. Why Is Your Vivo Y100t Stuck on the Boot Screen?
There are countless reasons why a problem happens, just like why your Android phone is stuck on the logo page. This section sieved out the top 3 reasons why your Android boot screen happens and some tips to overcome it.
1. Changes to the Software
Android is a flexible operating system. It allows users to customize it in any way they desire, which is Android’s beauty. The customizable nature of the operating system allows users to unlock, root, flash, and tinker. However, this flexibility in customization might be a double edge sword. Accidental tampering with the Android system might result in software problems, such as being stuck on the Android boot screen.
Fortunately, this is not a complicated fix. Android accepts different fixes and allows the system to return to how it once was. Even with software issues, the system does not get completely inoperable. The best way to fix changes to the software is to start from the beginning of the process. This might offer the best chance for you to restore your phone to normal.
Although it is fun to customize and change the software, following trusted sources ensures you do not damage your phone. Having an Android phone stuck on the logo page is one of the many examples of the problems that might happen if changes to the software go out of hand.
2. Android Software Updates
Updates are a common cause of Android phones stuck on the logo. It happened when the update did not complete as it should have been. Several reasons for incomplete updates, such as poor internet connection, the connection between computer and phone being lost, a power cut, the phone freezing, and the list go on. When an update is uncompleted, issues such as being stuck at the Android boot screen and many others might occur.
Before an update starts, your mobile device will notify you of the duration of the update. As a tip, set aside an additional 10-15 minutes on top of the update duration to ensure your update is completed successfully. It will be ideal for activating the software update only when there is sufficient power in your phone or keep it charging during the update.
When an update is disrupted or stopped before it completes, the existing Android version will become corrupted while the new software to be updated is incomplete. This means that your Vivo Y100t has no system to run on. Always complete your software updates, and you will not have the problem of your Android phone getting stuck on the logo.

3. Malfunctioning Applications
If you noticed that your Android phone is stuck on the logo page only after installing certain apps, there is a high chance that the app is not compatible with the existing apps in your phone or with the Android version. When an app conflicts with the Android system or other apps, this will run into problems with your phone.
This problem typically happens when an app is downloaded from a third-party source, not the official Google Play Store. This app from a third-party source might be malicious or contain a virus. This can cause problems such as being stuck at the Android boot screen.
To overcome this, locate the app that has been giving you issues and remove the app from your phone. Restart your device, and you should be able to have your Vivo Y100t functioning properly.
Part 2. 5 Helpful Ways To Fix Android Phones Stuck on Boot Screen
After understanding the common problems on why your Android phone is stuck on the logo page, here are five easy solutions you can try solving at home.
1. Force Reboot
When encountering problems with your Vivo Y100t, such as being stuck at the Android boot screen, you should first try a forced reboot. This simple yet effective solution could be what you need to solve all your Android problems. It is essential to leave your device turned off for at least a minute or two before turning it back on.
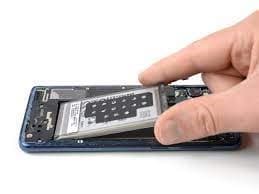
2. Pull Out Battery
Another way to restart your Vivo Y100t when it is frozen is to try taking the battery out. Android devices are designed with a removable battery, and sometimes you can resolve the issue easily by removing the battery and replacing it after a couple of seconds. Then, turn on your device again and test to see if your Android phone is stuck on the logo page.
If it works, then the problem is solved. However, some Android devices come with a built-in battery. For these kinds of devices, a stimulated battery pull should be attempted. A simulated battery pull is a set of instructions telling your Vivo Y100t to switch off and on again. If your device does not offer the simulated battery pull option, omit this troubleshooting option.
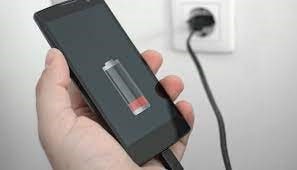
3. Charge Your Device
If your Android phone is stuck on the logo page and not getting past it, no matter how many times you have tried, it may be due to a low battery! As simple as it sounds, plug your device into a power outlet and try restarting your phone. You might be surprised that this simple fix is all it takes to solve your Android problem.
4. Wipe Cache Data
Cache refers to a software or hardware component of an Android device that stores your program and data for reference. This data might result from the daily usage of your device or duplicate data from a different source on the Vivo Y100t device. Similar to a computer, if the cache occupies too much space on your device, it might cause your Vivo Y100t to become slower and eventually get stuck at the Android boot screen.
Wiping out the cache data from your Vivo Y100t could free up more space, allow your device to function faster, and avoid problems such as being stuck at the Android boot screen. Do not worry; wiping the cache data is entirely safe and will not lead to any loss of important data or programs on your phone.
5. Factory Reset
If all the methods above fail, performing a factory rest might be your last option. However, it is important to note that performing a factory reset will erase everything on your phone, including apps, contacts, photos, etc. As a tip, back up all your data from your device before performing a factory reset. That way, you can still retrieve all your precious information after the reset.
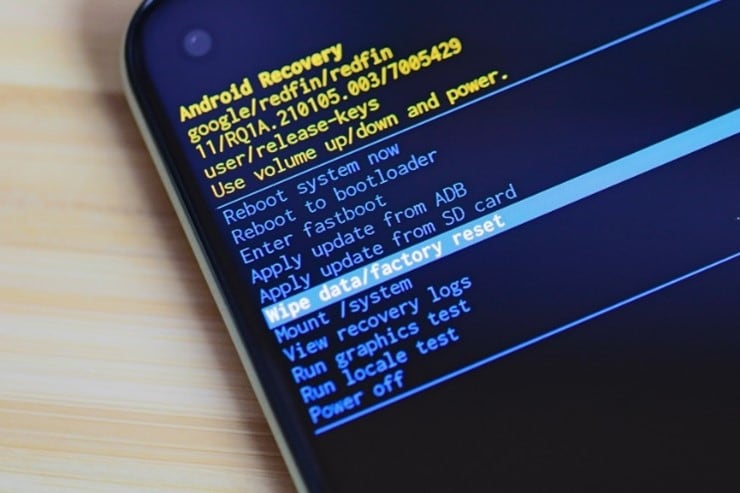
Follow the steps below to perform a factory rest on your Vivo Y100t:
Step 1: Turn off your phone and press the Power button and Volume Down button at the same time
Step 2: Use the Volume button to scroll the options and highlight Wipe data/factory reset. Press the Power button to begin the factory reset.
Part 3. Bonus Tip: Best App To Solve Android Phone Stuck On Boot Screen
If all the solutions above do not work and you do not want to perform a factory reset on your phone, one option is to use an app called Dr.Fone. It is one of the most effective phone recovery solutions and can help to bring your Vivo Y100t back to a state like it was brand new. Being stuck on the Android boot screen will be a problem of the past.
Refer to the tutorial below to solve your Android phone is stuck on the logo page issue.
Step 1: Download and install Dr.Fone – System Repair (Android) on your computer. Open the application and connect your Vivo Y100t to the computer.
Step 2: Select the issue you face on the next page. If you use a Vivo Y100t phone, select Stuck at Vivo Y100t Logo. Alternatively, you can click on Black Screen or Stuck in Boot Loop.
Step 3: Input the Brand, Name, Model, Country, and Carrier of your phone and click on Next.

Step 4: Follow the instructions provided on the page and wait for the system repair to finish. After which, click on Done to complete the process.
 safe & secure
Conclusion
This article summarizes some possible reasons your Android phone is stuck on the logo page. Five useful strategies were shared to easily overcome your Vivo Y100t being stuck in the boot. However, if all the above methods do not work, we recommend trying the Dr.Fone-System Repair.
Dr.Fone-System Repair repairs the operating system issues and fixes the problem with your Vivo Y100t. Once you power on your Vivo Y100t again, you can rest assured that it will be like new.
Also read:
- [New] Best Hashtags for YouTube To Get Your Views to 6 Figures for 2024
- Best Price-to-Performance Laptops Under $500 (Gaming Edition)
- Effortlessly Connect Canon Printer Online
- How to Captivate Viewers Using Multiple Perspectives on FB Live
- How To Fix Part of the Touch Screen Not Working on Lenovo ThinkPhone | Dr.fone
- How To Restore a Bricked Nokia C300 Back to Operation | Dr.fone
- In 2024, How to Transfer Contacts from Samsung Galaxy S24 Ultra to Outlook | Dr.fone
- Maximize Productivity: Top Secret Windows Functionality for Enhanced Usability
- Reasons for Google Pixel Fold Stuck on Boot Screen and Ways To Fix Them | Dr.fone
- Reasons for Xiaomi Redmi A2 Stuck on Boot Screen and Ways To Fix Them | Dr.fone
- Reliable User Guide to Fix Vivo V30 Lite 5G Running Slow and Freezing | Dr.fone
- Simple Solutions to Fix Android SystemUI Has Stopped Error For Realme 12+ 5G | Dr.fone
- Step-by-Step Process to Send Audio Messages on Apple iPhones
- Title: Simple Solutions to Fix Android SystemUI Has Stopped Error For Vivo Y100t | Dr.fone
- Author: Abel
- Created at : 2024-09-29 23:10:15
- Updated at : 2024-10-06 21:56:56
- Link: https://fix-guide.techidaily.com/simple-solutions-to-fix-android-systemui-has-stopped-error-for-vivo-y100t-drfone-by-drfone-fix-android-problems-fix-android-problems/
- License: This work is licensed under CC BY-NC-SA 4.0.