
Solved Warning Camera Failed on Asus ROG Phone 8 Pro | Dr.fone
[Solved] Warning: Camera Failed on Asus ROG Phone 8 Pro
In this article, you will learn why camera fails on Asus ROG Phone 8 Pro devices, how to make camera work again, as well as a system repair tool to fix this issue in few clicks.

Asus ROG Phone 8 Pro devices are one of the best Android devices available in the market and their users are always satisfied with their features. However, it is a recent observation that many Asus ROG Phone 8 Pro users complain about Asus ROG Phone 8 Pro camera failed error while using the camera App on the Asus ROG Phone 8 Pro device. It is a strange error and pops up suddenly with only one option to tap on, i.e., “OK”
The error message reads as follows: “Warning: Camera Failed”.
Once you click on “OK” the app shuts down abruptly and your Asus ROG Phone 8 Pro camera is failed. We understand this is not a very pleasing situation, thus, here are ways to tackle the camera failed Asus ROG Phone 8 Pro issue. Let us now move ahead and find out why exactly you experience Warning: Camera Failed error and how to fix it.
Part 1: Why Asus ROG Phone 8 Pro phone has Warning: Camera Failed error?
We are all aware that no device runs smoothly, without any glitches. We also know that there is a cause behind every problem. Listed below are a few reasons behind camera failed error, especially on Asus ROG Phone 8 Pro devices:

- If you have recently updated your OS version, there are chances that certain bugs are preventing the camera App from functioning normally. Also, if the update is interrupted and not downloaded completely, certain apps may suffer.
- There are chances of your internal storage being cluttered with unwanted Apps and files leaving no space for the camera App to save its data and work smoothly.
- If you haven’t cleared camera Cache and Data, the chances of the App to get clogged up increase tremendously which disrupt its working.
- Warning: Camera Failed error can also be a direct outcome of a change in the system settings or the Asus ROG Phone 8 Pro device’s internal settings.
- Finally, if you tamper a lot with the camera settings and do not update the App whenever it is available, Asus ROG Phone 8 Pro Camera App will not be efficient.
There might be much more reasons for the camera failed error, but these are the most obvious ones. Now let us now move on to troubleshooting the problem.
Part 2: How to fix Asus ROG Phone 8 Pro Camera Failed in One Click?
If you are experiencing some kind of issues in your Asus ROG Phone 8 Pros such as Asus ROG Phone 8 Pro camera failed, the Asus ROG Phone 8 Pro device stopped working, black screen, play store not working, etc. There is a special software is designed for such kind of issues in Android devices, i.e. dr. fone. The tool enables the users to fix various kinds of issues in the Asus ROG Phone 8 Pro devices and perform a complete system repair so the Asus ROG Phone 8 Pro device starts working normally.
Dr.Fone - System Repair (Android)
One-click solution to fix camera failed on Asus ROG Phone 8 Pro devices
- The tool has a one-click operation which makes it super easy to use.
- You don’t need any technical skills expertise to operate the software.
- The software supports all the Asus ROG Phone 8 Pro devices including the latest and older ones.
- The software can fix the “warning camera failed”, the app is crashing, failed update, etc.
4,616,396 people have downloaded it
Note: You have to remember that the system repair may erase all the Asus ROG Phone 8 Pro device data. So, create a backup of your Asus ROG Phone 8 Pro data first and then try fixing the Asus ROG Phone 8 Pro phone.
Follow the steps given below and fix the camera failed error:
Step 1. Download the software on your computer and launch it. Connect your device and select the System Repair option from the main interface. In the next screen, select Android Repair module.

Step 2. You will have to provide the Asus ROG Phone 8 Pro device details accurately to ensure that the software provides a precise firmware package to be downloaded. Enter brand, name, model, country, and carrier of your device and agree to the terms and condition.

Step 3. Now put your device in the download mode. The software will provide you with a guide to put the phone in download mode to begin the downloading process.

Step 4. As soon as the firmware is downloaded, the software will automatically initiate the repair process. You will be able to see the ongoing repair.


When the software is done repairing the system, you will be notified. Thus, the Camera failed Asus ROG Phone 8 Pro error in your phone will be fixed.
Part 3: How to fix Camera Failed error by clearing camera data?
Has anyone ever informed you that it is absolutely necessary to keep clearing camera data every once in a while? Yes, since it deletes all unnecessary data stored in respect of the App and no, it does not mean that all your photos and videos will get deleted. Just follow the steps given below to clear camera data:
1. First, visit “Settings’” on your Asus ROG Phone 8 Pro device and select “Apps” or Application Manager”.

2. Now a list of all Apps will appear before you. Keep scrolling down until your find “Camera”.

Tap on “Camera” to open the “Camera Info” screen and once you are there, hit “Clear Data” option as shown below.

That’s all, now return to the Home Screen and access the camera again. Hopefully, it will work now.
Part 4: How to fix Camera Failed error by removing third-party Apps?
Another tip to fix Asus ROG Phone 8 Pro camera failed error is by deleting a few unwanted third-party Apps (recently installed) to free some space in the Asus ROG Phone 8 Pro device’s internal storage. It is essential to create and keep storage space for the camera App to function smoothly and allow it to store its data as well. Also, if this issue only happens recently, it might be some newly installed Apps causing some glitches with the camera.
Simply, follow the instructions given below to remove Apps from Asus ROG Phone 8 Pro Devices:
1. Click on the “Settings” icon on the Home Screen and from the options before you, select “Apps”/ “Application Manager”.
2. You will see that a list of downloaded and built-in Apps will open up before you as follows.

3. Now, once you select the App you want to uninstall, the App Info screen will appear. Tap on “Uninstall” option and then tap on “Uninstall” again on the pop-up message.

The App will be removed immediately and its icon will disappear from the Home Screen and you will notice an increase in the storage capacity of your device.
Part 5: How to fix Camera Failed error by wiping Cache Partition?
This method might seem tedious and time-consuming and you may also lose your data and essential settings. However, wiping the Cache Partition only cleans your device system internally and gets rid off any unwanted and trouble making elements causing Warning: Camera Failed error. Follow the step-by-step guide given below to clean Cache Partition smoothly:
1. Firstly, switch off the Asus ROG Phone 8 Pro device by pressing the power button and tapping on “Power Off” as shown in the screenshot below. Then wait for the lit screen to turn off completely before proceeding further.

2. Now, press and hold the power on/off, home and volume up button simultaneously. Your device will now vibrate. This a signal to let go of the power button (only).

3. Once the Recovery Screen appears, leave all buttons and use the volume down key till you reach “Wipe Cache Partition”.

4. Now, to select the option to use the power on/off button and wait for the process to get over. Once this done, tap on “Reboot system now” and see that your device restarts normally.

You may try to use the camera app once the process completes.
Part 6: How to fix Camera Failed error by Reset Settings?
Resetting the camera settings solves the problem 9 out of 10 times and thus is worth a try.
1. To reset, first, launch the Camera App by tapping on its icon.

2. Then go to Camera “Settings” by tapping on the circular gear like icon.

3. Now look for “Reset Settings” options and click on it.

Once done, go back to the Home Screen and start the camera App again to use it.
Part 7: How to fix Camera Failed error by Factory Reset?
Lastly, if the above-mentioned techniques do not help you in fixing the camera failed error, you can consider performing a Factory Reset. Note: This method will delete all your saved data so it is advised to backup before you start the process.
Here are the steps to factory reset your device to fix “Warning: Camera Failed” Error:
1. Start by visiting “Settings” on your Asus ROG Phone 8 Pro device on which the camera has failed.

2. Now from the list of options before you, select “Backup and reset” and move ahead.

3. Now you must first select “Factory data reset” and then tap on “Reset Device” as shown in the screenshot below.


4. Finally, you have to click on “Erase Everything” and wait for the Asus ROG Phone 8 Pro device to reboot itself.

Note: You will have to set up your Asus ROG Phone 8 Pro device from scratch once it is reset, however, that is a small price to pay to fix your Camera App.
Warning: Camera Failed error is not a rare phenomenon and many users experience it on daily basis. So, there is no need to panic, All you need to do is carefully follow the instructions given above and repair your Camera App yourself. You do not need to seek any technical assistance for the same as the camera failed issue is not difficult to deal with. So go ahead and try these tricks to enjoy using the Camera App on your Asus ROG Phone 8 Pro devices.
Restore Missing App Icon on Asus ROG Phone 8 Pro: Step-by-Step Solutions
The growing conversation around the missing app icons on Android issue has caught our attention. While it seems confusing, it’s a problem that some Android users have encountered.
After all, the presence of app icons on our Android device’s home screen is important for convenient access to our frequently used applications. When your Asus ROG Phone 8 Pro’s icons suddenly disappear, it can leave you feeling lost about how to use and access your apps.
No worries, though. We’ve got you covered with a simple guide in this article. Just follow the steps, and you’ll get those missing app icons back on your Asus ROG Phone 8 Pro.
Part 1: Make Sure if the Missing App Is Installed
Before proceeding with troubleshooting the missing app icon on your Android device, it’s essential to confirm whether the app is still installed or if it has been accidentally deleted. To do it, you can have a quick check on Google Play:
- Step 1: Go to the Play Store.
- Step 2: Tap your Google profile at the top right and find Manage apps and devices.
- Step 3: Open Manage and select the “Installed” tab.
![]()
Now, see whether you can find the app icon that disappeared on your Android. If you can’t find it, it means the app has been accidentally deleted, and you can install it back on your device. However, if it’s confirmed to be installed on your Android but remains missing from your home screen, you can continue the following practice.
Part 2: How To Find the Missing App Icon on Android
“All my apps disappeared from my home Android screen. What should I do?”
If you’ve confirmed that the missing app is installed, but its icon is nowhere to be found on your home screen, don’t fret—there are several solutions you can take to locate and restore the missing app icon on Android.
1. Check hidden apps
How could the Android phone icon be missing? Well, app icons can disappear from your home screen for different reasons. One of the common reasons is you might have accidentally hidden it in your phone. To find and check whether the app is hidden, the steps can be different depending on the phone model you are using.
However, as a general guide, you can follow these steps:
- Step 1. Go to your phone’s Settings.
- Step 2. Use the search bar to look for “Hidden app.”
- Step 3. Once you find the “Hidden app” settings, watch the list to see if the missing app is there. If it is, you can toggle off the switch to unhide it.
![]()
2. Move the app to the home screen from the App Drawer
If your app icon disappeared on your Android, you can also easily restore it by adding the app to the home screen from the app drawer. Follow the step-by-step guide below:
- Step 1. Open the App Drawer on your Android. To do this, swipe from the bottom to the top, starting from your home screen. The App Drawer is where all your installed apps are neatly listed.
- Step 2. Once you open the App drawer, locate the app icon that has disappeared from your home screen. For example, you lost the phone icon on Android. Then, look for the phone icon from the App Drawer.
- Step 3. Long-press the Icon of the missing app and move it to the desired location on your home screen. You can drag it to an empty space or a specific folder.
- Step 4. Release to drop the app icon onto the home screen.
![]()
3. Re-enable disabled app
App icons can also disappear on the Android home screen if you unintentionally or intentionally disable them. Certain phone models even offer a functionality known as ‘Freezer,’ allowing users to temporarily halt the apps. While in a frozen state, the app remains inactive and doesn’t appear on the home screen until you unfrozen it.
To re-enable the disabled app, you can follow the steps here:
- Step 1. Open the Apps & Notifications on the Settings.
- Step 2. Select the app which icon is missing on your home screen. For example, tap the phone app if the phone icon disappears on your Android.
- Step 3: In the App Info, tap Enable.
4. Reset Android to factory settings
If the previous methods don’t work, you might need to do a factory reset on your Asus ROG Phone 8 Pro. But before doing that, it’s important to back up your data first because a factory reset will clear all your data and cache when you press the reset button.
How to reset Android to factory setting:
- Step 1: Go to your Android Settings.
- Step 2: Select Backup and Reset > Factory data reset. Then, choose to erase all data.
Please be mindful that performing a factory reset on Android will reset your Android completely to its initial state.
![]()
Part 3: How to Fix System Error on Android Easily with Reliable Software
Missing app icons on Android can sometimes be a result of errors in your Android system launcher, causing inconvenience and potential disruptions to your device’s operation. To address this issue effectively, you can turn to Dr.Fone’s advanced system repair tool. This tool is designed to handle various system issues, providing an easy and reliable solution.
How to fix the Android system using Dr.Fone’s system repair tool:
- Step 1. Open the Repair Tool
Start by launching Wondershare Dr.Fone on your computer. Go to the Toolbox section and connect your Asus ROG Phone 8 Pro. Choose System Repair and pick Android as your device type.
 safe & secure
4,136,839 people have downloaded it
- Step 2. Begin Repair
Click Start on the new screen to kick off the repair. Since you’re dealing with the Android system, select System Damage.

- Step 3. Fill in the Asus ROG Phone 8 Pro device Details
The platform will detect your Asus ROG Phone 8 Pro’s brand. Confirm the Name, Model, Country, and Carrier. If your device is unlocked, choose OPEN in the Carrier section. Agree to the warning, click Next, and proceed with the repair.
- Step 4. Activate Download de
Follow the instructions to put your Asus ROG Phone 8 Pro into Download Mode. Once you are in Download Mode, the firmware will be downloaded automatically.

- Step 5. Confirm Installation
Remember, the repair may erase data. It’s advisable to back up your data first before starting the repair. Enter “000000” to confirm the repair process, shown by a progress bar. Once finished, click Done and see if your phone has returned to normal.

More Articles About Android System:
9 Solutions for Android Process System isn’t Responding Error
How to Fix Android App Not Installed Error Quickly?
Authentication Error Occurred? Here Are 10 Proven Fixes
Conclusion
When the app disappears from the home screen of your Android, it can hinder your ability to access and use the app efficiently. There are several reasons why an app might disappear from your Android home screen, and addressing the issue depends on the specific circumstances.
Whether it’s due to accidental deletion or a system glitch, we have discussed various methods to recover the missing app and ensure smooth functionality in this article. In cases of system-related issues on your Asus ROG Phone 8 Pro, it’s advisable to rely on trustworthy software such as Dr. Fone’s system repair tool for a comprehensive resolution.
Ways to Unbrick Your Android Device: Various Ways for Recovery
When your Asus ROG Phone 8 Pro becomes unresponsive or frozen after mistakenly flashing a ROM or rooting, you are informed that the phone has been bricked. The most terrifying aspect will not just be gadget loss, but also data erasure. However, what exactly is a bricked phone, and, more importantly, how do you fix a bricked Android phone?
This article will explain what a bricked android phone is, why an Android phone becomes bricked, how to unbrick an Android phone without losing data and a third-party application you can use.
Part 1. Causes of Bricked Phones
In everyday settings, our mobile devices have become our greatest friends, therefore breaking your phone is the last thing you want to do. There are different reasons why devices brick, and we must be familiar with them in order to comprehend the various techniques to repair bricked devices.
Here are some common reasons why your Asus ROG Phone 8 Pro is bricked:
- **Flashing Stock/Custom ROM:**It is possible that you installed an incompatible ROM in the Android phone, that the phone shuts off during the process, or that you have performed other errors that cause your phone to restart indefinitely or to become stuck at the starting screen.
- **Rooting an Android device:**You are unable to effectively root the Asus ROG Phone 8 Pro device.
- **Android firmware is being updated:**If the phone is interrupted when updating the Android firmware, it will be bricked.
- **Installing harmful applications:**You installed harmful programs on your Asus ROG Phone 8 Pro, or the phone was infected with a virus.
Part 2. How to Fix a Bricked Phone
The first step is to establish how badly your device is bricked. In most cases, you will be working with soft bricks that are pretty simple to repair. If your phone is stuck in a boot loop or enters recovery mode every time you turn it on, you may have a soft brick.
To repair bricked Android phones and tablets, you must first thoroughly examine the Asus ROG Phone 8 Pro device’s state. Before you begin troubleshooting, determine the sort of bricking that your phone is experiencing. However, there is no specific software to unbrick your Asus ROG Phone 8 Pro; you may need to learn the complexities of this issue or hire a professional to do it for you.
 safe & secure
Here are some simple methods for repairing bricked Android devices:
Method 1. Reboot the Phone in Safe Mode
Trying to reboot your android device in safe mode is the first and easiest thing you should try if your phone is bricked. Here’s how to do it:
- Step 1: Turn off your smartphone and press the Volume Up + Power button to enter recovery mode. Then, using the volume controls, navigate the menu and select Reboot system now.
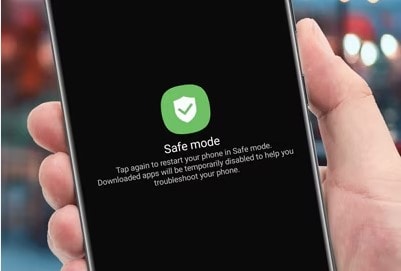
- Step 2: Select the highlighted option by pressing the Power button. After that, wait for your device to reset normally.
- Note: The steps for booting into recovery mode may change based on the manufacturer of your device. For further information, go to the user manual for your phone or tablet.
Method 2. Wipe the Cache Partition
This is the first indication that a user’s phone has gone bricked. The phone turned on automatically, however it became stuck or frozen on the logo screen. The issue might be caused by the undeleting of data and cache, which prevents the phone from displaying the home screen.
This issue, however, may be resolved by wiping the data and cache partitions in recovery mode. You must do the following to do this:
- Step 1: Turn off your smartphone and enter recovery mode by pressing the Power and Volume Down buttons simultaneously. Different devices have various approaches for entering recovery mode, so you may perform better.
- Step 2: After entering recovery mode, you should see the screen below. Remember to pick Advanced and then “Wipe Dalvik Cache” if your device is under Clockwork Mod recovery. Return to the main screen and select “Wipe Cache Partition” once more.
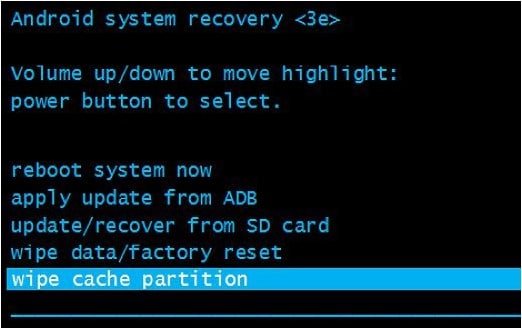
- Step 3: Finally, on your smartphone, choose the Reboot system immediately.
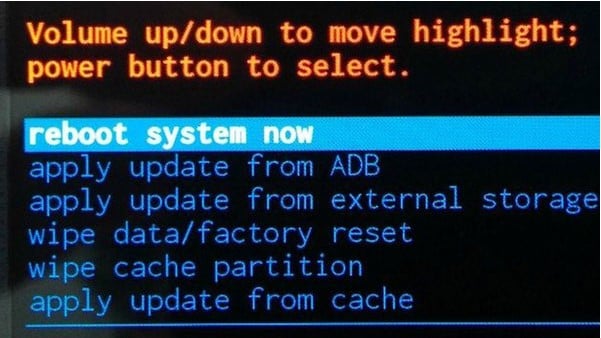
Method 3. Perform a Factory Reset
A factory reset can undo the alterations made to your device that resulted in the brick phone, but you will lose everything you have downloaded and installed in the process. Here’s how to restore a bricked Android phone to factory settings:
- Step 1: Boot your device into recovery mode (turn off your device, then press power button + volume up button).
- Step 2: Select “Wipe Data/“Factory Reset” then confirm the action. When the process is done, you’ll be returned to the recovery mode menu.
- Step 3: Select “Reboot System Now” to restart your device.
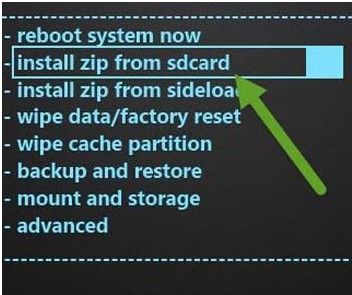
Method 4. Flash a Custom ROM
If you boot your phone directly into recovery mode, there’s a problem with the ROM you loaded. Then simply flash the following custom ROM on your phone:
- Step 1: Save the required ROM (in ZIP format) to an SD card. The SD card should then be inserted into your Asus ROG Phone 8 Pro.
- Step 2: Click the “Install zip from sdcard” button. Then, select the ZIP file that contains the ROM. Finally, click the “reboot system now” button.
Method 5. Using Wondershare Dr.Fone
Wondershare Dr.Fone - Data Recovery is the first data recovery solution for any damaged Android smartphone in the globe. It offers one of the greatest recovery rates and can recover a variety of information like images, videos, contacts, messages, and call logs. The program is most effective with Asus ROG Phone 8 Pro smartphones.
While it is not an Android unbrick tool, it is a useful tool for retrieving data when your Asus ROG Phone 8 Pro becomes bricked. It is quite easy to use:
- Step 1: Launch Wondershare Dr.Fone and select “Data Recovery” > “Recover Android Data” from the menu. Then, select “****Recover from Broken Phone”.

- Step 2: Choose the file types you wish to recover. Click “Next” and then select the type of damage your phone is experiencing. Select “Touch screen not responsive, or cannot access the phone” or “Black/broken screen”.

- Step 3: Use the recovery wizard to enter your Android smartphone into Download Mode. Connect your Android handset to the computer after following the instructions to begin automatically analyzing your device.

- Step 4: The program will provide a list of all recoverable files, organized by file type. To preview the file, highlight it. Choose the files you wish to recover and then click “Recover” to save all the data you want to restore.

 safe & secure
Part 3. How to Prevent Bricking Your Phone
How to prevent a device from “bricking” itself and how to repair it if it does The delay is set by the MCU, but it should be long enough to allow the debug adapter to connect to the Asus ROG Phone 8 Pro device and halt it before the Asus ROG Phone 8 Pro device disables itself.
Here are some things to remember to prevent your device from bricking:
- Avoiding unofficial firmware updates: Installing unapproved OS firmware on your phone will most certainly violate any manufacturer’s warranty you have on it. Read the installation instructions for your unique phone model thoroughly and then carefully follow them, taking time and patience.
- **Being cautious when rooting or jail breaking:**Rooting and Jail breaking disables parts of the operating system’s built-in security mechanisms, which are part of what makes the operating system safe, and your data protected from exposure or damage.
- **Install an antivirus application on your device:**Mobile devices increase the danger of data leaks and breaches. As a result, antiviral software is beneficial on mobile phones. Mobile Device Management is an excellent choice for virus protection on your mobile device.
- Backup your phone data regularly: Backing up your phone safeguards your data in the event that you lose it, it is stolen, or it no longer works. When it comes time to replace your phone, having a backup makes it simple to restore your data to the new device. Furthermore, backing up your phone allows you to organize your data so that it is easier to access.
- Avoid installing apps from untrusted sources: Apps installed from unauthorized sources make your device and personal data more exposed to dangers such as Ransomware. So you should be wary of where you download applications.
Conclusion
It is certainly upsetting when your gadget bricks, but you may attempt the solutions listed above to resolve the issue. Meanwhile, if you want to solve the problem quickly and easily, you can try Wondershare Dr.Fone. It can not only help you repair your Android smartphone, but it can also help you extract data from a bricked device, recover data, and many more Android device solutions!
safe & secure
Also read:
- [New] Initial Visual Journey Review with Additional Paths for 2024
- 2024 Approved Free Subtitle Services The Ultimate Convertors Guide
- Easter Extravaganza: Best Children's DVD Picks Ranked by Popularity
- Fix Cant Take Screenshot Due to Security Policy on Honor 90 Lite | Dr.fone
- Gmail Vs. Outlook.com Showdown: Which One Reigns Supreme?
- How Can I Screen Mirroring Apple iPhone XS Max to TV/Laptop? | Dr.fone
- How To Fix Part of the Touch Screen Not Working on Vivo Y100 5G | Dr.fone
- How to Fix Unfortunately, Contacts Has Stopped Error on OnePlus Ace 3 | Dr.fone
- How To Fix Unresponsive Phone Touchscreen Of Samsung Galaxy Z Fold 5 | Dr.fone
- In 2024, 5 Ways to Track Vivo X100 without App | Dr.fone
- Proven Ways to Fix There Was A Problem Parsing the Package on Infinix Hot 40 Pro | Dr.fone
- Quick Fixes for Why Is My Lava Blaze 2 Pro Black and White | Dr.fone
- Restore Missing App Icon on Xiaomi Redmi Note 13 5G Step-by-Step Solutions | Dr.fone
- Sony Xperia 1 V Not Connecting to Wi-Fi? 12 Quick Ways to Fix | Dr.fone
- Step-by-Step Guide to Correcting Windows Update Failure (Error 0X80070002)
- Title: Solved Warning Camera Failed on Asus ROG Phone 8 Pro | Dr.fone
- Author: Abel
- Created at : 2024-10-01 04:44:58
- Updated at : 2024-10-06 18:24:45
- Link: https://fix-guide.techidaily.com/solved-warning-camera-failed-on-asus-rog-phone-8-pro-drfone-by-drfone-fix-android-problems-fix-android-problems/
- License: This work is licensed under CC BY-NC-SA 4.0.