
Solved Warning Camera Failed on Realme 11X 5G | Dr.fone
[Solved] Warning: Camera Failed on Realme 11X 5G
In this article, you will learn why camera fails on Realme 11X 5G devices, how to make camera work again, as well as a system repair tool to fix this issue in few clicks.

Realme 11X 5G devices are one of the best Android devices available in the market and their users are always satisfied with their features. However, it is a recent observation that many Realme 11X 5G users complain about Realme 11X 5G camera failed error while using the camera App on the Realme 11X 5G device. It is a strange error and pops up suddenly with only one option to tap on, i.e., “OK”
The error message reads as follows: “Warning: Camera Failed”.
Once you click on “OK” the app shuts down abruptly and your Realme 11X 5G camera is failed. We understand this is not a very pleasing situation, thus, here are ways to tackle the camera failed Realme 11X 5G issue. Let us now move ahead and find out why exactly you experience Warning: Camera Failed error and how to fix it.
Part 1: Why Realme 11X 5G phone has Warning: Camera Failed error?
We are all aware that no device runs smoothly, without any glitches. We also know that there is a cause behind every problem. Listed below are a few reasons behind camera failed error, especially on Realme 11X 5G devices:

- If you have recently updated your OS version, there are chances that certain bugs are preventing the camera App from functioning normally. Also, if the update is interrupted and not downloaded completely, certain apps may suffer.
- There are chances of your internal storage being cluttered with unwanted Apps and files leaving no space for the camera App to save its data and work smoothly.
- If you haven’t cleared camera Cache and Data, the chances of the App to get clogged up increase tremendously which disrupt its working.
- Warning: Camera Failed error can also be a direct outcome of a change in the system settings or the Realme 11X 5G device’s internal settings.
- Finally, if you tamper a lot with the camera settings and do not update the App whenever it is available, Realme 11X 5G Camera App will not be efficient.
There might be much more reasons for the camera failed error, but these are the most obvious ones. Now let us now move on to troubleshooting the problem.
Part 2: How to fix Realme 11X 5G Camera Failed in One Click?
If you are experiencing some kind of issues in your Realme 11X 5Gs such as Realme 11X 5G camera failed, the Realme 11X 5G device stopped working, black screen, play store not working, etc. There is a special software is designed for such kind of issues in Android devices, i.e. dr. fone. The tool enables the users to fix various kinds of issues in the Realme 11X 5G devices and perform a complete system repair so the Realme 11X 5G device starts working normally.
Dr.Fone - System Repair (Android)
One-click solution to fix camera failed on Realme 11X 5G devices
- The tool has a one-click operation which makes it super easy to use.
- You don’t need any technical skills expertise to operate the software.
- The software supports all the Realme 11X 5G devices including the latest and older ones.
- The software can fix the “warning camera failed”, the app is crashing, failed update, etc.
4,616,396 people have downloaded it
Note: You have to remember that the system repair may erase all the Realme 11X 5G device data. So, create a backup of your Realme 11X 5G data first and then try fixing the Realme 11X 5G phone.
Follow the steps given below and fix the camera failed error:
Step 1. Download the software on your computer and launch it. Connect your device and select the System Repair option from the main interface. In the next screen, select Android Repair module.

Step 2. You will have to provide the Realme 11X 5G device details accurately to ensure that the software provides a precise firmware package to be downloaded. Enter brand, name, model, country, and carrier of your device and agree to the terms and condition.

Step 3. Now put your device in the download mode. The software will provide you with a guide to put the phone in download mode to begin the downloading process.

Step 4. As soon as the firmware is downloaded, the software will automatically initiate the repair process. You will be able to see the ongoing repair.

When the software is done repairing the system, you will be notified. Thus, the Camera failed Realme 11X 5G error in your phone will be fixed.
Part 3: How to fix Camera Failed error by clearing camera data?
Has anyone ever informed you that it is absolutely necessary to keep clearing camera data every once in a while? Yes, since it deletes all unnecessary data stored in respect of the App and no, it does not mean that all your photos and videos will get deleted. Just follow the steps given below to clear camera data:
1. First, visit “Settings’” on your Realme 11X 5G device and select “Apps” or Application Manager”.

2. Now a list of all Apps will appear before you. Keep scrolling down until your find “Camera”.

Tap on “Camera” to open the “Camera Info” screen and once you are there, hit “Clear Data” option as shown below.

That’s all, now return to the Home Screen and access the camera again. Hopefully, it will work now.
Part 4: How to fix Camera Failed error by removing third-party Apps?
Another tip to fix Realme 11X 5G camera failed error is by deleting a few unwanted third-party Apps (recently installed) to free some space in the Realme 11X 5G device’s internal storage. It is essential to create and keep storage space for the camera App to function smoothly and allow it to store its data as well. Also, if this issue only happens recently, it might be some newly installed Apps causing some glitches with the camera.
Simply, follow the instructions given below to remove Apps from Realme 11X 5G Devices:
1. Click on the “Settings” icon on the Home Screen and from the options before you, select “Apps”/ “Application Manager”.
2. You will see that a list of downloaded and built-in Apps will open up before you as follows.

3. Now, once you select the App you want to uninstall, the App Info screen will appear. Tap on “Uninstall” option and then tap on “Uninstall” again on the pop-up message.

The App will be removed immediately and its icon will disappear from the Home Screen and you will notice an increase in the storage capacity of your device.
Part 5: How to fix Camera Failed error by wiping Cache Partition?
This method might seem tedious and time-consuming and you may also lose your data and essential settings. However, wiping the Cache Partition only cleans your device system internally and gets rid off any unwanted and trouble making elements causing Warning: Camera Failed error. Follow the step-by-step guide given below to clean Cache Partition smoothly:
1. Firstly, switch off the Realme 11X 5G device by pressing the power button and tapping on “Power Off” as shown in the screenshot below. Then wait for the lit screen to turn off completely before proceeding further.

2. Now, press and hold the power on/off, home and volume up button simultaneously. Your device will now vibrate. This a signal to let go of the power button (only).

3. Once the Recovery Screen appears, leave all buttons and use the volume down key till you reach “Wipe Cache Partition”.

4. Now, to select the option to use the power on/off button and wait for the process to get over. Once this done, tap on “Reboot system now” and see that your device restarts normally.

You may try to use the camera app once the process completes.
Part 6: How to fix Camera Failed error by Reset Settings?
Resetting the camera settings solves the problem 9 out of 10 times and thus is worth a try.
1. To reset, first, launch the Camera App by tapping on its icon.

2. Then go to Camera “Settings” by tapping on the circular gear like icon.

3. Now look for “Reset Settings” options and click on it.

Once done, go back to the Home Screen and start the camera App again to use it.
Part 7: How to fix Camera Failed error by Factory Reset?
Lastly, if the above-mentioned techniques do not help you in fixing the camera failed error, you can consider performing a Factory Reset. Note: This method will delete all your saved data so it is advised to backup before you start the process.
Here are the steps to factory reset your device to fix “Warning: Camera Failed” Error:
1. Start by visiting “Settings” on your Realme 11X 5G device on which the camera has failed.

2. Now from the list of options before you, select “Backup and reset” and move ahead.

3. Now you must first select “Factory data reset” and then tap on “Reset Device” as shown in the screenshot below.


4. Finally, you have to click on “Erase Everything” and wait for the Realme 11X 5G device to reboot itself.

Note: You will have to set up your Realme 11X 5G device from scratch once it is reset, however, that is a small price to pay to fix your Camera App.
Warning: Camera Failed error is not a rare phenomenon and many users experience it on daily basis. So, there is no need to panic, All you need to do is carefully follow the instructions given above and repair your Camera App yourself. You do not need to seek any technical assistance for the same as the camera failed issue is not difficult to deal with. So go ahead and try these tricks to enjoy using the Camera App on your Realme 11X 5G devices.
Gmail Not Working on Realme 11X 5G: 7 Common Problems & Fixes
Ever since Android is introduced, it has almost eliminated the need of computers to work through Gmail. Gmail carries much importance especially when you’re a working person. A lot of work is done through mails on daily basis. But maybe today is not your lucky day. Maybe Gmail is giving you a hard time today. Is it? Is your Gmail not responding or keeps stopping you from going further? Well! There is no need to be bothered anymore. We are discussing some of the general Gmail problems along with their fixes. So, if your Gmail is not working on Android, you can go through this article and find the relevant solution.
Problem 1: Gmail App not responding or keeps crashing
First and foremost, the most common situation people meet with is when there Gmail keeps crashing. Or simply, it doesn’t respond at all. When you open it, it stuck for a few seconds and then you have to close it. It seriously is an annoying issue. If your Gmail is also not responding or crashing and you aren’t able to work properly, following are the solution you can follow.
Clear Cache
The first thing you can do to fix Gmail not responding issue is to clear the cache of Gmail. This has higher chance to get the issue resolved. To do this:
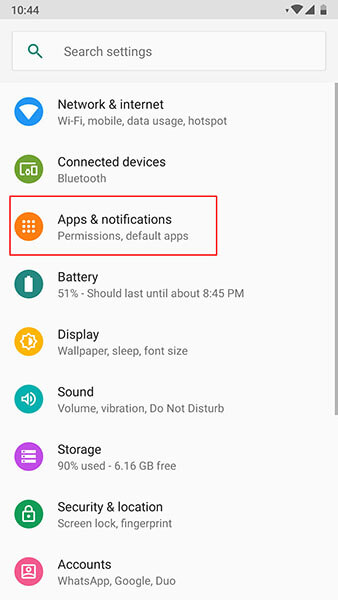
Go to “Settings” and look for “Apps & Notifications”. Please note that the option may vary in some Android phone like it maybe “Application” or “App Manager”. So, don’t panic and look for the option carefully.

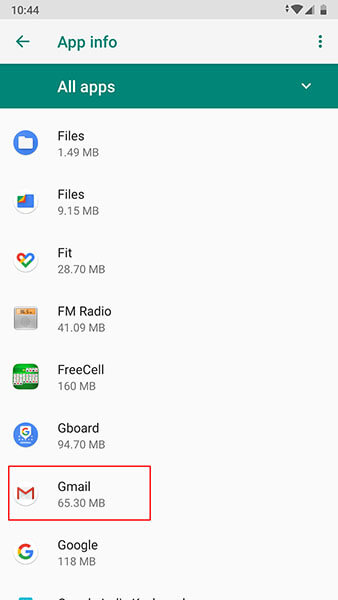
Now, from the apps list, search “Gmail” and tap on it.
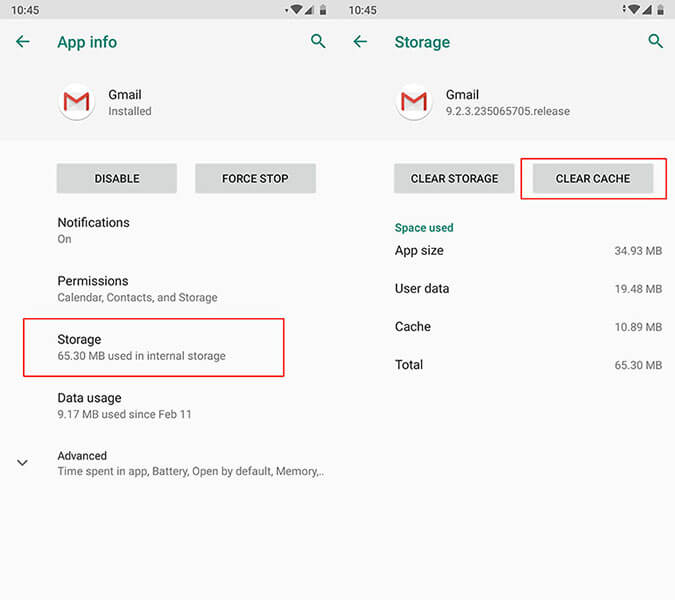
Go to “Storage” followed by “Clear Cache”.
Restart the Realme 11X 5G device
Restarting the Realme 11X 5G device in the first place simply resolves many problems and so in the instance when Gmail keeps stopping. Simply long press the power button of your device and restart the Realme 11X 5G device. See of the problem gets vanished or not.
Factory Reset the Realme 11X 5G device
The next option that you can try is resetting your device. This will lead to data loss so we suggest you to take backup firstly and then proceed with this method.
Hit on “Settings” and search for “Backup & Reset” option.
Tap on “Reset” or “Erase all data” (the option name again may vary).

If unfortunately the above solutions don’t work, there is a requirement to flash the stock Android ROM again. Before you wonder how, there is a professional one-click tool that can surely be of assistance. It is Dr.Fone - System Repair (Android) . The tool takes special care of the Android phones and fixes almost every system issues with ease. It takes no special technical skills and performs efficiently.
Problem 2: Gmail won’t sync between all ends
The next most common problem where people get stuck with is when there Gmail won’t sync. Here are the solutions to this particular problem.
Make Space in the Phone
When Gmail stops syncing, one of the things that can save you is clearing the storage. It is the space that maybe the culprit and therefore the syncing don’t work at all. We would like to suggest you removing the unwanted apps to clear the storage or deleting the downloaded files. You can also transfer the important files to your computer and make the space vacant.
Check Gmail Sync Settings
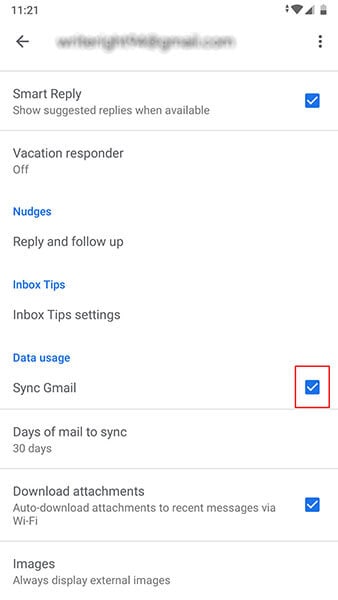
When still the Gmail not working issue persists and you can’t sync, make sure to check the Gmal sync settings. For this, follow the steps below:
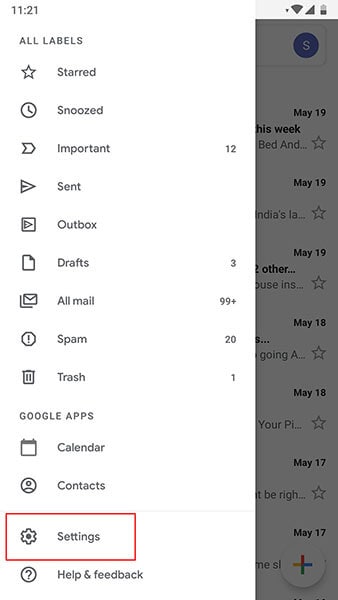
Launch the Gmail app and tap on the menu icon (three horizontal lines).
Tap “Settings” and choose your account.
Check the box next to “Sync Gmail” if it’s not checked.
Restart the Realme 11X 5G device
Again, restarting can also be helpful in this situation. When you boot the Realme 11X 5G device again, check if your Gmail can sync or not.
Problem 3: Gmail won’t load
In case you are using the Gmail over your web browser and it has tested your patience in loading, here are the solutions that could prove to be fruitful for you. Please check these out.
Ensure to Use Gmail Supported Browser
First of all, you need to make sure that the browser you are using works with Gmail or not. Gmail can smoothly perform in Google Chrome, Firefox, Safari, Internet Explorer and Microsoft Edge. However, the browsers should be updated. So, please make sure that these browsers are running on the latest versions. Moreover, in case you use Chromebook, don’t forget to update the operating system in order to let it support Gmail.
Clear Cache of web browser
If you tried the above method but to no avail, try to clear the cache and cookies of the web browser. But by doing so, the browser history will be removed. As well as, the records of the websites you previously enjoyed will also be lost.
Check browser extensions or add-ons
If not the above one, try this tip. It encourages you to check your browser extensions. Perhaps these are interfering with the Gmail and due to this conflict, Gmail won’t load. You can either turn off these extensions and plug-ins temporarily or make use of the incognito mode of the browser where there are no such things like extensions and plug-ins.
Problem 4: Gmail can’t send or receive
Gmail also gives you problem in sending or receive mails and messages. And to troubleshoot such issue, following are the solutions mentioned.
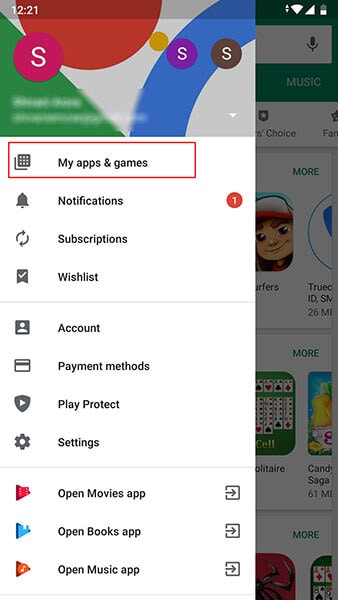
Check the Latest Version of Gmail
This issue is likely to emerge when you are using an outdated version of Gmail. And therefore, the first solution says you to check if the Gmail update is available. You can go to the Play Store and from the “My apps & games” option, you can see if Gmail needs to be updated or not.
Verify Internet Connection
Another thing that carries weight while you can send or receive mails is the internet connection. As we all know that Gmail won’t respond if the Realme 11X 5G device is not connected to the internet. Therefore, you are advised to turn off Wi-Fi and then enable it again. Also, please ensure to switch to Wi-Fi if you are using the cellular data. This may hamper the process and stop you from receiving or sending mails.
Remove you Account and Add Again
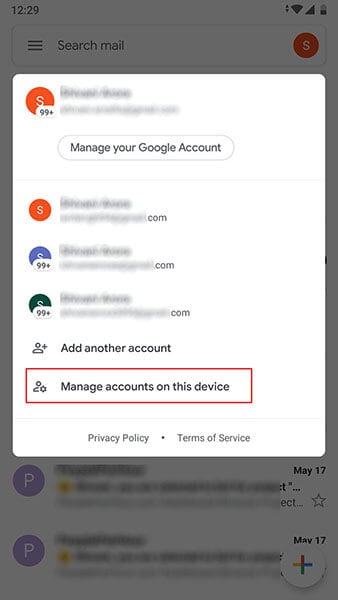
If still Gmail keeps stopping you to go ahead, make sure to once sign out from it. To do this:
Open your Gmail app and go to “Manage accounts on this device”.
Now, tap on the account you are working with. Tap on “REMOVE ACCOUNT” thereafter. After this, you can again sign in and then check if the problem is gone or not.

Problem 5: Stuck in sending
Now, here is another annoying problem that doesn’t let Gmail working on Android properly. This problem addresses the situation where users send a mail but it gets stuck on sending. If this is the problem that you are going through, the following solutions will help you.
Try Alternative Gmail Address
First of all, if Gmail is not working due to stuck in sending issue, we advise you to make use of some other Gmail address to send the mail. If the problem still occurs, jump to the next solution.
Check Network Connection
As already mentioned, be sure of an active internet connection while working with Gmail. When you are not using a stable connection, it may lead to stuck on sending, Gmail crashing and many other issues. You can fix the issue by doing these three things:
- Most importantly, use only Wi-Fi rather than cellular data if you want a smoother process.
- Turn off Wi-Fi and then turn it on again after nearly 5 seconds. Do the same with the router. Plug it out and the plug in.
- Lastly, turn on Airplane mode and after a few seconds, turn it off again.
Now try to send the mail and see if things are still the same or not.
Check Attachments
Large attachments can also be the reason for this issue. We would here like to suggest you to check the attachments you are sending. If these are not so important, you can remove them and send the mail. Or if it is not possible to send the mail without attachments, compressing the files can be a solution.
Problem 6: “Account not synced” issue
Many times, the users get the error that says “Account not synced” while they try to work with Gmail. And this is the 6th problem we are introducing. The ways mentioned below will assist to get out of the trouble.
Make Space in the Phone
When Gmail stops to further the process by prompting “Accounts not synced” issue, be sure that your Realme 11X 5G has some storage in it. If not, create it straight away. As we also mentioned in one of the above solutions, you can either delete the unnecessary files or transfer the important files to the PC to make the space in the phone. Go along with this tip and see if it works.
Check Gmail Sync Settings
As another solution, check Gmail sync settings to get the issue fixed.
Simply open Gmail and hit the menu icon which is three horizontal lines on the top.
Go to “Settings” and choose your account.
- See the tiny box beside “Sync Gmail” and check it if it is not.
Restart the Realme 11X 5G device
If the above method went futile, simply restart your device. Take help of the Power button on your device. Long press it and from the options, restart it. This will hopefully work for you.
Problem 7: Gmail app running slow
The last problem that you may face is the slow-going Gmail app. In simple words, you may experience that Gmail app is operating extremely slowly. To fix this, following solutions will help you.
Restart the Phone
It is a universal method to fix minor Android system issues. And here too, we would like you to restart your Realme 11X 5G in the first place when you find that Gmail is not responding due to the sluggish behavior.
Clear Storage of Device
Usually all the apps start running slow when the Realme 11X 5G device is not having sufficient space. As the apps need space to function quickly and appropriately, having the Realme 11X 5G device on low storage can prove to be a bad luck for Gmail. So, make sure you wipe out the items you no longer needed on your device and create some room so that the Gmail responds nicely and won’t be running slow anymore.
Update Gmail App
As the last tip that will indeed help you is to update the Gmail app. Until you update the app when required, Gmail keeps stopping you from working and you will definitely get frustrated. Therefore, go to Play Store and look for the Gmail update. If it is available, welcome it with smile and bid farewell to the problem of slow running Gmail.
What if your problem still doesn’t get resolved after following these 3 tips? Well! If that is the case, we will again recommend you to make use of an expert one-click tool to flash the stock Android ROM.
Dr.Fone - System Repair (Android) is going to help you serving the purpose. This mighty tool possesses huge success rate and one can rely on it for its simplicity and security. It is designed to work with numerous problem related to Android system. So, no matter if your Gmail keeps crashing or keeps stopping, it has the solution for everything.
Dr.Fone - System Repair
Fix all Gmail issues caused by Android system:
- Gmail app corruption or not opening
- Gmail app crashing or stopping
- Gmail app not responding
Strategies for Apps That Won’t Download From Play Store On Realme 11X 5G
The frustration of apps not downloading in the Google Play Store can annoy users. A seamless download experience is crucial for user satisfaction and app success. When you encounter such issues, they disrupt the interaction expected from your device.
The inconvenience can impact user trust and the overall perception of an app’s reliability. Addressing these challenges is crucial to maintaining a satisfied user experience and ensuring the success of apps on the platform. Explore the article below to learn what to do when apps not downloading from the Play Store issue appears.
Part I. 7 Usual Reasons Behind Apps Not Downloading in Google Play Store
The reasons below collectively contribute to the frustration users experience when apps are unable to download from the Play Store:
Connectivity Issues
Slow or unstable internet connections can interfere with the download process. It often leads to failed or delayed app installations. You will experience frustration when faced with connectivity issues, impacting your ability to access desired apps.
Insufficient Storage
Limited available storage on the Realme 11X 5G device prevents the installation of new apps. Users may find it challenging to manage their storage effectively. It can hinder the expansion of your app library and impact the overall device functionality.
Outdated Play Store Version
Running an outdated version of the Play Store can cause compatibility issues with the newest versions of apps. You’ll miss out on new features and improvements, affecting the overall user experience and the efficiency of the Play Store.
Google Account Authentication Problems
Issues with verifying Google accounts can restrict access to the Play Store. It prevents you from downloading or updating apps. Authentication problems pose a significant barrier, impacting your ability to stay current with app versions.
App Download Restrictions
Device settings or parental controls may impose restrictions on certain app downloads. You may encounter limitations in accessing specific apps. It can affect the Realme 11X 5G device’s versatility.
Incorrect Date and Time Settings
Inaccurate date and time settings on the Realme 11X 5G device can disrupt the Play Store’s functionality. You’ll face obstacles in downloading apps due to authentication errors or syncing issues. It can have a negative impact on the overall user experience.
Play Store Bugs and Glitches
Technical issues within the Play Store, such as bugs or glitches, can lead to failed downloads. You may encounter unexpected errors, causing uncertainty and potential distrust in the reliability of the app platform.
If you encounter any of these issues, having a reliable tool to fix them is essential. Wondershare Dr.Fone - System Repair offers a solution if you cannot download from the Play Store. The platform ensures you can download apps again with a high success rate in minutes.
Part II. Having a Third-Party Tool Is Essential To Safeguard Your Apps
Dr.Fone - System Repair is a dependable alternative offering a comprehensive solution to various Android-related problems. Its key features set it apart, making it an essential asset for users facing app download challenges.
 safe & secure
4,307,222 people have downloaded it
Key Features
The summarized points show why Dr.Fone is a flexible and powerful tool for Android users with various phone models.
Supports up to 1000+ Android Models
Dr.Fone System Repair boasts compatibility with a vast range of Android models. It provides a universal solution for users regardless of their device. The extensive support ensures that users with diverse Android devices can rely on the tool for effective issue resolution.
Fixes All Kinds of Android Problems in Minutes
The tool is designed to address a wide array of Android problems. Whether it’s connectivity issues, authentication problems, or glitches within the Play Store, Dr.Fone - System Repair solves these issues within minutes. Its efficiency in tackling diverse problems makes it a valuable asset for users seeking a quick and reliable solution.
High Success Rate Without Data Loss
One of the standout features of Dr.Fone - System Repair is its high success rate in problem resolution without causing data loss. You can have confidence that your apps and important data remain intact throughout the repair process. It ensures a smooth solution and maintains the integrity of the user’s device and data.
When grappling with persistent issues hindering app downloads on the Google Play Store, having a reliable third-party tool becomes essential to safeguard your apps and ensure a seamless user experience. The next section will show you how to use the platform to fix the apps not downloading in the Google Play Store problem.
Part III. First Choice: Use Dr.Fone - System Repair for App Downloading Issues
Using Dr.Fone - System Repair to resolve app downloading issues is straightforward. Here are three simple steps to effectively address app-related challenges:
**Note:**It is highly recommended that you back up your Android data before using Dr.Fone for Android repair.
- Step 1: Download and install Dr.Fone - System Repair on your computer. Launch the program and select System Repair from the available options.
safe & secure
3,143,540 people have downloaded it
- Step 2: Connect your Realme 11X 5G to the computer using a USB cable. Dr.Fone will detect your device, and you’ll be prompted to choose your device’s type. Select Android Repair.

- Step 3: Follow the on-screen instructions until the app downloads the correct firmware for your device. As it downloads, Dr.Fone will verify it and put your device details on display. You can install the firmware on your Realme 11X 5G by choosing Fix Now.

Step 4: Initiating the system repair process will be accompanied by a progress bar visible on the screen. Upon completion, a prompt window will emerge, presenting a completion message.
If you can download apps successfully, click Doneto close the tool.
If the problem persists, select TryAgain to rerun the process.

If you can’t download Dr.Fone for some reason, you can try these common fixes to try to resolve your app download issues on your device
Part IV. 8 Other Methods of Resolving Common App Downloading Issues
Here are 8 other methods to troubleshoot and resolve common app downloading problems:
Check Internet Connection
A stable internet connection is essential for downloading apps. Do an Internet signal check to ensure you are connected to a reliable Wi-Fi network or have a strong mobile data signal. If the connection is weak, consider switching to a more robust network.
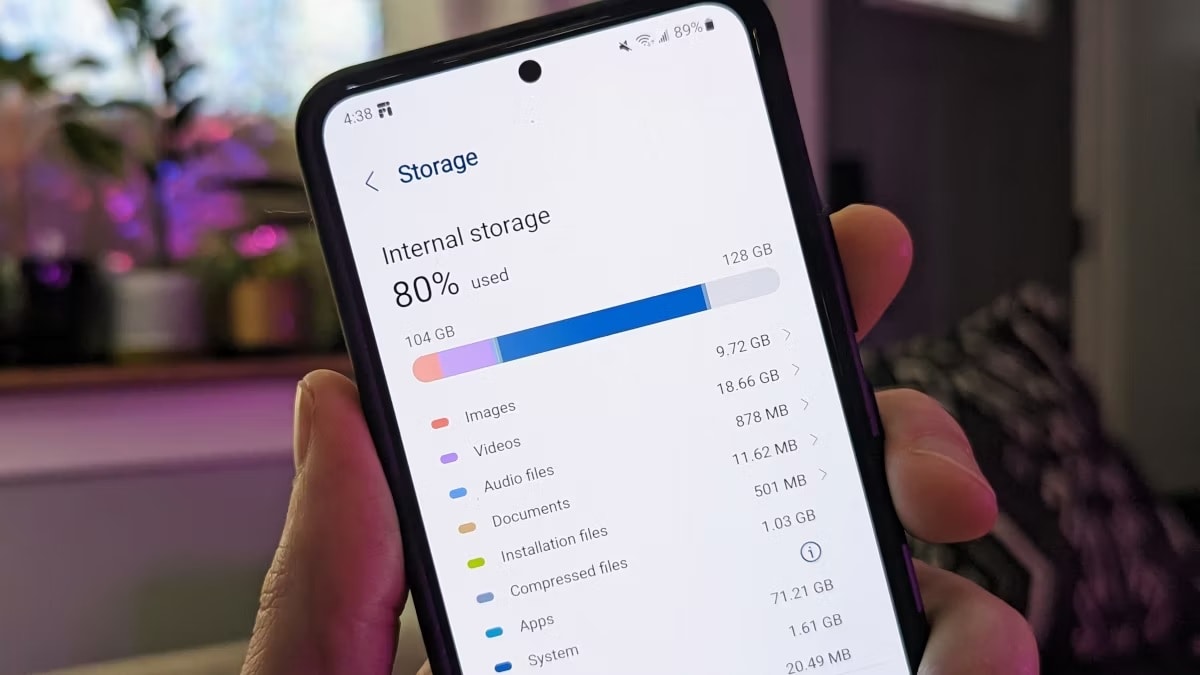
Free Up Storage Space
Insufficient storage on your device can hinder app installations. Navigate to the Realme 11X 5G device settings, access the Storage section, and clear unnecessary files or apps. Creating more space ensures a smoother download experience.
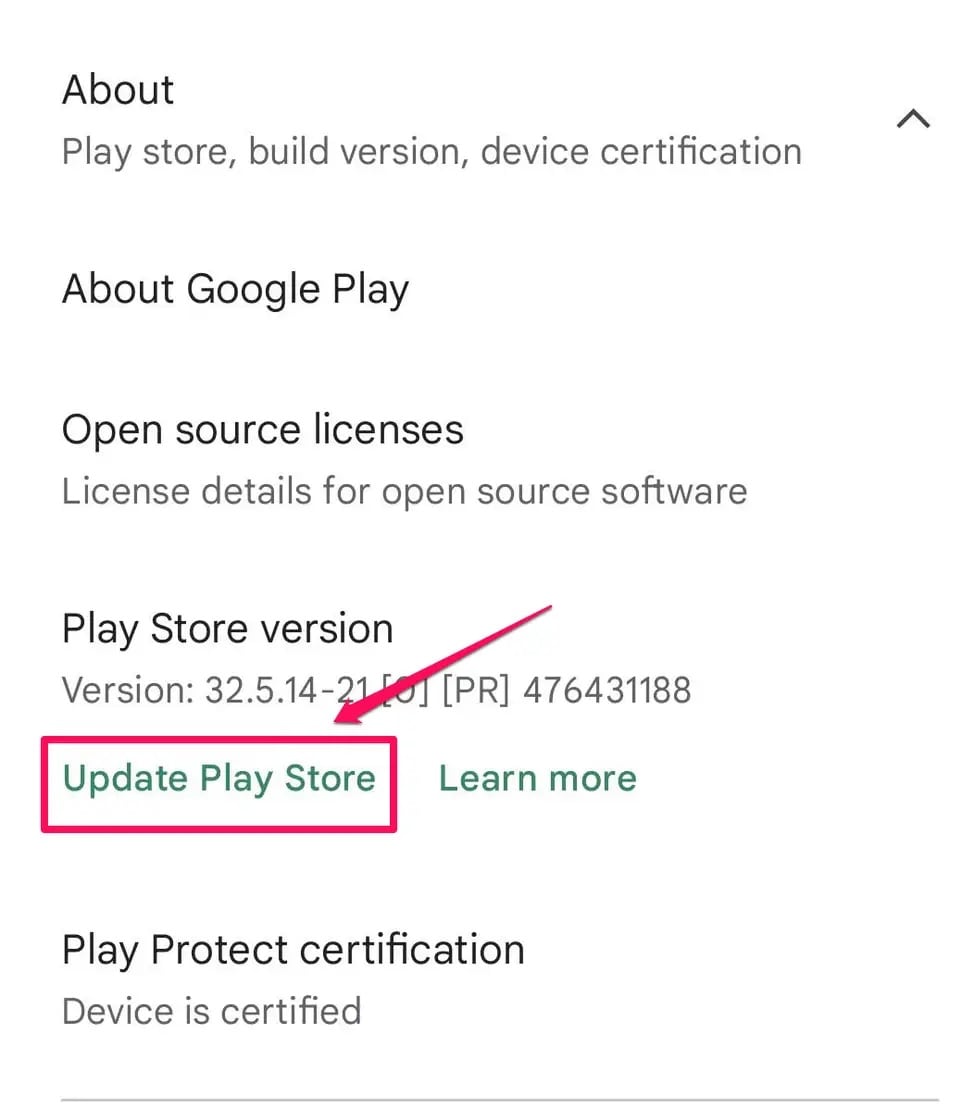
Update the Play Store
An outdated Play Store version may lead to compatibility issues. Open the Google Play Store, go to Settings, and tap the Play Store version. If an update is available, install it to ensure compatibility with the latest apps.
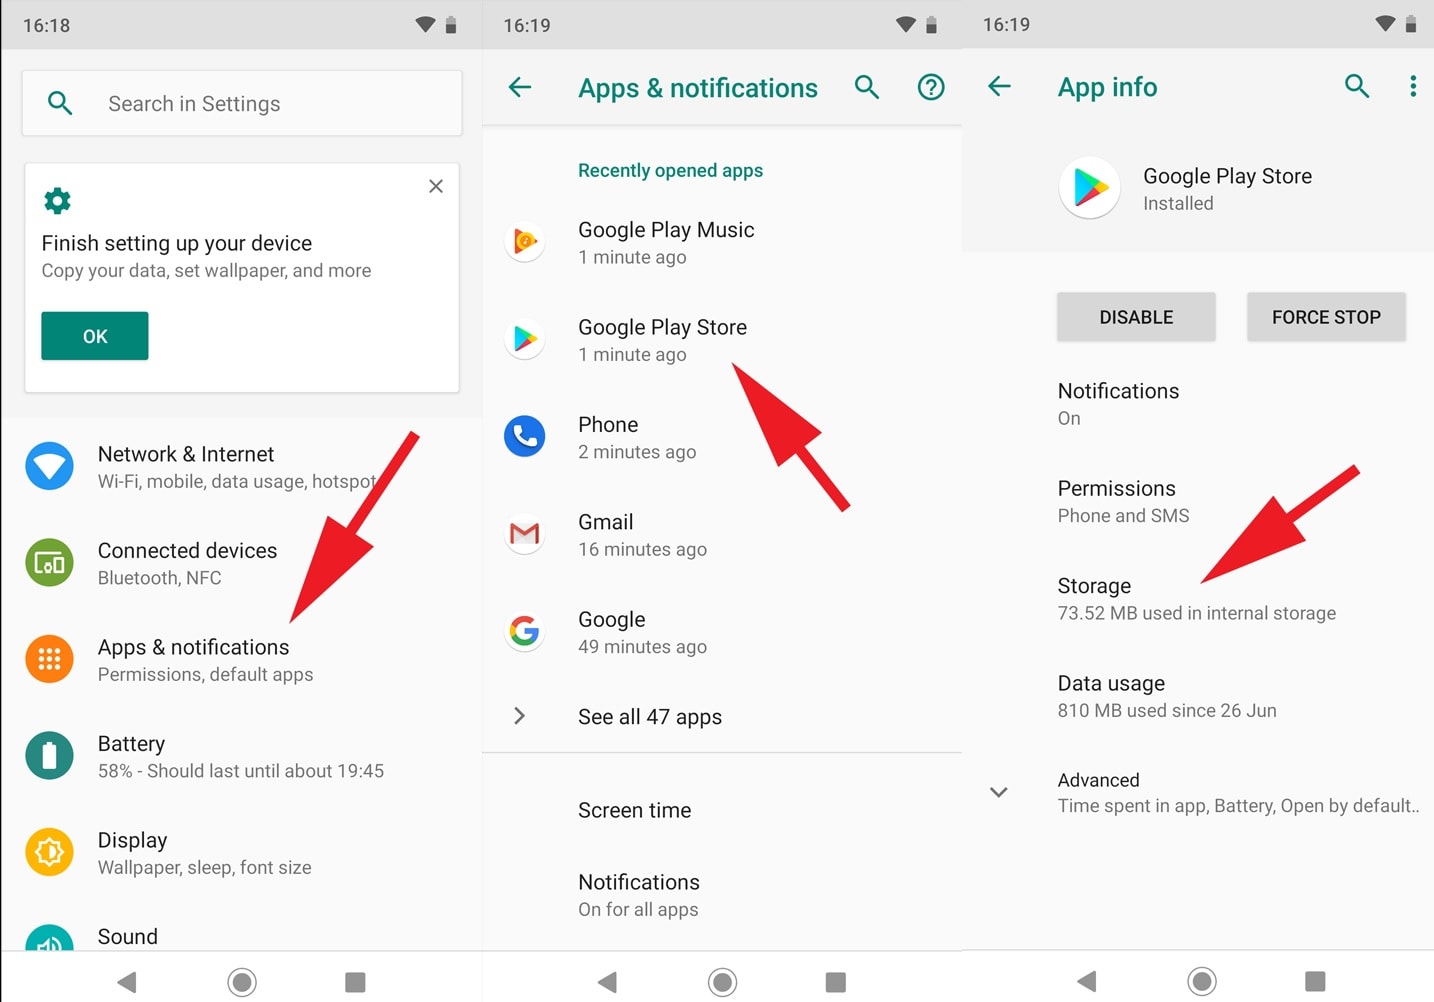
Clear Play Store Cache and Data
Cached data in the Play Store can sometimes cause download problems. Head to the Realme 11X 5G device settings and open Apps or Application Manager. Locate Google Play Store, and tap Storage. Clear both the cache and data to refresh the app.
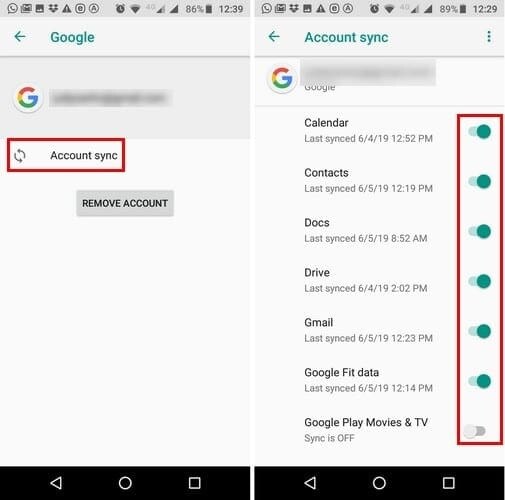
Verify Google Account
Authentication issues with your Google account can prevent app downloads. Confirm that your Google account is properly verified. Go to the Realme 11X 5G device settings, select Accounts, and ensure your Google account is active and synced.
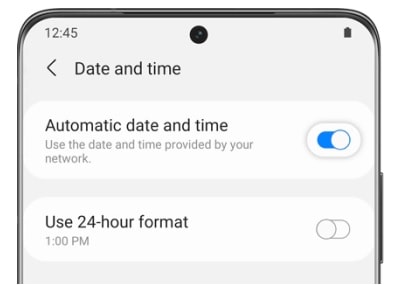
Check Date and Time Settings
Incorrect date and time settings may disrupt the authentication process. Verify that your device’s date and time are set correctly. Enable automatic date and time settings to ensure accuracy.
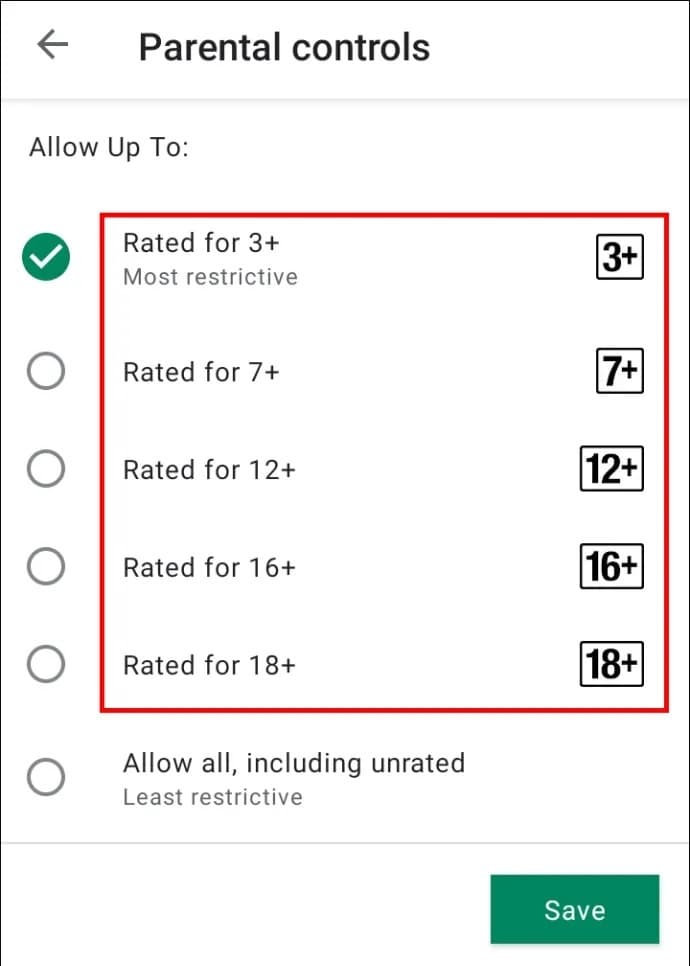
Review Download Restrictions
Device settings or parental controls might impose restrictions on certain app downloads. Examine the download restrictions in the Realme 11X 5G device settings and adjust them accordingly to allow for the installation of desired apps.
Restart the Realme 11X 5G device
Sometimes, a simple restart can resolve various issues. Power off your device, wait a few seconds and then power it back on. This can help refresh system processes and eliminate temporary glitches.
Conclusion
Ensuring a smooth app download experience demands attention to various factors. From connectivity to storage management, each step contributes to resolving download challenges. The careful review of date/time settings and download restrictions further enhances the process when you cannot download from the Play Store.
For persistent issues, consider Dr.Fone - System Repair. The app is a viable option, providing a comprehensive approach. Embracing these measures ensures you can easily fix apps that won’t download from the Play Store. Having a reliable tool beside you also fosters an uninterrupted and enjoyable downloading journey from the Play Store.
Also read:
- [New] 2024 Approved Instagram Enhancement The Top Tactics for Better Storytelling
- [New] In 2024, Secrets to a Flawless PS3 Gameplay Record
- [Updated] Expert Tips for LUT Integration in Premiere Projects
- 2024 Approved Beyond Capture – Understanding MyCam's Advanced Features
- Become an Expert Tutorial for Making GIFs Into Desirable WhatsApp & Telegram Stickers for 2024
- How To Fix Part of the Touch Screen Not Working on Motorola Moto G04 | Dr.fone
- How To Restore a Bricked Nokia C12 Back to Operation | Dr.fone
- In 2024, Tonal Treasures The Ultimate List of Classical Download Sites
- Realme GT Neo 5 SE Camera Not Working Unexpected Error? Fix It Now | Dr.fone
- Samsung Galaxy F34 5G Screen Unresponsive? Heres How to Fix It | Dr.fone
- Sign a PDF v1.3 document with electronic signature tool
- Simple Solutions to Fix Android SystemUI Has Stopped Error For Honor X8b | Dr.fone
- Title: Solved Warning Camera Failed on Realme 11X 5G | Dr.fone
- Author: Abel
- Created at : 2024-10-03 03:51:52
- Updated at : 2024-10-07 04:41:39
- Link: https://fix-guide.techidaily.com/solved-warning-camera-failed-on-realme-11x-5g-drfone-by-drfone-fix-android-problems-fix-android-problems/
- License: This work is licensed under CC BY-NC-SA 4.0.