
Spotify Keeps Crashing A Complete List of Fixes You Can Use on Samsung Galaxy A25 5G | Dr.fone
Spotify Keeps Crashing: A Complete List of Fixes You Can Use on Samsung Galaxy A25 5G

Does your Spotify keep crashing? You’re not alone. This problem is widespread and can happen to anyone. Fortunately, there are ways to rectify it quickly and easily. We’ve prepared a guide to fixing your Spotify crashing problem.
In our guide, you’ll find out why your Spotify keeps crashing. Moreover, you’ll get a list of fixes for your Spotify closing problem and detailed instructions. Once you’ve read our guide, you’ll successfully solve the problem of Spotify crashing on Android.
Part 1. Why Spotify Keeps Crashing

Some people have encountered a problem with their Spotify accounts. Spotify can sometimes keep crashing and closing due to several reasons. For example, it can happen due to your phone not being compatible with the app. This can happen if your operating system isn’t updated to the newest version.
Another reason the Spotify app keeps crashing could be an antivirus or a VPN blocking Spotify from working. Moreover, your device might be out of storage space, causing your phone to slow down and crash apps.
Several other reasons for this problem include network issues, a weak Wi-Fi signal, or the battery saving mode. Furthermore, your apps and files might be corrupted, or an app on your phone might block Spotify from working correctly.
Part 2. Spotify Keeps Crashing: Best Fixes
As you can see, there are numerous reasons for your Spotify crashing. Fortunately, all of them are easy fixes, and there’s no need to worry. We’ve prepared a list of 11 ways to fix your Spotify. With these fixes and detailed instructions, you’ll be able to eliminate your Spotify problem with ease.
1. Fix the Spotify Closing Issue by Repairing Your System
The reason for your Spotify crashing may be more significant than just a bug. Your device system might be behind it. If that’s the case, you might need to repair your system before trying to fix Spotify.
If you want to repair your mobile device’s system quickly and efficiently, try Wondershare Dr.Fone.
Wondershare Dr.Fone is an app that gives you complete control over your phone. You can manage it, back it up, recover files, and repair your system. The system repair option will fix your Android in just a few clicks and allow you to use Spotify freely. The steps go as follows:
- Step 1: Install and open Wondershare Dr.Fone on your computer and connect your Android.
- Step 2: Go to the Toolbox section and select System Repair.

- Step 3: Choose the Android

- Step 4: See which Android errors Wondershare Dr.Fone can fix and click Start.

- Step 5: Select the **Brand,**Name, Model, Country, and Carrier In the Carrier section, choose OPEN if your device is unlocked.

- Step 6: Tick the “I agree with the warning, and I am ready to proceed”checkbox and click Next.
- Step 7: Put your Android in Download Mode. You can find the steps below these instructions.
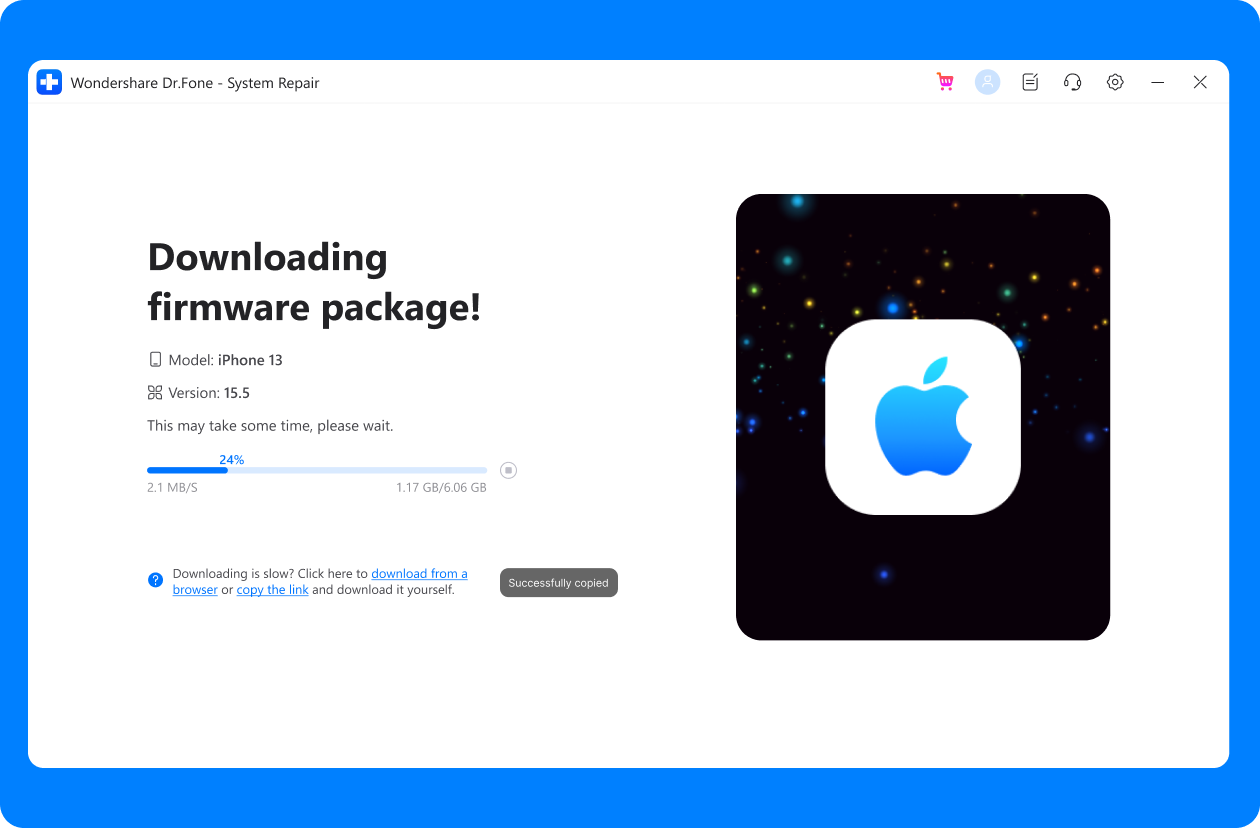
- Step 8: The program will automatically download once you put the phone in Download Mode.

- Step 9: Once the firmware downloads, click Fix Nowto install it on your Android.

- Step 10: Type “000000” in the dialog box and click Confirm.

- Step 11: That will start the system reparation, which you can follow on the screen.

- Step 12: Once it finishes, click Doneto complete the system repair.

There are two ways to enter Download Mode: one for Android devices with the Home button and another for those without it.
The steps for entering Download Mode on an Android phone with the Home button are as follows:

- Step 1: Turn off your phone.
- Step 2: Press and hold the Volume Down,Home, and Power buttons simultaneously.
- Step 3: Press the Volume Upbutton to enter Download Mode.
The steps for entering Download Mode on Android devices without the Home button are as follows:

- Step 1: Turn off your phone.
- Step 2: Press and hold the Volume Down, Bixby, andPower buttons simultaneously.
- Step 3: Press the Volume Upbutton to enter Download Mode.
2. Force-Close the App
You can force-close Spotify and open it again to make it work properly. That is an easy fix if your Spotify has developed a bug. If that is the case, follow the next steps:
- Step 1: Try opening Spotify.
- Step 2: If it’s not working, open App Switcher or Recent Apps. Different Android devices open it differently. Thus, you can swipe up from your Home screen, or if you have three buttons at the bottom, press Recent Apps.

- Step 3: Find Spotify in Recent Appsand click X or swipe up over it to force-close it.
- Step 4: Try opening Spotify again.
3. Re-Login to Your Spotify
The Spotify app may be working fine. Maybe you’re having problems with your Spotify account. If so, you can try logging out and logging in again to see if that works. That isn’t a big problem; sometimes Spotify accounts start bugging. You can re-login to your Spotify account by following these steps:
- Step 1: Open Spotify.
- Step 2: Tap Settingsin the upper right corner.

- Step 3: Scroll to the bottom of the settings and tap Log Out.

- Step 4: Tap Log In.

- Step 5: Enter your login credentials.
- Step 6: Tap Loginagain, and you’re in.

4. Restart Your Device
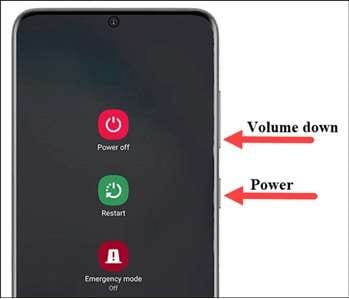
Another way to stop Spotify from crashing can be restarting your Android. The steps may vary slightly depending on the Samsung Galaxy A25 5G device, but they’re mostly the same. Follow these steps to restart your device:
- Step 1: Press and hold the Power button(you must press and hold both the Power and Volume Up buttons on a newer Android device).
- Step 2: Tap Restart. That will restart your Android, and you can try opening Spotify again.

5. Set Up Your Time and Date
Another possible reason for your Spotify closing problem could be the incorrect time and date on your Android. That is also an easy fix; you must set it correctly and try opening the app again. Set up your time and date with these steps:
- Step 1: Open Settingson your Android.
- Step 2: Go to Systemor General Management (depending on your Android model).
- Step 3: Go to Date and Time.
- Step 4: Tap Set Dateand set the correct date.

- Step 5: Go to Set Timeand set the right time.

6. Update Your System Software
Your Spotify app might keep crashing because your system is outdated. Try updating it to the latest version to try and fix the crashing problem. The steps for the Android system update are as follows:
- Step 1: Open Settings.

- Step 2: Go to System or About Phone.

- Step 3: Select System Update.
- Step 4: If there’s an available update, tap

7. Update Your App
If your system is updated, then Spotify might need an update. The app might malfunction if you’re using an older version. Thus, updating the app might solve the Spotify crashing problem. You can update Spotify by following these steps:
- Step 1: Go to the Play Store.

- Step 2: Search and open Spotify in the Play Store.
- Step 3: Tap Update

8. Free up Storage
Spotify can start crashing if your Android’s storage space is at capacity. That can also cause other apps to crash, not only Spotify. Therefore, check the storage space and free up as much as possible. Follow these steps:
- Step 1: Open
- Step 2: Go to Device Maintenance > Storageor go directly to Storage.

- Step 3: Here, you can see how much of your storage space is available and what’s taking up the most space.

- Step 4: Then, you can go ahead and clear as much space as you can.
9. Reinstall Spotify
There’s another solution if the Spotify app keeps crashing. You can try uninstalling and reinstalling it again on your Android. That will reset the app and might solve your problem. Follow the next steps to reinstall Spotify:
- Step 1: Find the Spotify app on your Android.
- Step 2: Hold the app icon.
- Step 3: Then, press Uninstall.

- Step 4: Press OK.
- Step 5: Then, open the PlayStore and find Spotify.
- Step 6: Tap Installto reinstall the app again.

- Step 7: Once it installs, log in to test if it’s working.
10. Check if Spotify Is Down
If your Spotify keeps crashing and closing, it might not be your device’s problem. Sometimes, Spotify’s server can be down, and many people face the same issue. If that’s the case, you can check with your friends if their Spotify is working or check online if Spotify is down. To do that, follow these steps:
- Step 1: Open your web browser.
- Step 2: Type “Is Spotify down” in the search bar.

- Step 3: You’ll see several websites that check real-time app servers and if they’re down.

- Step 4: Go to one or two and see what they say. If Spotify is down, you’ll need to wait for them to fix the problem.
11. Clear the Cache
When using different apps and websites, your device caches data from those sources. Since there’s no need to pile up your Spotify cache, you can clear it. Follow these steps:
- Step 1: Open Settings.

- Step 2: Go to Apps.
- Step 3: Find Spotify and tap it.

- Step 4: Tap Storageor Storage usage.

- Step 5: Tap Clear Cache.

 safe & secure
Conclusion
If your Spotify app keeps crashing, several reasons might be behind it. For instance, your storage space might be at capacity, your system might need an update, your phone might have a software bug, or the Spotify server might be down.
We’ve given you 11 solutions to fix the Spotify crashing problem. However, if your system needs repairing, you can try Wondershare Dr.Fone for quick and easy repair. This solution and all others will surely help you fix the crashing problem.
How To Deal With the Samsung Galaxy A25 5G Screen Black But Still Works?
With the advance of technology over the years, many of us rely on smartphones to communicate, work, and play. As such, it can be pretty concerning when your device begins to act strange like your phone screen suddenly went blank.

Whether you’re using an iPhone or an Android device, you’ll eventually encounter a problematic symptom like this. Therefore, this article will explore what to do when your phone screen goes black. After exploring below, you’ll learn the common causes of why your phone screen went black and how to fix it. Read on below to learn more.
Part 1: Why Did My Samsung Galaxy A25 5G Screen Go Black but Still Works? Common Causes
Experiencing a cell phone blank screen is not exclusive to Android or iOS users. A phone screen not turning on happens all the time due to several factors that may or may not be out of your control. While they can be frustrating, here are some common causes you should know as to why your phone screen went black but still works.
A Drained Battery
The first thing that comes to mind when your phone screen suddenly goes black is you have a drained battery. Even though this is obvious, it’s still important to mention, as this is usually what most people encounter. To fix this problem, plug your smartphone into a charger and wait for your device to turn on again. If it works, then you just prevented a rather annoying experience.

App Troubles
If your phone is working, but the screen is black, there’s also a high probability that you are having an isolated issue with a particular application. An app could be loading something, which often happens for streaming apps such as YouTube, Netflix, Prime, and more, especially if you have slow internet connectivity.
Software Issues
A potential reason why your phone screen went black but still works could be because of your smartphone’s software. This problem suggests that your Samsung Galaxy A25 5G is crashing, potentially freezing your device if not addressed immediately. If this is the cause, then your device is likely experiencing a critical system error, and you should directly try to reboot your phone.
Hardware Problem
If you dropped your phone, there’s a high chance the LCD connectors went loose due to the physical impact. If this happened to you, the phone might be working, but the screen is black due to the LCD cable dislodging. Another issue could be your phone got exposed to extreme temperatures. This can also cause a black screen but your phone is still on.

Part 2: How To Fix Black Screen on Your Phone
Here are four valuable methods you should know on what to do when your phone screen goes black on your iPhone or Android smartphone to get them working again.
Method 1: Force Restart your Android/iOS Smartphone
If your phone screen is black but still works, force restarting it is the easiest way to fix it. The following are the detailed steps for both Android and iOS devices.
How to Force Restart your Android Device
Here is how you force restart an Android device when your phone screen doesn’t turn on.
Step 1: Press and hold the Power and Volume Down buttons simultaneously.
Step 2: Hold the same buttons until your device restarts, and display the phone’s logo.
How to Force Restart your iOS Device
If you own the latest iPhone models, here are the method of restarting it from iPhone 8 up to 14.
Step 1: Press and immediately release Volume Up. Next, press and immediately release Volume Down.

Step 2: Press and hold Sleep/Wake until you see the Apple logo.
Note
If you own an iPhone 7, press and hold the Side button and Volume Down simultaneously until you see the apple logo.
Method 2: Uninstall or Update Outdated Applications
In some cases, your phone screen is black but still works because of installing incompatible apps on your iOS/Android device. If the installed app is frequently crashing, it may be the source of a blank cell phone screen. Uninstall the problem app to see if the black screen disappears or not.
Method 3: Inspect the LCD Connectors
If your phone screen goes black but still works, you should inspect the logic board to the LCD screen to see if it has become disconnected. It is common for smartphones that often get dropped a few times. It’s best to plug the connectors back to regain your screen’s functionality.
However, this requires technical know-how. It’s better to seek help from a professional as you could risk causing more damage to your device if you don’t know what you’re doing.
Method 4: Perform a Factory Reset
If all the methods above did not solve your problem, the last resort you can take is to perform a Factory Reset. This method works on Android and iOS smartphones and erases all your data. It is the quickest way to try to fix why your phone screen went black. Here are the steps.
For Android Users
If you’re on Android, tap Settings > Backup and Reset. Tap on Factory data reset > Delete all to initiate the factory reset.
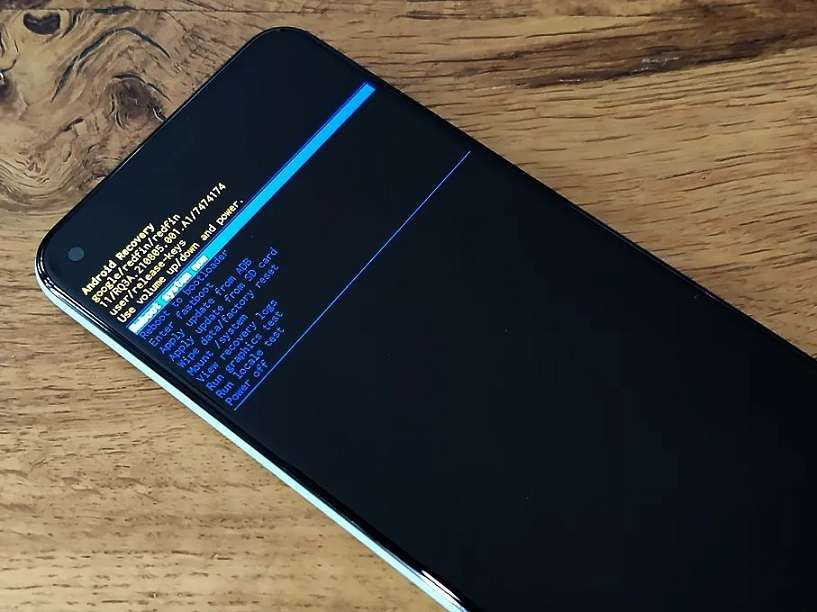
If you cannot do this, here’s how to perform a factory reset manually using Recovery Mode.
Note
The process of booting into Recovery Mode is not the same across all Android devices and depends on the manufacturer and model of your phone. Refer to your owners manual to see which method is the right one for your Samsung Galaxy A25 5G.
Step 1A: Press and hold the Power button and Volume Down buttons simultaneously and continue holding until the screen starts.
Step 1B: For Android devices with a Home button, press and hold the Home button and the Power button and continue holding until the screen starts.
Step 1C: Press and hold the Power button as well as the Volume Up and Volume Down buttons simultaneously and continue holding until the screen starts.

Step 2: Use the Volume buttons to navigate the choices and select Wipe data/factory reset and confirm your choice with the Power button.
Step 3: Simply wait for the process to complete and wait for your Samsung Galaxy A25 5G to restart automatically.
F****or iOS Users
Step 1: For iOS users, meanwhile, tap Settings > General > Transfer or Reset iPhone.
Step 2: Next, choose Erase All Content and Settings. Check the list of items you want to remove.

Step 3: Tap Continue and enter your iPhone passcode. A message warns you that the process will delete all media and data and reset all settings.
Step 4: Tap Erase iPhone to confirm. You’ll be asked to type in your Apple ID and password if Find My is active. Enter your password and tap Erase.
Part 3: How To Fix Black Screen Phone With an Alternative
If your phone screen went black but still works and doing the methods above did not solve the issue, you can use Wondershare Dr.Fone for iOS and Android as a last resort. It’s one of the most popular smartphone repair tools today, enabling you to fix all kinds of annoying scenarios. These include black screen, boot loop, white screen of death, bricked iOS or Android device, and more.
Key Features
Dr.Fone – System Repair for iOS and Android has fantastic features you can immediately take advantage of. Here are its key features below.
- Fix all Android and iOS Problems in Minutes
Dr.Fone – System Repair can fix all kinds of issues on your Android/iOS, such as a black screen, white screen of death, screen freeze, boot loop, or recovery mode. All of this can be done within less than 10 minutes to save you precious time.
- Supports up to 1000+ Android Smartphones and the latest iOS
All iOS versions, including the latest iOS 16 and iOS 16 beta, are fully supported by Dr.Fone – System Repair. The app handles all your smartphone issues without data loss to secure your info. On the other hand, if you own an Android, the app supports up to 1000+ Android smartphones, making it highly versatile for Android owners.
Tech Specs
Dr.Fone – System Repair (Android)’s minimum system requirements for your computer are listed below.
| Computer OS | Android |
|---|---|
| Windows 11, 10, 8.1, 8, 7 | Android 2.1 and up to the latest |
Meanwhile, here are the system requirements for Dr.Fone – System Repair (iOS).
| Computer OS | iOS |
|---|---|
| Windows 11, 10, 8.1, 8, 7 | Supports all iOS versions, including the latest iOS 16 and iOS 16 beta |
| macOS 12, 11, 10.15, 10.14, 10.13, 10.12, 10.11, 10.10, 10.9, 10.8 |
Pros and Cons
If you’re still undecided about Dr.Fone – System Repair, here are its pros and cons.
Pros
- Fone – System Repair for iOS and Android has a clutter-free and beginner-friendly user interface. It’s easy to understand and use, so you can start immediately.
- Both the iOS and Android versions finish the repair tasks within less than 10 minutes to save you time.
Cons
- Each version for each OS is sold separately.
- The free version works up to your device’s compatibility. Once you start the repair process, the app will ask you for a valid license key.
How to Fix Black Phone Screen With Dr.Fone – System Repair
Here’s how to fix your phone screen with Dr.Fone – System Repair on iOS/Android.
Step 1: Download and install Dr.Fone – System Repair for iOS or Android. Next, open the program and connect your smartphone.
Step 2A (For iOS): Choose the correct model of your iPhone for the program to be able to download the appropriate firmware package.
Step 2B (For Android): Click Start. On the next window, choose the Brand, Name, Model, Country, and Carrier of your smartphone, then click Next.
Step 3: Follow the on-screen instructions provided on the main program window and wait for the repair process to complete.
safe & secure
4,262,204 people have downloaded it
Conclusion
Our increasing reliance on smartphones has led to amazing advancements in new technologies. However, lingering issues such as your phone screen not turning on or your phone screen being black but still working are ongoing problems to many. That’s why learning how to prevent these events is essential to take care of your smartphone.
Doing all the recommended methods above usually solves the case. If the different fixes don’t work for you, Dr.Fone – System Repair for iOS and Android can help resolve all your problems within less than 10 minutes. You can download it for free on Windows and Mac to test it yourself.
Samsung Galaxy A25 5G Not Receiving Texts? 10 Hassle-Free Solutions Here
If you are using an Samsung Galaxy A25 5G, you might have encountered the issue of not receiving texts. This issue can be quite frustrating, as it prevents you from staying connected with your friends and family. However, there are several ways to fix this issue and get your texts back up and running. In this article, we will show you some of the best solutions to fix the issue of not receiving texts on Samsung Galaxy A25 5G.
It is very common that the Android messaging app is not working on many devices especially broken devices . People often encounter this issue in Samsung Galaxy A25 5G phones, even the latest ones.
You might find lots of people online stating I can’t receive text messages on Android. And usually, people don’t find a legit solution for this issue. If you are also experiencing this sort of issue on your Samsung Galaxy A25 5Gs, then don’t panic. We have a series of methods that can supposedly fix the problem. But at first, we will learn what the main reasons this problem arises are and how do you know that it is consistent not some random error.
Take a look at the sections below, and you will learn all possible things regarding the messaging application on your phone.
Part 0. Symptoms and Causes of Android Not Receiving Texts
The most common symptoms that would clarify that your Android messaging service is not working right are given below:
- You will stop receiving any texts all of a sudden.
- You can’t send or receive a text message.
- Whenever you try to text someone, the message sent failed notification pop up on the screen.
The reasons why your Android is not receiving texts are given below:
- Network issue
- Insufficient memory
- Mis-configuration of device settings
- Switching of devices
- A glitch in the messaging app
- Software issue
- Carrier problem with the registered network.
Apart from all these reasons, some additional causes are also there that can lead to this issue.
Part 1: One-click to Fix Android not Receiving Texts by Android System Repair
If you are not willing to waste your precious time fixing the message problem, then you can switch to the top-rated Android repair tool, i.e., Dr.Fone - System Repair (Android) . With this software, you can easily fix issues like the black screen of death, crashing apps, can’t receive text messages on Android, or failed download. If you have no idea what is causing the message app problem, you can simply think of repairing the whole Android system.
You surely need to try the software as it can perform the following tasks:
Dr.Fone - System Repair (Android)
Android repair tool to fix Android Not Receiving Texts
- Fix the Android system without technical knowledge.
- Complete Android repair tool for all brands and models.
- Simple and Easy Repair procedure
- 100% guarantee that the problem will be fixed.
- Also available for iOS devices.
3981454 people have downloaded it
You can download and install the software on your system and use it to fix any issue. Then follow the steps given below:
Step 1: Launch the application and choose the System Repair option from the main interface. Connect your Samsung Galaxy A25 5G to the computer and choose the Android Repair mode, and hit the Start button to begin.
Step 2: You will have to provide information about your device, including the brand, name, model, country, and carrier. In between, you will be notified that your device repair might erase the existing data of your device.
Step 3: Agree with the conditions and hit the Next button. The software will download the firmware package automatically. It might take a while to finish the download, and when it is finished, the repair process will be initiated automatically.
It won’t take long, and your Samsung Galaxy A25 5G will be repaired. Now you will be able to receive and send text messages without any hassle.
Part 2: Remove and Insert the SIM
The easiest thing that you can try if your Samsung Galaxy A25 5G is not receiving any text messages is because the SIM is not inserted right. If your SIM card is inserted wrong, then it is obvious you can’t receive text messages on Android. Simply take out the SIM card, see how it must be inserted, and do it correctly. Once the SIM is inserted in the right way, you will receive the pending text messages immediately unless there is another issue preventing it.
Part 3: Check Network Connection
Another simple method that you can try if you are not receiving text messages on Samsung Galaxy A25 5G phone is to check your network connection. Usually, you can see the bar on the top of the screen. Maybe the problem exists because you have no signal strength at the moment.
Part 4: Consult your Carrier about the Data Plan
Maybe you are unable to get messages on your Samsung Galaxy A25 5Gs because your existing data plan has expired. You can directly contact your Carrier about the issues where your Samsung Galaxy A25 5G is not receiving texts. If your plan has expired, then you might have to renew it immediately. If not, then try out other fixes to resolve this issue.
Part 5: Try the SIM card in Another Phone or Slot
Sometimes, people complain that Samsung Galaxy A25 5G is not receiving texts from iPhone, and it might be because of the SIM card issue. So, the best thing you can try is to remove the SIM from your current phone and insert it into another phone.
When you are offline the message is saved on the server and just about when you get online, the text messages are delivered. If it is the SIM issue, then you will not get the message unless you contact your network operator.
Part 6: Clear the Cache of Messaging App
In smartphones, the memory space often gets filled up with cache. And not everyone remembers that they have to clear the cache from time to time. The accumulated cache can also lead to this issue. So, if your Android messaging app is not working, you have to clear the cache memory.
Step 1: Open the Settings and go to Apps. Find the Messages app from the list and tap to open it. There you will see the storage occupied by the app along with the cache.
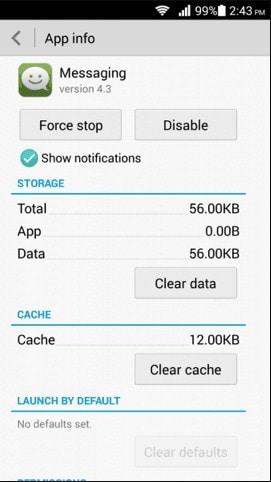
Step 2: Click on the Clear Cache button and wait as the Samsung Galaxy A25 5G device free up the memory of your device.
Once the cache is cleared, you can also clear the data if you want to and you’ll instantly receive the text messages on your phone.
Part 7: Delete Useless Messages to Free Up Space
Sometimes, if you are not receiving text messages on Samsung Galaxy A25 5G, it means that you need to clean up the clutter of useless messages from your phone and SIM both. The phone messages can be deleted directly from your phone. But the SIM card messages needed to be deleted separately. The SIM cards don’t have enough memory to hold plenty of messages. Therefore, once the storage is full, you will stop receiving messages entirely.
Step 1: Open the messages app and open settings. Look for an option that says “Manage SIM Card Messages”. Sometimes, you can find this option under Advanced Settings.
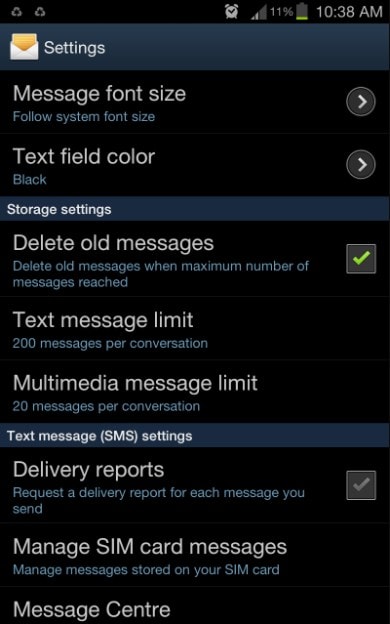
Step 2: There, you will see the existing messages on the SIM. You can either delete all the messages or perform a selective deletion to free up space.
Part 8: Try a Third-party Messaging App
If you can’t receive messages on your default app, then you can try installing a third-party messaging app. Nowadays, most people use social media messaging apps like WhatsApp, Skype, etc. for messaging. So, if somehow, the Android is not receiving texts, then the new apps can help you to send and receive messages with a non-native network.
_Further Reading: 15 Best Free Chat Apps in 2022. Chat Now! _
Part 9: Ensure your Phone is Fully Charged
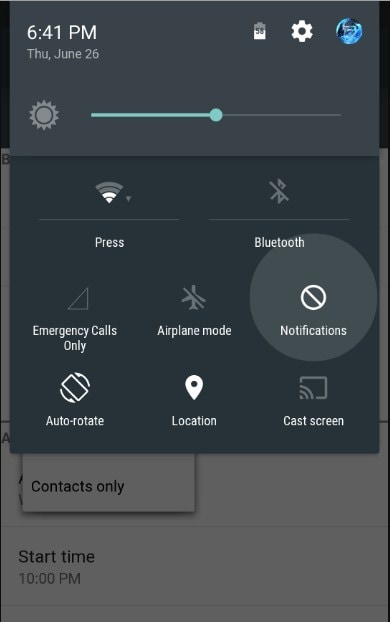
Another possible fix to this problem might be your phone’s battery percentage. Sometimes, when the Android is in power saving mode, it disables the default apps too. As a result, you can’t even receive text messages on Android. So, when you plug in the charger, the power saving mode will be disabled, and you will get your text messages.
Part 10: Ensure It’s Not An iMessage From iPhone
If the Samsung Galaxy A25 5G phone is not receiving texts from iPhone, then this might be a different issue. Usually, there is an option on the iPhone where they can send texts as iMessage and simple messages. If the iPhone user sends the text as iMessage, then it will not show up on the Android device. To resolve this, you have to follow the steps below:
Taking the iPhone in hand makes sure that you are connected to a network. Open settings and scroll to look for the Message option. Toggle the bar next to the iMessage option to turn it off.
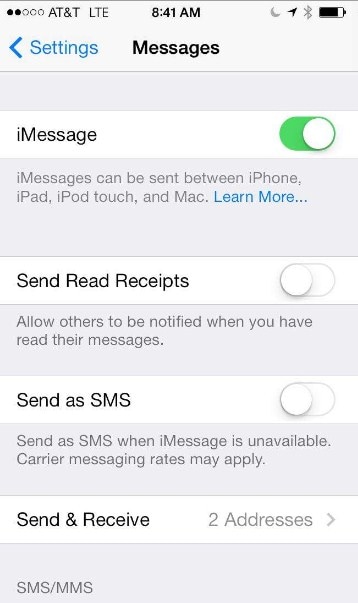
If the FaceTime option is also on, you might have to deactivate that too to send messages and calls as regular ones.
Part 11: Update Your Android
Updating the operating system to the latest Android version can fix some system errors which may cause the “Android not receiving texts” issue because the latest version always brings a better user experience and fix the know bugs.
Conclusion
Now you know several methods that can work if the Android messaging app is not working. If you experience this kind of issue with your Samsung Galaxy A25 5G, then you are most likely to resolve them with these fixes. If none of the solutions seem to fix the issue, then you can take the help of Dr. Fone - System Repair (Android) feature. With this tool, you can resolve all kinds of working issues on your device.
Also read:
- [New] 2024 Approved Next-Gen Editing Excellence Perfect for Vimeo Content
- [New] 2024 Approved The Art of Edible Media Recipe Tutorials
- [New] In 2024, Revealing Hidden Pathways Understanding Facebook's Off-Activity Tracking
- [Updated] In 2024, Leveraging Branding Skills Skyrocketing Your YouTube Subscriber Base
- [Updated] Insta-Twist Techniques for Tailoring Your Photos on the Fly for 2024
- 2024 Approved Navigating the Intricacies of MorphVOX Evolution
- Dessert Dialogues: Discovering 'Chocolate' Across Cultures
- Easy Ways to Manage Your Itel P55 Location Settings | Dr.fone
- How to Change Location On Facebook Dating for your Xiaomi Redmi 12 5G | Dr.fone
- How To Restore a Bricked Tecno Spark 10 5G Back to Operation | Dr.fone
- How To Upgrade or Downgrade Apple iPhone 8? | Dr.fone
- In 2024, Change Location on Yik Yak For your Infinix Hot 40i to Enjoy More Fun | Dr.fone
- In 2024, How to Change Location on TikTok to See More Content On your Vivo V29 | Dr.fone
- In 2024, How to Fake Snapchat Location on Tecno Pova 5 | Dr.fone
- My Videos Arent Playing on Infinix Smart 7 HD – What Can I Do? | Dr.fone
- Reasons for Samsung Galaxy F34 5G Stuck on Boot Screen and Ways To Fix Them | Dr.fone
- Restore Missing App Icon on Oppo Reno 10 5G Step-by-Step Solutions | Dr.fone
- Solved Warning Camera Failed on Realme Narzo 60 5G | Dr.fone
- Unveiling the Leading SSD Contenders for 202N4 - Expert Insights From ZDNet
- Title: Spotify Keeps Crashing A Complete List of Fixes You Can Use on Samsung Galaxy A25 5G | Dr.fone
- Author: Abel
- Created at : 2025-01-07 18:59:46
- Updated at : 2025-01-10 18:46:05
- Link: https://fix-guide.techidaily.com/spotify-keeps-crashing-a-complete-list-of-fixes-you-can-use-on-samsung-galaxy-a25-5g-drfone-by-drfone-fix-android-problems-fix-android-problems/
- License: This work is licensed under CC BY-NC-SA 4.0.