
Stuck at Android System Recovery Of Lava Blaze 2 Pro ? Fix It Easily | Dr.fone
Stuck at Android System Recovery Of Lava Blaze 2 Pro ? Fix It Easily
In this article, you will learn what is Android system recovery, and how to fix Android stuck at system recovery step by step. To get out of Android system recovery more easily, you need this Android repair tool.
You know your Lava Blaze 2 Pro is stuck in recovery mode when you cannot turn on the Lava Blaze 2 Pro device. If you try to turn it on, it shows a message that says, “Android System Recover.” This situation can be quite debilitating for most Android users. Most of the time, you don’t know whether you have lost all of your important Android data. It is even more worrying because of the fact that you cannot turn on your device at all, especially when you don’t know how to fix it.
Part 1. What is Android System Recovery?
Despite all the worry that surrounds an unwanted Android system recovery screen, it is actually a feature that can be quite helpful to your Lava Blaze 2 Pro when it’s needed. It can be useful when you want to hard reset the Android device without having to access the settings. This can be very useful if your device is not working very well or if your touch screen is experiencing problems. It can also be very helpful when you are having a problem accessing the settings on your device.
For these reasons, it is actually a good thing, although when it does happen unexpectedly, you may want to know how to fix it.
Part 2. How to get to Android System recovery
Now that you know how useful the Android System can be, you may want to know how to utilize this feature to get out of some of the problems we mentioned above. Here’s how you can safely get to the Android recovery system on your Lava Blaze 2 Pro.
Step 1: Hold down the power key and then select “Power Off” from the options on the screen. If, however, your screen is unresponsive, keep holding the power key for several seconds until the Lava Blaze 2 Pro device is completely turned off.

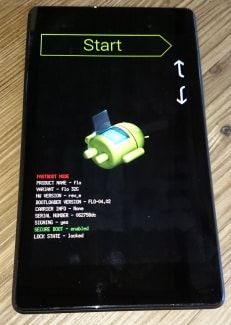
Step 2: Next, you need to hold down the Power and the Volume Key. You should able to see the Android image and a bunch of information about your device. There should also be a “Start” at the top right corner of the screen.
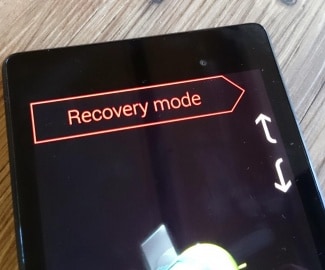
Step 3: Press the Volume up and Volume down keys and use the Power key to select menu options. Press the Volume down key twice to see “Recovery Mode” in red at the top of the screen. Press the Power key to select it.
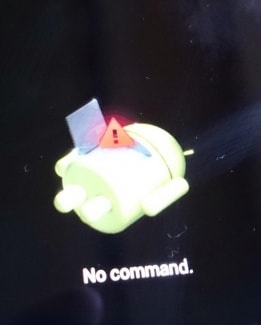
Step 4: The white Google logo will appear immediately followed by the Android logo again as well as the words “No Command” at the bottom of the screen.
Step 5: Finally, press and hold both the Power and the Volume up Key for around 3 seconds and then let go of the Volume up Key but keep holding the Power Key. You should see the Android system recovery options at the top of the screen. Use the Volume keys to highlight and the Power key to select the one you want.

Part 3. Android Stuck at System Recovery? How to fix in one click?
Sometimes during the System Recovery process, the process can glitch, and you’ll lose data on your device, rendering it unusable. However, another solution to fix this is to repair your device using the Dr.Fone - System Repair tool.
Dr.Fone - System Repair (Android)
One-stop solution to fix Android stuck at System recovery
- It’s the #1 software for PC-based Android repair
- It’s easy to use with no technical experience required
- Supports all latest Lava Blaze 2 Pro devices
- Easy, one-click fix Android stuck at system recovery
3981454 people have downloaded it
Here’s a step by step guide on how to use it yourself;
Note: Be aware that this process can erase all your personal files on your device, so ensure you’ve backed up your Lava Blaze 2 Pro before continuing.
Step #1 Head over to the Dr.Fone website and download the software for your Windows computer.
Once installed on your computer, open onto the main menu and connect your Lava Blaze 2 Pro using the official USB cable. Select the System Repair option.

Step #2 Select the ‘Android Repair’ option from the next screen.

Insert your device information, including the brand, carrier details, model and country and region you’re in to ensure you’re downloading the correct firmware.

Step #3 Follow the onscreen instructions on how to put your device in Download Mode.
Your device should already be in this mode but follow the instructions to make sure. There are methods available for devices, both with and without home buttons.

Step #4 The firmware will now start downloading. You’ll be able to track this process in the window.
Ensure your device, and your computer stays connected the entire time, and make sure your internet connection remains stable.

After downloading, the software will automatically start to repair your device by installing the firmware. Again, you can track the progress of this on the screen, and you’ll need to ensure your device remains connected throughout.

You’ll be notified when the operation is complete and when you’re able to disconnect your phone and use it as normal, free from it being stuck on the Android system recovery screen!

Part 4. Android Stuck at System Recovery? How to fix in a common way?
If, however, your device is stuck on system recovery mode, here’s how you can easily get it out of system recovery. The process is slightly different for different Android devices, so you should check your device’s manual before attempting this process.
Step 1: Power off the Lava Blaze 2 Pro device, and just to be sure, take out the battery to ensure that the Lava Blaze 2 Pro device is fully turned off. Then reinsert the battery.
Step 2: Press and hold down the Home button, Power Button, and the Volume up Key simultaneously until the Lava Blaze 2 Pro device vibrates.
Step 3: Once you feel the vibration, release the power button but continue to hold down the Home and Volume up Key. The Android recovery screen will display. Release the Volume up and Home buttons.
Step 4: Press the Volume down key to select the “Wipe Data/ Factory Reset option and then press the Power button to select it.
Step 5: Next, you need to press the Volume down button to highlight “Delete All User Data” and then press the Power button to select it. The device will reset and present the “Reboot System Now” option.
Step 6: Finally, press the Power button to reboot the phone in normal mode.
Part 5. Backup and Restore Android System
Losing data on your Lava Blaze 2 Pro is a common occurrence, and since Android devices don’t really have an automatic full backup solution, it is important to know how to backup and restore your device system. Here’s how to easily do that.
Step 1: Enter the recovery mode on your Lava Blaze 2 Pro, as described in Part 2 above. Use the Volume and Power keys to select the “Backup & Restore” option on the screen.
Step 2: Tap on the backup option or use the Volume and Power keys if your screen is unresponsive. This will begin backing up your system to the SD card.
Step 3: After the process is complete, choose “Reboot” to restart the Lava Blaze 2 Pro device.
Step 4: You can then simply check Recovery > backup directory on your SD card. You can rename it to easily find it later during the restore process.
To restore the system from the backup created, follow these simple steps.
Step 1: Once again, enter recovery mode as described in part 2 above and then choose Backup & Restore from the menu list.
Step 2: Press “Restore” to begin the recovery process from the Backup file we created
Step 3: You will be notified when the system restore is complete.
Android system recovery mode can be quite useful, especially when your system is unresponsive. As we have also seen, it is important to know how to get into and out of System Recovery mode if you are going to backup and restore your Android system. It is also quite easy to do both of these things.
[Solved] Warning: Camera Failed on Lava Blaze 2 Pro
In this article, you will learn why camera fails on Lava Blaze 2 Pro devices, how to make camera work again, as well as a system repair tool to fix this issue in few clicks.

Lava Blaze 2 Pro devices are one of the best Android devices available in the market and their users are always satisfied with their features. However, it is a recent observation that many Lava Blaze 2 Pro users complain about Lava Blaze 2 Pro camera failed error while using the camera App on the Lava Blaze 2 Pro device. It is a strange error and pops up suddenly with only one option to tap on, i.e., “OK”
The error message reads as follows: “Warning: Camera Failed”.
Once you click on “OK” the app shuts down abruptly and your Lava Blaze 2 Pro camera is failed. We understand this is not a very pleasing situation, thus, here are ways to tackle the camera failed Lava Blaze 2 Pro issue. Let us now move ahead and find out why exactly you experience Warning: Camera Failed error and how to fix it.
Part 1: Why Lava Blaze 2 Pro phone has Warning: Camera Failed error?
We are all aware that no device runs smoothly, without any glitches. We also know that there is a cause behind every problem. Listed below are a few reasons behind camera failed error, especially on Lava Blaze 2 Pro devices:

- If you have recently updated your OS version, there are chances that certain bugs are preventing the camera App from functioning normally. Also, if the update is interrupted and not downloaded completely, certain apps may suffer.
- There are chances of your internal storage being cluttered with unwanted Apps and files leaving no space for the camera App to save its data and work smoothly.
- If you haven’t cleared camera Cache and Data, the chances of the App to get clogged up increase tremendously which disrupt its working.
- Warning: Camera Failed error can also be a direct outcome of a change in the system settings or the Lava Blaze 2 Pro device’s internal settings.
- Finally, if you tamper a lot with the camera settings and do not update the App whenever it is available, Lava Blaze 2 Pro Camera App will not be efficient.
There might be much more reasons for the camera failed error, but these are the most obvious ones. Now let us now move on to troubleshooting the problem.
Part 2: How to fix Lava Blaze 2 Pro Camera Failed in One Click?
If you are experiencing some kind of issues in your Lava Blaze 2 Pros such as Lava Blaze 2 Pro camera failed, the Lava Blaze 2 Pro device stopped working, black screen, play store not working, etc. There is a special software is designed for such kind of issues in Android devices, i.e. dr. fone. The tool enables the users to fix various kinds of issues in the Lava Blaze 2 Pro devices and perform a complete system repair so the Lava Blaze 2 Pro device starts working normally.
Dr.Fone - System Repair (Android)
One-click solution to fix camera failed on Lava Blaze 2 Pro devices
- The tool has a one-click operation which makes it super easy to use.
- You don’t need any technical skills expertise to operate the software.
- The software supports all the Lava Blaze 2 Pro devices including the latest and older ones.
- The software can fix the “warning camera failed”, the app is crashing, failed update, etc.
4,616,396 people have downloaded it
Note: You have to remember that the system repair may erase all the Lava Blaze 2 Pro device data. So, create a backup of your Lava Blaze 2 Pro data first and then try fixing the Lava Blaze 2 Pro phone.
Follow the steps given below and fix the camera failed error:
Step 1. Download the software on your computer and launch it. Connect your device and select the System Repair option from the main interface. In the next screen, select Android Repair module.
Step 2. You will have to provide the Lava Blaze 2 Pro device details accurately to ensure that the software provides a precise firmware package to be downloaded. Enter brand, name, model, country, and carrier of your device and agree to the terms and condition.
Step 3. Now put your device in the download mode. The software will provide you with a guide to put the phone in download mode to begin the downloading process.
Step 4. As soon as the firmware is downloaded, the software will automatically initiate the repair process. You will be able to see the ongoing repair.
When the software is done repairing the system, you will be notified. Thus, the Camera failed Lava Blaze 2 Pro error in your phone will be fixed.
Part 3: How to fix Camera Failed error by clearing camera data?
Has anyone ever informed you that it is absolutely necessary to keep clearing camera data every once in a while? Yes, since it deletes all unnecessary data stored in respect of the App and no, it does not mean that all your photos and videos will get deleted. Just follow the steps given below to clear camera data:
1. First, visit “Settings’” on your Lava Blaze 2 Pro device and select “Apps” or Application Manager”.

2. Now a list of all Apps will appear before you. Keep scrolling down until your find “Camera”.

Tap on “Camera” to open the “Camera Info” screen and once you are there, hit “Clear Data” option as shown below.

That’s all, now return to the Home Screen and access the camera again. Hopefully, it will work now.
Part 4: How to fix Camera Failed error by removing third-party Apps?
Another tip to fix Lava Blaze 2 Pro camera failed error is by deleting a few unwanted third-party Apps (recently installed) to free some space in the Lava Blaze 2 Pro device’s internal storage. It is essential to create and keep storage space for the camera App to function smoothly and allow it to store its data as well. Also, if this issue only happens recently, it might be some newly installed Apps causing some glitches with the camera.
Simply, follow the instructions given below to remove Apps from Lava Blaze 2 Pro Devices:
1. Click on the “Settings” icon on the Home Screen and from the options before you, select “Apps”/ “Application Manager”.
2. You will see that a list of downloaded and built-in Apps will open up before you as follows.

3. Now, once you select the App you want to uninstall, the App Info screen will appear. Tap on “Uninstall” option and then tap on “Uninstall” again on the pop-up message.

The App will be removed immediately and its icon will disappear from the Home Screen and you will notice an increase in the storage capacity of your device.
Part 5: How to fix Camera Failed error by wiping Cache Partition?
This method might seem tedious and time-consuming and you may also lose your data and essential settings. However, wiping the Cache Partition only cleans your device system internally and gets rid off any unwanted and trouble making elements causing Warning: Camera Failed error. Follow the step-by-step guide given below to clean Cache Partition smoothly:
1. Firstly, switch off the Lava Blaze 2 Pro device by pressing the power button and tapping on “Power Off” as shown in the screenshot below. Then wait for the lit screen to turn off completely before proceeding further.

2. Now, press and hold the power on/off, home and volume up button simultaneously. Your device will now vibrate. This a signal to let go of the power button (only).

3. Once the Recovery Screen appears, leave all buttons and use the volume down key till you reach “Wipe Cache Partition”.

4. Now, to select the option to use the power on/off button and wait for the process to get over. Once this done, tap on “Reboot system now” and see that your device restarts normally.

You may try to use the camera app once the process completes.
Part 6: How to fix Camera Failed error by Reset Settings?
Resetting the camera settings solves the problem 9 out of 10 times and thus is worth a try.
1. To reset, first, launch the Camera App by tapping on its icon.

2. Then go to Camera “Settings” by tapping on the circular gear like icon.

3. Now look for “Reset Settings” options and click on it.

Once done, go back to the Home Screen and start the camera App again to use it.
Part 7: How to fix Camera Failed error by Factory Reset?
Lastly, if the above-mentioned techniques do not help you in fixing the camera failed error, you can consider performing a Factory Reset. Note: This method will delete all your saved data so it is advised to backup before you start the process.
Here are the steps to factory reset your device to fix “Warning: Camera Failed” Error:
1. Start by visiting “Settings” on your Lava Blaze 2 Pro device on which the camera has failed.

2. Now from the list of options before you, select “Backup and reset” and move ahead.

3. Now you must first select “Factory data reset” and then tap on “Reset Device” as shown in the screenshot below.


4. Finally, you have to click on “Erase Everything” and wait for the Lava Blaze 2 Pro device to reboot itself.

Note: You will have to set up your Lava Blaze 2 Pro device from scratch once it is reset, however, that is a small price to pay to fix your Camera App.
Warning: Camera Failed error is not a rare phenomenon and many users experience it on daily basis. So, there is no need to panic, All you need to do is carefully follow the instructions given above and repair your Camera App yourself. You do not need to seek any technical assistance for the same as the camera failed issue is not difficult to deal with. So go ahead and try these tricks to enjoy using the Camera App on your Lava Blaze 2 Pro devices.
Spotify Keeps Crashing: A Complete List of Fixes You Can Use on Lava Blaze 2 Pro

Does your Spotify keep crashing? You’re not alone. This problem is widespread and can happen to anyone. Fortunately, there are ways to rectify it quickly and easily. We’ve prepared a guide to fixing your Spotify crashing problem.
In our guide, you’ll find out why your Spotify keeps crashing. Moreover, you’ll get a list of fixes for your Spotify closing problem and detailed instructions. Once you’ve read our guide, you’ll successfully solve the problem of Spotify crashing on Android.
Part 1. Why Spotify Keeps Crashing

Some people have encountered a problem with their Spotify accounts. Spotify can sometimes keep crashing and closing due to several reasons. For example, it can happen due to your phone not being compatible with the app. This can happen if your operating system isn’t updated to the newest version.
Another reason the Spotify app keeps crashing could be an antivirus or a VPN blocking Spotify from working. Moreover, your device might be out of storage space, causing your phone to slow down and crash apps.
Several other reasons for this problem include network issues, a weak Wi-Fi signal, or the battery saving mode. Furthermore, your apps and files might be corrupted, or an app on your phone might block Spotify from working correctly.
Part 2. Spotify Keeps Crashing: Best Fixes
As you can see, there are numerous reasons for your Spotify crashing. Fortunately, all of them are easy fixes, and there’s no need to worry. We’ve prepared a list of 11 ways to fix your Spotify. With these fixes and detailed instructions, you’ll be able to eliminate your Spotify problem with ease.
1. Fix the Spotify Closing Issue by Repairing Your System
The reason for your Spotify crashing may be more significant than just a bug. Your device system might be behind it. If that’s the case, you might need to repair your system before trying to fix Spotify.
If you want to repair your mobile device’s system quickly and efficiently, try Wondershare Dr.Fone.
Wondershare Dr.Fone is an app that gives you complete control over your phone. You can manage it, back it up, recover files, and repair your system. The system repair option will fix your Android in just a few clicks and allow you to use Spotify freely. The steps go as follows:
- Step 1: Install and open Wondershare Dr.Fone on your computer and connect your Android.
- Step 2: Go to the Toolbox section and select System Repair.
- Step 3: Choose the Android

- Step 4: See which Android errors Wondershare Dr.Fone can fix and click Start.
- Step 5: Select the **Brand,**Name, Model, Country, and Carrier In the Carrier section, choose OPEN if your device is unlocked.
- Step 6: Tick the “I agree with the warning, and I am ready to proceed”checkbox and click Next.
- Step 7: Put your Android in Download Mode. You can find the steps below these instructions.
- Step 8: The program will automatically download once you put the phone in Download Mode.
- Step 9: Once the firmware downloads, click Fix Nowto install it on your Android.

- Step 10: Type “000000” in the dialog box and click Confirm.

- Step 11: That will start the system reparation, which you can follow on the screen.
- Step 12: Once it finishes, click Doneto complete the system repair.
There are two ways to enter Download Mode: one for Android devices with the Home button and another for those without it.
The steps for entering Download Mode on an Android phone with the Home button are as follows:
- Step 1: Turn off your phone.
- Step 2: Press and hold the Volume Down,Home, and Power buttons simultaneously.
- Step 3: Press the Volume Upbutton to enter Download Mode.
The steps for entering Download Mode on Android devices without the Home button are as follows:

- Step 1: Turn off your phone.
- Step 2: Press and hold the Volume Down, Bixby, andPower buttons simultaneously.
- Step 3: Press the Volume Upbutton to enter Download Mode.
2. Force-Close the App
You can force-close Spotify and open it again to make it work properly. That is an easy fix if your Spotify has developed a bug. If that is the case, follow the next steps:
- Step 1: Try opening Spotify.
- Step 2: If it’s not working, open App Switcher or Recent Apps. Different Android devices open it differently. Thus, you can swipe up from your Home screen, or if you have three buttons at the bottom, press Recent Apps.

- Step 3: Find Spotify in Recent Appsand click X or swipe up over it to force-close it.
- Step 4: Try opening Spotify again.
3. Re-Login to Your Spotify
The Spotify app may be working fine. Maybe you’re having problems with your Spotify account. If so, you can try logging out and logging in again to see if that works. That isn’t a big problem; sometimes Spotify accounts start bugging. You can re-login to your Spotify account by following these steps:
- Step 1: Open Spotify.
- Step 2: Tap Settingsin the upper right corner.

- Step 3: Scroll to the bottom of the settings and tap Log Out.

- Step 4: Tap Log In.

- Step 5: Enter your login credentials.
- Step 6: Tap Loginagain, and you’re in.

4. Restart Your Device
Another way to stop Spotify from crashing can be restarting your Android. The steps may vary slightly depending on the Lava Blaze 2 Pro device, but they’re mostly the same. Follow these steps to restart your device:
- Step 1: Press and hold the Power button(you must press and hold both the Power and Volume Up buttons on a newer Android device).
- Step 2: Tap Restart. That will restart your Android, and you can try opening Spotify again.

5. Set Up Your Time and Date
Another possible reason for your Spotify closing problem could be the incorrect time and date on your Android. That is also an easy fix; you must set it correctly and try opening the app again. Set up your time and date with these steps:
- Step 1: Open Settingson your Android.
- Step 2: Go to Systemor General Management (depending on your Android model).
- Step 3: Go to Date and Time.
- Step 4: Tap Set Dateand set the correct date.

- Step 5: Go to Set Timeand set the right time.

6. Update Your System Software
Your Spotify app might keep crashing because your system is outdated. Try updating it to the latest version to try and fix the crashing problem. The steps for the Android system update are as follows:
- Step 1: Open Settings.

- Step 2: Go to System or About Phone.

- Step 3: Select System Update.
- Step 4: If there’s an available update, tap

7. Update Your App
If your system is updated, then Spotify might need an update. The app might malfunction if you’re using an older version. Thus, updating the app might solve the Spotify crashing problem. You can update Spotify by following these steps:
- Step 1: Go to the Play Store.

- Step 2: Search and open Spotify in the Play Store.
- Step 3: Tap Update

8. Free up Storage
Spotify can start crashing if your Android’s storage space is at capacity. That can also cause other apps to crash, not only Spotify. Therefore, check the storage space and free up as much as possible. Follow these steps:
- Step 1: Open
- Step 2: Go to Device Maintenance > Storageor go directly to Storage.

- Step 3: Here, you can see how much of your storage space is available and what’s taking up the most space.

- Step 4: Then, you can go ahead and clear as much space as you can.
9. Reinstall Spotify
There’s another solution if the Spotify app keeps crashing. You can try uninstalling and reinstalling it again on your Android. That will reset the app and might solve your problem. Follow the next steps to reinstall Spotify:
- Step 1: Find the Spotify app on your Android.
- Step 2: Hold the app icon.
- Step 3: Then, press Uninstall.

- Step 4: Press OK.
- Step 5: Then, open the PlayStore and find Spotify.
- Step 6: Tap Installto reinstall the app again.

- Step 7: Once it installs, log in to test if it’s working.
10. Check if Spotify Is Down
If your Spotify keeps crashing and closing, it might not be your device’s problem. Sometimes, Spotify’s server can be down, and many people face the same issue. If that’s the case, you can check with your friends if their Spotify is working or check online if Spotify is down. To do that, follow these steps:
- Step 1: Open your web browser.
- Step 2: Type “Is Spotify down” in the search bar.

- Step 3: You’ll see several websites that check real-time app servers and if they’re down.

- Step 4: Go to one or two and see what they say. If Spotify is down, you’ll need to wait for them to fix the problem.
11. Clear the Cache
When using different apps and websites, your device caches data from those sources. Since there’s no need to pile up your Spotify cache, you can clear it. Follow these steps:
- Step 1: Open Settings.

- Step 2: Go to Apps.
- Step 3: Find Spotify and tap it.

- Step 4: Tap Storageor Storage usage.

- Step 5: Tap Clear Cache.

 safe & secure
Conclusion
If your Spotify app keeps crashing, several reasons might be behind it. For instance, your storage space might be at capacity, your system might need an update, your phone might have a software bug, or the Spotify server might be down.
We’ve given you 11 solutions to fix the Spotify crashing problem. However, if your system needs repairing, you can try Wondershare Dr.Fone for quick and easy repair. This solution and all others will surely help you fix the crashing problem.
Also read:
- [New] Editor's Assistant Top 5 Portable Devices for VFX Artists for 2024
- [New] Understanding Transient Suppression via Audacity
- [Updated] Establishing a Mac-Based Sports Media Outlet for 2024
- [Updated] In-Depth Video Metrics at Your Fingertips Social Blade for YouTube
- Discounted 24 FreeSync Dell Screen at an Unbeatable Price of Just $99!
- Discover the Sony XBR4#9X900F: Unveiling a New Era of Smart LED TVs in 4K Ultra HD
- How To Fix Unresponsive Phone Touchscreen Of Realme GT Neo 5 | Dr.fone
- How To Revive Your Bricked Huawei P60 in Minutes | Dr.fone
- Is Photoshop's Stabilization Feature Aiding Creativity?
- Oppo A1x 5G Not Receiving Texts? 10 Hassle-Free Solutions Here | Dr.fone
- Quick Fixes for Why Is My Xiaomi 14 Pro Black and White | Dr.fone
- Samsung Galaxy A54 5G Bootloop Problem, How to Fix it Without Data Loss | Dr.fone
- Updated The Complete Guide to Audio Manipulation in Avidemux
- Why is iPogo not working On Realme 12 Pro 5G? Fixed | Dr.fone
- Title: Stuck at Android System Recovery Of Lava Blaze 2 Pro ? Fix It Easily | Dr.fone
- Author: Abel
- Created at : 2025-02-19 16:07:38
- Updated at : 2025-02-20 16:24:04
- Link: https://fix-guide.techidaily.com/stuck-at-android-system-recovery-of-lava-blaze-2-pro-fix-it-easily-drfone-by-drfone-fix-android-problems-fix-android-problems/
- License: This work is licensed under CC BY-NC-SA 4.0.