
Stuck at Android System Recovery Of Nokia C12 Plus ? Fix It Easily | Dr.fone
Stuck at Android System Recovery Of Nokia C12 Plus ? Fix It Easily
In this article, you will learn what is Android system recovery, and how to fix Android stuck at system recovery step by step. To get out of Android system recovery more easily, you need this Android repair tool.
You know your Nokia C12 Plus is stuck in recovery mode when you cannot turn on the Nokia C12 Plus device. If you try to turn it on, it shows a message that says, “Android System Recover.” This situation can be quite debilitating for most Android users. Most of the time, you don’t know whether you have lost all of your important Android data. It is even more worrying because of the fact that you cannot turn on your device at all, especially when you don’t know how to fix it.
Part 1. What is Android System Recovery?
Despite all the worry that surrounds an unwanted Android system recovery screen, it is actually a feature that can be quite helpful to your Nokia C12 Plus when it’s needed. It can be useful when you want to hard reset the Android device without having to access the settings. This can be very useful if your device is not working very well or if your touch screen is experiencing problems. It can also be very helpful when you are having a problem accessing the settings on your device.
For these reasons, it is actually a good thing, although when it does happen unexpectedly, you may want to know how to fix it.
Part 2. How to get to Android System recovery
Now that you know how useful the Android System can be, you may want to know how to utilize this feature to get out of some of the problems we mentioned above. Here’s how you can safely get to the Android recovery system on your Nokia C12 Plus.
Step 1: Hold down the power key and then select “Power Off” from the options on the screen. If, however, your screen is unresponsive, keep holding the power key for several seconds until the Nokia C12 Plus device is completely turned off.

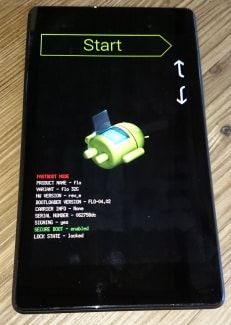
Step 2: Next, you need to hold down the Power and the Volume Key. You should able to see the Android image and a bunch of information about your device. There should also be a “Start” at the top right corner of the screen.
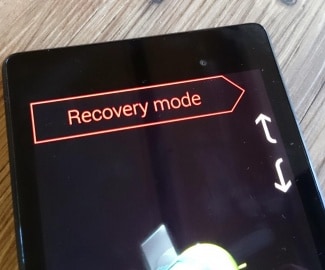
Step 3: Press the Volume up and Volume down keys and use the Power key to select menu options. Press the Volume down key twice to see “Recovery Mode” in red at the top of the screen. Press the Power key to select it.
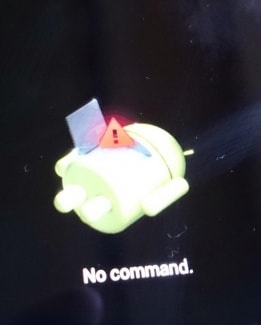
Step 4: The white Google logo will appear immediately followed by the Android logo again as well as the words “No Command” at the bottom of the screen.
Step 5: Finally, press and hold both the Power and the Volume up Key for around 3 seconds and then let go of the Volume up Key but keep holding the Power Key. You should see the Android system recovery options at the top of the screen. Use the Volume keys to highlight and the Power key to select the one you want.

Part 3. Android Stuck at System Recovery? How to fix in one click?
Sometimes during the System Recovery process, the process can glitch, and you’ll lose data on your device, rendering it unusable. However, another solution to fix this is to repair your device using the Dr.Fone - System Repair tool.
Dr.Fone - System Repair (Android)
One-stop solution to fix Android stuck at System recovery
- It’s the #1 software for PC-based Android repair
- It’s easy to use with no technical experience required
- Supports all latest Nokia C12 Plus devices
- Easy, one-click fix Android stuck at system recovery
3981454 people have downloaded it
Here’s a step by step guide on how to use it yourself;
Note: Be aware that this process can erase all your personal files on your device, so ensure you’ve backed up your Nokia C12 Plus before continuing.
Step #1 Head over to the Dr.Fone website and download the software for your Windows computer.
Once installed on your computer, open onto the main menu and connect your Nokia C12 Plus using the official USB cable. Select the System Repair option.

Step #2 Select the ‘Android Repair’ option from the next screen.

Insert your device information, including the brand, carrier details, model and country and region you’re in to ensure you’re downloading the correct firmware.

Step #3 Follow the onscreen instructions on how to put your device in Download Mode.
Your device should already be in this mode but follow the instructions to make sure. There are methods available for devices, both with and without home buttons.

Step #4 The firmware will now start downloading. You’ll be able to track this process in the window.
Ensure your device, and your computer stays connected the entire time, and make sure your internet connection remains stable.

After downloading, the software will automatically start to repair your device by installing the firmware. Again, you can track the progress of this on the screen, and you’ll need to ensure your device remains connected throughout.

You’ll be notified when the operation is complete and when you’re able to disconnect your phone and use it as normal, free from it being stuck on the Android system recovery screen!

Part 4. Android Stuck at System Recovery? How to fix in a common way?
If, however, your device is stuck on system recovery mode, here’s how you can easily get it out of system recovery. The process is slightly different for different Android devices, so you should check your device’s manual before attempting this process.
Step 1: Power off the Nokia C12 Plus device, and just to be sure, take out the battery to ensure that the Nokia C12 Plus device is fully turned off. Then reinsert the battery.
Step 2: Press and hold down the Home button, Power Button, and the Volume up Key simultaneously until the Nokia C12 Plus device vibrates.
Step 3: Once you feel the vibration, release the power button but continue to hold down the Home and Volume up Key. The Android recovery screen will display. Release the Volume up and Home buttons.
Step 4: Press the Volume down key to select the “Wipe Data/ Factory Reset option and then press the Power button to select it.
Step 5: Next, you need to press the Volume down button to highlight “Delete All User Data” and then press the Power button to select it. The device will reset and present the “Reboot System Now” option.
Step 6: Finally, press the Power button to reboot the phone in normal mode.
Part 5. Backup and Restore Android System
Losing data on your Nokia C12 Plus is a common occurrence, and since Android devices don’t really have an automatic full backup solution, it is important to know how to backup and restore your device system. Here’s how to easily do that.
Step 1: Enter the recovery mode on your Nokia C12 Plus, as described in Part 2 above. Use the Volume and Power keys to select the “Backup & Restore” option on the screen.
Step 2: Tap on the backup option or use the Volume and Power keys if your screen is unresponsive. This will begin backing up your system to the SD card.
Step 3: After the process is complete, choose “Reboot” to restart the Nokia C12 Plus device.
Step 4: You can then simply check Recovery > backup directory on your SD card. You can rename it to easily find it later during the restore process.
To restore the system from the backup created, follow these simple steps.
Step 1: Once again, enter recovery mode as described in part 2 above and then choose Backup & Restore from the menu list.
Step 2: Press “Restore” to begin the recovery process from the Backup file we created
Step 3: You will be notified when the system restore is complete.
Android system recovery mode can be quite useful, especially when your system is unresponsive. As we have also seen, it is important to know how to get into and out of System Recovery mode if you are going to backup and restore your Android system. It is also quite easy to do both of these things.
Best Methods for Nokia C12 Plus Won’t Turn On
The Nokia C12 Plus 3 boasts numerous impressive features, making it a desirable phone. However, occasional malfunctions can result in the Nokia C12 Plus 3 won’t turn on issue. This issue can be incredibly frustrating. Don’t panic if you encounter this issue! There exist solutions to rectify it. This comprehensive guide aims to assist you in diagnosing and resolving the problem.
It will offer both basic steps and advanced techniques. With clear instructions and insightful tips, we’ll help troubleshoot your Nokia C12 Plus 3. Should you encounter this setback, follow this guide diligently to revive your Nokia C12 Plus 3 and have it up and running again.
Scenario 1. Phone Not Charged
A Nokia C12 Plus 4 not turning on might simply be a victim of a drained battery due to lack of charging. Several factors could lead to this, including a damaged charging cable or adapter. Moreover, issues with the power source or a malfunctioning charging port can be the issue.
Reason 1. Damaged Charging Cable or Adapter
Solution: Replace the charging cable or adapter with a known working one. Try using a different USB-C cable and adapter to ensure it’s not a faulty connection.
![]()
Reason 2. Faulty Power Source
Solution: Verify the power source by trying different outlets or USB ports. Ensure the power source is functional by testing it with another device.
![]()
Reason 3. Charging Port Issues
Solution: Check the charging port thoroughly to identify any dirt, debris, or signs of damage. Gently clean the port using compressed air or a small brush. If there’s visible damage, consider professional repair services.
![]()
Scenario 2. Check for Damages
Sometimes, a Nokia C12 Plus 3 might not turn on due to physical damage incurred by the Nokia C12 Plus device. Instances such as accidental drops, exposure to water or moisture, or even hardware malfunctions can be the reason. These can cause visible or invisible damage, leading to Nokia C12 Plus 4 won’t turn on.
Reason 1. Physical Impact or Dropping
Solution: If the Nokia C12 Plus 3 has experienced a significant impact or drop, inspect the exterior for any visible damage. A cracked screen or internal hardware issue might prevent the Nokia C12 Plus device from turning on. Consider professional repair services if necessary.
![]()
Reason 2. Water or Moisture Exposure
Solution: If the Nokia C12 Plus 3 has been exposed to water or moisture, immediately turn it off. Moreover, do not attempt to power it on. Place the Nokia C12 Plus device in a bowl of uncooked rice or silica gel packets to help absorb moisture. Alternatively, use a vacuum or hairdryer in a cool setting to draw out moisture. It’s crucial to let the Nokia C12 Plus device dry completely before attempting to power it on.
![]()
Reason 3. Hardware Malfunction
Solution: Check for any hardware malfunction symptoms such as overheating , unusual sounds, or a burnt smell. If any such signs are evident, refrain from attempting to turn on the Nokia C12 Plus device. You should seek professional assistance from authorized service centers.
![]()
Scenario 3. Buggy Android Smartphone
An Android smartphone, including the Nokia C12 Plus 3 XL, can encounter situations where the OS becomes extremely buggy. It leads to various issues, such as the Nokia C12 Plus 3 XL won’t turn on or getting stuck in a boot loop . Software glitches, corrupted system files, or incompatible apps can contribute to such problems.
Reason 1. Device Stuck in the Boot Loop
Solution: Try initiating a force restart to help fix this issue. You can do that by pressing and holding the “Power” and “Volume Up” keys at the same time for 10 seconds.
![]()
Reason 2. Software Glitches or System Crash
Solution: If encountering issues with the Nokia C12 Plus device not powering on because of software glitches or a system crash, try initiating Safe Mode by simultaneously pressing and holding the ‘Power’ button along with a Volume key. This action will cause the Power menu to be displayed. Here, tap and hold the “Power off” for a while and tap “OK” once the Safe Mode prompt appears.
![]()
Scenario 4. System Glitches? Try Wondershare Dr.Fone as a Prioritized Solution
If you have attempted the solutions mentioned above without success, it is essential to explore a more robust option. This is important if the issue seems to be a major software problem that cannot be resolved using basic troubleshooting methods. In such cases, Wondershare Dr.Fone – System Repair emerges as a viable solution. Besides, It is a perfect fit to address the “Nokia C12 Plus 4 Not Turning On“ issue effectively.
Dr.Fone is designed to tackle various repairing problems that occur in Android devices. With its comprehensive setup, it can effectively address errors related to the Nokia C12 Plus. These measures are aligned to meet the specific requirements of your device. This is helpful in minimizing the time needed for troubleshooting.
Key Features of Wondershare Dr.Fone
- Fone allows you to repair the Android device with just a few clicks. By following the on-screen instructions, you can complete the whole process conveniently.
- It fixes all Android-related problems, including the Black screen of death , the Play Store not working, and more.
- This tool is compatible with all the mainstream Nokia C12 Plus models, including the latest ones.
Steps Required To Resolve System Glitches via Wondershare Dr.Fone – System Repair
Now, we’ll provide you with a guide to resolve the Not Turning On issue of your Nokia C12 Plus. Go through the steps mentioned below to use Dr.Fone for the repair process.
- Step 1: Open Dr.Fone and Access System Repair Tool
Starting with, you will have to activate Dr.Fone on your computer and head to the “Toolbar” panel on the left of the window. From there, navigate to the “System Repair” tool and continue with the “Android” device to proceed with the repair process.

 safe & secure
4,082,195 people have downloaded it
- Step 2: Start Android System Repair
In the next step, choose the “Start” button that appears, by which your device will be recognized. You have to put in the “Name, Model, Country, and Carrier” details of the Nokia C12 Plus device and hit the “Next” option. Then, you need to put your Nokia C12 Plus on Download Mode following the on-screen instructions.
- Step 3: Utilize the Firmware
Afterward, the firmware will start to download automatically once the Nokia C12 Plus device enters a Download Mode. You need to select the “Fix Now” button and continue typing in a “000000” code. Then, proceed with the “Confirm” option to install the firmware on your device.

- Step 4: End the System Repair of Android
Lastly, the repair process will get started and can be viewed in a progress bar. Once it ends, hit the “Done” button to conclude the activity, and check your device to see if it starts properly.
Scenario 5. Need for a Power Cycle
At times, an Android device, including the Nokia C12 Plus 3/4, might benefit from a power cycle procedure. This process involves completely refreshing the Nokia C12 Plus device’s system. It potentially my Nokia C12 Plus 3 won’t turn on issues, temporary bugs, or system hang-ups. These issues prevent the Nokia C12 Plus device from turning on or functioning properly.
Reason 1. System Freeze or Unresponsive Device
Solution: If the Nokia C12 Plus 3/4 is unresponsive or frozen, perform a forced restart by holding down the “Power” and “Volume Up” for about 10 seconds. This action should force the Nokia C12 Plus device to shut down and reboot, potentially resolving the issue.
![]()
Reason 2. Battery Optimization and Refreshment
Solution: Sometimes, a power cycle helps optimize the Nokia C12 Plus device’s battery performance and refreshes the system. Allow the Nokia C12 Plus 3/4 to completely power down, charge it for at least 30 minutes, then attempt to turn it on.
Reason 3. Software Hang-Up or Temporary Glitch
Solution. To shut down your Nokia C12 Plus 3/4, press and hold the power button, then choose ‘Power Off’ from the menu that appears. After the Nokia C12 Plus device powers down, wait for about 30 seconds to 1 minute to ensure it has fully shut down before moving forward. Subsequently, press and hold the power button until the Google logo displays to restart your device.
Scenario 6. Software Damaged? Restore Immediately
When an Android device experiences severe software damage, it can lead to major issues like the Nokia C12 Plus 3 won’t turn on. This can hinder the functionality of the Nokia C12 Plus device. It also includes the inability to turn on or persistent system malfunctions. In such cases, performing a complete phone restore becomes a necessary solution:
Reason 1. Corrupted System Files or Firmware Issues
Solution. In cases of severe software damage or corruption of system files, performing a settings reset becomes imperative. It is to restore the Nokia C12 Plus device to its default settings and resolve underlying issues.
![]()
Reason 2. Factory Reset as a Solution
Performing a factory reset serves as the ultimate solution. This is true when facing critical software damage that leads to a non-responsive Nokia C12 Plus 3/4. This process erases all user data, apps, settings, and files stored on the Nokia C12 Plus device, reverting it to its original factory state.
Steps To Perform a Factory Reset on Nokia C12 Plus 3/4
- Step 1. Access the “Settings” application on your Nokia C12 Plus 3/4. Then, navigate through the menu until you locate the “System” category located further down the list. Within the “System” settings, tap the last option named “Reset Options.”
![]()
- Step 2. On the following screen, press the “Erase All Data (Factory Reset)” option. Afterward, follow the on-screen instructions to complete the process.
![]()
Scenario 7. Phone Hangs on Installed App
There are scenarios where a phone, like the Nokia C12 Plus 3, hangs or gets stuck on a specific installed app. It happens during the startup process, and it can prevent the Nokia C12 Plus device from turning on properly. This issue often arises due to a malfunctioning or poorly coded app. This app disrupts the Nokia C12 Plus device’s startup routine, causing Nokia C12 Plus 4 won’t turn on.
Reason 1. Third-Party Apps Interference
Solution: Start by booting the Nokia C12 Plus 3 into Safe Mode. This mode disables third-party apps, allowing you to access the Nokia C12 Plus device without interference from downloaded applications.
![]()
Reason 2. Problematic App
Solution: While in Safe Mode, observe if the Nokia C12 Plus device boots up properly. If it successfully boots, it suggests that a third-party application is causing the problem. To pinpoint the problematic app, uninstall recently added apps individually and restart the Nokia C12 Plus device after each removal. This process helps pinpoint the problematic app causing the hang during startup.
![]()
Reason 3. Stacked Up App Cache and Data
Solution: If the problematic app is identified, try clearing its cache and data. Go to Settings and then access “Apps.” Within “Apps,” find the Problematic App and tap “Storage & cache.” On the subsequent display, select “Clear cache “ and “Clear storage” to restore the application to its original settings. After restarting the Nokia C12 Plus device, verify whether the problem persists.
![]()
Reason 4. Outdated Application
Solution: If the application is essential, ensure to seek updates within the Google Play Store. Updating the app to its latest version could potentially resolve any compatibility issues. Alternatively, if updates are not available or don’t resolve the problem, consider uninstalling and reinstalling the app.
![]()
Conclusion
In conclusion, this article has aimed to address the perplexing issue of a Nokia C12 Plus 3 won’t turn on. It offered a range of solutions depending on different underlying reasons. The guide included basic methods like checking for charging issues and examining hardware damage. Moreover, it included advanced techniques like software repair tools such as Wondershare Dr.Fone.
Users are encouraged to follow the step-by-step instructions outlined here. These solutions can serve as effective remedies for resolving the problem. For more in-depth and advanced solutions, considering Dr.Fone stands as a significant option. It offers a robust system repair feature for resolving intricate software-related issues.
safe & secure
3,673,294 people have downloaded it
[8 Quick Fixes] Unfortunately, Snapchat has Stopped on Nokia C12 Plus
Have you ever been deep in conversation with a loved one or friend, taking advantage of all the funny filters and games Snapchat has to offer when you’ve suddenly been presented with the ‘Unfortunately, Snapchat has Stopped’ error code? This is usually followed by the app crashing back to the main menu.
If so, don’t worry; you’re not alone. Snapchat crashing in this way is nothing new, but it can be incredibly annoying when it keeps happening and stops you from enjoying the conversations you care about.
Fortunately, there are plenty of solutions out there to help you out and get the app working again as it should do. Today, we’re going to explore them all to help you get back to what you were doing before and as though there was never a problem.
Part 1. Install Snapchat again from Google Play Store

One of the best ways to resolve the Snapchat crashing problem or Snap Map not working issue is to delete the app and reinstall it again. When you’re using your phone, there is data continually flowing around and data being sent here, there, and everywhere.
During these processes, bugs can occur, and if they can’t sort themselves out, the best thing to do is to reset your app and start from a fresh installation. Here’s how to do it.
Step 1: Hold down the Snapchat app from your main menu and press the ‘x’ button to uninstall the app.
Step 2: Open the Google App Store from your device and search ‘Snapchat’ in the search bar. Find the official app page and download the app onto your device.
Step 3: The app will automatically install itself once downloaded. Open the app, sign in to your account using your log-in details, and you should be able to use the app like normal.
Part 2. Check for new Snapchat Updates

Hand in hand with the problem above, sometimes a bug can restrict Snapchat from working, or perhaps your personal update settings. If you receive a Snapchat from someone with an upgraded version, this can crash your app.
Here’s how to make sure you’re running the latest version of Snapchat is Snapchat isn’t responding.
- Launch the Play Store and navigate to the My Apps and Games page
- Tap the Update button
- The app will now automatically update to the latest version
Part 3. Wipe the cache of Snapchat
If you have a lot of data in your Snapchat cache, this can cause the app to become overloaded in which you’ll need to clear it to start again and refresh the app. This is a common problem that can cause Snapchat has stopped working error.
Here’s how to fix it.
Open the Snapchat app and tap the Profile icon on the top left-hand side of your screen

Tap the Settings gear icon on the top right
Scroll down the Settings menu and tap the Clear Cache option
Here, you can choose to Clear All, but you can select individual areas if you prefer
Tap the Confirm option to clear your cache preference completely


Part 4. Fix the system issues that caused Snapchat stopping
If you’re experiencing the Snapchat crashing on Android often, or you’re experiencing similar errors with other apps, this can be an indication that there’s something wrong with your Android operating system.
The best way to fix this is to repair your device using the software known as Dr.Fone - System Repair (Android). This is a powerful repair system that can completely recover your device from any errors, including the Snapchat keeps crashing error.
Dr.Fone - System Repair (Android)
Dedicated repair tool to fix Snapchat crashing on Android.
- Recover your device from any problem, including black screen or unresponsive screen.
- Supports over 1000+ unique Android devices, models, and brands.
- Trusted by over 50+ million customers around the world.
- Can fully repair faults with your Nokia C12 Plus’s firmware in a few simple steps.
- One of the most user-friendly applications in the world.
3,889,035 people have downloaded it
To help you make the most of this Android repair software and to fix your Snapchat not responding error, here’s a step-by-step guide on how to use it.
Step 1: Download the Dr.Fone - System Repair (Android) software to your computer. Install the software to your Mac or Windows computer by following the onscreen instructions.
Once completed, open the software, so you’re on the main menu.
Step 2: From the main menu, click the System Repair option, followed by the Android option. Of course, if you have an iOS device you want to repair in the future, the option is there if you want it. Also, connect your Nokia C12 Plus to your computer using the USB cable.
Step 3: Confirm details.
On the next screen, use the drop-down menus to confirm the model, brand, operating system, and carrier of your device. Click Next to confirm the details are correct.
Step 4: You’ll now need to put your phone into Download Mode, sometimes referred to as Recovery Mode. For this, you can follow the onscreen instructions. Make sure your device stays connected to your computer throughout this process.
The method will slightly differ depending on whether your device has a home button, so make sure you follow the right instructions for your individual device.
Step 5: Once in Download Mode, the software will now download and install a fresh version of your Nokia C12 Plus’s operating system. This can take some time, so make sure your device stays connected, and your computer stays on and doesn’t shut down.
Step 6: That’s it! Once you see the screen saying your device has been repaired, you’ll be able to close the Dr.Fone - System Repair (Android) software, disconnect your phone, and can start using Snapchat as normal without the Snapchat not responding error coming up!
safe & secure
Part 5. Check for the Android update

Similar to some of the other solutions we’ve listed above, if you’re using an outdated version of the Android operating system, but the latest version of Snapchat is coded to the most recent, this can be a cause for the Snapchat crashing on Android problem to occur.
Fortunately, it’s easy to check to make sure you’re running the latest version of Android and to download and install the update if you need it. Here’s how, which will help to sort out your Snapchat keeps crashing Android problems.
Step 1: Open the Settings menu on your Nokia C12 Plus and select the About Phone option.
Step 2: Tap the ‘Check for Updates’ option. If an update is available, you’ll then have the option to Install Now or Install Overnight. If no update is available, you’ll see a notification stating your device is up to date and no action is needed.
Part 6. Connect to another Wi-Fi
In some cases, you may be trying to connect to a Wi-Fi network that’s not very stable. This may keep cutting the connection to your device, which in turn is causing Snapchat to crash on Android.
To resolve this, you can simply try connecting to another Wi-Fi network or a data plan to see whether this is the problem. If so, changing network and then using the Snapchat app should stop any error messages from occurring.
Step 1: Open the Settings menu on your Nokia C12 Plus, followed by the Wi-Fi option.

Step 2: Tap the new Wi-Fi network you’re currently connected to, and then tap the ‘Forget’ option, to stop your phone connecting to it.

Step 3: Now tap the new Wi-Fi network you want to connect to. Insert the Wi-Fi security code and connect. Now try reopening and using the Snapchat to see if you can use it.

Part 7. Stop using the custom ROM

If you’re running a custom Android ROM on your device, with some versions of the ROM and some apps, you’re going to experience errors simply because of the way the apps and the ROMs are coded and designed.
Unfortunately, there’s no easy fix to this, and if you want to continue using the app, you’ll need to reflash your Nokia C12 Plus back to its original firmware, and then wait until the ROM developers update the ROM to be compatible with social apps like Snapchat.
However, this reflashing process is simple thanks to the Dr.Fone - System Repair (Android) software that we listed above. To follow the detailed step-by-step guide, follow the steps on Part 4 of this article, or follow the quick guide instructions below.
- Download and install the Dr.Fone - System Repair (Android) software to your computer
- Connect your Nokia C12 Plus to your Windows computer using the USB cable
- Open the software and click the Repair option.
- Select the Android device repair option
- Make sure your carrier and device information are correct
- Put your device into Download Mode by following the onscreen instructions
- Allow the software to repair your Nokia C12 Plus automatically
Part 8. Reset the factory settings of your Android

One of the last resorts you can take is factory resetting your Nokia C12 Plus back to its original settings. From the day you first started using your device, you’ve been using the system and downloading files and apps, and over time this increases the chances of creating a bug.
However, by resetting your device to factory settings, you can reset these bugs and get your apps and device working again free from the Unfortunately, Snapchat has stopped error message. Here’s how to factory reset your device.
Make sure you back up your personal files from your device first like your photos and music files because factory resetting your device will clear your device’s memory.
Step 1: Tap the Settings menu on your device and click the Backup and Reset option.
Step 2: Click the Reset Phone option. That’s it! The phone will take several minutes to complete the process, after which your phone will be reset to its original state.
Also read:
- [New] In 2024, Audio Amplified Today's Hits Backdropping YT Shorts
- [Updated] 2024 Approved Naming Gems Top Strategies for Exceptional Podcast Titles
- [Updated] Core Techniques for Capturing Smartphone Content for 2024
- 2024 Approved Free Business Visual Aids to Enhance Your Meetings
- 2024 Approved Reviving the Gone Retrieving Former Reddit Discussions
- 2024 Approved The Ultimate List of Beautiful Wedding Clips - Youtube & Vimeo
- How to Bypass Google FRP Lock from Vivo Y100t Devices
- How to Fix the Soft Bricked Vivo Y100i Power 5G? | Dr.fone
- How to Fix the Soft Bricked Xiaomi Mix Fold 3? | Dr.fone
- How To Fix Unresponsive Phone Touchscreen Of Poco X5 Pro | Dr.fone
- How to Flash Dead Oppo A78 Safely | Dr.fone
- Play Store Stuck on Downloading Of Infinix Smart 8? 7 Ways to Resolve | Dr.fone
- Proven Ways to Fix There Was A Problem Parsing the Package on Samsung Galaxy Z Flip 5 | Dr.fone
- Reliable User Guide to Fix OnePlus Open Running Slow and Freezing | Dr.fone
- Reviving Your Memories: Step-by-Step Guide to Retrieving iPhone/iPad Images From an iTunes Backup
- Title: Stuck at Android System Recovery Of Nokia C12 Plus ? Fix It Easily | Dr.fone
- Author: Abel
- Created at : 2025-02-18 16:24:47
- Updated at : 2025-02-20 16:07:28
- Link: https://fix-guide.techidaily.com/stuck-at-android-system-recovery-of-nokia-c12-plus-fix-it-easily-drfone-by-drfone-fix-android-problems-fix-android-problems/
- License: This work is licensed under CC BY-NC-SA 4.0.